
Docker has been at the leading edge of containerized technologies with its open-source Community Edition and is steadily building features around it. Docker Swarm is the Docker native clustering solution that turns a pool of Docker hosts into a single virtual server allowing clustering with the built-in Swarm orchestration.
The docker CE is designed around four core principles: simple yet powerful with a “just works” user experience, resilient zero single-point-of-failure architecture, secure by default with automatically generated certificates, and backward compatibility with existing components. Thanks to the ease of use, this introductory guide is suitable for anyone looking to get started with Docker Swarm orchestration. No prior knowledge of containers is necessary, but if you wish, you can get acquainted with Docker by checking out a starter’s guide for how to install WordPress with Docker.
Deploying CoreOS nodes
One of the easiest ways of running docker is deploying a CoreOS host in which docker comes pre-installed. CoreOS itself is a container-optimised operating system that employs many of the docker’s features out of the box. Deploying a CoreOS server is fast and simple using a short Initialization Script called cloud-config, which is commonly used to bootstrap together a CoreOS cluster along with the required services. However, in this case, docker does not require any specific settings to start, but you may still wish to learn about the operating system itself with the article the rise of CoreOS.
For this guide, you will need to deploy three cloud servers: a manager and two worker nodes. Each of the nodes in the swarm cluster can act in either role and may be promoted or demoted even during runtime. If you are ready to get started, log into your UpCloud control panel and select Deploy server in the Servers menu.
- Select the location for your node.
- Pick a configuration, the smallest is fine.
- Under the operating system section, use the CoreOS template.
- Include any SSH keys you may wish to add to the root user.
- Use a simple initialization script to input a cloud-config file to customise the server at deployment. Add the following to the text field. Replace the ssh_key with the key you wish to use for login. The first key is added to the default username core. In the users section, you can also define your own username like the example docker user below.
#cloud-config
ssh_authorized_keys:
  - "ssh_key"
users:
  - name: "docker-user"
    groups:
      - "sudo"
      - "docker"
    ssh-authorized-keys:
      - "ssh_key"
- Once all settings are ready, start the node by clicking the Deploy server button at the bottom of the page.
Repeat until you have three CoreOS nodes up and running.
Log into each node over SSH using the keys you included or with the root user and password provided by the deployment process.
Configuring Docker Swarm on CoreOS
The Docker CE comes with an integrated cluster management solution. It allows the creation of a swarm of docker nodes that can deploy application services. As the first-party solution, no additional software is needed to use Swarm orchestration to create and manage a cluster.
CoreOS usually handles updates automatically, but in this case, use the command below to run the update manually.
sudo update_engine_client -update
...
Update succeeded -- reboot needed.
Once the update is completed, reboot the nodes to start using the new version.
sudo reboot
...
CoreOS stable (2079.3.0)
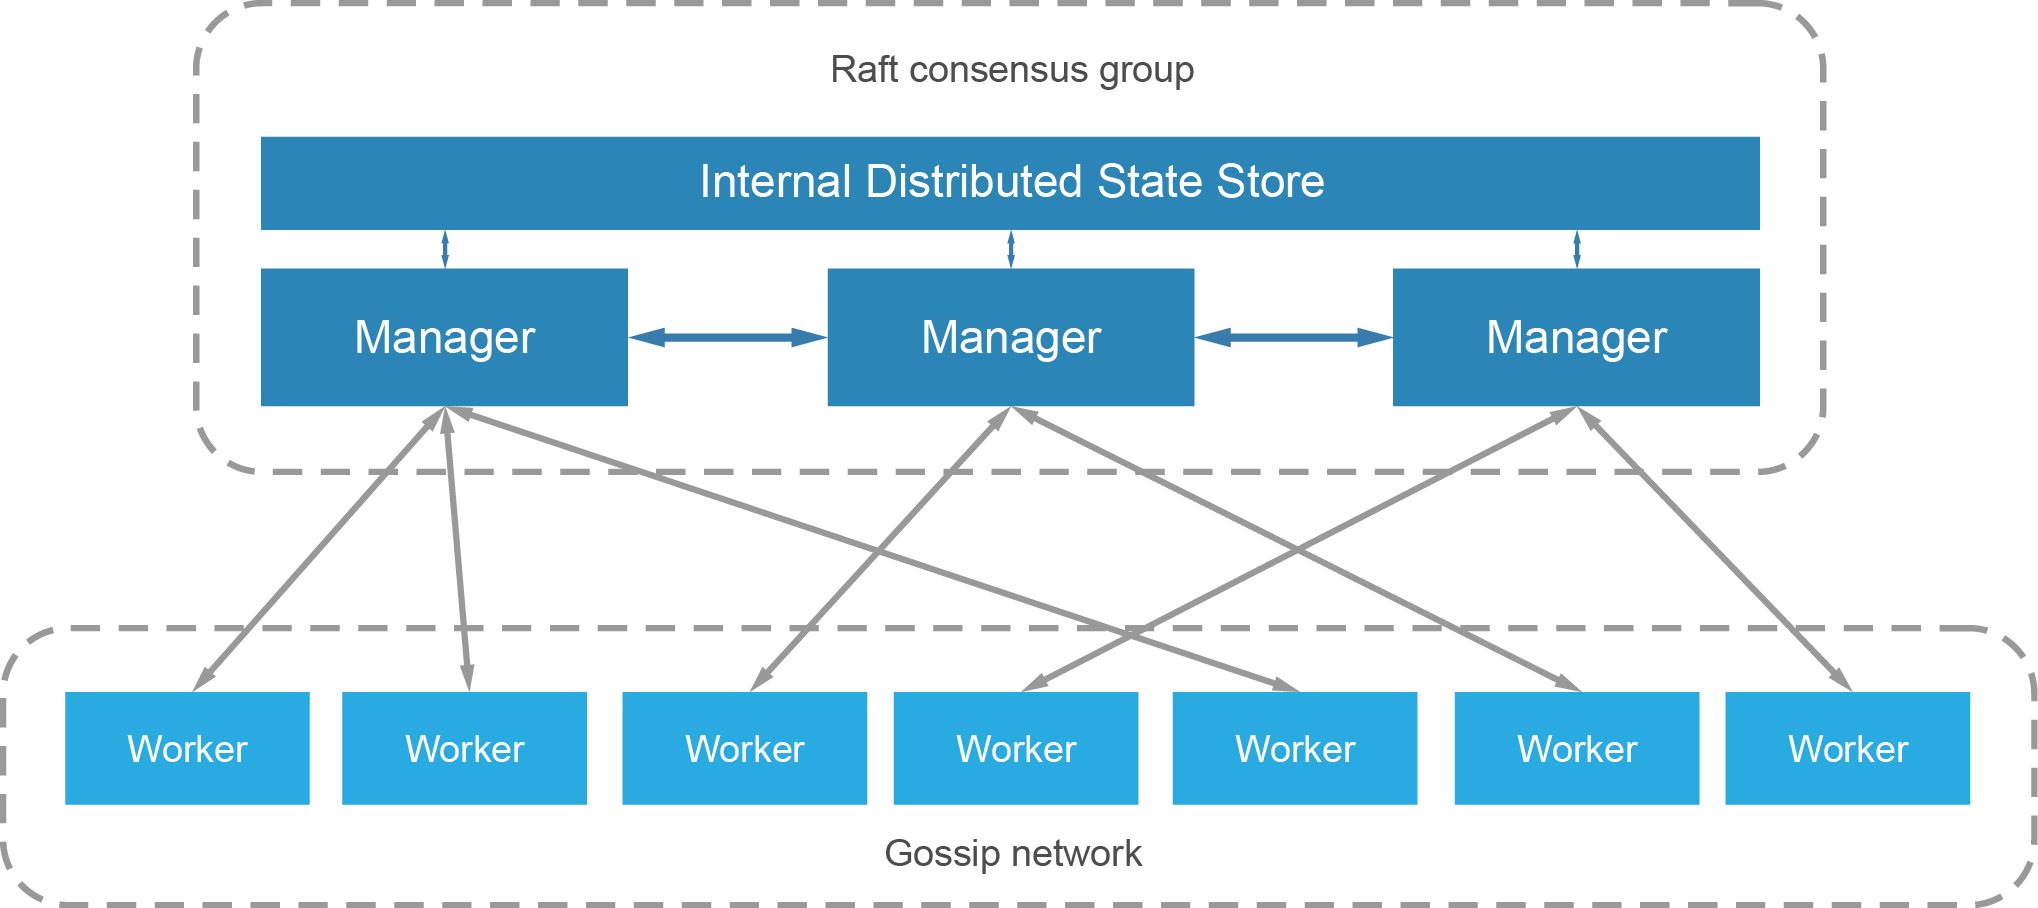
The Docker Swarm follows a decentralised design where nodes can handle any role in the cluster. The node specialisations for managers and workers are chosen at runtime. As the cluster must have at least one manager, the first node initializing the cluster is assigned as such. Subsequent nodes joining the cluster are usually added as workers but can be assigned as either. The flexibility means that the entire swarm can be built from a single disk image with little differentiation.
Create a new swarm cluster with the initialization command below. Replace the manager_private_ip with the private IP of the host you are creating the cluster on.
docker swarm init --advertise-addr manager_private_ipWhen the swarm starts successfully, you can see a docker swarm join command in the output like the example below. Use the command on your other nodes to join them to the swarm.
docker swarm join --token SWMTKN_token manager_private_ip
When all nodes are connected, use the following command on the manager to check that the nodes are ready to accept tasks.
docker node ls

ID                          HOSTNAME  STATUS  AVAILABILITY  MANAGER STATUS
3h39l1ex8c1i5oo2xn4qnwkj6 * node0     Ready   Active        Leader
4bdtzjfa0qw799e6npb4dxvl1   node1     Ready   Active
cu0jd5hb2l56swx9siq42f7li   node2     Ready   Active
If you run into problems joining nodes to the swarm, you can have the problematic node leave the cluster with the command below.
docker swarm leave
Then try to join again using the token and manager IP address as shown on your manager node. If every node of the cluster leaves, the swarm is disbanded and any node can start a new cluster with the initialization command.
Running services on Docker Swarm
Services are deployed on the cluster with simple requests for a number of containers of a certain application image. For example, if you deploy 5 replicas of a web host container, the manager takes the request and instructs the worker nodes to run more containers until the number of replicas is fulfilled.
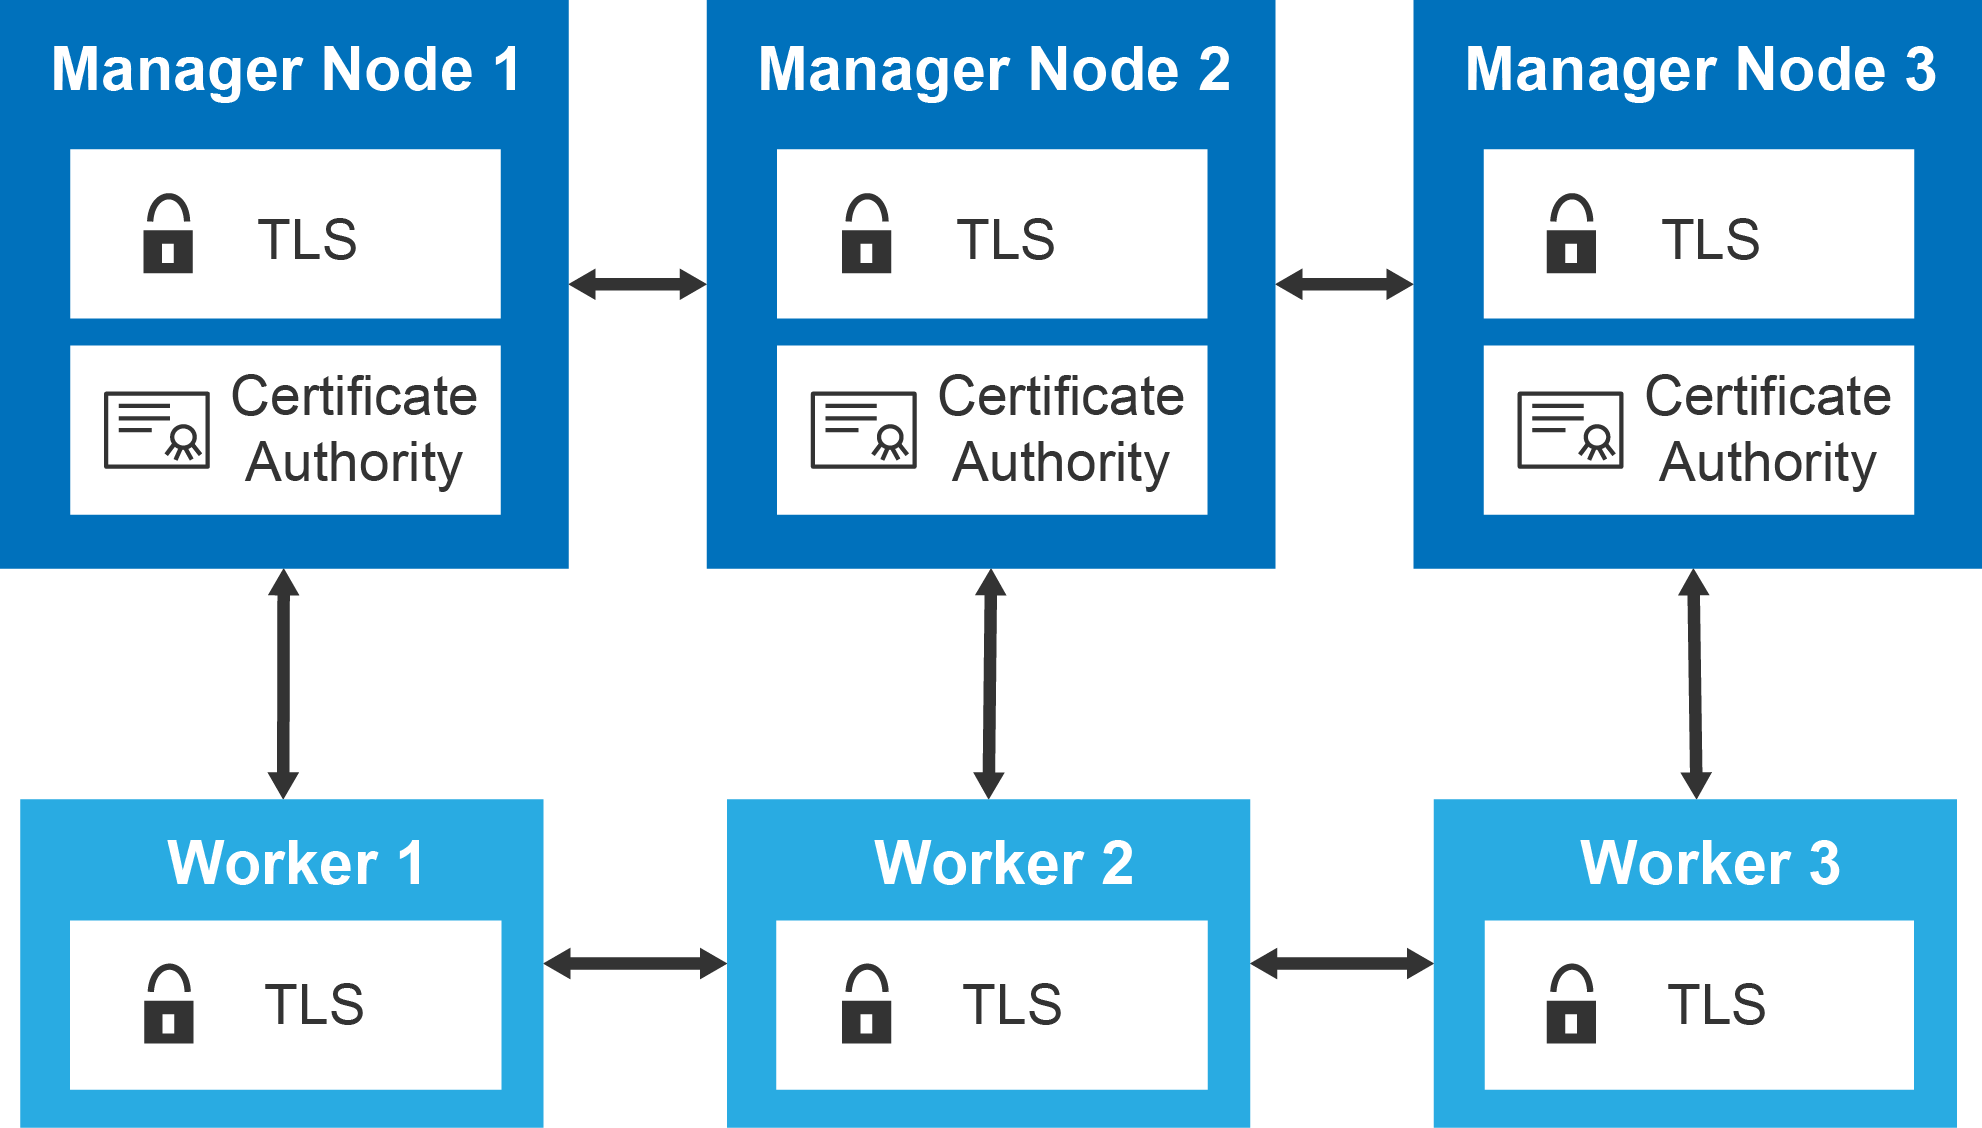
The swarm nodes enforce TLS authentication and encryption to secure communication between nodes. All of this is done by default and requires no additional attention. It is also possible to use self-signed root certificates, but for most cases, it is fine to go with the default implementation.
Prepare the cluster for containerized services by creating a network overlay for the containers to attach to.
docker network create
--driver overlay
--subnet 10.0.0.0/12
--opt encrypted
services
Then start a pair of web hosts with the following command.
docker service create
--replicas 2
--name nginx
--network services
--publish 80:80
nginx
ldm0yem039fj9eeet1s26gckt
overall progress: 2 out of 2 tasks
1/2: running   [==================================================>]
2/2: running   [==================================================>]
verify: Service converged
You can see all currently deployed services with the command below.
docker service ls
ID            NAME   MODE        REPLICAS  IMAGE         PORTS
ldm0yem039fj  nginx  replicated  2/2       nginx:latest  *:80->80/tcp
If you want to take a closer look at a specific service, use the next command.
docker service ps nginx
ID            NAME     IMAGE         NODE   DESIRED STATE  CURRENT STATE          ERROR  PORTS
mem2a0tbqx04  nginx.1  nginx:latest  node1  Running        Running 9 seconds ago
4sbg87lfh6fo  nginx.2  nginx:latest  node2  Running        Running 9 seconds ago
The output shows which nodes are running the containers.
Networking in the Swarm cluster
The swarm manages multi-host networking which supports overlay network services. The cluster manager automatically assigns virtual IP addresses to the containers that join the overlay. The swarm runs an embedded DNS server, which makes it possible for the swarm to also assign each container a unique DNS name that is resolvable from any container within the overlay network. This greatly simplifies service discovery and allows load balancing from the get-go.
Docker creates a number of network configurations by default. You can see the currently active networks using the ls command in the network scope.
docker network ls
Next to test the connection between containers, create a simple busybox service with the following command. The sleep parameter ensures the container remains alive long enough for you to have time to connect to it, as without having anything to do the container would simply exit.
docker service create
--name busybox
--network services
busybox
sleep 3000
With the service running, check which node it is on.
docker service ps busybox

ID                         NAME       IMAGE    NODE   DESIRED STATE  CURRENT STATE
eh2iznb6b8x8fm79eclmwbv7h  busybox.1  busybox  node1  Running        Running 9 seconds ago
Then connect to that node through SSH and check the name of the container.
docker ps

CONTAINER ID  IMAGE           COMMAND       CREATED        STATUS       PORTS  NAMES
e5329caea747  busybox:latest  "sleep 3000"  2 minutes ago  Up 2 minutes        busybox.1.4czfvm7771qy8lmbiz2bv4nbwdocker
Use the full container name to open it in a new terminal. For example as below but by using the container name shown in your terminal.
docker exec -it busybox.1.4czfvm7771qy8lmbiz2bv4nbwdocker /bin/sh
The following nslookup commands only work within a container connected to the overlay. Try to look up the web host service.
nslookup nginx

Server: 127.0.0.11
Address 1: 127.0.0.11

Name: nginx
Address 1: 10.10.1.2
Service Address 1 is the IP address for the load balancer. You can test the connectivity using wget within the busybox.
wget -O- 10.10.1.2
Alternatively, you can also look up the specific container addresses.
nslookup tasks.nginx

Server: 127.0.0.11
Address 1: 127.0.0.11

Name: tasks.nginx
Address 1: 10.10.1.4 nginx.1.288l03z4xzjrpfy53aokk1msd.services
Address 2: 10.10.1.3 nginx.2.ajyko9rdg8b7oiomd400y240g.services
Similarly, the direct container addresses are reachable from within the busybox container.
wget -O- 10.10.1.3
In both cases, you should see the default nginx welcome page in the reply.
Service scaling and management
Services running on the cluster are easily scalable through a single parameter. You can declare the number of replicas a service should have and the swarm manager automatically adapts by adding or removing containers to maintain the desired state.
The swarm also provides resilience through the reconciliation of the desired states. The manager continuously monitors the state of the nodes in the cluster. If a node goes offline, the manager will reconcile the difference in the desired state and the current state by redeploying the lost services on the available nodes.
Inspect the web host service currently running on your cluster. Using the –pretty parameter formats the output into a more human readable list.
docker service inspect --pretty nginx
Create an additional container for the web host by updating the scale of the service with the following command.
docker service scale nginx=3
Then check which node was assigned to run the third task. Note that a single node can host multiple containers of the same service.
docker service ps nginx
If you ever have to scale down the entire cluster or even just temporarily shut down a node, you can prepare the swarm in advance by updating the node availability. Empty one of the nodes in your cluster by changing its availability to drain with the command below.
docker node update --availability=drain <node hostname>
The swarm manager will then migrate any containers running on the drained node elsewhere in the cluster. Scale the service back down again.
docker service scale nginx=2
Lastly, return the node availability back to active, therefore allowing new containers to run on it as well.
docker node update --availability=active <node hostname>
The cluster is then ready for anything. You may still want to remove the web host containers when you are done with them to free up the port reservations.
Summary
That concludes this getting started guide to Docker Swarm. The inclusion of native Swarm orchestration is a big update but it is very easy to learn the basics. As a result, managing your swarm is greatly simplified thanks to first-party support.
The automatic TLS configuration enables a secure connection between nodes, along with the already secure UpCloud private network in which only cloud servers on your account are connected. The Swarm networking allows containers to easily communicate using service names through the secure overlay, however, remember to take care when publishing container ports to the public network.
Next, you might wish to look into the load balancing provided by the swarm orchestration. You can read more about the Swarm mode routing mesh in the docker documentation. Together with an external proxy, the swarm can manage an idea backend for distributed services.