Your UpCloud control panel offers an L3 firewall positioned just before the network interface connecting your cloud server to the internet. Therefore, it’s in a perfect position to secure all of the connections to your server. The firewall is configured per-server basis and billed according to our pricing.
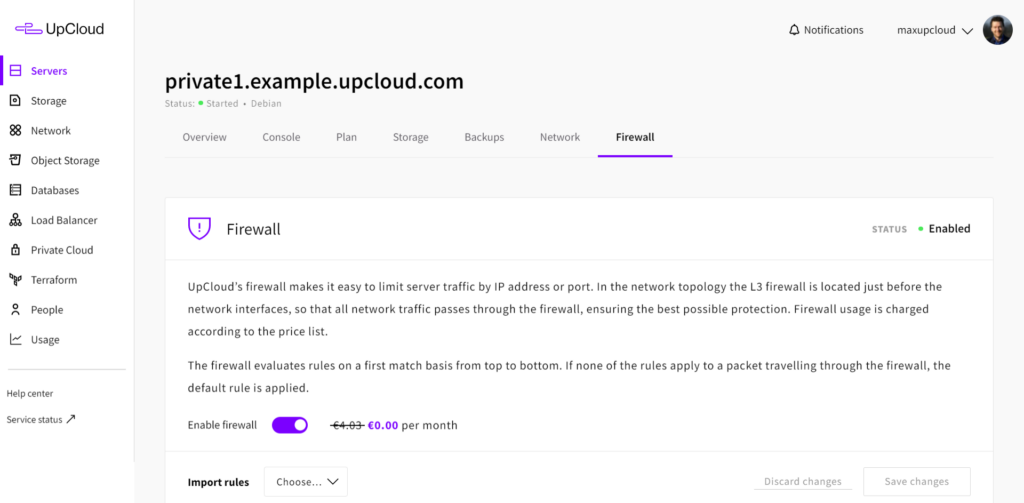
Sign in to your UpCloud Control Panel, click on the server you wish to configure and open the firewall tab in your server settings.
Note that the UpCloud firewall is stateless and does not keep track of connections. Make sure to configure rules to allow both incoming and outgoing traffic.
Managing the firewall
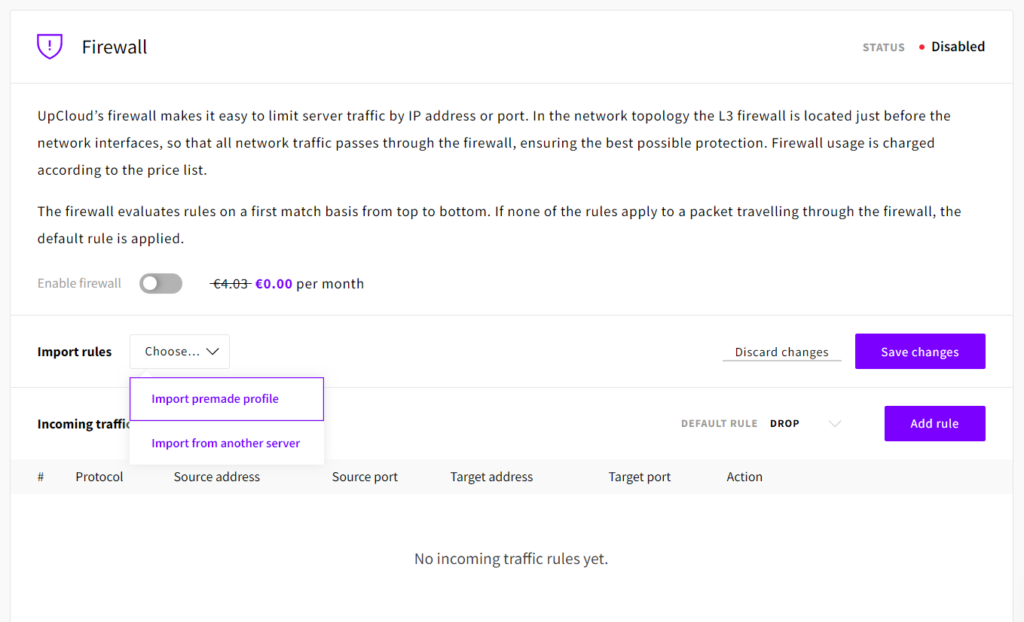
When you first open your firewall settings, the rules list will be empty and the firewall itself is disabled. If you already have active services running on the server, such as a website or a database, keep the firewall disabled until you have created all the required rules to avoid blocking connections while making configurations.
Click the toggle switch on the firewall panel to enable or disable the service.
Before configuring new rules, first, check the Default Rule settings for both incoming and outgoing traffic rules. These define the baseline rule for any traffic in each direction when no other rules match the data packet in question.
The most common approach for a firewall configuration is to use the Drop as the default rule and define the rules list to accept the connections you want to allow. Usually, there is no need to block outgoing traffic as anything on your cloud server should be installed and configured intentionally by you, but the option is there in case you need to be more restrictive.
Defining firewall rules
Start by setting the incoming traffic option to Default rule to Drop.
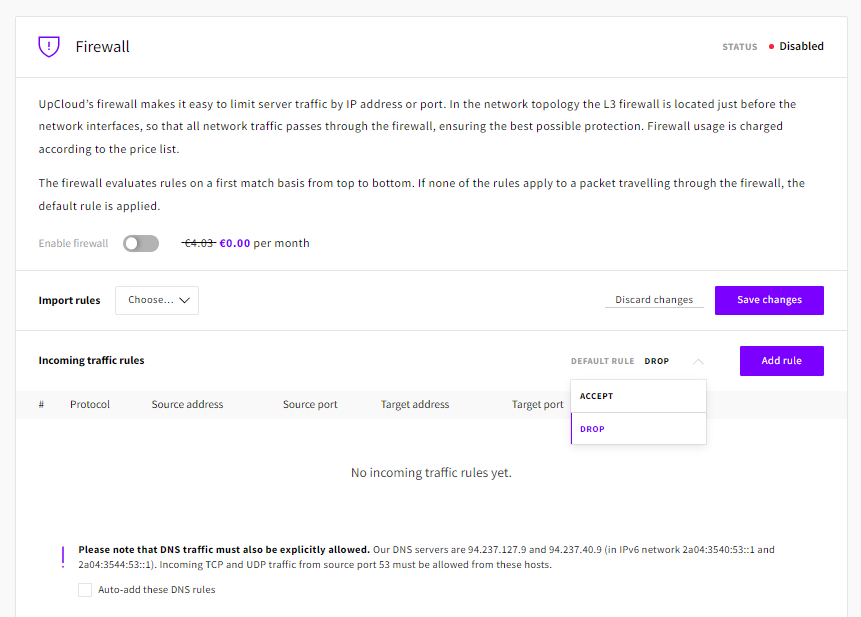
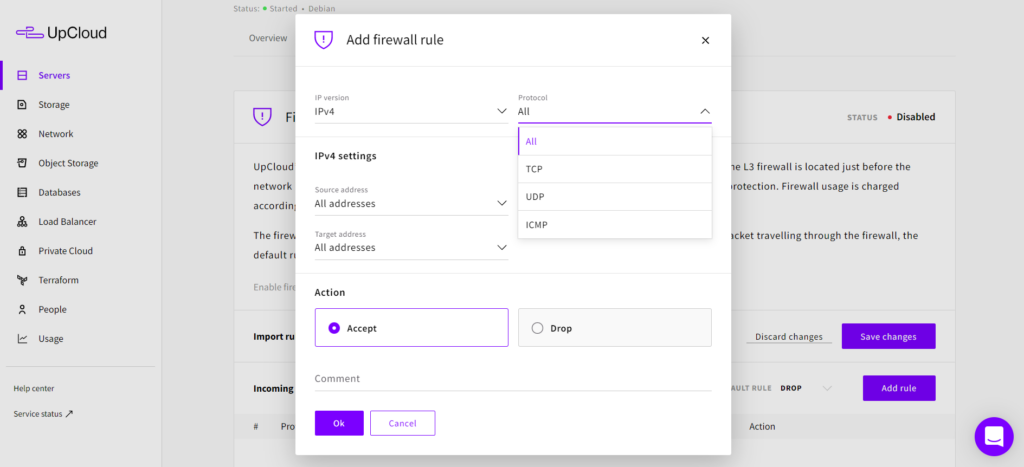
To allow connections on the incoming traffic rules, click the Add rule button, which will open a new firewall rule dialogue window. With the available rule options, you can precisely define which ports accept what kind of traffic and from where.
However, if your cloud servers have more than just SSH and web services, creating all the rules manually could get tiresome. Instead, select Import premade profile from the drop-down menu just above your incoming rules.
You can then select a profile and read the short description of the rule set in the dialogue panel to get a better idea of what those premade profiles are meant for. Do not worry if none of the profiles seems to match your use case perfectly, you can always edit or add more rules later. For the moment, pick the one that gets the closest to what you are aiming for.
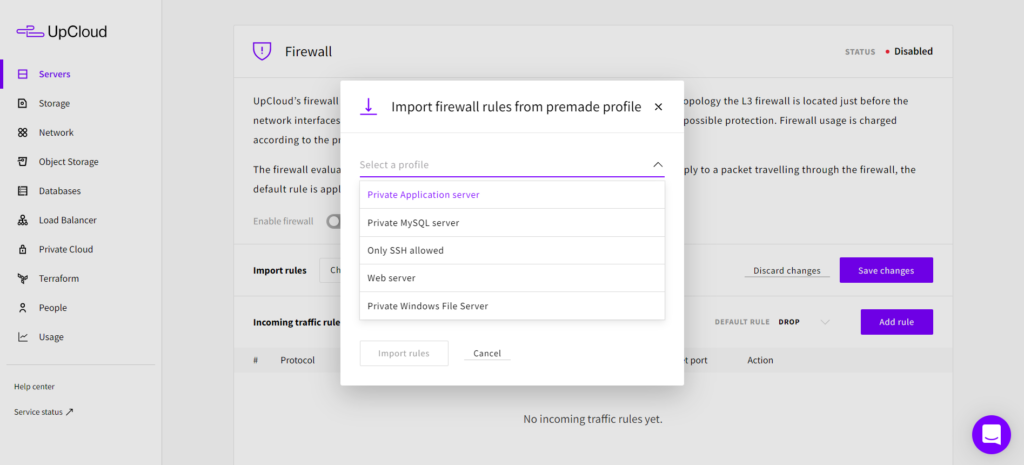
Once you’ve selected one, click the Import rules button to confirm.
This creates a group of inbound rules for allowing traffic based on the premade profile description. If you want to check out a different profile, just repeat the steps and select another group of rules to try. Similarly, you can copy rules between cloud servers by selecting Import from another server in the drop-down menu above your incoming rules table.
Finally, click the Save changes button on the right above your incoming rules table to apply the new rules.
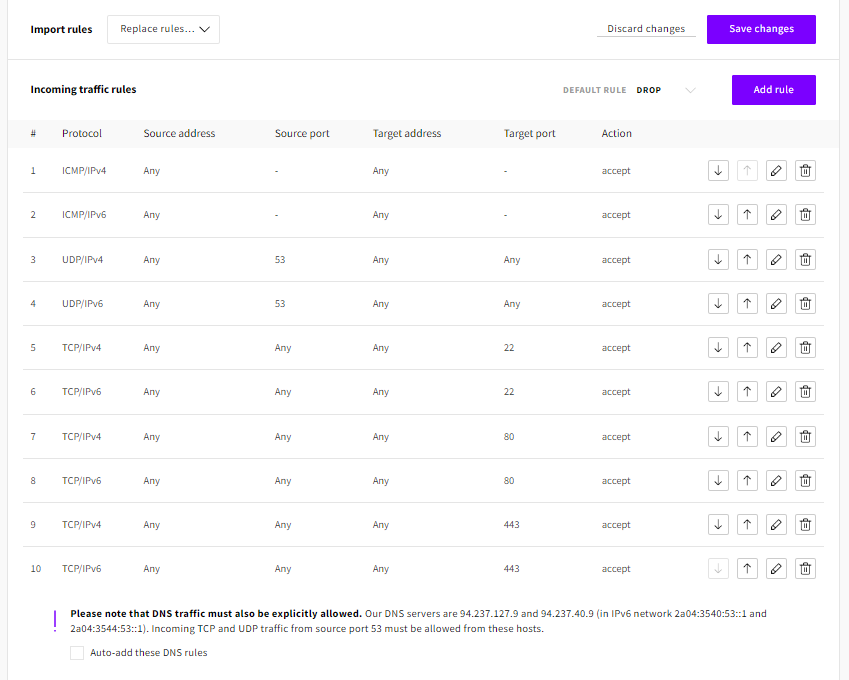
The above example configuration is a standard web server listening at 80 and 443 for HTTP(S), 22 for SSH, and port 53 for DNS. Each rule shows twice to allow both IPv4 and IPv6 traffic including ICMP that ping commands use. The default rule for all other incoming connections is to drop so packets heading to any other ports will be denied access. All outgoing ports can be allowed with the Default rule Accept.
Updating firewall rules
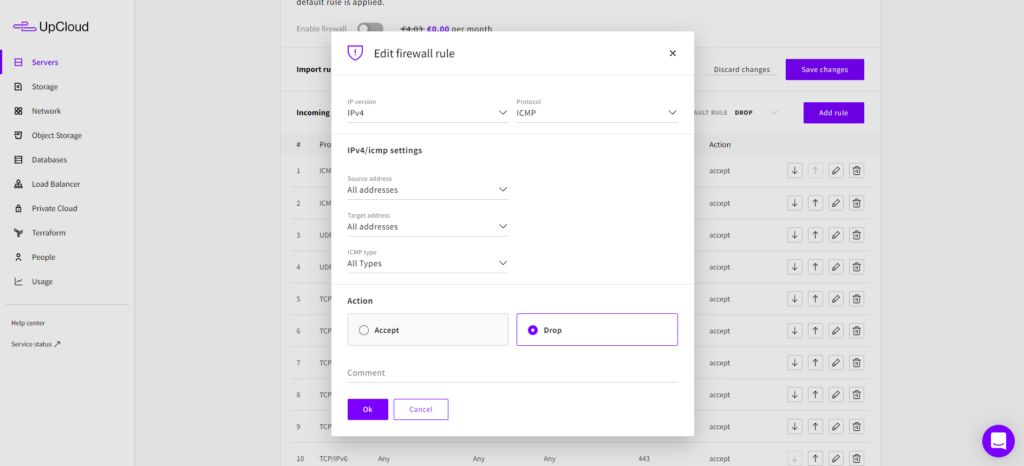
You can edit the rules created from the premade profiles just as any other manually added rules by clicking the pencil icon to the right of the rule row. It opens the dialogue panel to change an existing firewall rule with the current settings for that specific rule selected.
For example, you could disable the IPv4 ping reply for your server by editing the ICMP/IPv4 rule and selecting Drop from the Action menu. This retains the rule so you can easily allow it again if you wish instead of simply deleting the rule by clicking the bin icon. Save any changes by clicking Ok, or return without changing the rule by clicking Cancel.
Please note that the Default rule Drop/Accept matches both IPv4 and IPv6 protocols. If you have an IPv6 interface enabled on your server remember to add firewall rules for IPv6 traffic as well.
As with most firewall setups, the order of the rules also matters. All packets will be compared to the rules on a top-down basis, and the action is selected based on which rule matches the packet first. New rules you create are added to the bottom of the list, but you can change the order of the rules by simply dragging and dropping any rule on its list.
An example of using the rule order, for instance, if you wish to block all incoming IPv6 traffic, just create a new rule with Family: IPv6, Action: Drop and leave Protocol, Source, and Destination to “All”, then move that new rule to the top of the list using the arrows. This will supersede any other IPv6 rules below it regardless of their Action selection.
When you are done adding new or editing the existing rules, click the Save changes button again to apply the current set of rules to your firewall, then turn it on by clicking the toggle to Enabled.
Summary
With the UpCloud Firewall configured and enabled your cloud server gets the extra protection it deserves. Thanks to the easy-to-use web console you don’t have to worry about locking yourself out of your server by accidentally blocking SSH connections. For more intricate connection policies, consider implementing a server-side software firewall, such as iptables, as well.
glen
There is only 1 field that you need to normally be concerned about: the target port. Such as 21 if you want to allow ftp. yet the form here does not allow to edit this??!! so of what use is the firewall if it can’t protect or allow a port?
Janne Ruostemaa
Hi there, thanks for the comment. To configure a rule on a specific port number, you first need to select the protocol, TCP in your case. Then select the “Target port” as “A single port” and set the port number 21 in the field next to it.
Robi Erwin Setiawan
How to filter inbound traffic and only accept from Cloudflare IPs using UpCloud Firewall?
I would like to filter port 80 and 443 only accept from Cloudflare IPs.
Janne Ruostemaa
Hi Robi, thanks for the question. You can allow traffic specifically from Cloudflare IPs by creating Incoming rules for IPv4/v6 and setting the source address using CIDR mask, e.g. 173.245.48.0/20. It’s also possible to define the target port by selecting TCP/UDP protocol but it’s not strictly necessary if you trust the source IPs. Note that you’ll need to add all Cloudflare IPs to ensure no traffic is dropped. Also, don’t forget to create rules for SSH and DNS to not prevent regular operations. Importing a premade set of rules using the “Only SSH allowed” profile can be helpful to get started.
Hubert
It would be pretty awesome if Upcloud was managing the IP list updates of a certain number of large provider such as Cloudflare. That way, it would save some work and potential troubles for a whole lot of your customers.
One idea would be to only allow CF traffic on 80 and 443, so even if the origin’s IP is discovered, attackers could not cirtcumvent CF’s WAF.
Janne Ruostemaa
Hi Hubert, thanks for the comment. While we don’t currently have a way to actively track Cloudflare’s IP addresses, you can configure the UpCloud Firewall to only accept connections as you suggested by whitelisting the Cloudflare IP ranges.
Steve Hine
The Cloudflare IP list is available via the Cloudflare API. Could this be used to keep a Cloudflare Firewall profile up to date?
Janne Ruostemaa
Hi Steve, thanks for the question. While there’s no readily available automation to accomplish this, it should be possible to, for example, create a cronjob to periodically check the Cloudflare API for changes to the IP list and then update the firewall rules accordingly.
Rene
Time synchronization (ntp) is difficult with this firewall implementation. Usually opening outbound UDP123 is enough for time synchronization. However with this firewall you will also need to allow incoming UDP123.
This is a problem because most NTP servers are large pools with dynamic IP’s.
So we have to allow incoming UDP123 for *any* ip address, which may not be the best option if you want to limit inbound as much as possible.
How about an internal Upcloud NTP pool with predefined firewall rules, just like DNS?
Janne Ruostemaa
Hi Rene, thanks for the comment and suggestion. The problem you described is due to the nature of the UpCloud Firewall being stateless. This means it’s unable to differentiate between new and established connections requiring the ports to be opened to both directions. Therefore, for maximum security, you should run a software firewall on your Cloud Server for finer control while the UpCloud Firewall takes the brunt of the unwanted traffic.
boozedog
How about the ability to export/import firewall rules lists?
Janne Ruostemaa
Hi there, thanks for the question. The Control Panel options allow importing firewall rules from another Cloud Server which effectively performs both export and import operations in one go.