Configuring the time zone and synchronisation is an important but often overlooked part of maintaining Cloud Servers. Many web applications require accurate and reliable timekeeping to function correctly.
Configuring time zones
It is important to note that with the UpCloud virtualized systems the time zone of your cloud servers can be adjusted at two levels.
At your UpCloud control panel, you have the option to select the time zone provided to your cloud server by the hardware. Meanwhile, the operating system on your server will also most likely offer options for configuring the timezone settings.
These two layers of time zone configurations operate independently. In most cases, you should only select your desired local time zone at one of these options.
Selecting the hardware timezone
The time passed to the cloud server by the underlying hardware is usually expected to represent UTC +0000 by the operating system. Therefore, for the majority of server OS options, it is recommended to select the UTC time zone at the hardware level and then configure the local time in the operating system settings.
You can select the time zone at deployment in the Optionals section. Click the More Settings text and choose the timezone in the drop-down menu.
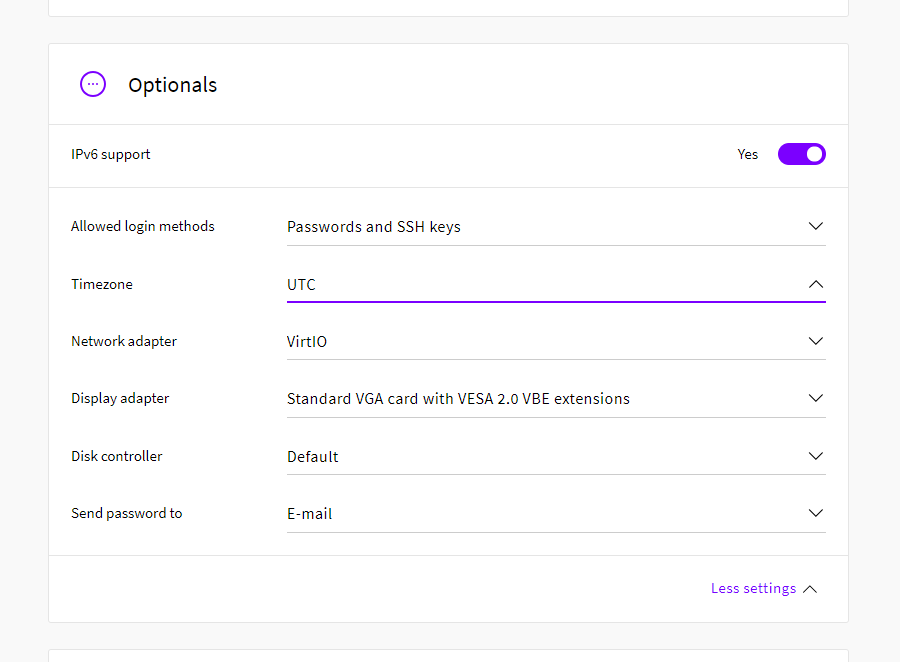
You can also change the time zone after deployment in the server settings. You will need to power down the server for the settings to be able to change these settings. Then open the settings group by clicking the text Optionals and choose the correct time zone for your server. Afterwards, click the Save Changes button to confirm and restart your server.

Changing the operating system time zone
Changing the time zone at the system level will greatly depend on OS in use. In this guide, you can find instructions for configuring the time zones on the main Linux systems CentOS, Debian, and Ubuntu, as well as Windows Server 2012 or newer.
Linux
For the majority of the latest Linux distributions, the system time zone can be configured using the timedatectl tool.
Check your current time zone using the following command.
timedatectl
      Local time: Wed 2017-05-24 08:57:48 UTC
  Universal time: Wed 2017-05-24 08:57:48 UTC
        RTC time: Wed 2017-05-24 08:57:48
       Time zone: Etc/UTC (UTC, +0000)
     NTP enabled: no
NTP synchronized: no
 RTC in local TZ: no
      DST active: n/a
In the output, you should see the current local and universal times along with the selected time zone. By default, the local time is usually set to UTC +0000 as above.
If you wish to change the local time zone, get a list of the available time zone names with the next command.
timedatectl list-timezones
The city time zones are arranged alphabetically according to their respective continents. You might need to scroll down the list to find a city in your time zone.
When you know the name of your time zone, configure it using the command underneath.
sudo timedatectl set-timezone Europe/London
The example above command sets the local time zone to BST +0100 which also enables automatic daylight saving time changes.
Windows
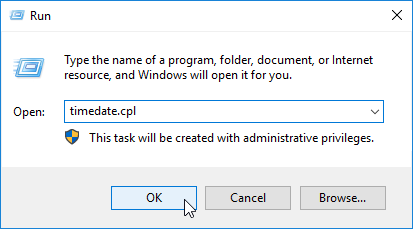
On Windows servers, the Date and Time settings can be found either through the Windows Control Panel or by entering the following in the command prompt, run, or search window.
timedate.cpl
This opens the Date and Time settings which show the current time and selected time zone.
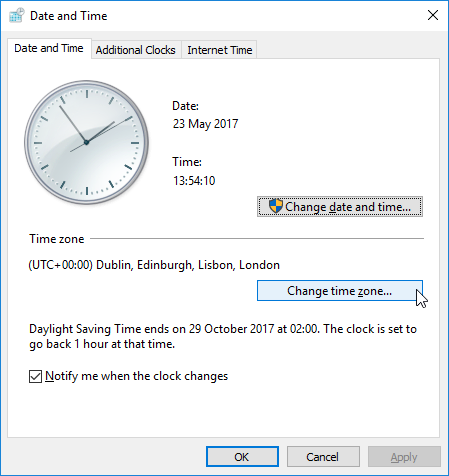
Click the Change time zone button and open the Time Zone Settings.
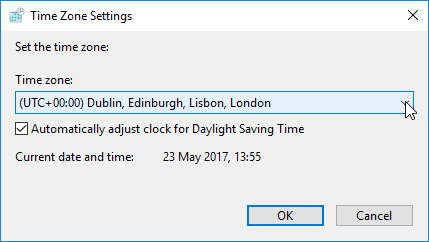
Select the desired time zone from the drop-down menu. With locations that observe daylight saving time, you can also select if you wish the system time to change automatically at the given dates.
When you are done, confirm the selection and close the windows by clicking the OK button.
Synchronising time with NTP
Your Cloud Servers can periodically synchronise the time with an authoritative time server using the Network Time Protocol (NTP). The NTP synchronisation calculates the drift of your system clock and continuously adjusts it, which prevents large corrections that could lead to inconsistent logs for instance. The cost of this is a little processing power and memory, but for a modern server, it is negligible.
Linux
On most modern distributions, including the latest Ubuntu, Debian, and CentOS, you will find timedatectl installed by default. Besides being used for setting the time zone, timedatectl can also configure time synchronisation using NTP.
In recent Ubuntu releases, timedatectl replaced ntpdate. By default, timedatectl syncs the time once on boot and later on it uses socket activation to recheck when network connections become active.
# Ubuntu
timedatectl
 Network time on: yes
NTP synchronized: yes
If that is not the case, you can enable the network time with the following command.
sudo timedatectl set-ntp true
Likewise, Debian has timedatectl installed, but it is not configured to synchronise the time by default. Enabled it with the command below.
# Debian
sudo timedatectl set-ntp true
If you then check the time settings again, you should see that NTP is enabled. After which, the time will get synchronised automatically in a few moments.
timedatectl
     NTP enabled: yes
NTP synchronized: yes
On CentOS servers, you will need to install NTP to enable synchronisation.
# CentOS
sudo yum install ntp
Next, enable ntpd in the system settings and restart it.
sudo systemctl enable ntpd
sudo systemctl restart ntp
You can now turn on NTP synchronisation with the following command.
sudo timedatectl set-ntp true
Then wait a moment for the system to synchronise the time.
timedatectl
     NTP enabled: yes
NTP synchronized: yes
Not to worry if the NTP enabled still shows n/a, it should also get updated shortly.
Windows
Windows servers should have time synchronisation enabled by default. But if you wish to check or change the settings, they can be found under the Internet Time tab in the Date and Time settings.
Open the settings either through the Windows Control Panel or by entering the following in the command prompt, run, or search window.
timedate.cpl
Then click the Internet Time tab in the Date and Time settings.
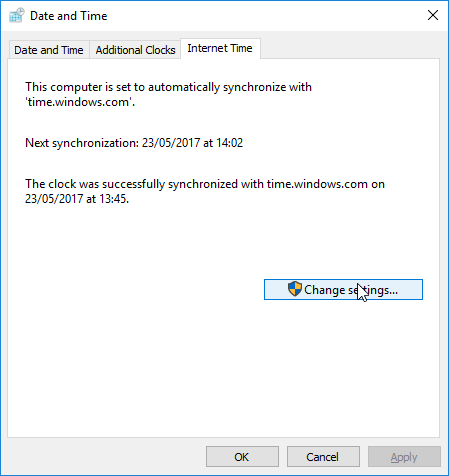
Click the Change Settings button to open the Internet Time Settings.
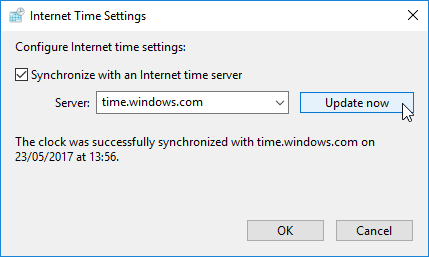
Select the time server you wish from the drop-down menu or type in a new address. You can test the server connection and manually synchronise the time by clicking the Update now button. After a moment, you should see a text confirming that the clock was successfully synchronised with the selected server.
When you are done, confirm the selection and close the windows by clicking the OK button.