
Managing Cloud Server plans
One of the advantages of our cloud computing platform is the ability to freely change your server configuration, adding or removing CPU cores, RAM, and storage to best suit your needs. UpCloud offers a number of Cloud Server plans, including Starter, Premium and Cloud Native options for you to choose from at server creation.
However, selecting one does not exclude you from the others. This article explains the differences between these configuration options and how to easily move between them at will.
Differences between the plans
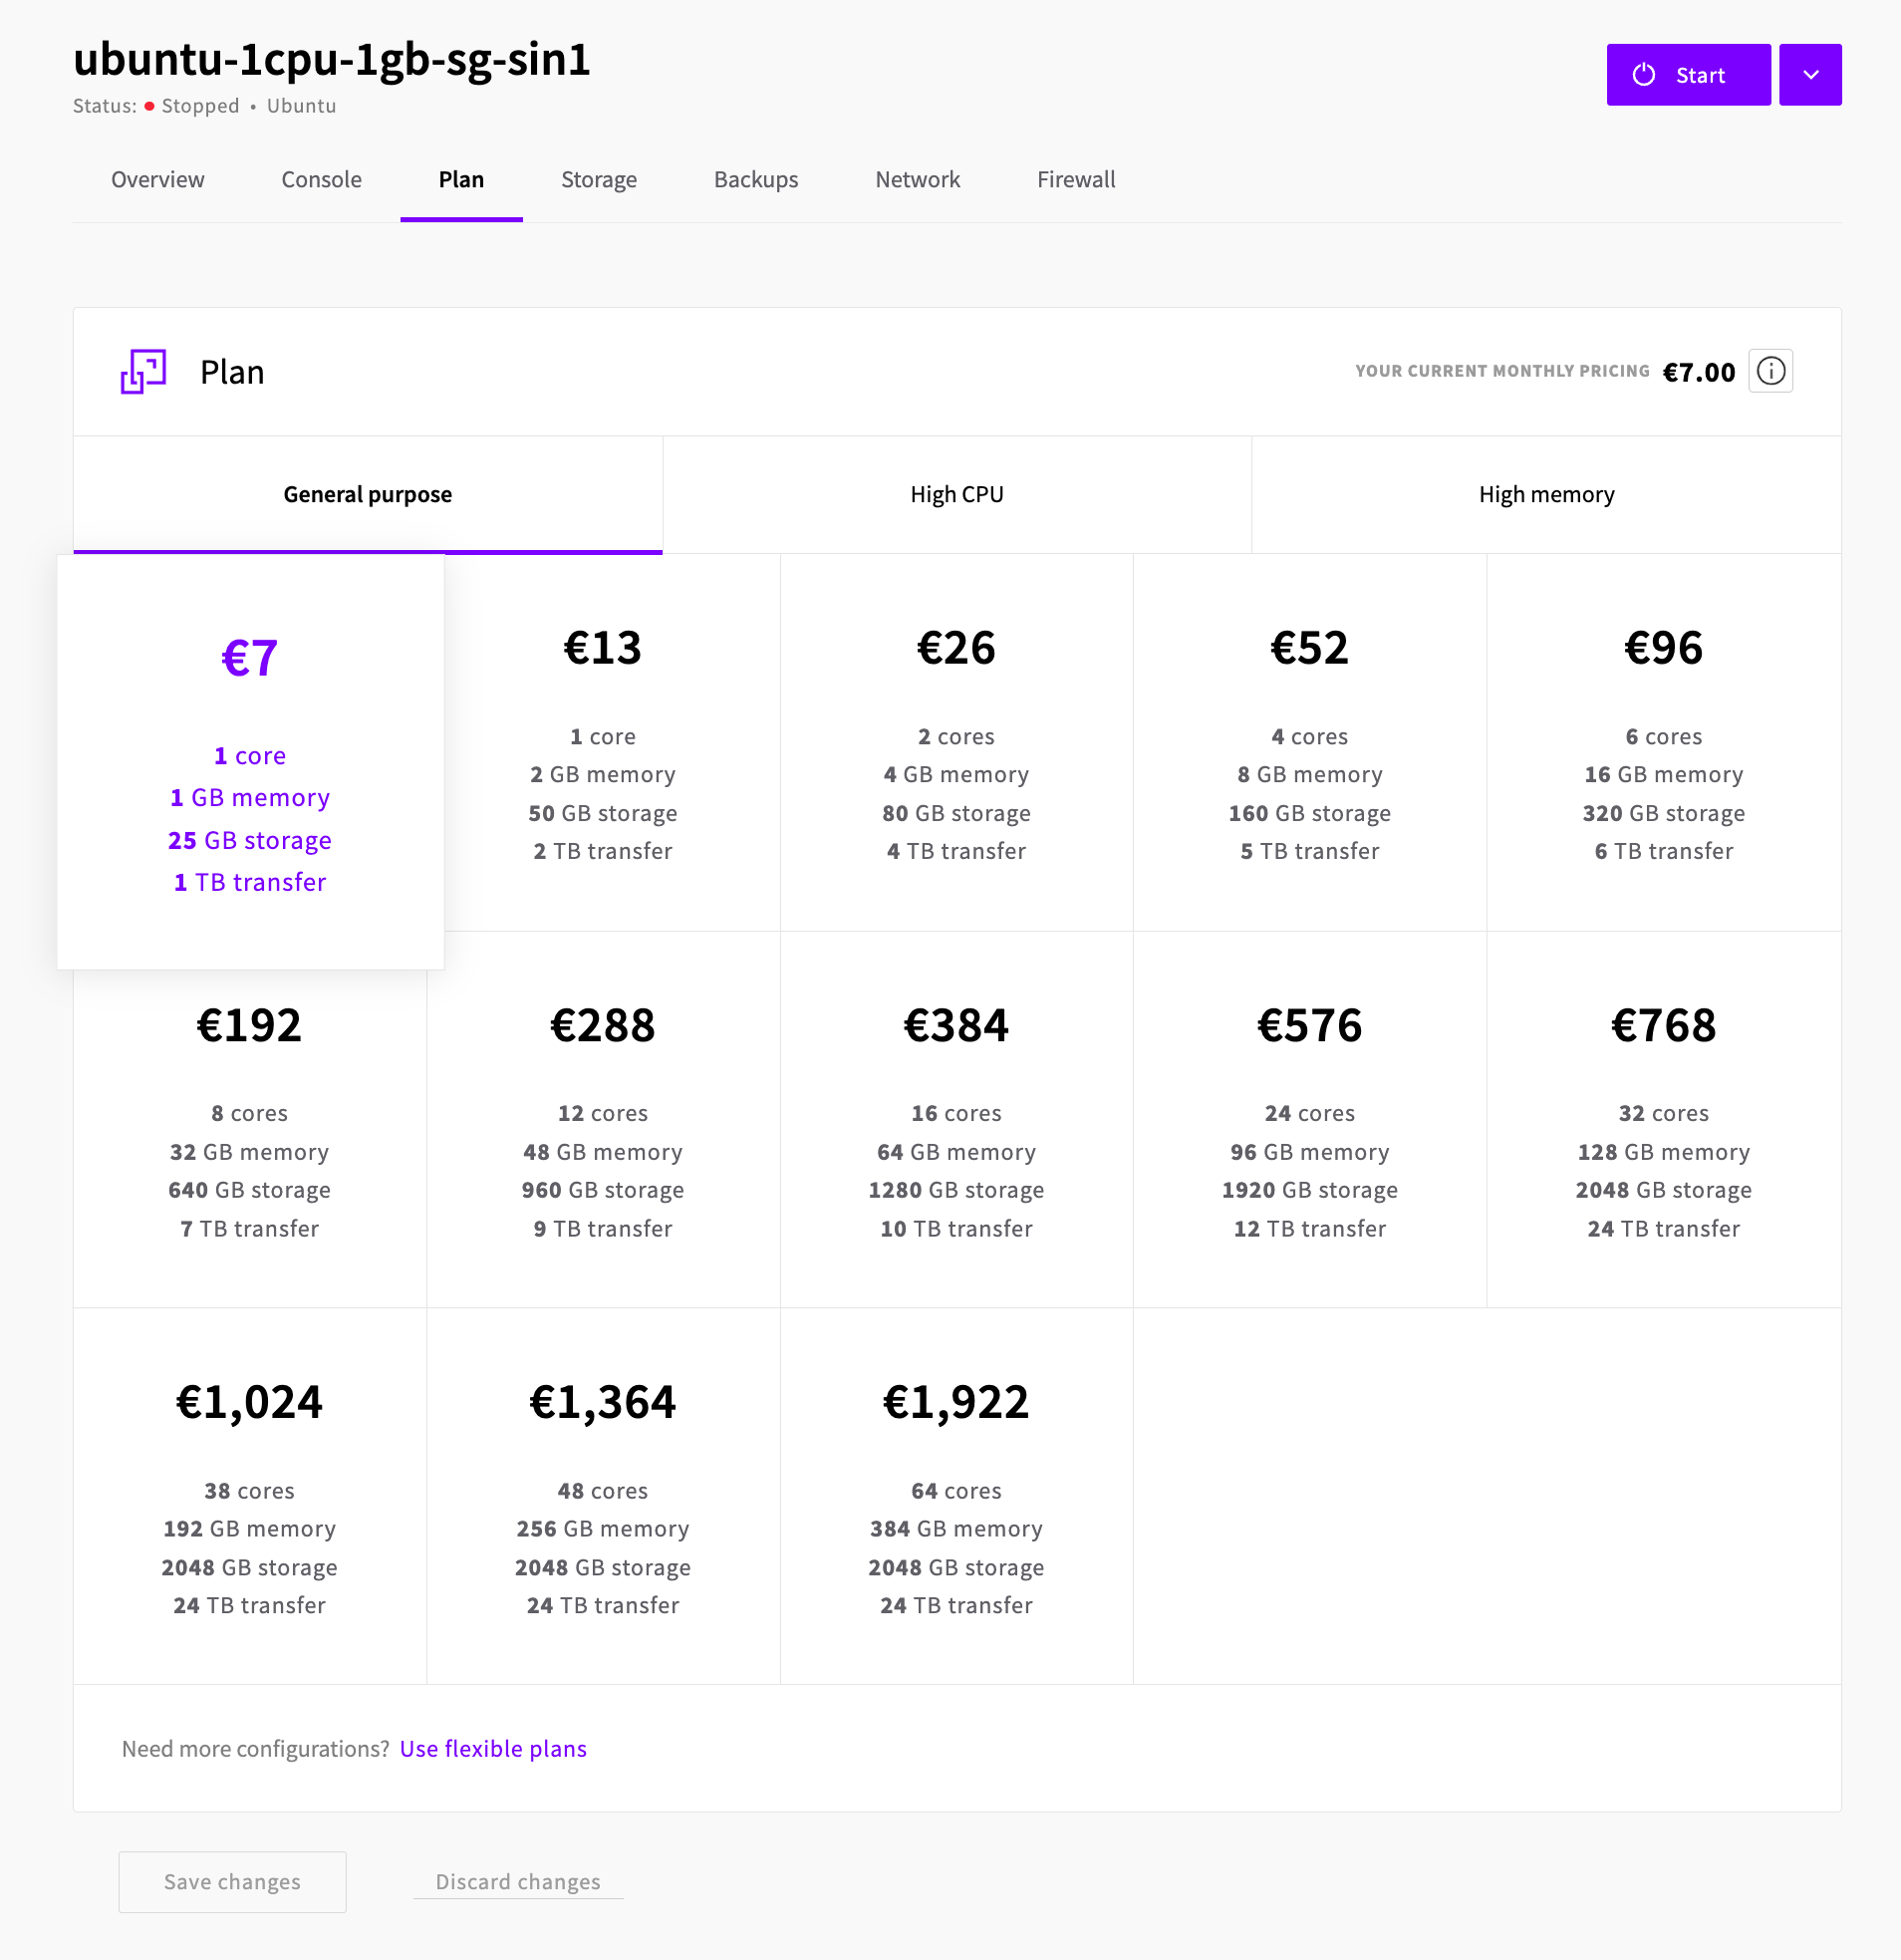
Starter plans are designed to offer inexpensive servers for development, testing and hosting non-critical workloads. These plans include all the required components of a functional server, and also a public IPv4 address. Storage is provided with the Standard storage tier, offering a general purpose performance.
Premium plans offer balanced resource configurations that allow predictability in usage and costs throughout the server’s lifetime. These plans comprise a public network IPv4 address, an optional IPv6 address, and a monthly public network transfer quota, as well as the CPU, RAM, and storage – all included for a cost-effective price billed hourly during the lifetime of the server.
Cloud Native plans offer the best possible price by unbundling storage and IPv4 addresses from the plans. Cloud Native plan servers can be used with any storage tier, and network connectivity can be provided either via SDN Private Networks or public IPv4/IPv6 addresses that can be attached at extra cost. Cloud Native plans are designed for ephemeral workloads, containerised applications and hosting microservices architectures.
See Cloud Servers pricing for more information on the different plans.
Resizing your Cloud Server
To adjust your server configuration, first, log into your UpCloud Control Panel and open your server details. Making changes to your system settings will require you to shut down the server before the options for configuration and disk management become available. With Windows servers, make sure to give the shutdown command from the operating system to safely power off your server.
We highly recommend taking a backup of your server before resizing storage devices.
You can continue once your server has been powered down. The option to change the configuration can be found in your server settings under Resize. The resize options allow you to choose between one of the Cloud Server plans. After you have made the desired changes, save the new configuration by pressing the Save changes button at the bottom of the page.
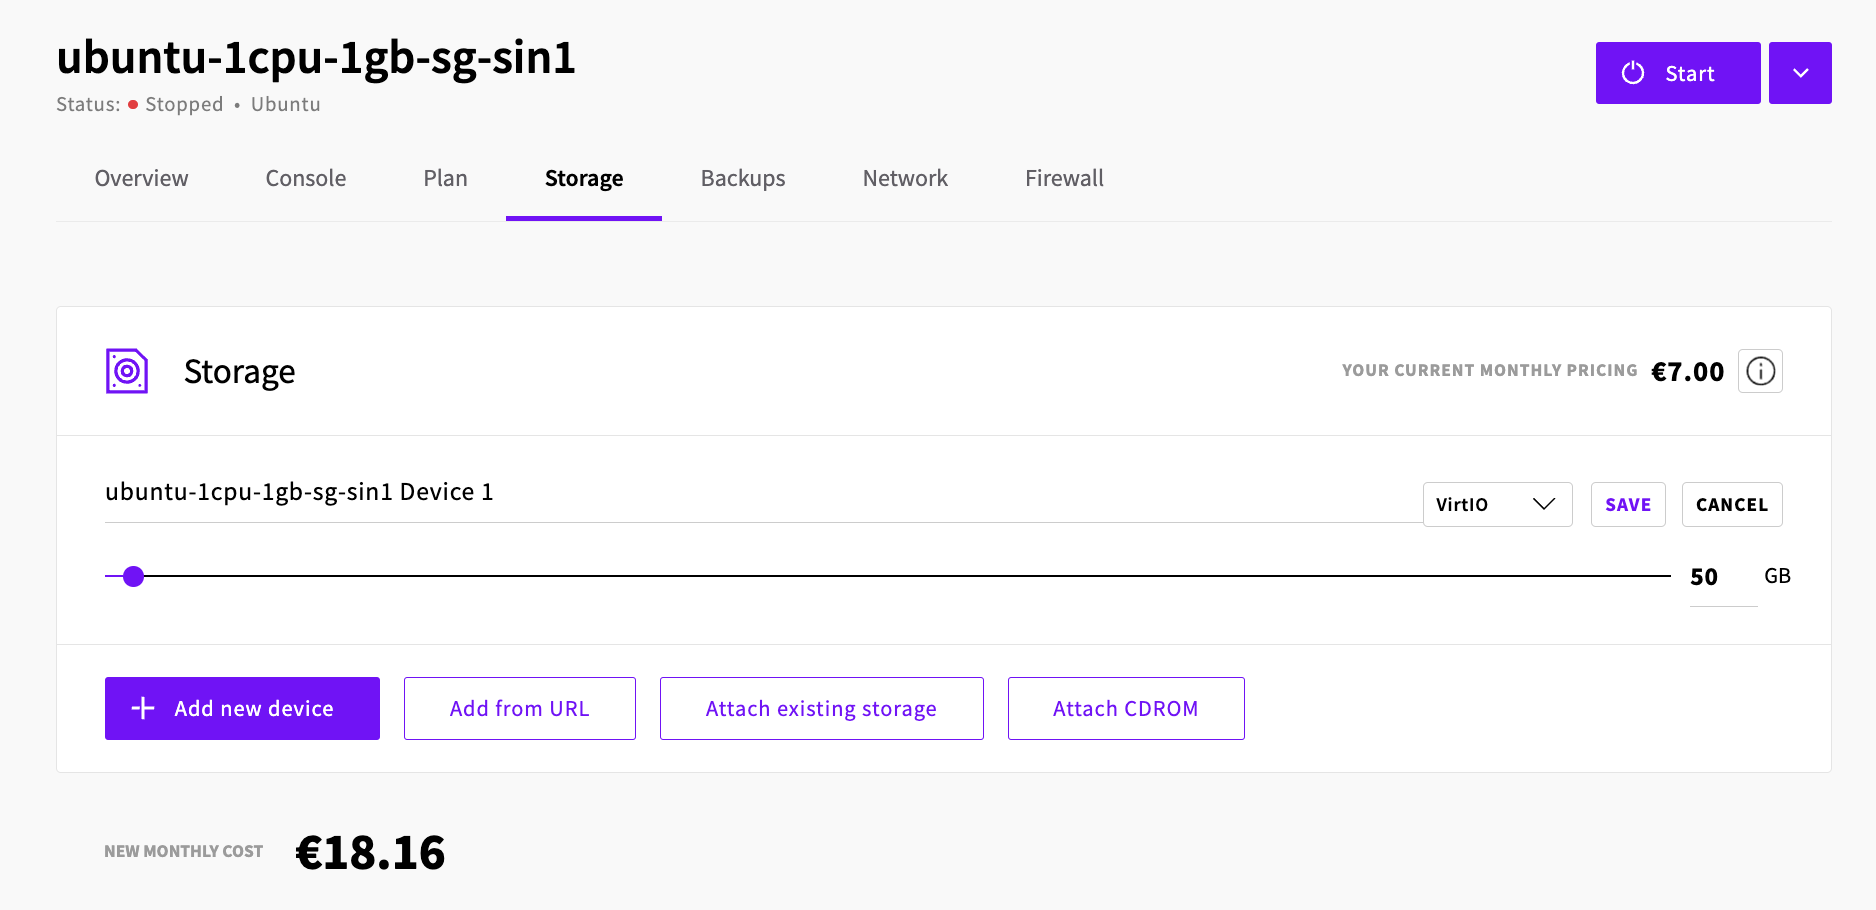
Scaling storage
If you require more storage space, you can also scale up the current storage or attach up to a total of 8 storage devices in the Storage section under Resizing at your server details. You can find more information about this in our guide for managing storage devices.
Note that increasing the size of a storage device beyond what’s afforded by your Cloud Server plan will cause it to be counted as an additional storage device and billed according to our standard pricing.
When you have finished making adjustments to your configuration, start the server again to take advantage of your newly added system resources. If you change the size of a previously used storage, take a look at the instructions for resizing storage to also update it in the OS.
Switching plans
Most of the time, using Premium plans is the most cost-efficient option while the other plans give further options. If you require additional memory or CPU temporarily, you can always upgrade to any higher plan and downgrade later. However, note that the storage devices are not automatically resized to allow you to easily return to the original configuration plan. This is because the process of decreasing storage size is a more complex task than increasing storage.
Switching between plans is as easy as choosing your new configuration and clicking the Save button. Note that your server needs to be powered down, then select one of the plans with the same or more storage capacity as your server currently has and click the Save changes button.
If you need more server resources, you can always select a larger plan and then scale up your storage device to take advantage of the allocated capacity. Remember to configure the additional storage space also on the OS level by following our resizing storage guide.
Pricing of the plans
The Cloud Server plans include resource options for many use cases conveniently combined to a single price while the Flexible configurations calculate hourly pricing purely by usage. Selecting a Premium plan is a cost-effective way to get started, but advanced users might wish to make use of the more targeted High CPU and High Memory plans.
In case you need to add storage, more than is bundled in the Cloud Server plan of your choice, you can always attach additional storage devices. This way your server retains the plan pricing while any extra storage is billed per GB.
If you need to increase the size of the first storage device, go to the Resize section in your server settings and adjust the storage size to your requirements. Note that you can only increase the storage size this way, to safely decrease the storage size follow our guide for resizing storage.
When making changes to your server plans, you can see the effect it has on the pricing at the bottom of the Resize view. Feel free to try different configurations, new billing takes an effect only after Saving the changes.
To find out more about the different plan options, see our pricing page for the in-detail list of hourly costs.