
Managing Workspace Members
Adding users to a workspace
Start by navigating to your workspace members list
- Click the dropdown in the top left corner, just below the UpCloud logo.
- Clicking the dropdown opens a view of your organizations and workspaces. Please hover over the workspace you want to invite members to, and click the Members button.

Invite user to workspace
- Click the Invite button on the right side of the members page.

- In the modal that appears, first enter the recipient's email address. Please note that this email has to match exactly the address the recipient is going to use for login.

- Choose Workspace access for the recipient from the dropdown on the right (read more about workspace access <here>).
- Click the Send invitation button, then ask the recipient to check their email.
Accepting the workspace invitation
- Click the link in your email invitation.
- You will land on the invitation page. If you are not yet authenticated, click Log in on Sign up (read more about sign up <here>).

- After authentication, you should see a page for accepting the invitation. If you see an error page instead, make sure you have authenticated with the same email address you used to receive the invitation.

- Click the Accept button, after which you will be added to the workspace and redirected to UpCloud Hub.
Removing members from the workspace
Go to the workspace members list.
- Click the dropdown in the top left corner, just below the UpCloud logo.
- Clicking the dropdown opens a view of your organizations and workspaces. Please hover over the workspace you want to remove members from, and click the Members button.
Remove user from workspace
- Click the removal icon next to the workspace member you want to remove. Please note that you cannot remove a member who has inherited access from the organization, a member with higher-level access than you, or the last owner of the workspace.

- Confirm the member's removal in the modal that opens.
Change the workspace access of the user
Go to the workspace members list.
- Click the dropdown in the top left corner, just below the UpCloud logo.
- Clicking the dropdown opens a view of your organizations and workspaces. Please hover over the workspace you want to modify members' access in, and click the Members button.
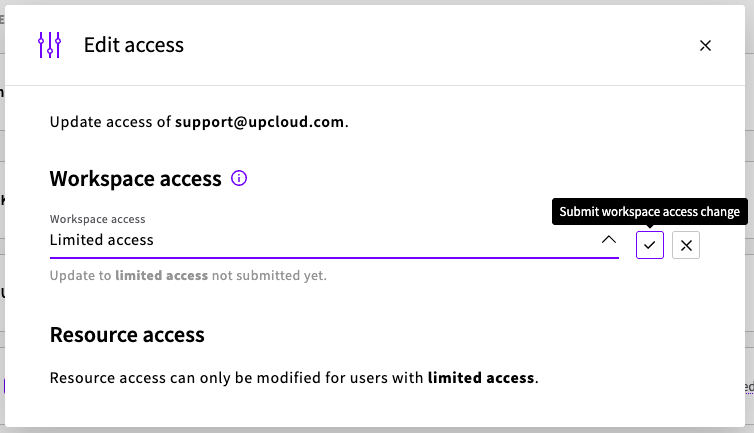
Change workspace access
- The edit icon next to the workspace member whose access you want to modify. Please note that you can not modify the access of members with higher-level access than yourself, inherited members, or the last owner of the workspace.

- In the modal that opens, select a new access level for the user.

- After selecting the new access level, click the submit button on the right side of the selection.
- For a member with limited access, you can also modify their resource access below.
- Enable access to all instances of a resource by clicking the switch for that resource. Below is an image with access to all servers enabled.

- Enable access to specific instances by clicking on the Add <resource name> button. Then click the checkbox for resources to access and submit. Below is an example for servers

- Enable access to all instances of a resource by clicking the switch for that resource. Below is an image with access to all servers enabled.
API Token management for Workspaces
Create an API user for your workspace by invite a new member e.g. by using the "+identifier" convention with your email [email protected]
Assign the API user with "Limited access" as needed.
Log into your workspaces using that API user, and create an API token for the API user. Follow our guide on How to create and use UpCloud API Tokens to learn more.
Setting up the API tokens this way helps in restricting any "yourname+api-email.com" member on the workspace and have the limited access.