How to connect UpCloud to FortiGate using VPN Gateway
Fortinet FortiGate Next-Generation Firewalls (NGFWs) offer comprehensive security solutions for various network environments, including branch offices, campuses, data centers, and cloud deployments. FortiGate NGFWs provide threat protection, SSL inspection, and visibility into cloud applications and IoT devices. They are known for their high performance, low latency, and ability to scale to meet the demands of large and distributed networks.
The UpCloud VPN Gateway allows you to connect to external networks securely through a VPN endpoint. It operates with our SDN Router, which can connect with one or multiple SDN Private Networks. All Cloud Servers connected to one of these SDN Private Networks can access the external networks via the Gateway.
This guide details how to configure an IPSEC VPN connection between a Fortinet FortiGate firewall and UpCloud.
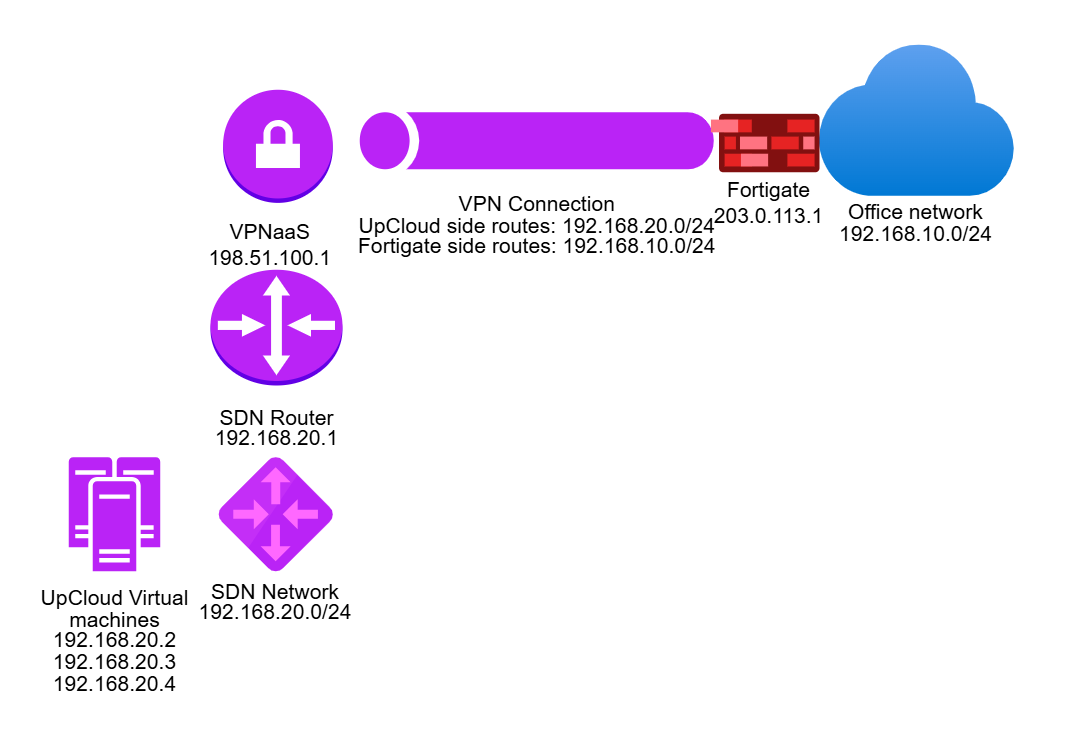
Please note that the VPN Gateway operates on a route-based site-to-site connection. Policy-based VPN is not currently supported.
Set up a VPN Gateway on UpCloud
To start, log in to your UpCloud Control Panel or sign up if you haven’t already.
Create a new UpCloud SDN Private Network
Create a new SDN Private Network by navigating to the following section:
Network -> Private networks -> “Create Private network”
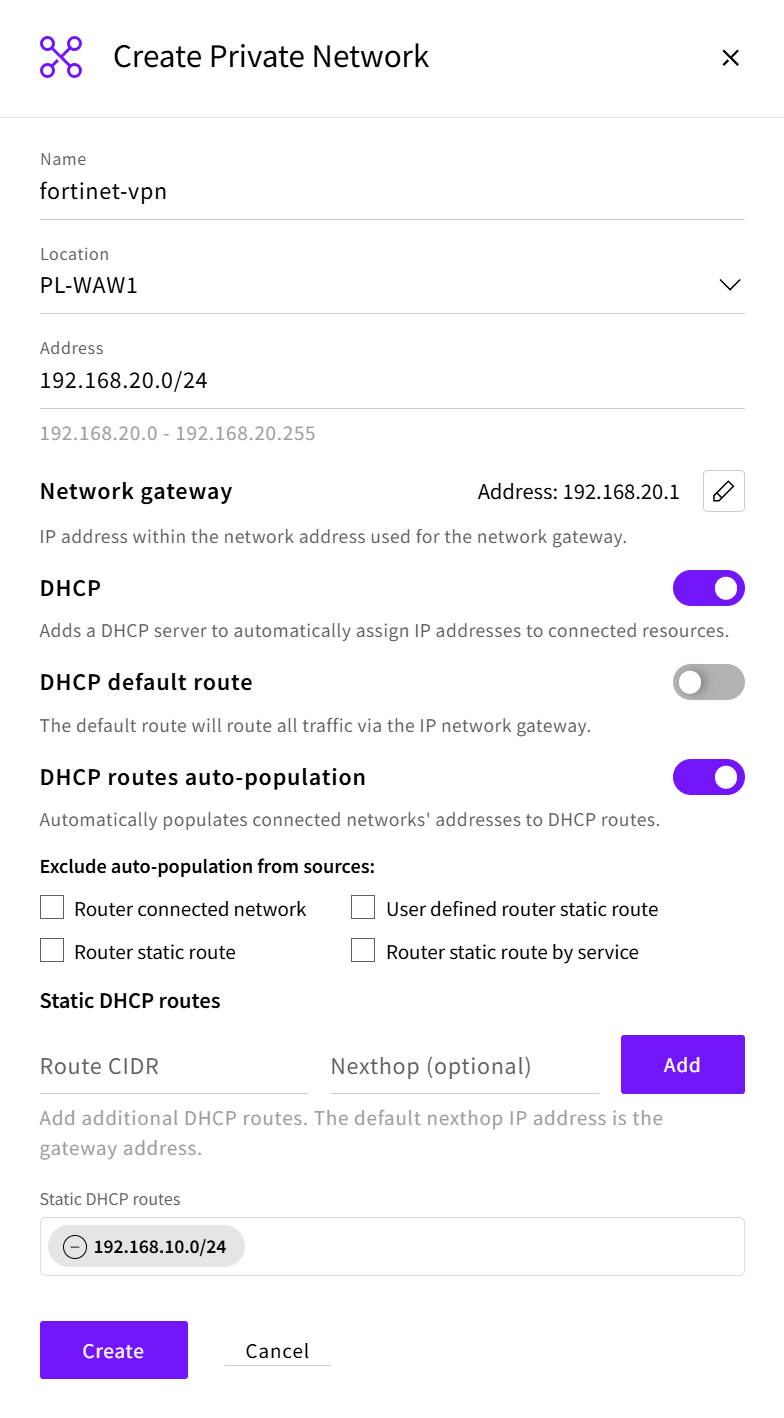
Configure your network by adding the following details:
- Set a name: e.g. fortinet-vpn
- Choose the location where you want to create the private network
- Define the range of the IP address: 192.168.20.0/24
- Click Show advanced settings to show DHCP routing options, then add DHCP route: 192.168.10.0/24
- Lastly, click the “Create” button to finish.
Create a new UpCloud router
Next, you will need to create a new SDN Router in the Network section under Routers:
Network -> Routers -> “Create SDN Router”
Name your router so that you can recognise it later.
- Name the router: e.g., fortinet-vpn-router
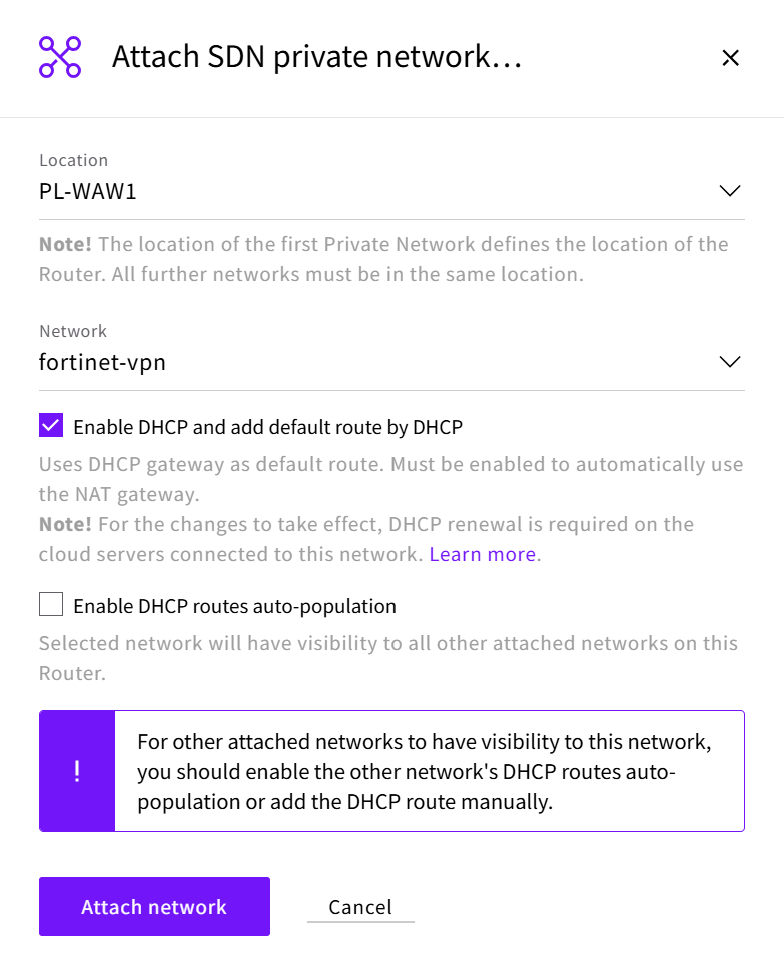
- Go to the router details and click the “Attach SDN Private Network” button
- Select the location of your SDN network and choose it from the Networks list: fortinet-vpn
- Enable “Enable DHCP and add default route by DHCP" and then turn off “Enable DHCP routes auto-population”
- When ready, click the “Attach network” button.
Create a new UpCloud VPN Gateway
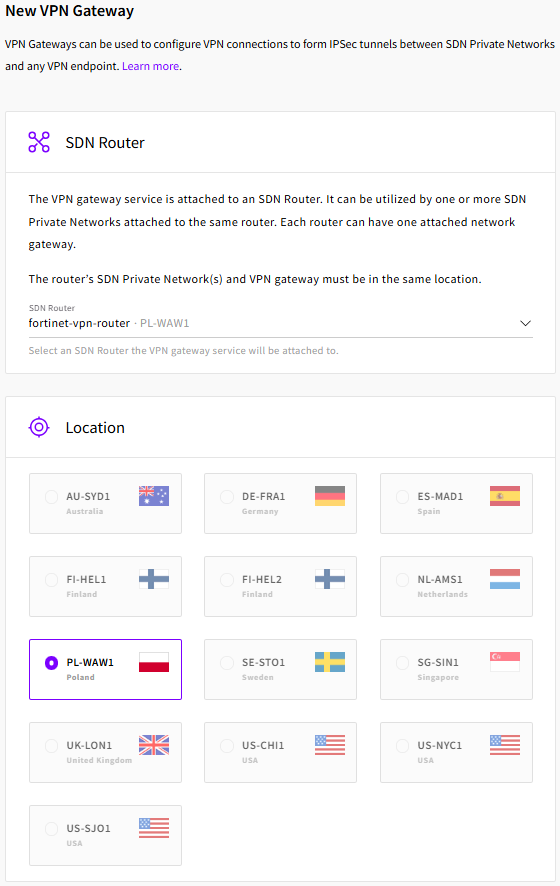
You are now ready to create your VPN Gateway. Head over to the VPN Gateways section and click the “Create VPN Gateway” button:
Network -> VPN Gateways -> “Create VPN Gateway”
- Choose your SDN router: fortinet-vpn-router
- Select the service plan: Production
- Next, give your gateway an appropriate name, e.g., fortinet-vpn-gw, or use the default
Then click the “Create VPN Gateway” button to confirm.
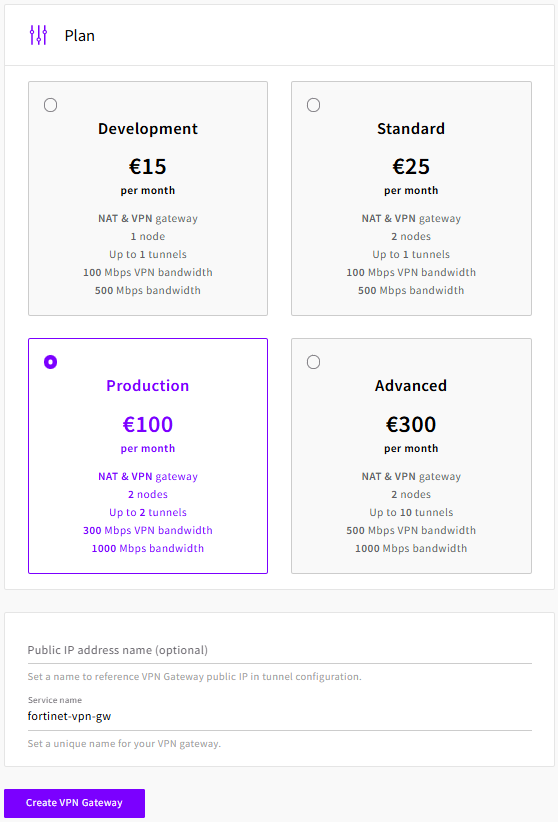
Note that the initial configuration may take a while.
The critical information needed from this point is the public IP address in the VPN gateway overview, which we will supply to the Fortigate VPN Tunnel as the Remote Gateway. Once the VPN Gateway's initial configuration is complete, the public IP address will be available.
Next, head over to the VPN Connections tab of the newly created VPN Gateway.
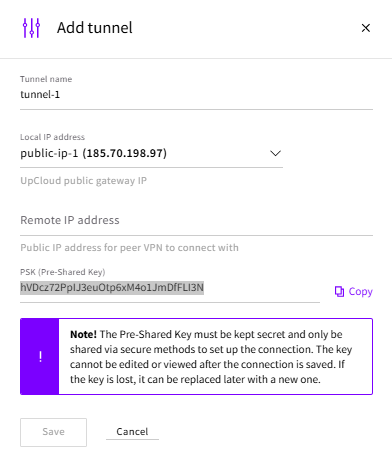
Click the “Configure connections” button and then “Add new tunnel”.
Copy and remember to securely save the PSK (Pre-Shared Key) displayed in the "Add tunnel" window for future use. This key will be required later when configuring your FortiGate VPN tunnel authentication. We recommend using your preferred password manager or a secure keystore for this sensitive information.
Leave the "Add tunnel" window open for now as we move to the Fortinet configuration.
Setting up a VPN endpoint on FortiGate
Head over to your FortiGate Web UI.
Create a new VPN Tunnel
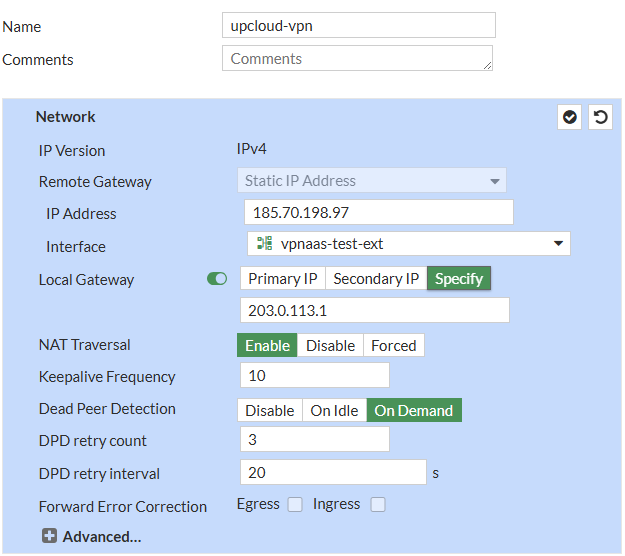
Log in to your FortiGate Web UI and navigate to VPN → IPsec Tunnels page. Click “Create new” and select IPsec Tunnel. Name the tunnel, e.g., upcloud-vpn, and add the Network settings:
- Choose IPv4
- In the “Remote Gateway”, select “Static IP Address” and add the public IP address of the UpCloud VPN Gateway you created.
- Choose the appropriate Interface on your FortiGate for the outgoing VPN connection. Consider enabling the Local Gateway configuration to define the source IP address for the VPN tunnel. Enabling Local Gateway is particularly advantageous if your FortiGate interface has multiple public IPs, providing the flexibility to choose the desired outgoing IP for the tunnel.
- Other network settings can typically remain at their default values.
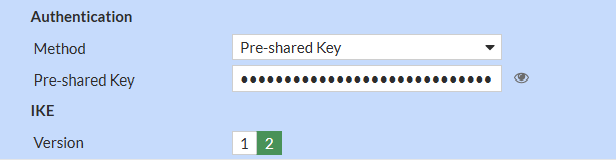
Next, under "Authentication", choose Pre-shared Key as the Method and enter the Secret/Pre-Shared Key you copied from your UpCloud VPN Gateway. Next, choose IKE Version 2.
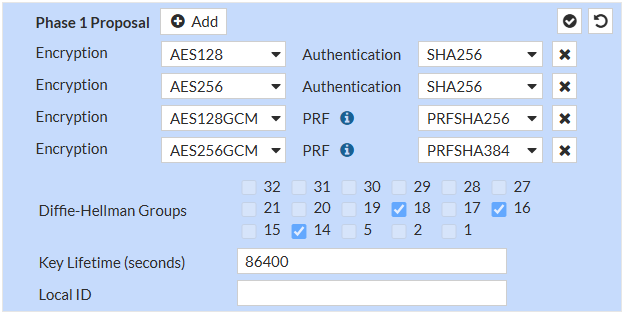
Following this, you'll need to define the Phase 1 parameters. Remove CHACHA20POLY from the list of proposed algorithms, as UpCloud VPN Gateway does not support it.
Lastly, in the Phase 2 settings, choose a name for the Phase 2 selector, e.g., to-upcloud-gateway. Specify your Local Network(s) behind the FortiGate and the Remote Network(s) managed by UpCloud.
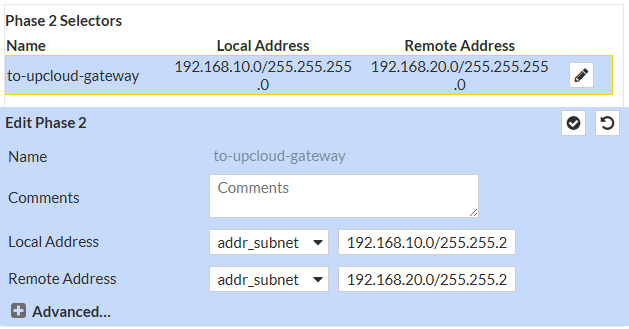
Then, click the “OK” button to finish creating the VPN tunnel.
Final Steps
Go back to the UpCloud VPN Gateway “Add tunnel” pop-up window and add the public IP address of the Fortigate Interface to the Remote IP address. Click Save.
Open the Advanced Settings to configure other settings, such as encryption algorithms, authentication algorithms, and protocol, and make sure they match your FortiGate VPN Tunnel configuration.
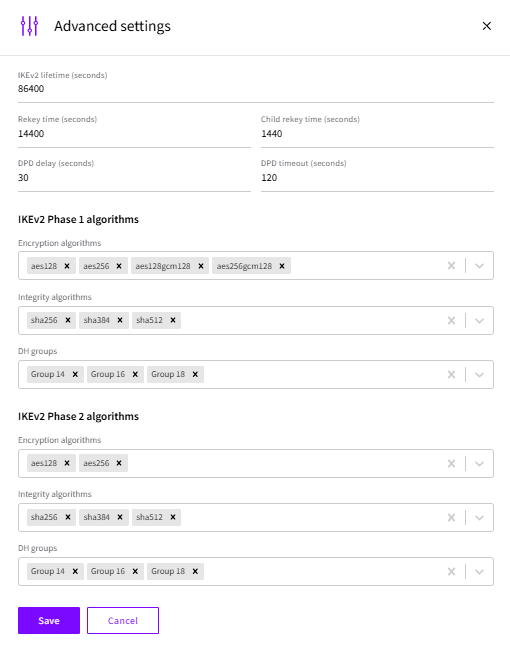
Save any changes that you made to the Advanced Settings.
Add the 192.168.20.0/24 IP range as a Local route and the 192.168.10.0/24 IP range as a Remote route.
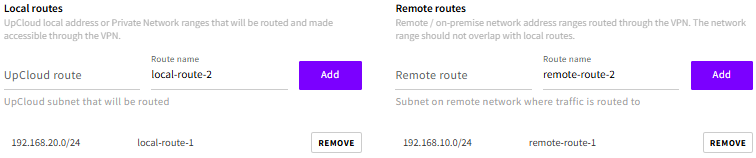
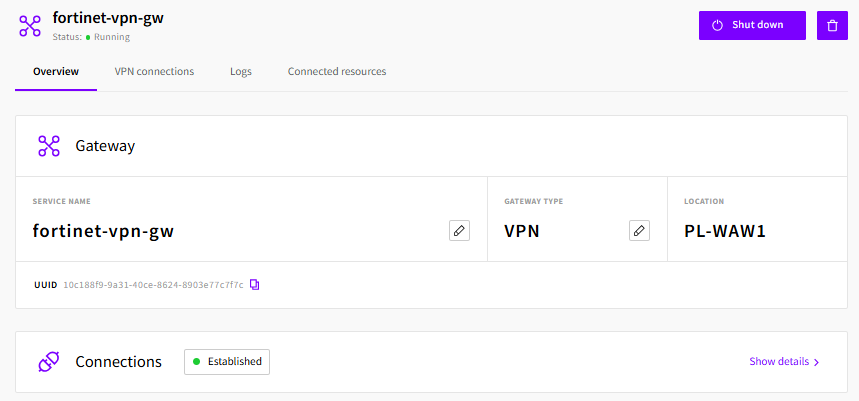
Finally, click Save again to finalize the creation of the VPN connection. Wait for the VPN tunnel to go up.

Troubleshooting Tips
- If you encounter any issues during the VPN tunnel setup or operation, your first step should be to consult the VPN Gateway Logs tab. This section provides real-time log messages that can offer valuable insights into the problem.
- Additionally, to simplify troubleshooting, especially during initial setup, consider streamlining your Phase 1 and Phase 2 configurations by selecting a single Encryption and a single Authentication algorithm. A common and recommended starting point is to configure AES128 for encryption and SHA256 for authentication on both phases, as this can help isolate potential compatibility problems.