UpCloud Managed Container Registry is in beta. Features shown in this guide may change before general availability.
How to deploy automatically with Container Registry webhooks
Beta notice
When your app runs in a container on a Cloud Server, the server can update the app automatically each time you push a new version of its container image to UpCloud Managed Container Registry. A registry webhook tells the server about the push, and the server pulls the image and restarts the app with Docker Compose.
This guide walks you through setting this up for a web app, from preparing the server to pushing your first update. The examples use the demo/hello-upcloud image, a small web page served on port 80, but you can follow along with your own image.
How it works
Everything runs on one Cloud Server. Docker Compose runs the app in a container, a small Python receiver handles the webhooks, and Caddy serves both over HTTPS.
Caddy is an open-source web server that gets and renews TLS certificates automatically, so there's no certificate setup to do. If you already use another web server, such as nginx, you can use it instead: it needs to serve app.example.com over HTTPS, pass requests for /registry-webhook to 127.0.0.1:9000, and pass everything else to 127.0.0.1:8080.
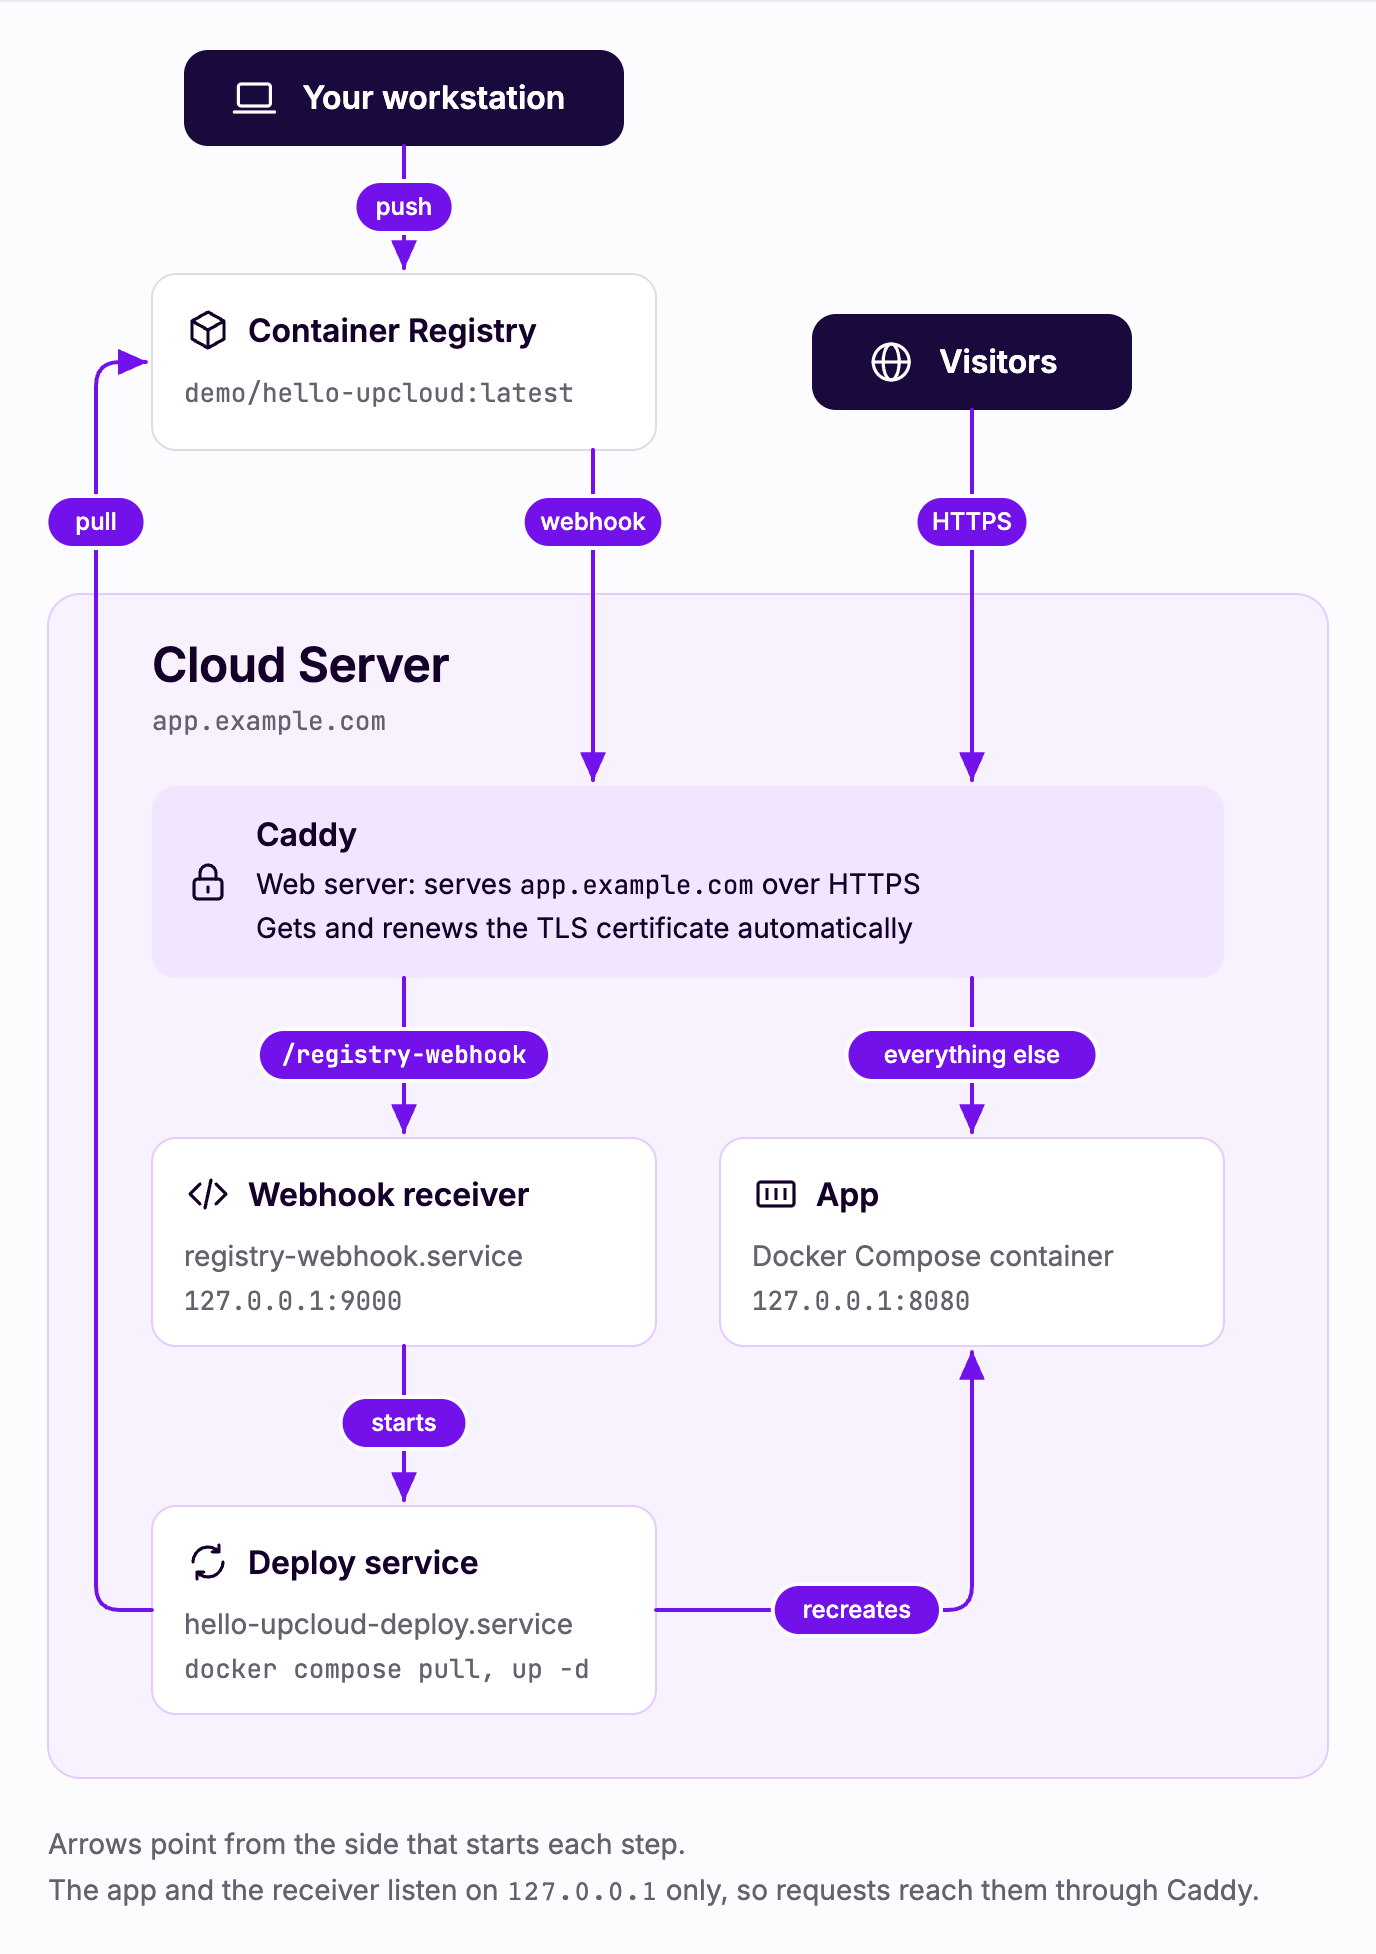
The server runs whichever image the latest tag points to. When you push a new image to latest:
- The registry sends an
image.updatedevent tohttps://app.example.com/registry-webhook. - Caddy passes the request to the receiver.
- The receiver checks the webhook's secret and, because the event is for
latest, starts a deploy. - The deploy pulls the new image and recreates the app's container with Docker Compose.
To roll back, you point latest at an earlier image, and the server deploys that one the same way.
Before you start
You need:
- An image of a web app in your registry, such as the
demo/hello-upcloud:1.0image you push in How to get started with UpCloud Container Registry. - Docker on your workstation, logged in to the registry as a user with the Read, Create, Update permissions. You need Update to move
latestto a different image, as described in Container Registry access control. - A Cloud Server with a public IPv4 address. The examples use Ubuntu 26.04 LTS, with the commands run as
root. - A domain name, such as
app.example.com, with anArecord that points to the server's public IPv4 address. Caddy uses it to get a TLS certificate for the server.
The registry delivers webhooks over the public internet, and Caddy also uses port 80 to get its certificate. If you use the Cloud Server firewall, allow incoming TCP traffic on ports 80 and 443.
Install Docker and Caddy
On the server, install Docker Engine, the Docker Compose plugin, and Caddy. On Ubuntu, all three come from the package archive:
apt update
apt install -y docker.io docker-compose-v2 caddy
If you use another web server instead of Caddy, leave caddy out of the command.
Docker and Caddy start right after the installation and again every time the server boots.
On other Linux distributions, follow Docker's Install Docker Engine and Caddy's Install instructions instead, and make sure both are set to start at boot.
Log in to the registry from the server
The server only pulls images, so give it a registry user of its own with just the Read permission. On the registry's Users tab, add a user such as app-server with Read and copy its password, as described in How to get started with UpCloud Container Registry.
Then log in on the server, and enter the password when prompted. Replace my-registry-1b77d021.upcloudcr.com with your registry's endpoint, which is shown on its Overview tab:
docker login my-registry-1b77d021.upcloudcr.com -u app-serverOutput
Login SucceededDocker warns that it stores the credentials unencrypted in /root/.docker/config.json. That's fine here: only root can read the file, and the user can only pull images.
Tag the image as latest
Because the server deploys whatever latest points to, start by adding the latest tag to the image you've already pushed, demo/hello-upcloud:1.0 in the examples. From your workstation, run:
docker buildx imagetools create \
  --tag my-registry-1b77d021.upcloudcr.com/demo/hello-upcloud:latest \
  my-registry-1b77d021.upcloudcr.com/demo/hello-upcloud:1.0
This tags the image in the registry without pulling or rebuilding it.
Run the app with Docker Compose
On the server, create a directory for the app. The examples call the app hello-upcloud, which also names its deploy service later on, so if you use another name, use it in those places too:
mkdir -p /opt/hello-upcloudThen create /opt/hello-upcloud/compose.yaml with the following content. If you're deploying your own app, change image to your image:
services:
  web:
    image: my-registry-1b77d021.upcloudcr.com/demo/hello-upcloud:latest
    ports:
      - "127.0.0.1:8080:80"
    restart: unless-stopped
The ports line makes the app, which listens on port 80 inside its container, available on port 8080 of the server's loopback address (127.0.0.1, also known as localhost). Nothing else needs to reach it there, because Caddy serves the app to the internet. If your app listens on a different port, change 80 to match. restart: unless-stopped makes Docker start the app again whenever the server reboots.
Start the app:
cd /opt/hello-upcloud
docker compose up -d
Then check that the app answers. The command prints the HTTP status code of the response, and 200 means the app served the page:
curl -s -o /dev/null -w '%{http_code}\n' http://127.0.0.1:8080Output
200Serve the app over HTTPS
If you use another web server, configure it as described in How it works, then continue with Create the deploy service.
Replace the contents of /etc/caddy/Caddyfile with the following, using your own domain name:
app.example.com {
	handle /registry-webhook {
		reverse_proxy 127.0.0.1:9000
	}
	handle {
		reverse_proxy 127.0.0.1:8080
	}
}
Caddy passes requests for /registry-webhook to the webhook receiver, which you set up later in this guide, and everything else to the app. Reload Caddy to apply the change:
systemctl reload caddyYou can now open https://app.example.com in a browser to see the app.
Create the deploy service
A deploy pulls the image that latest points to, and recreates the app's container if the image has changed. It runs as its own systemd service, so a deploy always runs to the end, even if the receiver restarts while it's running.
Create /etc/systemd/system/hello-upcloud-deploy.service:
[Unit]
Description=Deploy hello-upcloud from Container Registry
After=docker.service

[Service]
Type=oneshot
WorkingDirectory=/opt/hello-upcloud
ExecStart=/usr/bin/docker compose pull
ExecStart=/usr/bin/docker compose up -d
Load the service and run a deploy by hand to check that the server can pull from the registry:
systemctl daemon-reload
systemctl start hello-upcloud-deploy
journalctl -u hello-upcloud-deploy -o cat --no-pager
Output
Starting hello-upcloud-deploy.service - Deploy hello-upcloud from Container Registry...
 web Pulling
 web Pulled
 Container hello-upcloud-web-1  Running
hello-upcloud-deploy.service: Deactivated successfully.
Finished hello-upcloud-deploy.service - Deploy hello-upcloud from Container Registry.
The app is already running the image that latest points to, so the deploy leaves the container running as it is.
Create the webhook receiver
The receiver is a short Python program that uses only the standard library. It accepts a request only if it carries the webhook's secret, and starts the deploy service only for an image.updated event for the latest tag of your app's repository.
A single push sends an image.updated event for every manifest it uploads, for example one for each platform of a multi-platform image. Only the manifest pushed with the tag has the tag as its reference, so checking the reference makes the receiver deploy once per push.
Generate a secret and store it in a file that only
rootcan read:touch /etc/registry-webhook.env chmod 600 /etc/registry-webhook.env echo "WEBHOOK_SECRET=$(openssl rand -hex 32)" > /etc/registry-webhook.envCreate a directory for the receiver:
mkdir -p /opt/registry-webhookThen create
/opt/registry-webhook/receiver.py:import hmac import json import os import subprocess from http.server import BaseHTTPRequestHandler, ThreadingHTTPServer SECRET = os.environ["WEBHOOK_SECRET"] REPOSITORY = "demo/hello-upcloud" TAG = "latest" DEPLOY_SERVICE = "hello-upcloud-deploy.service" class WebhookHandler(BaseHTTPRequestHandler): def do_POST(self): token = self.headers.get("Authorization", "") if not hmac.compare_digest(token.encode(), f"Bearer {SECRET}".encode()): self.send_response(401) self.end_headers() return length = int(self.headers.get("Content-Length", 0)) event = json.loads(self.rfile.read(length) or b"{}") if ( self.headers.get("ce-type") == "upcloud.container-registry.image.updated" and event.get("name") == REPOSITORY and event.get("reference") == TAG ): print(f"Deploying {REPOSITORY}:{TAG} {event.get('digest')}", flush=True) subprocess.run(["systemctl", "restart", "--no-block", DEPLOY_SERVICE]) self.send_response(204) self.end_headers() ThreadingHTTPServer(("127.0.0.1", 9000), WebhookHandler).serve_forever()The receiver listens on port 9000 of the loopback address, where Caddy sends the webhook requests. Requests without the right secret get
401 Unauthorized, and every other request gets204 No Content. Because the receiver restarts the deploy service rather than just starting it, a push that arrives during a deploy starts the deploy over, so the server always ends up on the newest image.If you're deploying your own app, set
REPOSITORYto your image's repository, without the registry endpoint, andDEPLOY_SERVICEto your app's deploy service. To deploy a tag other thanlatest, changeTAG.Create
/etc/systemd/system/registry-webhook.service:[Unit] Description=Container Registry webhook receiver After=network-online.target docker.service Wants=network-online.target [Service] EnvironmentFile=/etc/registry-webhook.env ExecStart=/usr/bin/python3 /opt/registry-webhook/receiver.py Restart=on-failure [Install] WantedBy=multi-user.targetStart the receiver, and have it start every time the server boots:
systemctl daemon-reload
systemctl enable --now registry-webhook
Check that Caddy passes webhook requests to the receiver by sending one without the secret, which the receiver refuses:
curl -s -o /dev/null -w '%{http_code}\n' -X POST https://app.example.com/registry-webhookOutput401
Add the webhook
On the server, show the secret:
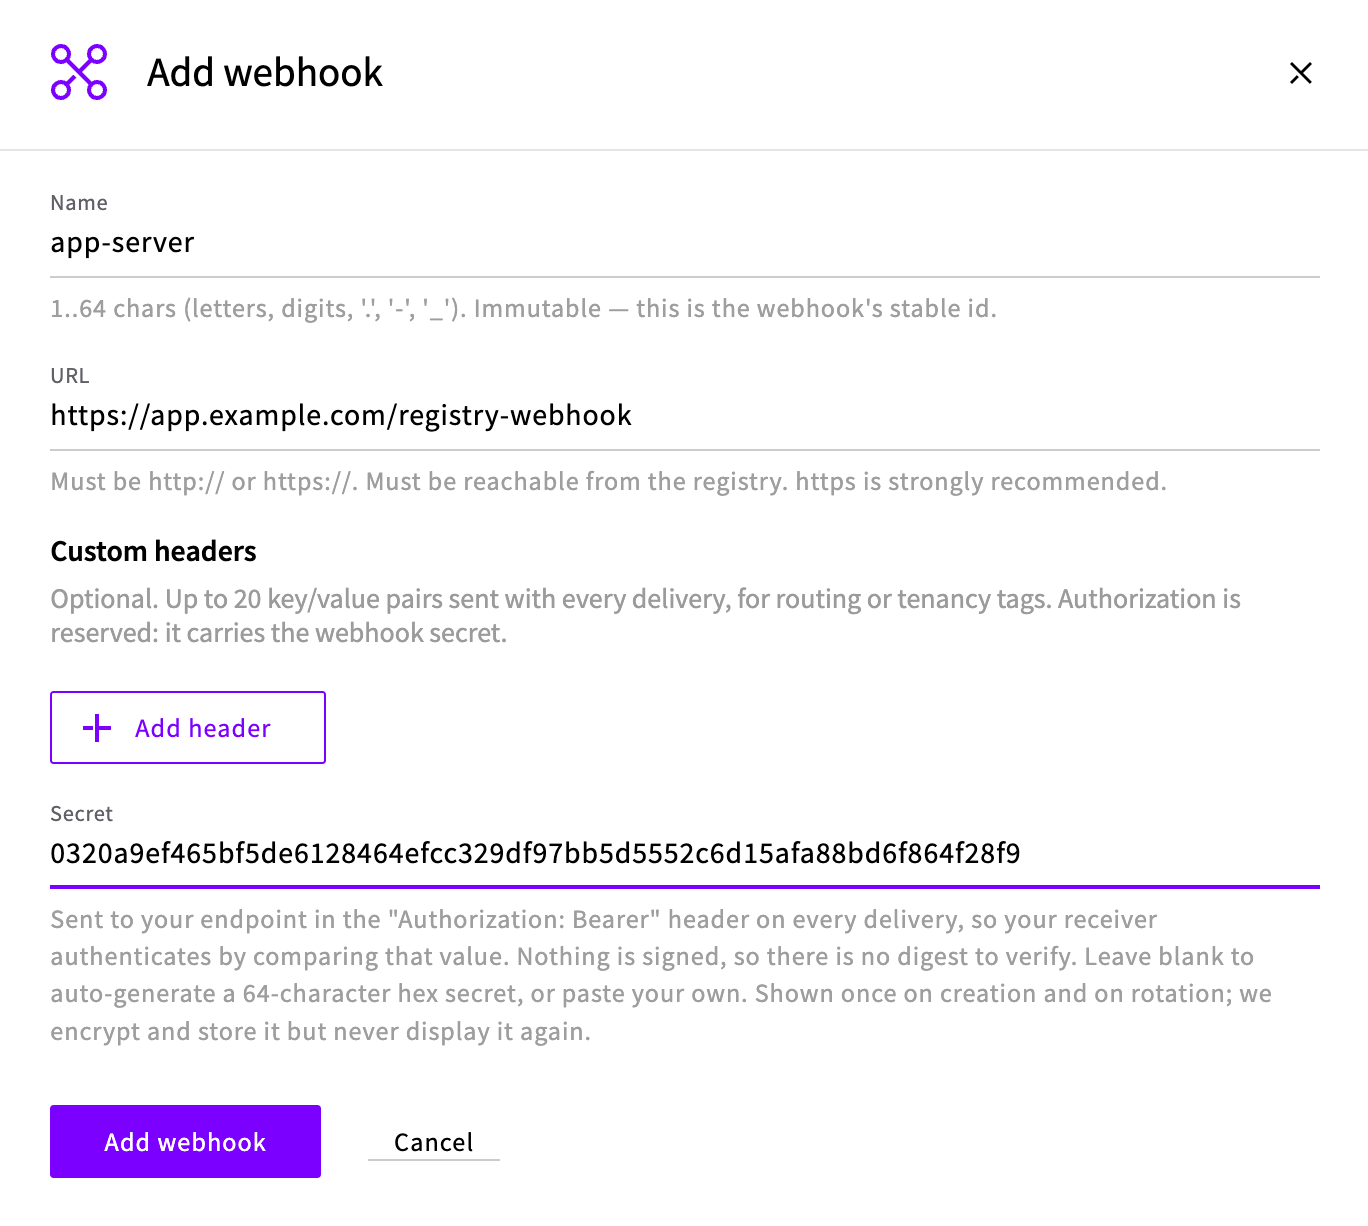
cut -d= -f2 /etc/registry-webhook.envIn the Control Panel, open the registry's Webhooks tab and select Add webhook.
Enter a Name, such as
app-server, and the URLhttps://app.example.com/registry-webhook.Paste the secret into the Secret field, and select Add webhook.
Push a new version
On your workstation, build the new version of your image and push it with both a new version tag and the latest tag. If you're using the example image, first change the heading in index.html, for example to Hello again from UpCloud Container Registry, and then run the following from the directory with the Dockerfile:
docker buildx build --platform linux/amd64,linux/arm64 \
  -t my-registry-1b77d021.upcloudcr.com/demo/hello-upcloud:1.1 \
  -t my-registry-1b77d021.upcloudcr.com/demo/hello-upcloud:latest --push .
Tagging each build with a version as well as latest keeps every version in the registry, so you can roll back to it later. If you build images in CI, for example with GitHub Actions as shown in How to get started with UpCloud Container Registry, add the latest tag to the pipeline's tags and give its registry user the Update permission.
To follow the deploy as it happens, watch the logs on the server:
journalctl -u registry-webhook -u hello-upcloud-deploy -fFirst the receiver logs a Deploying line with the digest of the new image, and then the deploy service recreates the app's container with it. Once the deploy finishes, https://app.example.com serves the new version, which for the example image means the new heading.
Roll back
To go back to an earlier version, point latest at it. For example, to return to 1.0:
docker buildx imagetools create \
  --tag my-registry-1b77d021.upcloudcr.com/demo/hello-upcloud:latest \
  my-registry-1b77d021.upcloudcr.com/demo/hello-upcloud:1.0
The registry sends an image.updated event for latest, just as it does for a push, and the server deploys 1.0.
Troubleshooting
Nothing happens after a push.
Check the receiver's log with journalctl -u registry-webhook:
- If there are no
POST /registry-webhooklines, the registry can't reach the server. Check that the domain points to the server, that ports 80 and 443 are open, and thathttps://app.example.comloads. - If the lines end in
401, the webhook's secret doesn't match/etc/registry-webhook.env. Delete the webhook and add it again with the value from the file. - If the lines end in
204but there's noDeployingline, the push wasn't to the repository and tag the receiver deploys. Check the repository and tag you pushed, andREPOSITORYandTAGin the receiver.
The deploy fails with pull access denied.
If the error ends in no basic auth credentials, the server isn't logged in to the registry, so run docker login on the server again.
A push happened while the server was down. The registry delivers each event once and doesn't send it again, so a push that happens while the server is down or restarting doesn't reach it. To catch up, run a deploy by hand:
systemctl start hello-upcloud-deploy