
Dokku on Kubernetes: A Scalable Open-Source Heroku Alternative
Why Deploy Dokku on Kubernetes?
Dokku is a popular Platform as a Service (PaaS) solution that aims to simplify application development and allows developers to deploy apps just by running git push. It describes itself as an open-source alternative to Heroku.
However, Dokku is designed to run on a single container, which will later on limit your ability to scale as demand grows. Running Dokku on Kubernetes addresses this limitation and delivers the best of both worlds:
Convenience and simplicity: A simple development lifecycle which allows you to deploy just by pushing code. No Dockerfile, no YAML, no Helm, no CI/CD pipelines.
Scalability and reliability: The hability scale horizontally on inexpensive compute as demand grows, and the self-healing features of Kubernetes.
Built-in multi-app support: Dokku can host many apps on a single builder, each isolated by name and route.
This guide demonstrates how to set up Dokku on UpCloud's Managed Kubernetes Service (UKS) in just a few minutes, by running a single command. It enables application developers to leverage Dokku's convenience and the power of container orchestration without needing to become Kubernetes experts upfront.
What is this good for?
This setup is great for:
- Startups: Get stated quickly on your programming language of choice, while knowing you'll be able to scale at an affordable price later.
- Fast Iteration without CI/CD: Fast iteration and simple deployments without setting up CI/CD.
- Learning or quick experimentation: If you need a way to provide a PaaS-like environment for many ephemeral or sandboxed projects.
- Microservices: Each repo can deploy to its own Dokku app with custom domains, environment variables, and internal communication between apps.
What You'll Get
This set-up will run a Dokku builder inside a Kubernetes cluster on UpCloud. This transforms Kubernetes into a platform-as-a-service (PaaS) for developers who prefer to deploy applications via Git. It installs Dokku into a namespaced environment, equips it with persistent volumes, and exposes it over a Managed Load Balancer, enabling instant deployments via a simple git push.
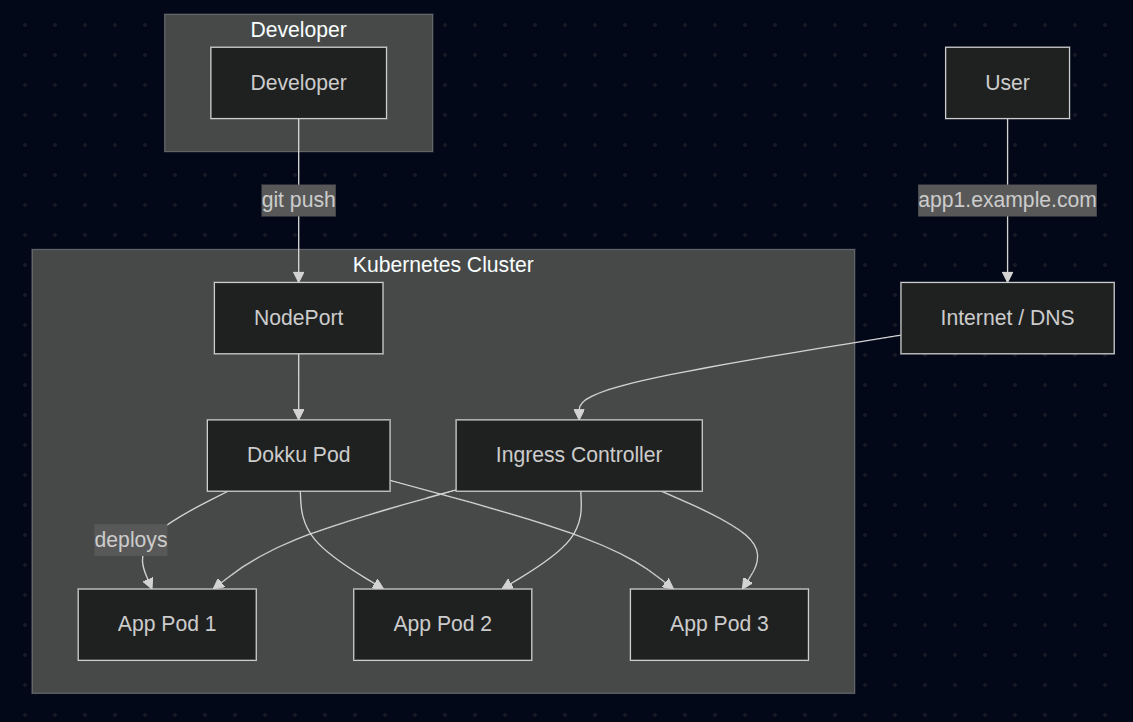
How This Works
- You initiate the deployment of Dokku on Kubernetes by running the
upctl stack deploycommand. - The command provisions a Kubernetes cluster and deploys to it a container that runs Dokku.
- The deployment will set up Dokku with the Kubernetes scheduler plugin, so any app you deploy through Dokku will run inside Kubernetes —not in the Dokku container itself, which would be the case in a traditional single-container Dokku deployment. This means that as you need to deploy more apps, you can simply scale up your Kubernetes cluster with more nodes to add capacity.
- You push your app via Git, and Dokku handles buildpacks, environment config, and routing.
- Each new application you deploy to Dokku will be made accessible through a URL that will look like this:
https://<APP_NAME>.<GLOBAL_DOMAIN>💡 A brief note about Builders
It's important to note that this set-up currently only supports apps that can be built with Herokuish (the classic Heroku buildpack model). For example, Node.js apps with a package.json, Python apps with requirements.txt, or Ruby apps with a Gemfile.
While other builder alternatives like Cloud Native Buildpacks (CNB) exist, they require direct access to a Docker daemon, which cannot be made available in this Kubernetes-based architecture without introducing additional complexity and security trade-offs.
Requirements
You'll need the following:
- An UpCloud account. Sign up for a free trial here.
- The UpCloud CLI (
upctl) and API credentials for it. See this guide for instructions on how to get started with the UpCloud CLI. - An SSH key. By default the
upctlcommand will look for~/.ssh/id_rsa, but you can specify another via parameters. - A Github personal access token with the
write:packagespermission.
Once the items above are in place you'll be able to proceed. Let's get into it.
1. Deploy Dokku
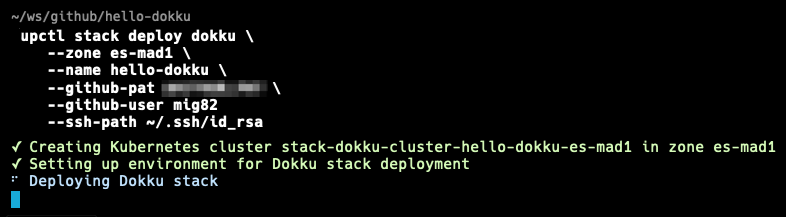
Once you have set up the UpCloud CLI with API credentials, you can just run:
upctl stack deploy dokku \
    --zone <zone-name> \
    --name <cluster-name> \
    --github-pat <github-personal-access-token> \
    --github-user <github-username> \
    --ssh-path <path-to-ssh-key>
For example:
upctl stack deploy dokku \
    --zone es-mad1 \
    --name hello-dokku \
    --github-pat ghp_b1miQ... \
    --github-user morpheus \
    --ssh-path ~/.ssh/id_rsa
This will:
- Create a Kubernetes cluster.
- Deploy the Dokku builder pod and supporting services.
- Create a Load Balancer to serve as the point of entry for your apps.
- Configure Dokku and enable a Kubernetes scheduler to deploy your apps.
- Prompt you to set
dokkuas a Git remote and for any other additional steps required.
Note that because this will deploy a Kubernetes cluster for you, the process may take a few minutes. Here's what that might look like:
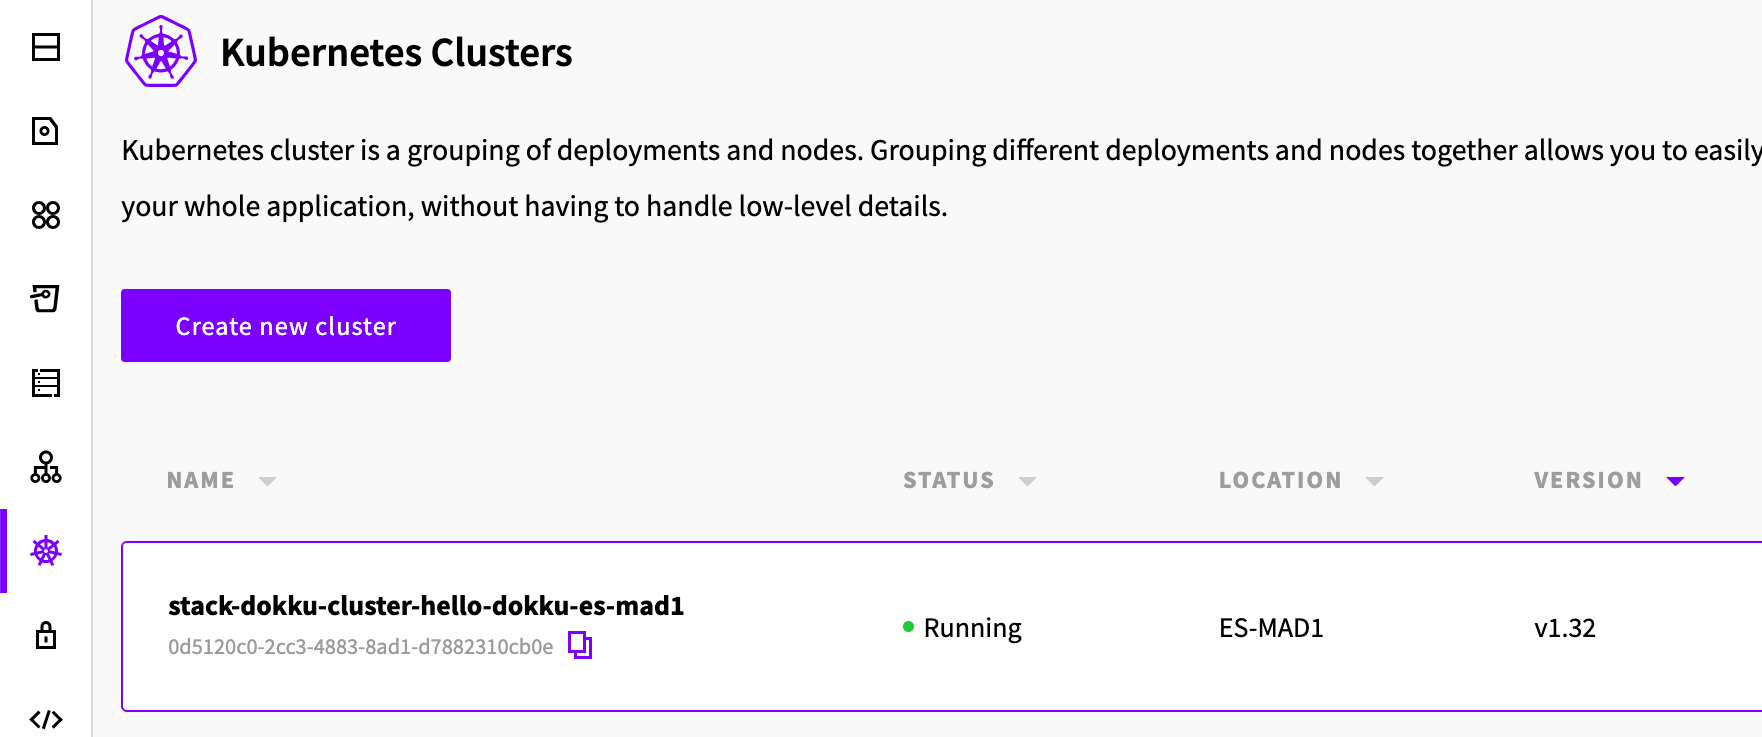
Once the process is done, if you navigate to see your Managed Kubernetes clusters in UpCloud Hub, you'll see the newly created cluster that will run Dokku and all the applications you deploy through it.
The output of the command will show you the next steps to follow.
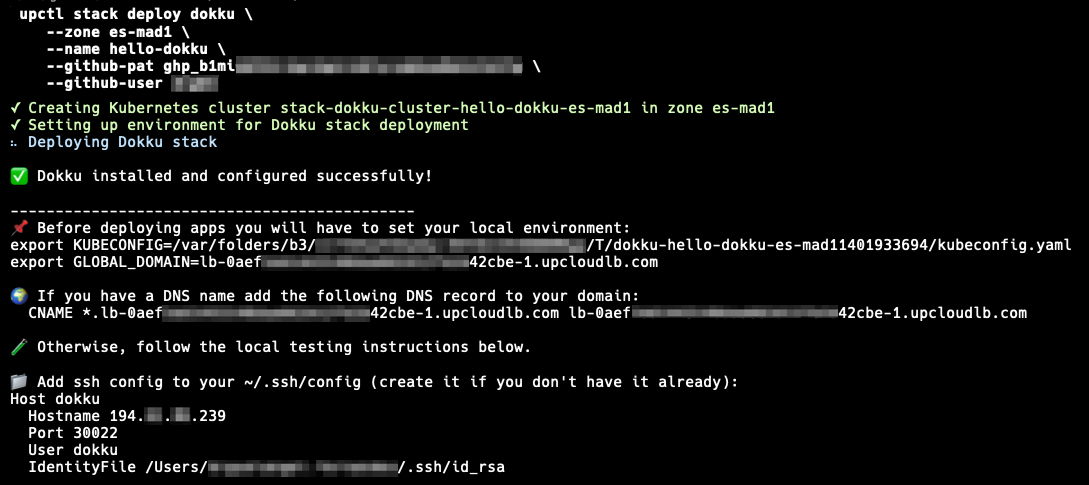
As you will see from the output, the upctl stack deploy dokku command will prompt you to do several things. We'll go over them in turn.
🎯 Start by copying and running the two export commands in the output in order to set the necessary environment variables:
# This allows you to communicate with your Kubernetes cluster.
export KUBECONFIG=path/to/kubeconfig.yaml
# This is the public hostname of the load balancer that will expose your Dokku apps.
export GLOBAL_DOMAIN=lb-....upcloudlb.com
2. Configure an SSH key to connect to Dokku
As stated in the output of the upctl stack deploy dokku command above, before you're able to connect to Dokku, first you'll have to add a new entry to your local SSH config. Once this is done, you'll be able to talk to your Dokku instance.
Edit your local ~/.ssh/config file to add the following entry.
Host dokku
  Hostname [public IP of the node where Dokku runs]
  Port 30022
  User dokku
  IdentityFile /Users/[your username]/.ssh/id_rsa
💡 The exact entry you need (including the specific public IP) is made available by the output of upctl stack deploy dokku. However, if you've lost said output, you can still find the IP by querying the nodes in your cluster.
# Get the nodes in the cluster
kubectl get nodes -o wide
The ouput will include the public IP of the node running Dokku, which is the one you need to add to the entry in ~/.ssh/config.

You can also verify the port by querying the cluster's services.
# Get the services in the cluster
kubectl get services -n dokku
The output will show you port 30022 being exposed for TCP connections.

This is the port added in the new entry in ~/.ssh/config.
3. Get a demo app to deploy
Let's find a sample app and push it to Dokku. We'll call this new project "demo-app":
# Create a common directory for all your apps.
mkdir apps && cd apps
# Clone the demo app we'll use to test with.
git clone https://github.com/heroku/node-js-sample.git demo-app
cd demo-app
4. Create and manage an app in Dokku
Now that Dokku is installed and we have a sample app to deploy, all we have to do is create this app in Dokku and push the sample code to it. To do that, we would normally need to jump into the container running Dokku inside Kubernetes in order to issue Dokku commands.
🎯 However, since running Dokku on Kubernetes comes with a few complications, we've prepared this Makefile for your convenience which will help with most of the heavy lifting and abstract most of the low level details for you.
Download it to the root of your project and then try make help to see all the convenience targets we've baked into it for you.
# Get the utility makefile we've prepared for you.
curl https://raw.githubusercontent.com/UpCloudLtd/paasup/refs/heads/main/dokku/Makefile > Makefile
# Show all the dokku commands.
make help
Armed with this makefile, let's create a new app in Dokku, so we can push our sample code to it.
# Create a new app in Dokku
make create-app APP_NAME=demo-app
Note that with this makefile, you can forward any Dokku commands to the Dokku pod inside Kubernetes by using the dokku target in the makefile. For example, you can list this and any other future apps you create like this:
# List all the apps you've created.
make dokku apps:list
💡 If you'd like a user-friendly list of frequently-used Dokku commands that you should master, there are several cheatsheets out there you can try. Here's one such Dokku cheatsheet for convenience.
If you're familiar with how Dokku on Kubernetes works, and prefer to invoke Dokku commands directly jump to the last section in this guide for advanced users.
5. Add Dokku as a Git remote
The process of deploying an application to Dokku is modeled after the Heroku deployment experience, which relies on Git to deploy, rather than using CI/CD pipelines or manual deployment commands. You simply push your code to a special Git remote that Dokku manages.
To add this special Git remote run:
git remote add dokku dokku@dokku:demo-app
git remote show
If all goes well, the output from the last command above should be this:
dokku
origin
Contrats! This shows you're able to talk to Dokku 🎉
Now, every time you run git push to this dokku remote, the Dokku server will receive the code, detect the type of application it is (detect a package.json for Node.js, a requirements.txt for Python, etc), run the appropriate build, create an image and schedule it to the cluster.
Now let's push our sample app to Dokku.
git push dokku masterThe system will prompt you to confirm you want to connect with the new Dokku server.
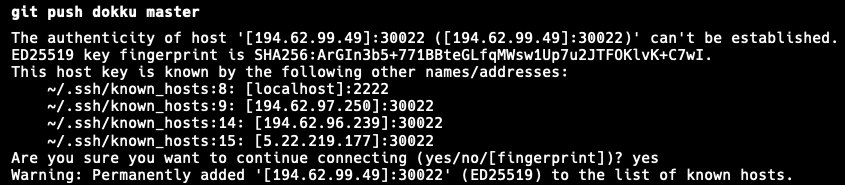
Once done, the output of the command will show you the subdomain where the application will be served.
But, you still need one more step before you can access your app over your web browser.
4. Access your apps from your web browser
For development, you'll have to edit your local /etc/hosts file to map the public IP of the ingress controller to the subdomain for each Dokku app you create, in order to be able to access it through your web browser.
💡 As instructed in the output of upctl stack deploy dokku you'll need the public IP of the ingress controller for your cluster. You can find it by first searching for the ingress-nginx service in the Kubernetes cluster and then using the dig command to get it's public IP again.
# Find the ingress controller
kubectl get services -n ingress-nginx
The output will look like this:

Then use dig +short on the public hostname of the ingress-nginx service, found underneath the EXTERNAL-IP column of the output.
# Get the public IP of the ingress controller
dig +short lb-0aef2...42cbe-1.upcloudlb.com
The output will be the public IP you must speficy in the new entry of your local /etc/hosts file.

💡 Note: You can also find the public hostname of the ingress services under the Load Balancers section in Hub.
Once edited, this is what your local /etc/hosts file might look like:
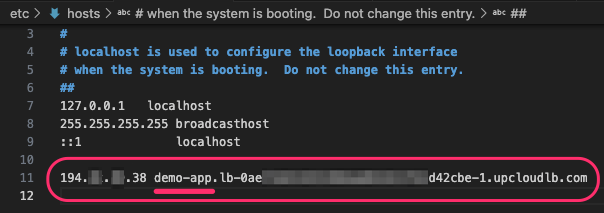
Note that you must not include the protocol prefix —e.g. https://
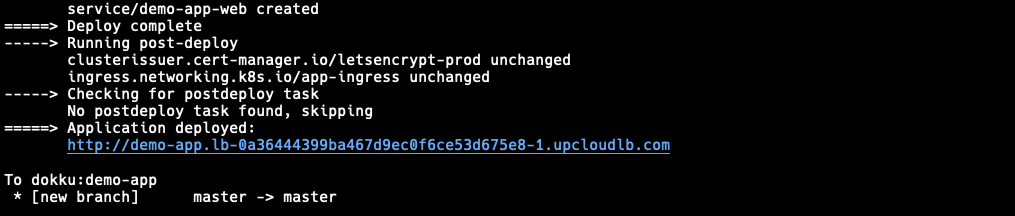
Now open a web browser and navigate to the URL reported in the output of git push dokku master:
https://demo-app.lb-***-1.upcloudlb.com/About deploying other apps
One of the most convenient aspects of this set-up is that you can deploy as many apps to Dokku as you like, and it will schedule them in your Upcloud Kubernetes cluster and expose them through subdomains of the main load balancer's public hostname. For example, if you follow the same process for a second app called second-app you will be able to access it at:
https://second-app.lb-***-1.upcloudlb.comHow to make the apps publicly available
The URL's we are using, of the form lb-***-1.upcloudlb.com, point to ingress load balancers deployed in Kubernetes. This means TLS in our demo won't work. To make these apps publicly available over HTTPS, you'll need a DNS name. Once you have a DNS name, like example.com, you'll be able to add the CNAME record for the UpCloud Load Balancer to your domain's records in your DNS provider. The CNAME record will look something like this:
CNAME *.lb-0a364...75e8-1.upcloudlb.com lb-0a364...75e8-1.upcloudlb.comOnce this is done, users will be able to access your applications built and deployed through Dokku over subdomains of your configured domain like first-app.example.com and second-app.example.com and TLS will work.
Advanced users
If you prefer to not use the convenience makefile we provided above and would rather interact directly with Dokku, first you'll need to find the name of the Dokku pod.
Once we have it, you'll be able to use kubectl exec to run Dokku commands remotely on it:
# Find the Dokku builder pod's name.
kubectl get pods -n dokku
The output of the kubectl get pods command above will look like this:

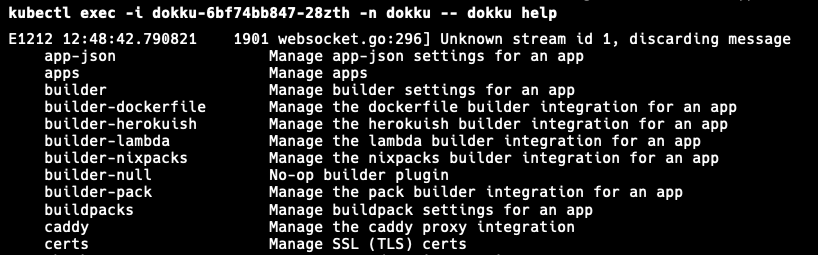
Once you have the name of the Dokku pod, you can then issue remote Dokku commands by prefixing them with kubectl exec -i. For example, this is how you'd run the dokku help command:
# Invoke Dokku commands in the pod found above.
kubectl exec -i [dokku pod name] -n dokku -- dokku help
The output of the kubectl exec command above will look like this:
For brevity, or if you'd like to be able to execute the Dokku commands directly in the Dokku pod, just jump into it using the kubectl exec -it command:
kubectl exec -it [dokku pod name] -n dokku -- /bin/bashOnce inside the Dokku pod, you can run Dokku commands plainly, like for example dokku version.
The output of that would look like this:

Final thoughts
This stack provides a flexible way to run Heroku-style Git-based workflows on modern Kubernetes infrastructure. Whether you're bootstrapping a new SaaS, building internal tools, or managing multiple clients, this Dokku-on-Kubernetes approach gives you the best of both worlds: simplicity and scalability.
We aim to iterate over this guide (and soon others like it), so if you have any feedback or would like to contribute, please raise an issue or MR in our upctl repository