
OIDC cluster authentication is in public beta and subject to change.
OIDC cluster authentication on Managed Kubernetes
OIDC cluster authentication lets users sign in to a Managed Kubernetes cluster with an existing identity provider, such as Google, Microsoft Entra ID, Okta, Keycloak, or Dex, instead of sharing the cluster's static admin kubeconfig. The provider proves who the user is; you decide what they can do with Kubernetes role-based access control (RBAC).
Note
What it does and why you would use it
An OIDC issuer added to a cluster tells the Kubernetes API server to trust ID tokens from that provider. When a user runs kubectl, a helper plugin gets an ID token from the provider and sends it to the API server, which validates the token and maps its claims to a Kubernetes username and groups.
This gives you:
- One identity per person, tied to your provider, instead of a shared credential.
- Central offboarding: disable someone in the provider and they can no longer get new tokens.
- Access that is scoped by RBAC, so authentication and authorization stay separate.
Authentication only proves identity. A freshly authenticated user has no permissions until you bind their username or a group to a Role or ClusterRole. OIDC does not replace anything: the static admin kubeconfig from GET /kubernetes/{uuid}/kubeconfig keeps working. If it has been shared, contact UpCloud support to rotate it.
How it works
- You register one or more issuers on the cluster. Each issuer has an issuer URL, a list of accepted audiences, and rules for mapping token claims to a Kubernetes identity.
- A user logs in to your provider through kubelogin (the
kubectl oidc-loginplugin), which caches the resulting ID token. kubectlsends the token to the API server. The API server checks the signature against the issuer's published keys, checks the audience, applies your claim mappings, and runs any validation rules.- RBAC decides whether the resulting user is allowed to perform the request.
Each issuer you add becomes one authenticator in the cluster's Kubernetes structured authentication configuration. For the upstream token-validation mechanism, see the Kubernetes OpenID Connect tokens documentation.
Prerequisites
- A Managed Kubernetes cluster on Kubernetes 1.34 or newer. On an older cluster, adding an issuer fails with
OIDC authentication configuration is supported from Kubernetes version 1.34.0 onwards. - An OIDC identity provider that publishes a discovery document at
<issuer-url>/.well-known/openid-configurationand issues ID tokens. GitHub on its own is not an OIDC provider; see GitHub and Dex. - Your UpCloud API token in an environment variable, used as a bearer token. If you do not have one yet, see How to create and use UpCloud API tokens.
export UPCLOUD_TOKEN=ucat_...kubectland kubelogin installed on each user's machine. Install kubelogin with Krew or Homebrew:
kubectl krew install oidc-login
# or
brew install kubelogin
For Windows and other install methods, see the kubelogin setup guide.
Set up an OIDC provider
The setup is the same for any OIDC provider:
- Create an OAuth client (some providers call it an application) in your provider.
- Note its client ID. This becomes the issuer audience the cluster checks for.
- If the provider issues a client secret, keep it. Each user supplies it at login.
Providers differ mainly in what they name these things and whether they issue a groups claim. The rest of this section walks through Google as one worked example; Microsoft Entra ID, Okta, Keycloak, and Dex follow the same three steps against their own consoles.
Example: Google
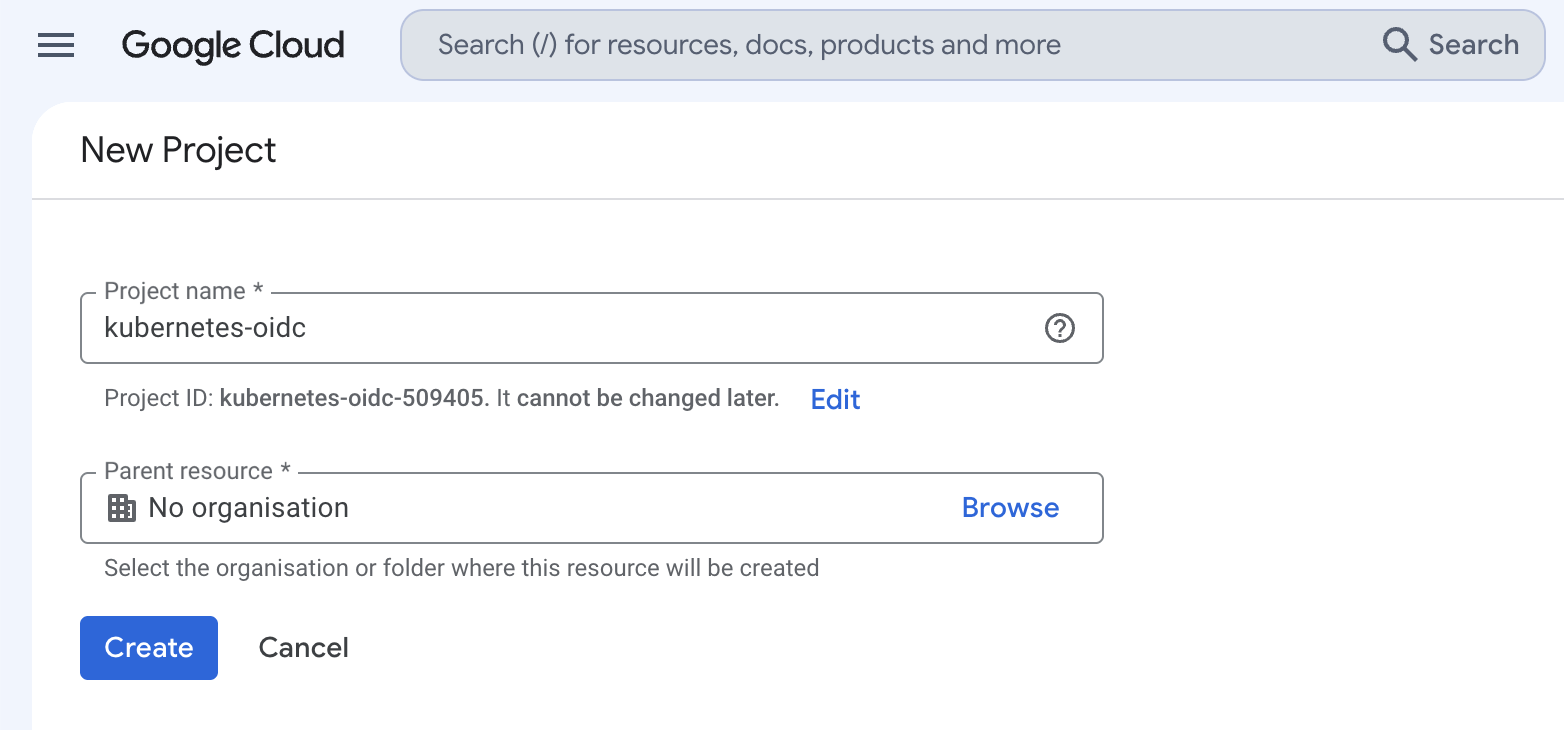
Create or select a Google Cloud project.
- In the project picker in the top bar, click New project, give it a name, and click Create (or pick an existing project).
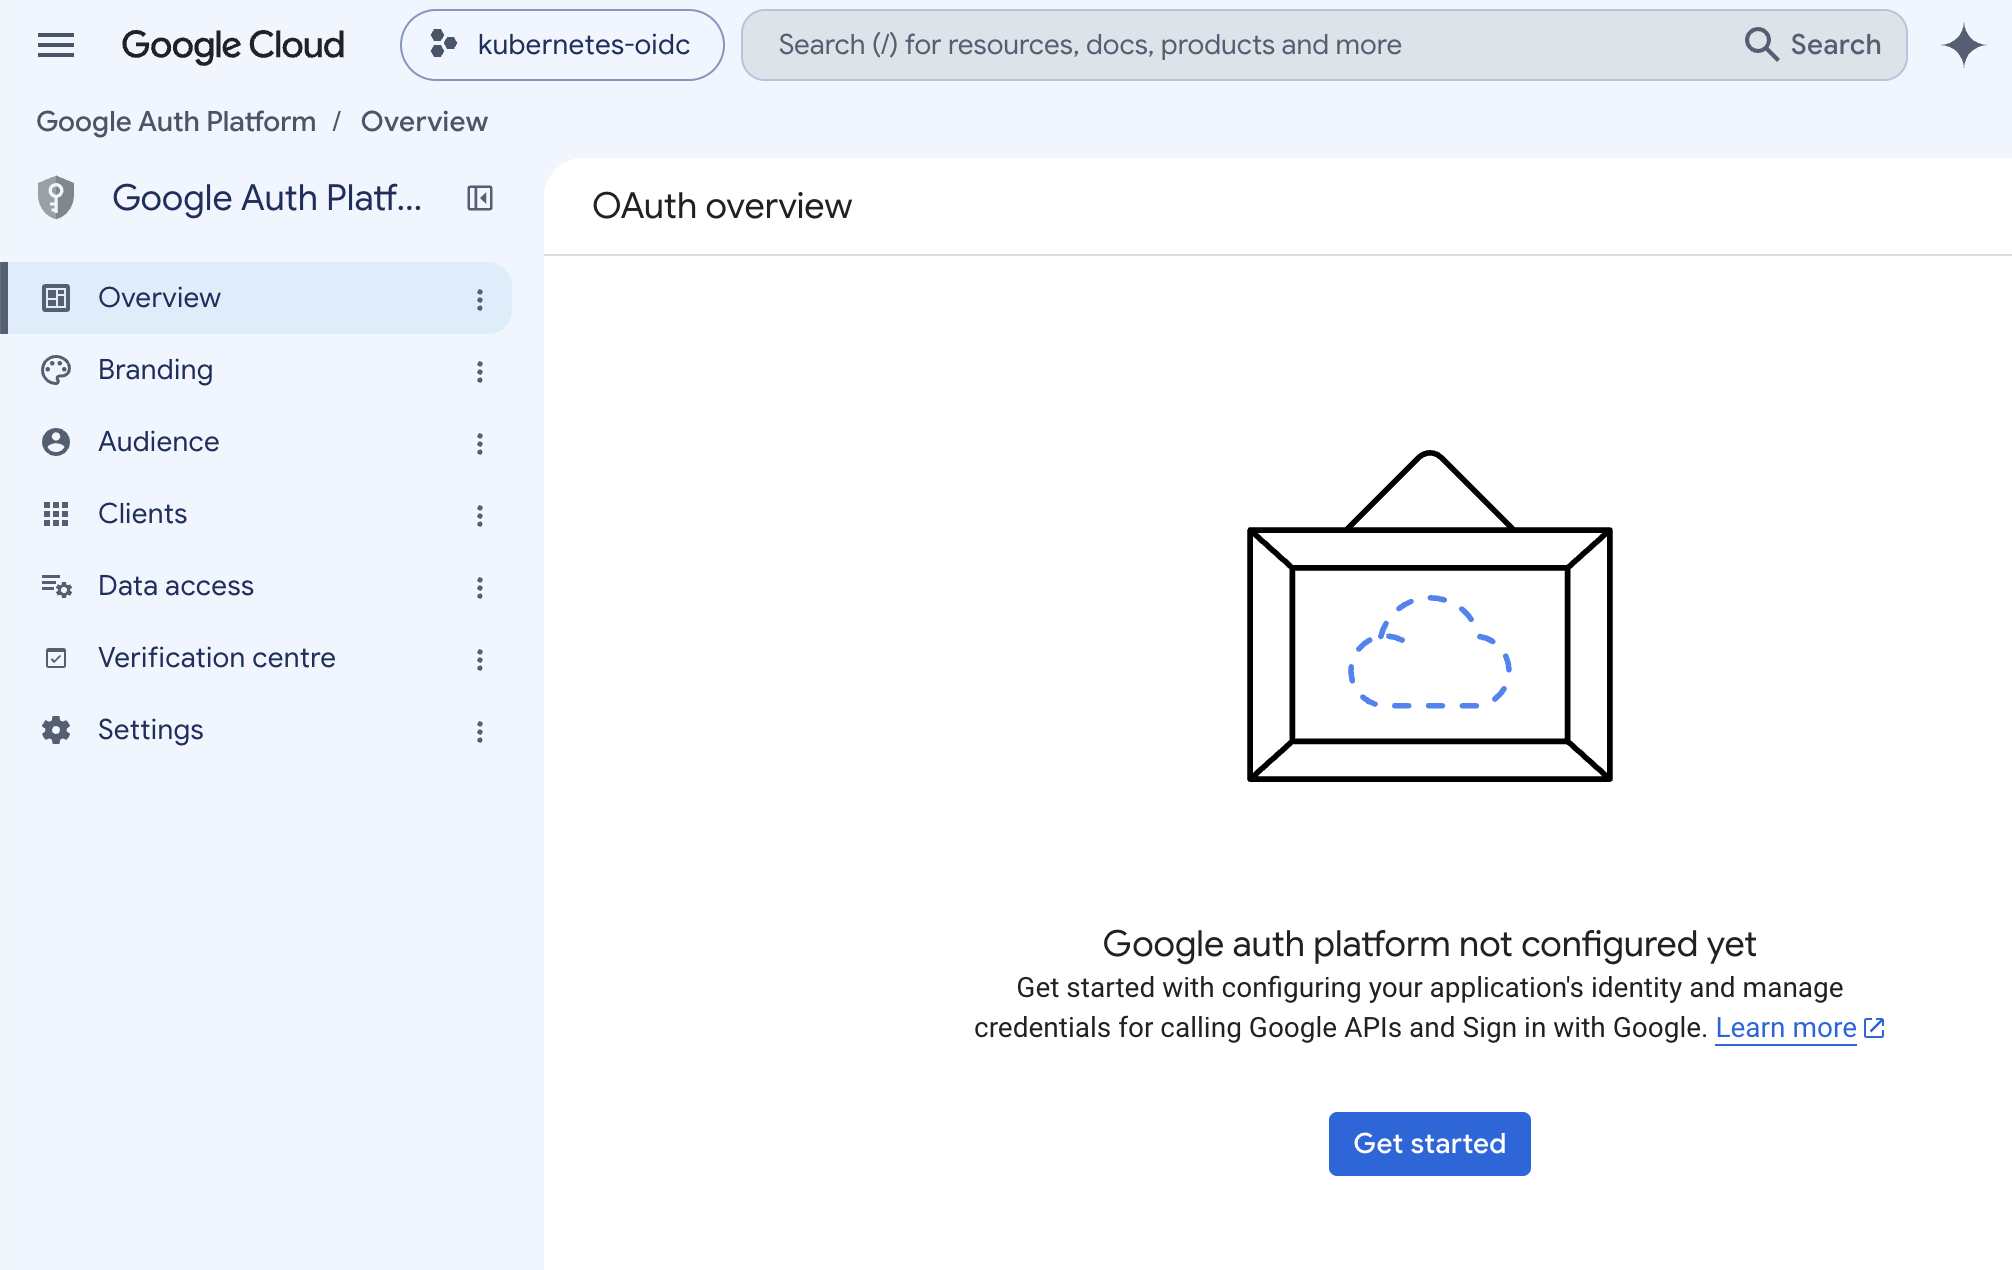
Open menu > APIs and services > OAuth consent screen. This opens the Google Auth Platform; on a new project it shows "Google Auth Platform not configured yet", so click Get started.
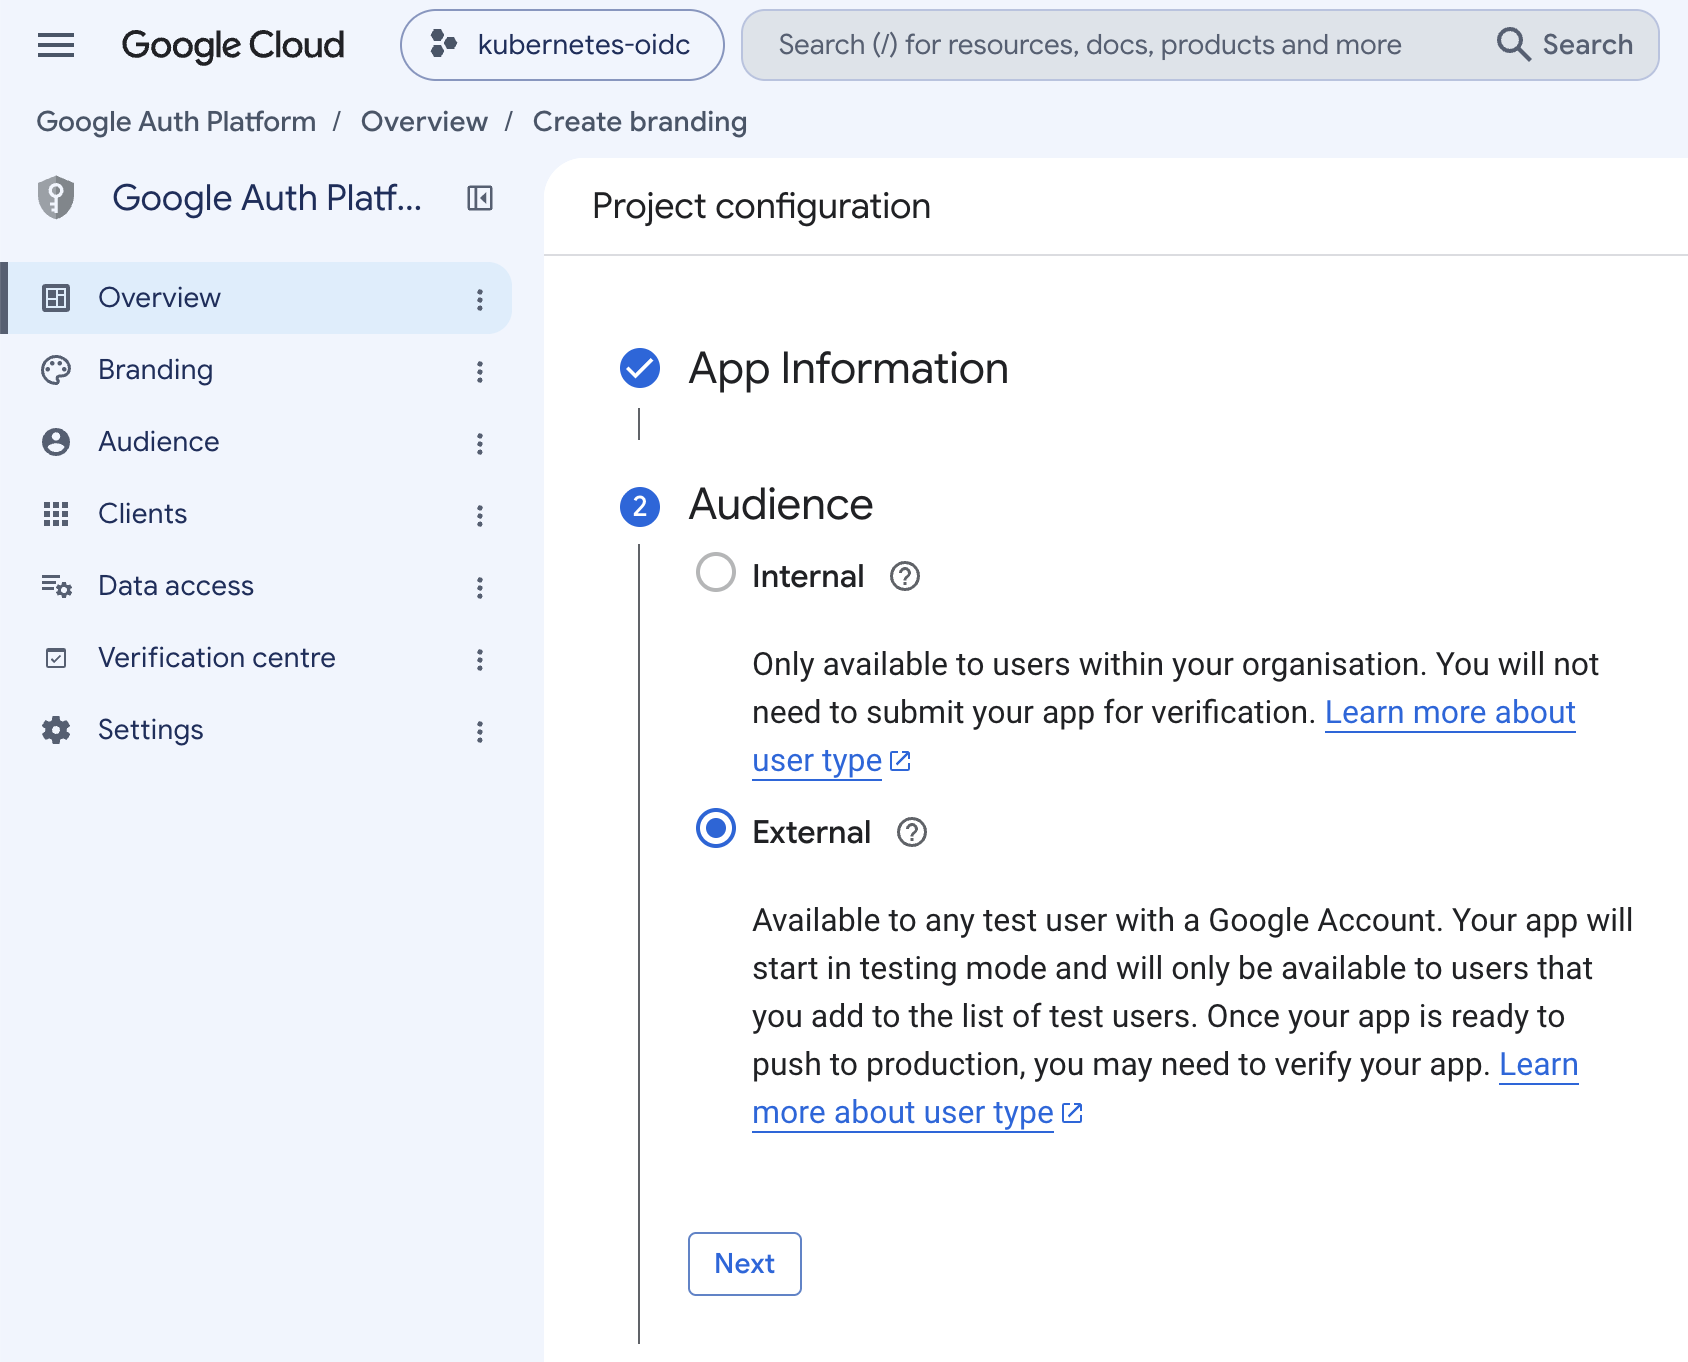
Work through the project configuration wizard:
- App information - the app name users see on the sign-in screen (choose one your team will recognize) and a support email.
- Audience - choose Internal for a Google Workspace organization, or External for personal Google accounts, which starts the app in testing mode.
- Contact information - an email address Google can use to reach you.
- Finish - agree to the policy and click Create.
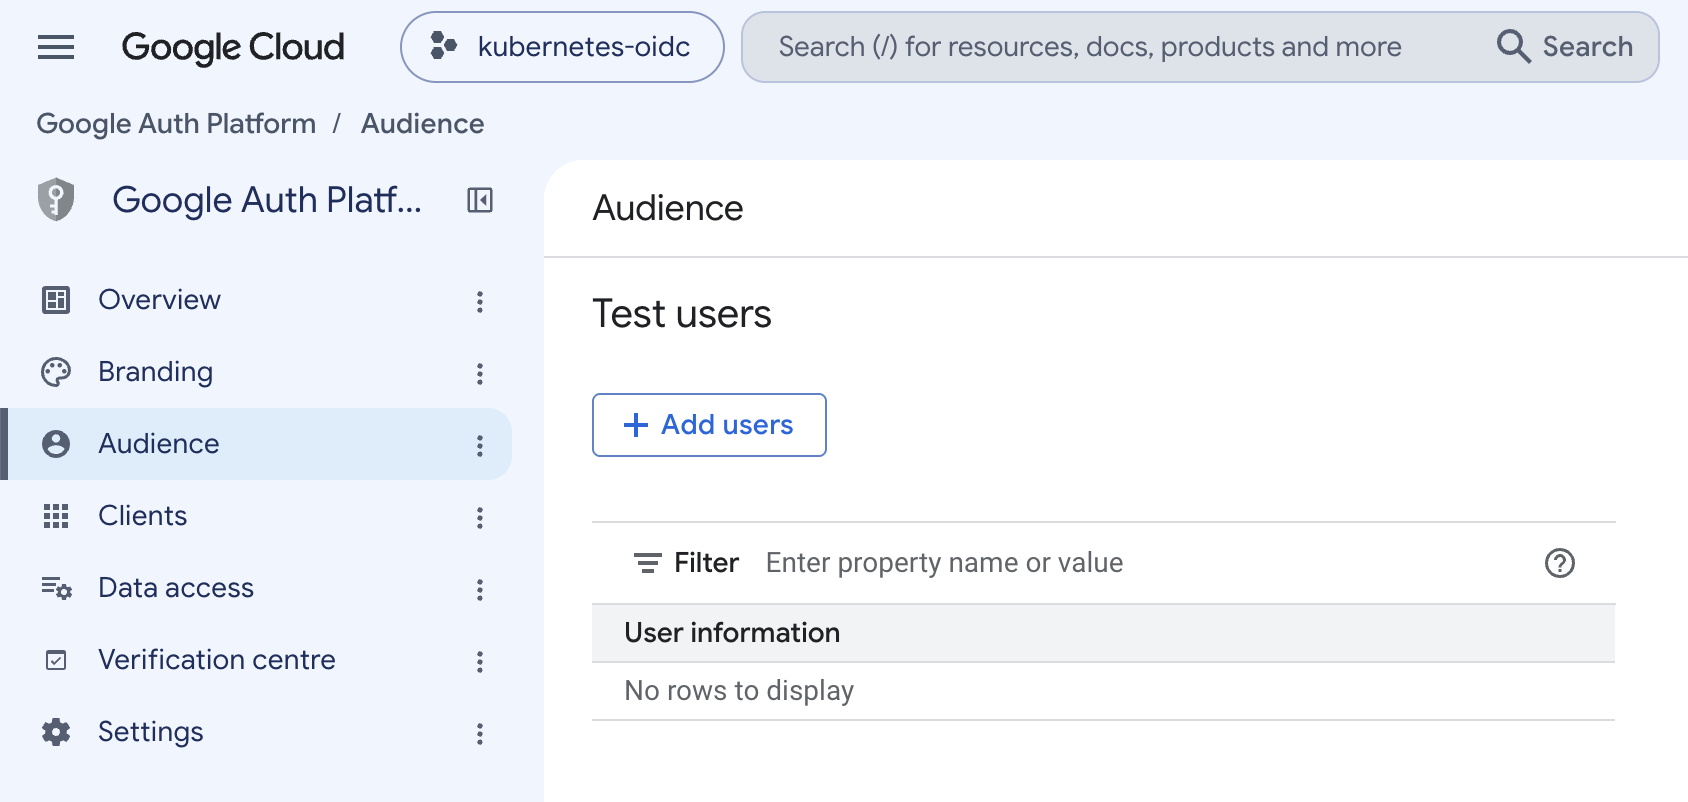
After the app is created, if you chose External, add the accounts that may sign in.
- Open Audience in the left menu and click Add users under Test users.
- While the app is in testing mode, only the listed test users can sign in; Google refuses any other account before a token reaches the cluster.
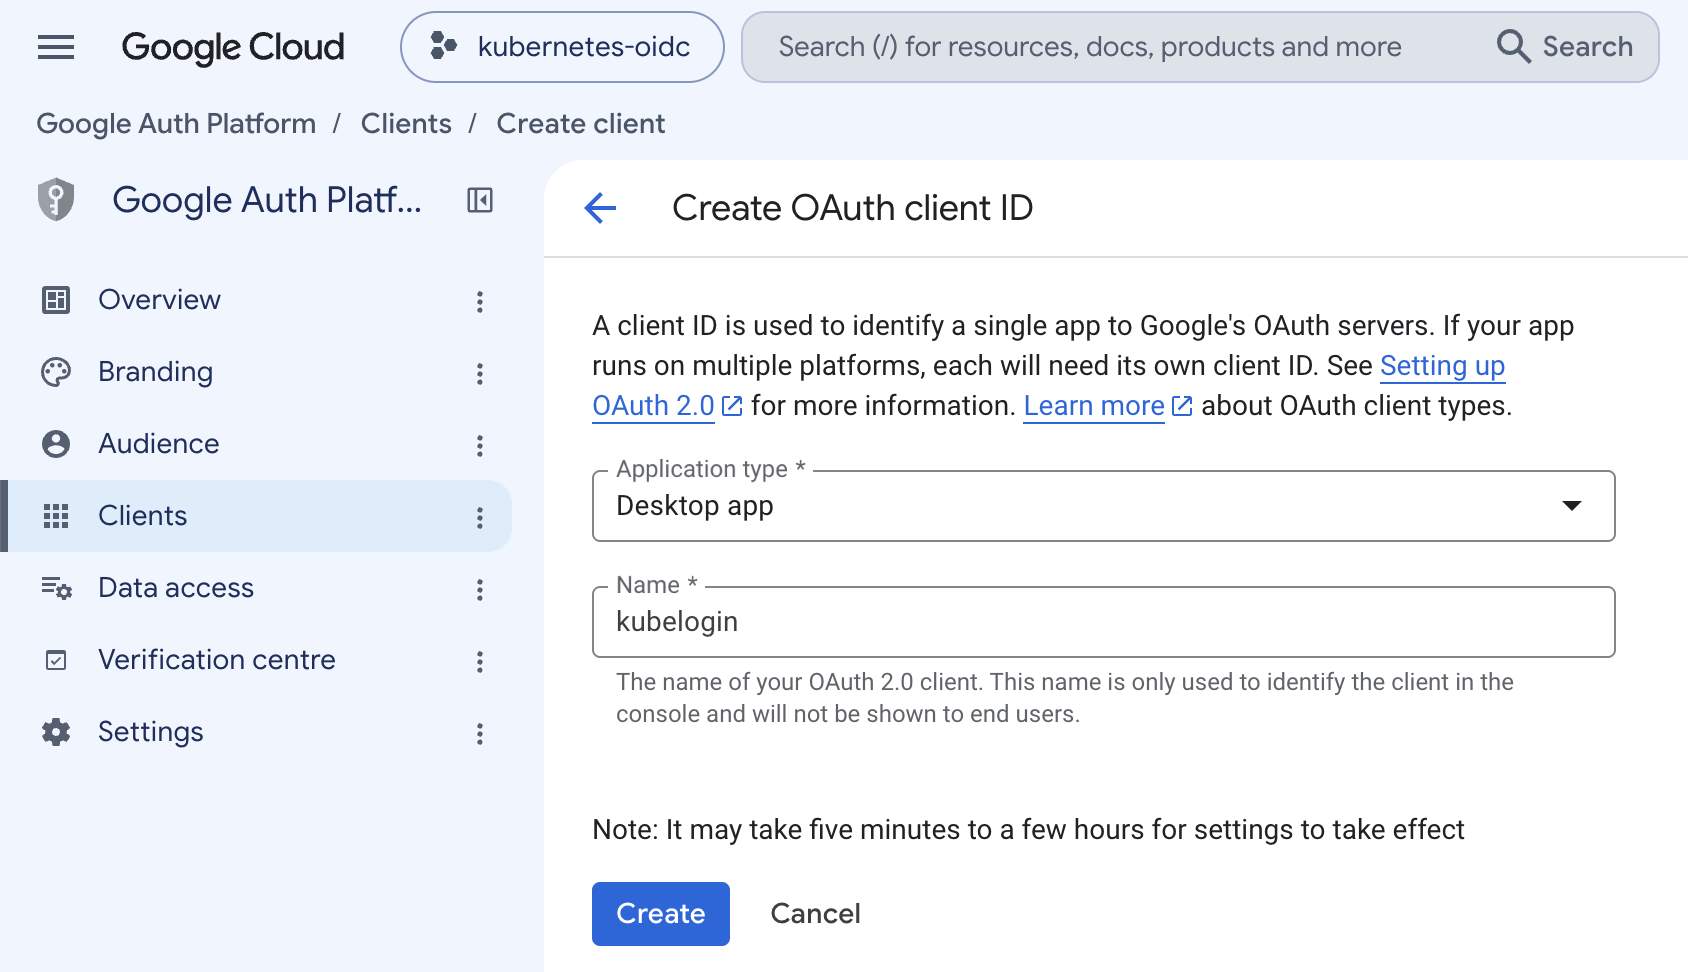
Create the client: open Clients in the left menu, click Create client, choose application type Desktop app, name it, and click Create.
- Use a Desktop app client, not a Web application client: every user's kubeconfig carries the client secret, and Google documents an installed (Desktop) app's secret as not confidential, whereas a Web application secret is meant to stay confidential.
- A Desktop app client accepts a redirect to any loopback address, so there are no redirect URIs to register and kubelogin's local callback port works without extra configuration.
- No scopes need adding and no APIs need enabling;
openid,email, andprofileare available by default.
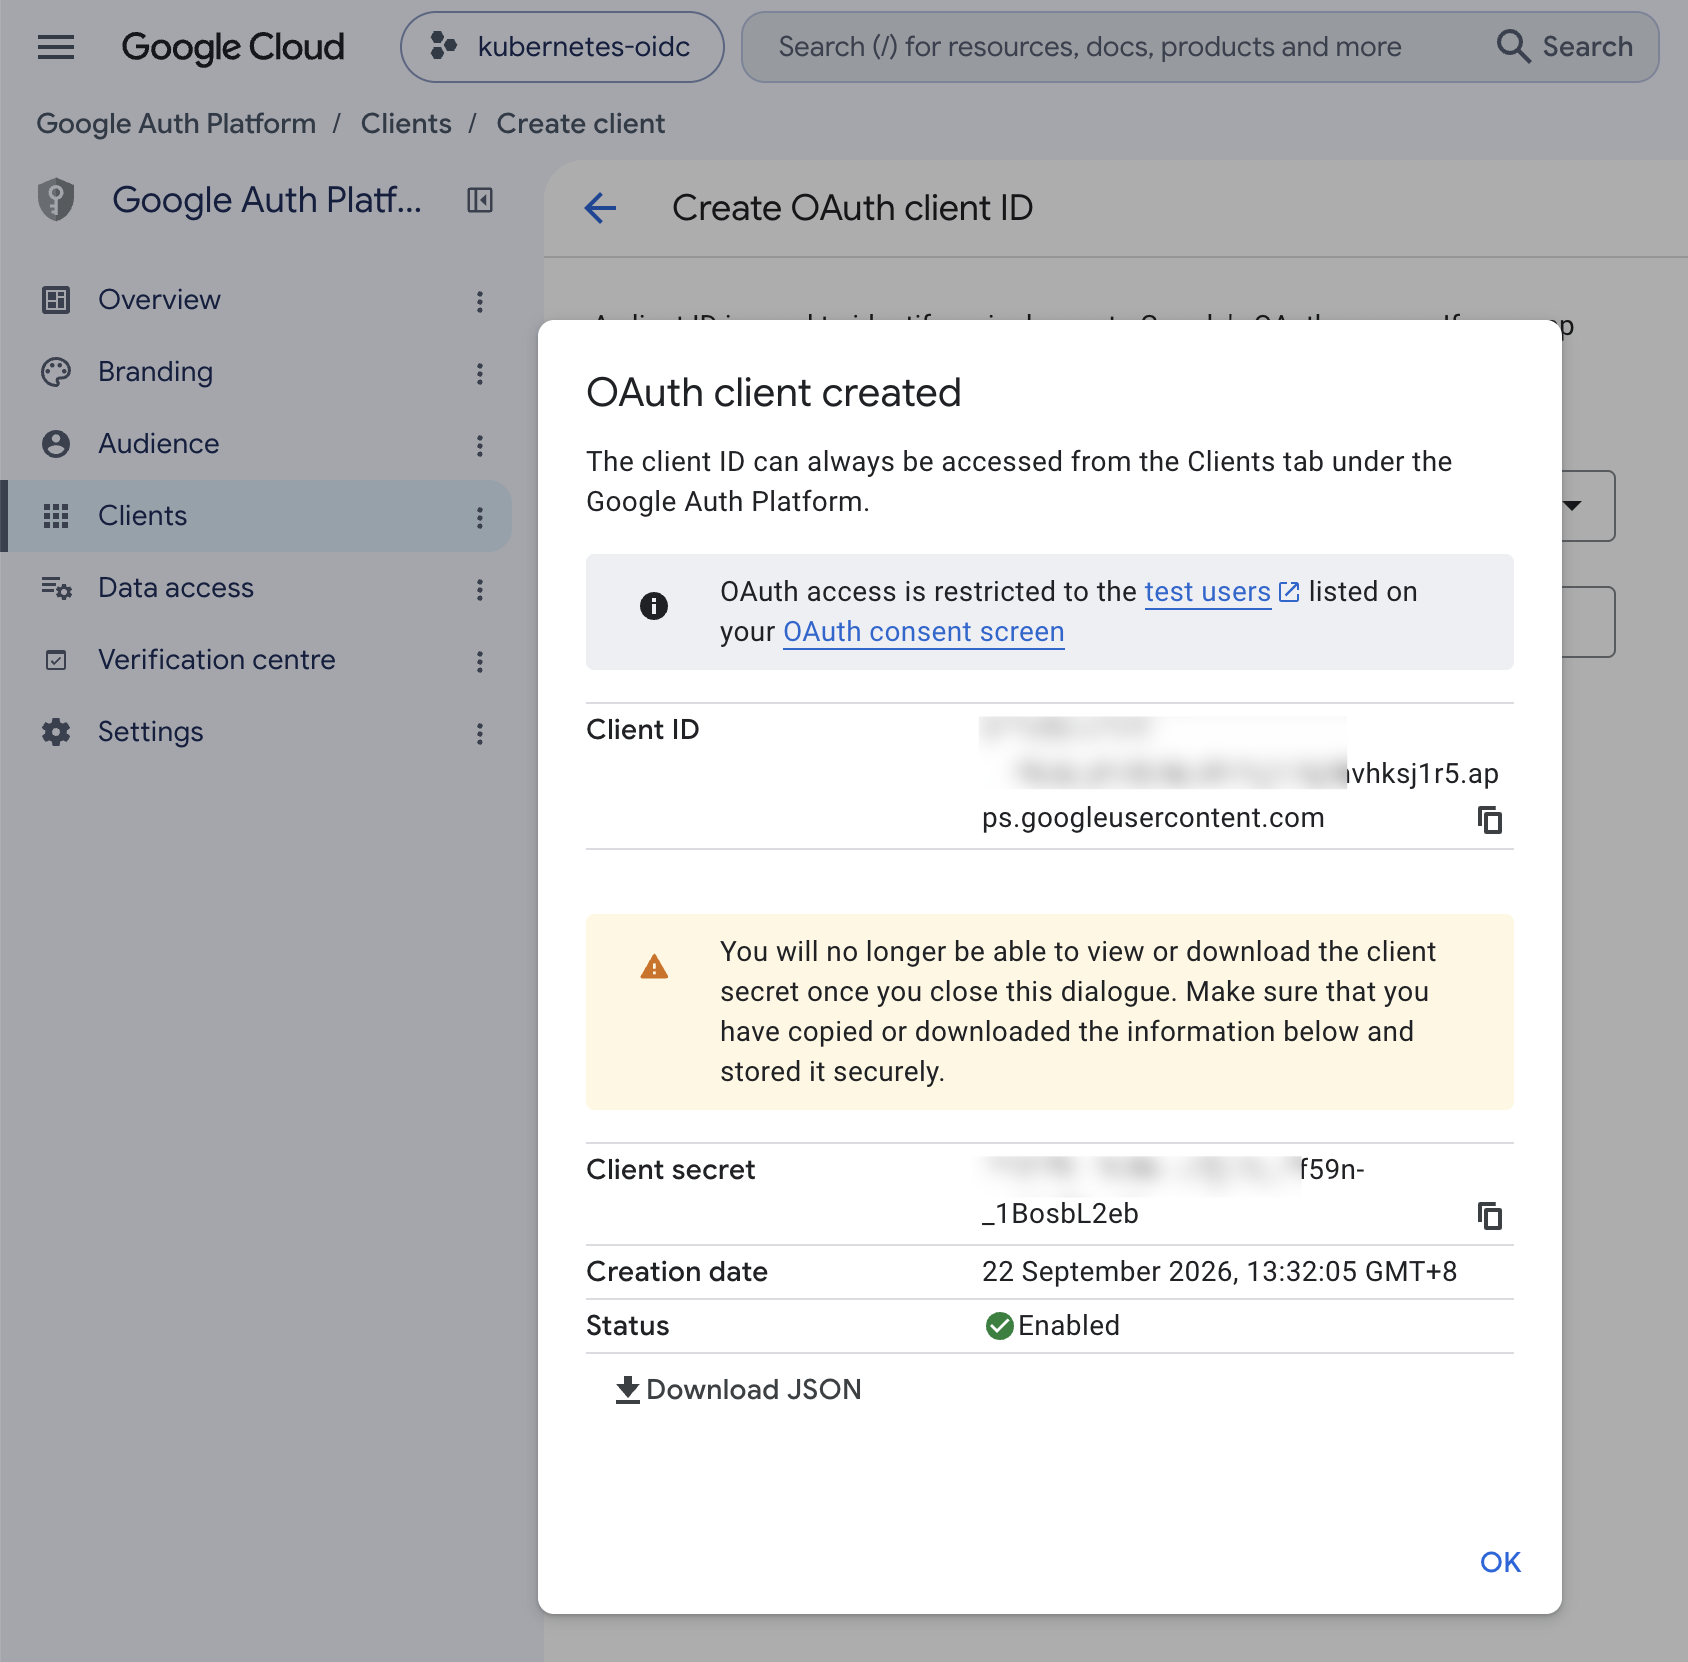
In the OAuth client created dialog, copy the client ID and client secret, or use Download JSON.
- Copy the secret before you close the dialog, because Google does not show it again.
- The client ID becomes the issuer audience. The client secret is not stored in the cluster and is not embedded in the generated kubeconfig; each user supplies it with
--oidc-client-secret(covered below).
Google ID tokens include sub, email, email_verified, and name, but no groups claim. On Google you therefore bind RBAC by username. Google Workspace tokens also carry an hd (hosted domain) claim, which you can require with a validation rule to restrict logins to your organization.
Add an issuer with the API
Issuers live under https://api.upcloud.com/1.3/kubernetes/<cluster-uuid>/authentication, and every call authenticates with -H "Authorization: Bearer $UPCLOUD_TOKEN". The Managed Kubernetes API reference lists every endpoint, request body, and response schema; this section shows the calls that get an issuer working. A GET on the endpoint returns the issuers as a JSON array, [] on a new cluster.
Minimal issuer
The smallest issuer needs a name, an issuer URL, at least one audience, and a username mapping. Save the body to a file:
cat > issuer.json <<'JSON'
{
  "name": "google",
  "issuer_url": "https://accounts.google.com",
  "audiences": ["<client-id>.apps.googleusercontent.com"],
  "claim_mappings": {
    "username": { "claim": "email", "prefix": "oidc:" }
  }
}
JSON
Then post it:
curl -s -X POST -H "Authorization: Bearer $UPCLOUD_TOKEN" \
  -H "Content-Type: application/json" \
  -d @issuer.json \
  https://api.upcloud.com/1.3/kubernetes/<cluster-uuid>/authentication
The API responds with 201 and echoes the stored issuer. The name must be lowercase letters, digits, and hyphens.
Note
A username mapping is required. If you omit claim_mappings.username, the API rejects the request with claimMappings.username: Required value: claim or expression is required. When you set claim, you must also set prefix (use an empty string "" for no prefix).
Note
When you map the username from the email claim, Kubernetes automatically requires the token's email_verified claim to be true. A token with email_verified: false is rejected as Unauthorized even when you set no validation rule, while a token that omits email_verified is accepted. This applies only to the email claim.
The API server picks up a new issuer within about a minute. Until then, logins return Unauthorized.
Prefixes and why they matter
prefix is prepended to the claim value to form the Kubernetes identity. With email and prefix: "oidc:", the user [email protected] becomes oidc:[email protected]. Prefixing keeps provider identities separate and prevents a token from impersonating a built-in Kubernetes user or group. Always prefix usernames and groups. See Protect built-in groups for why this is not optional.
A fuller issuer
A production issuer usually maps groups as well, restricts which tokens are accepted, and guards against privileged group names. This example uses a generic provider that issues a groups claim:
cat > issuer-full.json <<'JSON'
{
  "name": "my-provider",
  "issuer_url": "<issuer-url>",
  "audiences": ["<client-id>"],
  "audience_match_policy": "MatchAny",
  "claim_mappings": {
    "username": { "claim": "email", "prefix": "oidc:" },
    "groups":   { "claim": "groups", "prefix": "oidc:" }
  },
  "claim_validation_rules": [
    { "expression": "claims.email.endsWith('@example.com')", "message": "Only example.com accounts may sign in." }
  ],
  "user_validation_rules": [
    {
      "expression": "user.groups.all(g, !g.startsWith('system:'))",
      "message": "Groups must not start with the system: prefix."
    }
  ]
}
JSON
Then post it:
curl -s -X POST -H "Authorization: Bearer $UPCLOUD_TOKEN" \
  -H "Content-Type: application/json" \
  -d @issuer-full.json \
  https://api.upcloud.com/1.3/kubernetes/<cluster-uuid>/authentication
To change an issuer that already exists, PUT the full body to .../authentication/<name> instead; see Manage issuers.
On Google, drop the groups mapping and bind by username; Google issues no groups claim.
Notes on the fields:
audiencesaccepts more than one value. If you list more than one, setaudience_match_policytoMatchAny, or the API returnsaudienceMatchPolicy must be MatchAny for multiple audiences.claim_mappings.groupsuses the sameclaimplusprefixform as the username. If a token does not include the mappedgroupsclaim, the login still succeeds - the user just gets no groups from the provider. So it is safe to configure a groups mapping even when some tokens lack the claim.claim_validation_rulesreject a token before it authenticates;user_validation_rulesrun against the final mapped user (user.username,user.groups), typically to block privileged names. Each rule is either aclaimwith arequired_value(a plain string comparison, good for a string claim such as a Google Workspacehddomain) or a CELexpressionwith amessage. Use the CEL form for anything that is not a plain string match:required_value: "true", for example, does not match a booleanemail_verified: true. These two rule sets, along with theuidandextramappings and expression-based mappings, are API-only and cannot be set in the Control Panel. For the field names and CEL rule syntax, see the Kubernetes structured authentication configuration and CEL documentation.- For a provider that serves its discovery endpoint with a private or self-signed certificate, add
certificate_authoritywith a base64-encoded PEM CA bundle. The API server then trusts that CA for the issuer's endpoint.
Get the OIDC kubeconfig and log in
The API generates a kubeconfig for an issuer, built around kubelogin:
curl -s -H "Authorization: Bearer $UPCLOUD_TOKEN" \
  https://api.upcloud.com/1.3/kubernetes/<cluster-uuid>/authentication/google/kubeconfig \
  | jq -r '.kubeconfig' > oidc.kubeconfig
The generated kubeconfig runs kubectl oidc-login get-token with the issuer URL, the client ID (the issuer's first audience), and the openid, email, and profile scopes. It contains no client secret and no long-lived credential. If your provider has more than one audience, add ?audience=<audience> to the same URL to choose which one becomes the client ID. Quote the URL, because the ? and = are special in some shells:
curl -s -H "Authorization: Bearer $UPCLOUD_TOKEN" \
  "https://api.upcloud.com/1.3/kubernetes/<cluster-uuid>/authentication/google/kubeconfig?audience=<other-audience>" \
  | jq -r '.kubeconfig' > oidc.kubeconfig
Google requires the client secret even for a Desktop app client, but the generated kubeconfig does not include it. Each user adds it by editing oidc.kubeconfig and putting one line under the existing args:
- --oidc-client-secret=<client-secret>Now log in. The first command that talks to the cluster opens your browser to sign in:
KUBECONFIG=oidc.kubeconfig kubectl get podsGoogle first shows an account chooser ("Choose an account to continue to your app name"), then a consent screen ("Sign in to your app name") that lists the name and profile picture and the email address the app will receive. Click Continue.
After you approve the sign-in, kubelogin caches the token and the command runs. Confirm the identity the cluster sees:
KUBECONFIG=oidc.kubeconfig kubectl auth whoamiOn Google this shows a username of oidc:<your-email> and only the system:authenticated group, because Google issues no groups claim:
ATTRIBUTE   VALUE
Username    oidc:[email protected]
Groups      [system:authenticated]
kubelogin caches tokens under ~/.kube/cache/oidc-login. Clear the cache to force a fresh login:
kubectl oidc-login cleanGrant access with RBAC
A user who has authenticated still has no permissions. Before you bind anything, kubectl fails:
Error from server (Forbidden): pods is forbidden: User "oidc:[email protected]" cannot list resource "pods" in API group "" at the cluster scopeThe username and groups in that message are what your claim mappings produced. Bind them with Kubernetes RBAC. Use a ClusterRoleBinding for cluster-wide access or a RoleBinding for a single namespace.
Bind a username:
kubectl create clusterrolebinding alice-view \
  --clusterrole=view \
  --user="oidc:[email protected]"
Bind a group (for providers that issue a groups claim):
kubectl create clusterrolebinding platform-admins \
  --clusterrole=edit \
  --group="oidc:platform-admins"
After the binding, the same command succeeds. Confirm which identity the cluster sees with kubectl auth whoami:
KUBECONFIG=oidc.kubeconfig kubectl auth whoamiATTRIBUTE VALUE
Username oidc:[email protected]
Groups [oidc:platform-admins system:authenticated]If a user logs in but still gets Forbidden, run kubectl auth whoami first. It shows the exact username and groups the cluster sees. If those do not match the username or group in your RBAC binding, that is the cause - usually a missing or wrong prefix.
Protect built-in groups
Kubernetes treats the group system:masters as cluster-admin, and that binding cannot be removed. If your issuer maps groups without a prefix and a provider token carries a group named system:masters, the user is granted cluster-admin. Guard against it with both of these:
Prefix every group mapping with
prefix: "oidc:"(or any prefix), so a provider group can never equal asystem:group.Reject
system:groups with a user validation rule:"user_validation_rules": [ { "expression": "user.groups.all(g, !g.startsWith('system:'))", "message": "Groups must not start with the system: prefix." } ]This rule rejects a token whose mapped groups include a
system:name, and it does not lock out normal users: the automaticsystem:authenticatedgroup is added after the rule runs, so legitimate logins with non-system groups still succeed.
Revocation is not immediate
Two different delays apply when you take access away:
- Issuer changes (add, update, delete) reach the API server within about a minute. After that, a deleted issuer's tokens are refused, and a live session stops working once the change takes effect; a cached token can keep working for up to about a minute after its issuer is deleted, then fails.
- Disabling a user in your provider does not cut existing access at once. A cached ID token stays valid until it expires, and the lifetime is set by the provider (a Google ID token lasts one hour). If kubelogin also holds a refresh token, it can obtain new ID tokens without another login until that refresh token stops working. Whether a refresh token is issued depends on the provider and the requested scopes: some issue one only when you add the
offline_accessscope, others (for example Keycloak) return one by default, and Google issues one when the client usesaccess_type=offline. If you need logins to expire quickly, check what your provider issues and keep its token lifetimes short. To force a re-login on one machine, runkubectl oidc-login clean.
Manage issuers
All issuer operations use the same .../authentication endpoint with the Bearer token. The Managed Kubernetes API reference has the exact requests and response schemas; the behaviour worth knowing before you use them:
- Read:
GET .../authenticationreturns every issuer as a JSON array;GET .../authentication/<name>returns one. - Update one issuer:
PUT .../authentication/<name>with the full issuer body. The change is all-or-nothing, so a rejected update leaves the previous issuer in place. APUTto a name that does not exist returns404; it does not create the issuer. - Replace every issuer:
PUT .../authenticationwith a JSON array, which becomes the complete set. An empty array ([]) removes all issuers. - Import native configuration:
PUT .../authentication/importwith a KubernetesAuthenticationConfigurationdocument asapplication/yaml. Each imported issuer is named after its issuer URL host (for examplehttps://accounts.google.combecomesaccounts-google-com), and the import is rejected if the top-levelanonymousfield is present. - Delete one issuer:
DELETE .../authentication/<name>returns204.
Adding, changing, or deleting an issuer takes effect at the API server within about a minute. Deleting an issuer does not end sessions instantly - see Revocation is not immediate.
Control Panel
You can manage issuers in the UpCloud Control Panel as well as through the API. Open your cluster and select the Authentication tab. Issuers created with the API appear here too.
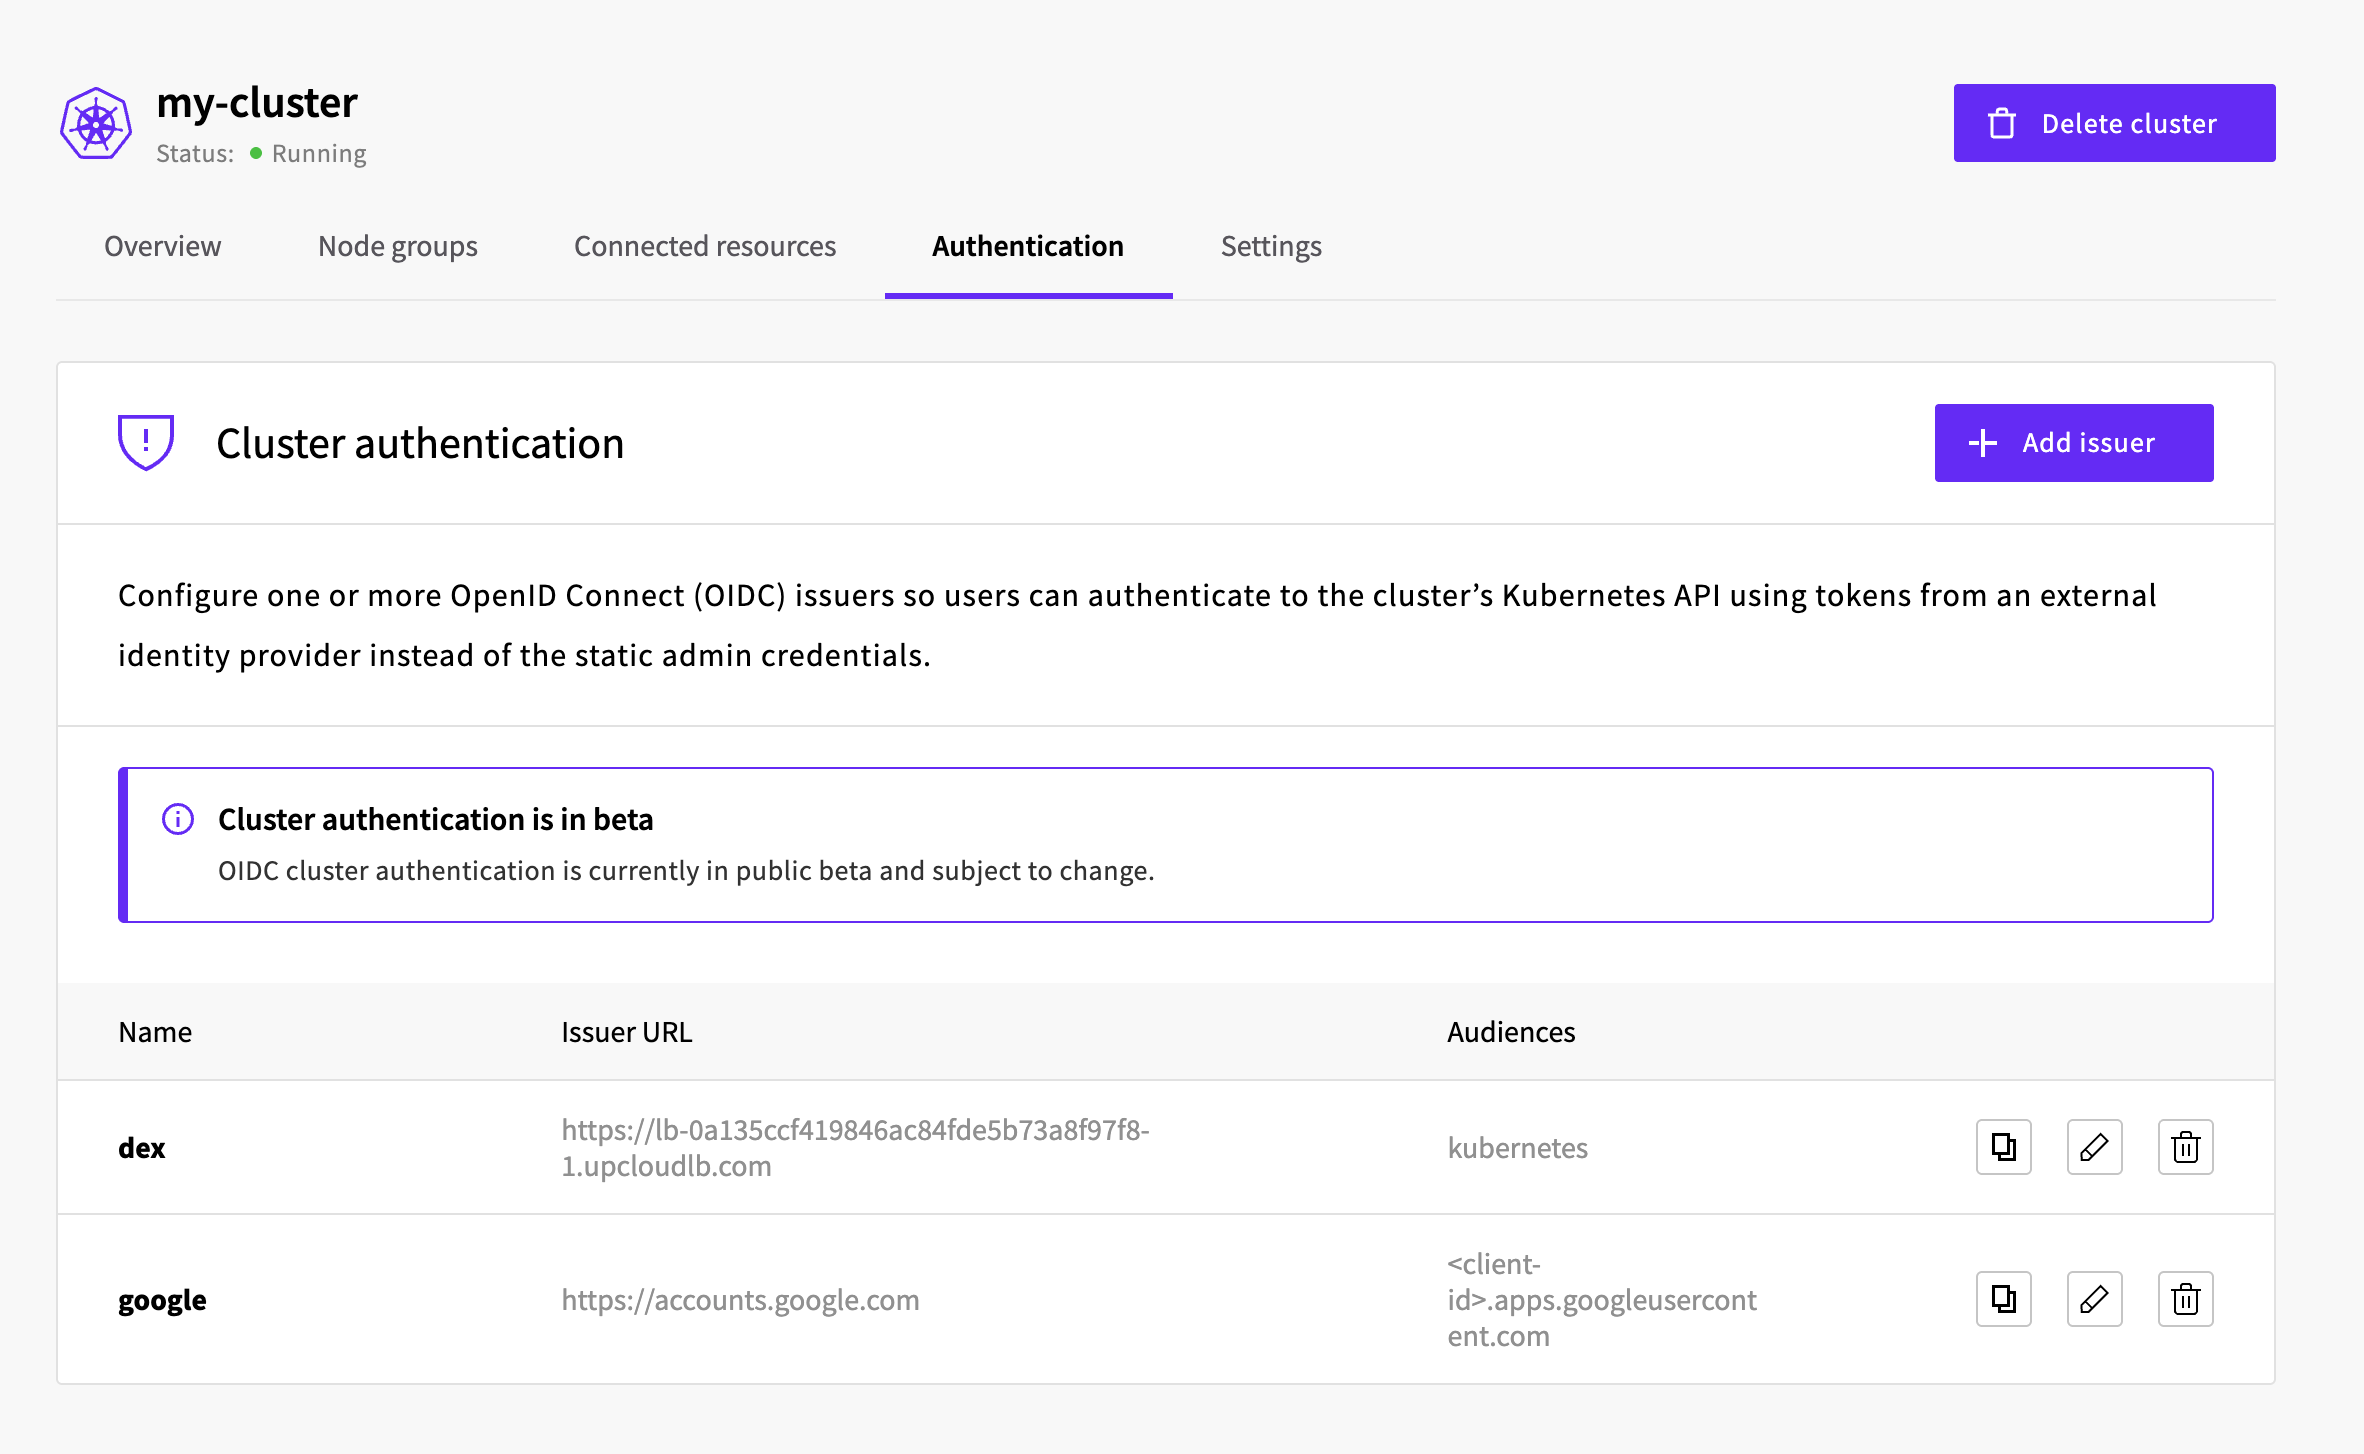
The table lists each issuer by Name, Issuer URL, and Audiences.
Add issuer, at the top of the tab, opens the Add authentication issuer form. It has fields for the name, issuer URL, audiences, an optional discovery URL, the username and groups claim mappings, and an optional certificate authority. Each field shows an inline hint and is validated as you type.
Each issuer row has three icon buttons, shown above: Download kubeconfig, Edit, and Delete. Hover over one to see its name.
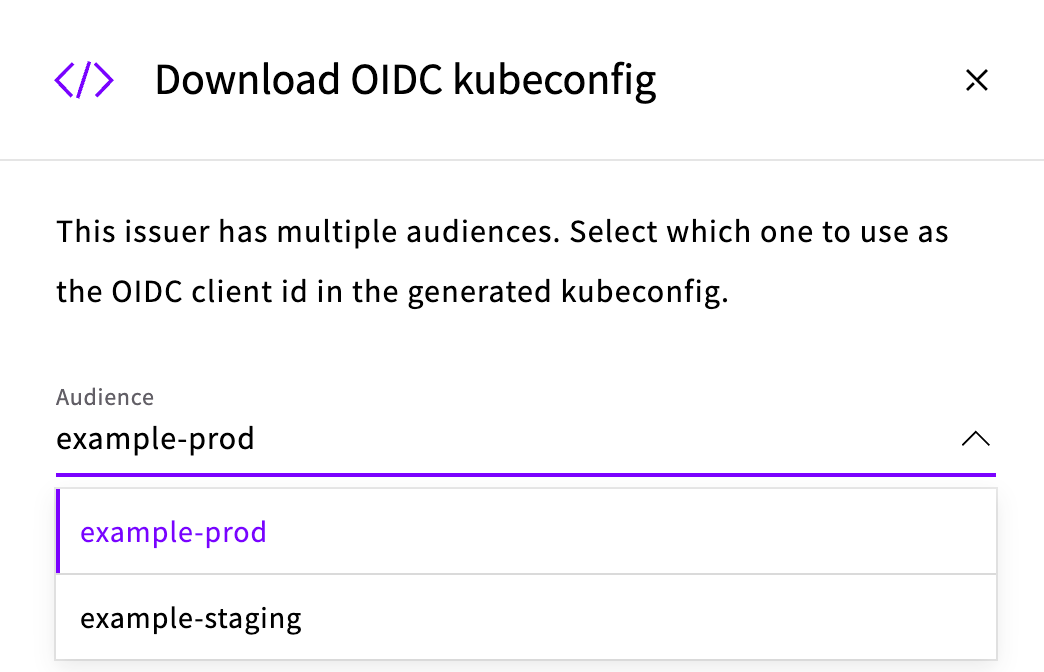
Download kubeconfig downloads the OIDC kubeconfig for that issuer, the same file the API's kubeconfig endpoint returns. For an issuer with a single audience, the file downloads straight away, using that audience as the client ID. For an issuer with more than one audience, the Control Panel first opens a Download OIDC kubeconfig dialog with an Audience dropdown and asks which audience to use as the client ID, defaulting to the first. The API's kubeconfig endpoint does the same with its ?audience= parameter, shown under Get the OIDC kubeconfig and log in.
Edit opens the same fields pre-filled as Edit authentication issuer, with Name read-only.
Delete asks for confirmation and warns that users authenticating through the issuer will lose access and that the action cannot be undone.
The form covers the common fields, but several issuer settings are API-only. The Control Panel does not include audience_match_policy, the uid or extra claim mappings, expression-based (CEL) mappings, claim_validation_rules, user_validation_rules, or YAML import. In particular, the system: groups guard in Protect built-in groups is a user_validation_rules entry, so it can only be set through the API; an issuer that needs that protection must be created and maintained with the API.
Editing an issuer in the Control Panel does not remove the API-only settings the form does not show, such as claim_validation_rules and user_validation_rules.
The Control Panel fills in one detail the form does not show: adding more than one audience sets audience_match_policy to MatchAny for you.
Leaving a prefix field empty stores an empty-string prefix, which maps the claim with no prefix at all. Because the Control Panel cannot set the system: groups guard (a user_validation_rules entry, which is API-only), the prefix is your only protection in the Control Panel against a provider group colliding with a built-in Kubernetes group such as system:masters. Always fill in both Username prefix and Groups prefix when you configure an issuer in the Control Panel, and see Protect built-in groups.
Other tooling
At the time of writing, OIDC cluster authentication is available through the API and the Control Panel only. It is not yet supported in upctl, the Terraform provider, or Pulumi. Use the API until support lands in those tools.
GitHub and Dex
GitHub is an OAuth 2.0 provider, not an OIDC provider: it does not publish an OIDC discovery document and does not issue ID tokens, so you cannot register it directly as an issuer. To let users sign in with GitHub, run an OIDC provider that federates to it and point the cluster at that provider. Dex is a common choice, a small OIDC provider with a GitHub connector. The same pattern covers any provider that is OAuth-only or SAML-only: put Dex or Keycloak in front, and register that as the issuer.
A provider you run yourself needs an HTTPS endpoint the API server can reach. If you serve it with a private or self-signed certificate, pass the CA to the issuer in certificate_authority (base64-encoded PEM) so the API server trusts it.
Note
If you expose your own provider behind an UpCloud Managed Load Balancer and terminate TLS at the provider, set the load balancer frontend to TCP mode so it passes the TLS connection through. A plain LoadBalancer Service defaults to HTTP mode, which does not pass TLS through to an HTTPS backend.
Troubleshooting
Because UpCloud manages the control plane, the API server logs aren't available to you, so diagnose login failures from the client side by comparing the ID token your provider issued against the issuer configuration on the cluster.
Get the ID token. Include --oidc-client-secret only for providers that require one (Google does; some do not):
kubectl oidc-login get-token \
  --oidc-issuer-url=<issuer-url> \
  --oidc-client-id=<client-id> \
  --oidc-client-secret=<client-secret> \
  | jq -r .status.token > id-token.txt
An ID token is signed, not encrypted, so you decode it (no key needed) to read its claims. The claims are the middle of the token's three dot-separated segments, Base64URL-encoded. Decode them with jq (this needs a recent jq, whose @base64d handles URL-safe Base64 and missing padding):
jq -R 'split(".")[1] | @base64d | fromjson' id-token.txtThe output is the token's claims. A Google login decodes to this shape (values redacted):
{
  "iss": "https://accounts.google.com",
  "azp": "<client-id>.apps.googleusercontent.com",
  "aud": "<client-id>.apps.googleusercontent.com",
  "sub": "1234567890",
  "email": "[email protected]",
  "email_verified": true,
  "at_hash": "<redacted>",
  "nonce": "<redacted>",
  "name": "Your Name",
  "picture": "https://lh3.googleusercontent.com/a/<redacted>",
  "given_name": "Your",
  "family_name": "Name",
  "iat": 1700000000,
  "exp": 1700003600
}
Note there is no groups claim (Google does not issue one) and no hd claim on a personal Google account; a Google Workspace token adds hd.
Check the decoded claims against the issuer:
issmust exactly equal the issuer'sissuer_url.audmust contain one of the issuer'saudiences(your OAuth client ID).- The claims you mapped (
email,groups, and so on) must be present in the token.
Specific errors:
- A newly added issuer still fails to log in. Issuer configuration takes up to about a minute to reach the API server. Wait, then retry.
You must be logged in to the server (Unauthorized). The API server rejected the token and does not return the reason to the client. Decode the token as above and confirmiss,aud, and your mapped claims. If you useclaim_validation_rulesoruser_validation_rules, one of them may be rejecting the token; the rule'smessageis not sent to the client, so re-check the rules against the token's claims yourself.Invalid value: "http://...": URL scheme must be https. Theissuer_urlmust use HTTPS.audienceMatchPolicy must be MatchAny for multiple audiences. Setaudience_match_policytoMatchAnywhenever you list more than one audience.claimMappings.username: Required value. Add aclaim_mappings.username.- Logged in but every command is
Forbidden. Authentication works; you have no RBAC binding for that identity. Runkubectl auth whoami, then bind the exact username or group it reports. A mismatch is almost always a missing or wrong prefix.
To preview what kubelogin will request before you add it to a kubeconfig, run kubectl oidc-login setup --oidc-issuer-url=<issuer-url> --oidc-client-id=<client-id> and compare its output with your issuer configuration.