
How to migrate MySQL database to UpCloud Managed Databases using the migration tool
UpCloud's migration tool provides a streamlined way to move your MySQL databases from external servers to the UpCloud Managed Databases service.
The migration tool offers two ways migrate a MySQL database: replication method and mysqldump method. You can perform either method through the UpCloud Control Panel, or via the command-line using the provided scripts.
Both methods require that your source MySQL server has a superuser account with sufficient privileges to read all database content. This account must be able to log in from any IP address, or at least from the public IP address of your UpCloud Managed Database.
Before diving into the migration process, it's important to note that you should always test your migration in a non-production environment first. Also, ensure that you have recent backups of your data before beginning any migration process.
Please note these important limitations that apply regardless of which method you choose:
- Schema changes during migration may cause replication to fail
- System databases (
information_schema,mysql,performance_schema,sys) are excluded from the migration - Database users are not migrated and must be created separately
Replication method
This establishes a continuous synchronisation between your source database and the UpCloud Managed Database. Changes made to your source database are automatically replicated to the target, allowing for minimal downtime when you eventually switch over.
The replication method is ideal when you need to keep downtime to an absolute minimum, as your applications can continue using the source database while the migration is in progress.
Requirements for replication method:
- Source database must be running MySQL version 5.7 or later (up to 8.0)
- Target UpCloud Managed Database must be running MySQL 8.0 or newer
- Multi-master clusters are not supported
- All databases must use the InnoDB storage engine
- GTID mode must be enabled on both source and target
- The
enforce_gtid_consistencysetting must be enabled - Each database must have a unique
server_idvalue
You can check your current MySQL server configuration by running:
SHOW VARIABLES LIKE 'server_id';
SHOW VARIABLES LIKE 'gtid_mode';
SHOW VARIABLES LIKE 'enforce_gtid_consistency';
If GTID mode is not enabled or any of these settings need to be changed, configure your MySQL server with these commands:
SET GLOBAL server_id=21;
SET GLOBAL gtid_mode=ON;
SET GLOBAL enforce_gtid_consistency=ON;
Important limitation: The replication method is currently not supported when migrating from AWS RDS instances. For AWS RDS migrations, you must use the mysqldump method instead.
mysqldump method
This method creates a snapshot of your source database at a specific point in time, which is then transferred to the target database. It's simpler than the replication method but requires a period during which the source database remains unchanged.
Requirements for mysqldump method:
- The UpCloud Managed Database must be able to access the source MySQL server.
- You should lock the source database from changes during the migration process, as this can cause downtime. If you allow write operations to the database during the mysqldump migration, you are likely to have changes that will not be migrated.
Choosing the best approach for your needs
If minimising downtime is important and your source database meets the requirements, the replication method is the recommended approach. It is especially useful for busy production databases where continuous operation is needed.
If your database is smaller, doesn't change frequently, or if you're able to schedule downtime, the mysqldump method offers simplicity and wider compatibility.
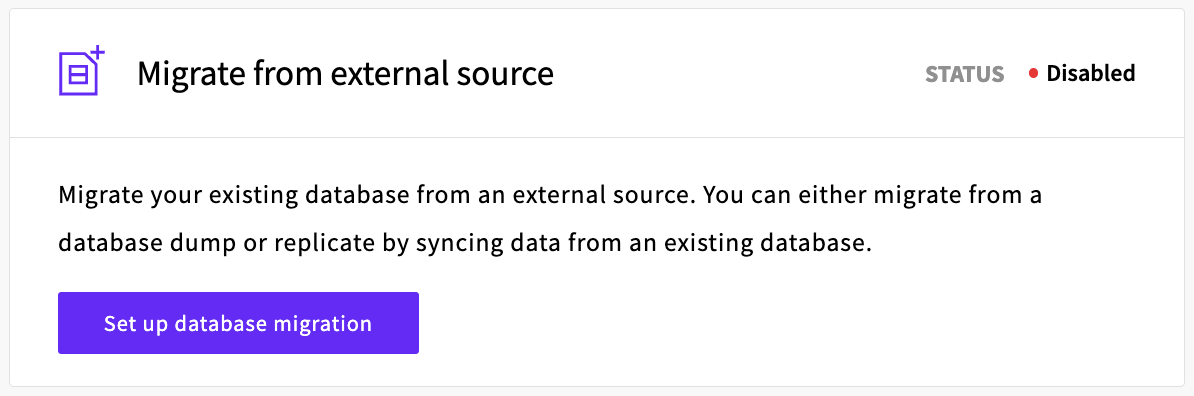
Migrating with the UpCloud Control Panel
Now Let's walk through the migration process using the UpCloud Control Panel
Preparing for migration
Before starting, ensure you have:
- Created a Managed Database service on UpCloud
- Access credentials for your source database
- Verified your source database is accessible from UpCloud's network
- Documented your existing database users for recreation later
Setting up the migration
Begin by logging into your UpCloud Control Panel and navigating to your Managed Database service.
Click the "Settings" tab and scroll down to the Migration section. This is where you'll configure all the details needed to connect to your source database and initiate the migration.
You'll notice two configuration options: using a connection URI or manually entering the connection details. The connection URI is a convenient option if you have a connection string available. Otherwise, the manual configuration provides a more guided approach.

When configuring manually, you'll need to select your preferred migration method first – either replication or dump (mysqldump). Then, provide the details of your source database:
- The hostname or IP address of your source database server
- The port number (typically 3306 for MySQL)
- Username and password with sufficient privileges
- An initial database to connect to
If there are specific databases you want to exclude from migration, you can list them in the "Ignore databases" field. This is useful when you only want to migrate certain databases from a server that contains many.
You can also specify whether to use SSL for the connection to your source database. Using SSL is recommended when your source database is accessible over the public internet, as it encrypts the data in transit.
Verification and validation
After entering your connection details, migration tool will verify whether the migration is possible with your settings. This validation step checks connectivity to your source database and assesses the preferred migration method based on your database configuration.
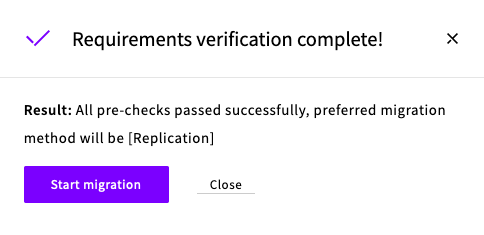
The verification results will indicate if there are any issues that need to be addressed. For example, if you've selected the replication method but your source database doesn't have GTID mode enabled, you'll receive a notification suggesting you enable it or use the mysqldump method instead.
This step is important for identifying potential problems before starting the actual migration. If issues are found, you can adjust your source database configuration or change your migration method accordingly.
Starting and monitoring the migration
Once the verification is successful, you can start the migration process.
The migration will begin immediately, and you'll be presented with a progress window that provides real-time status updates.
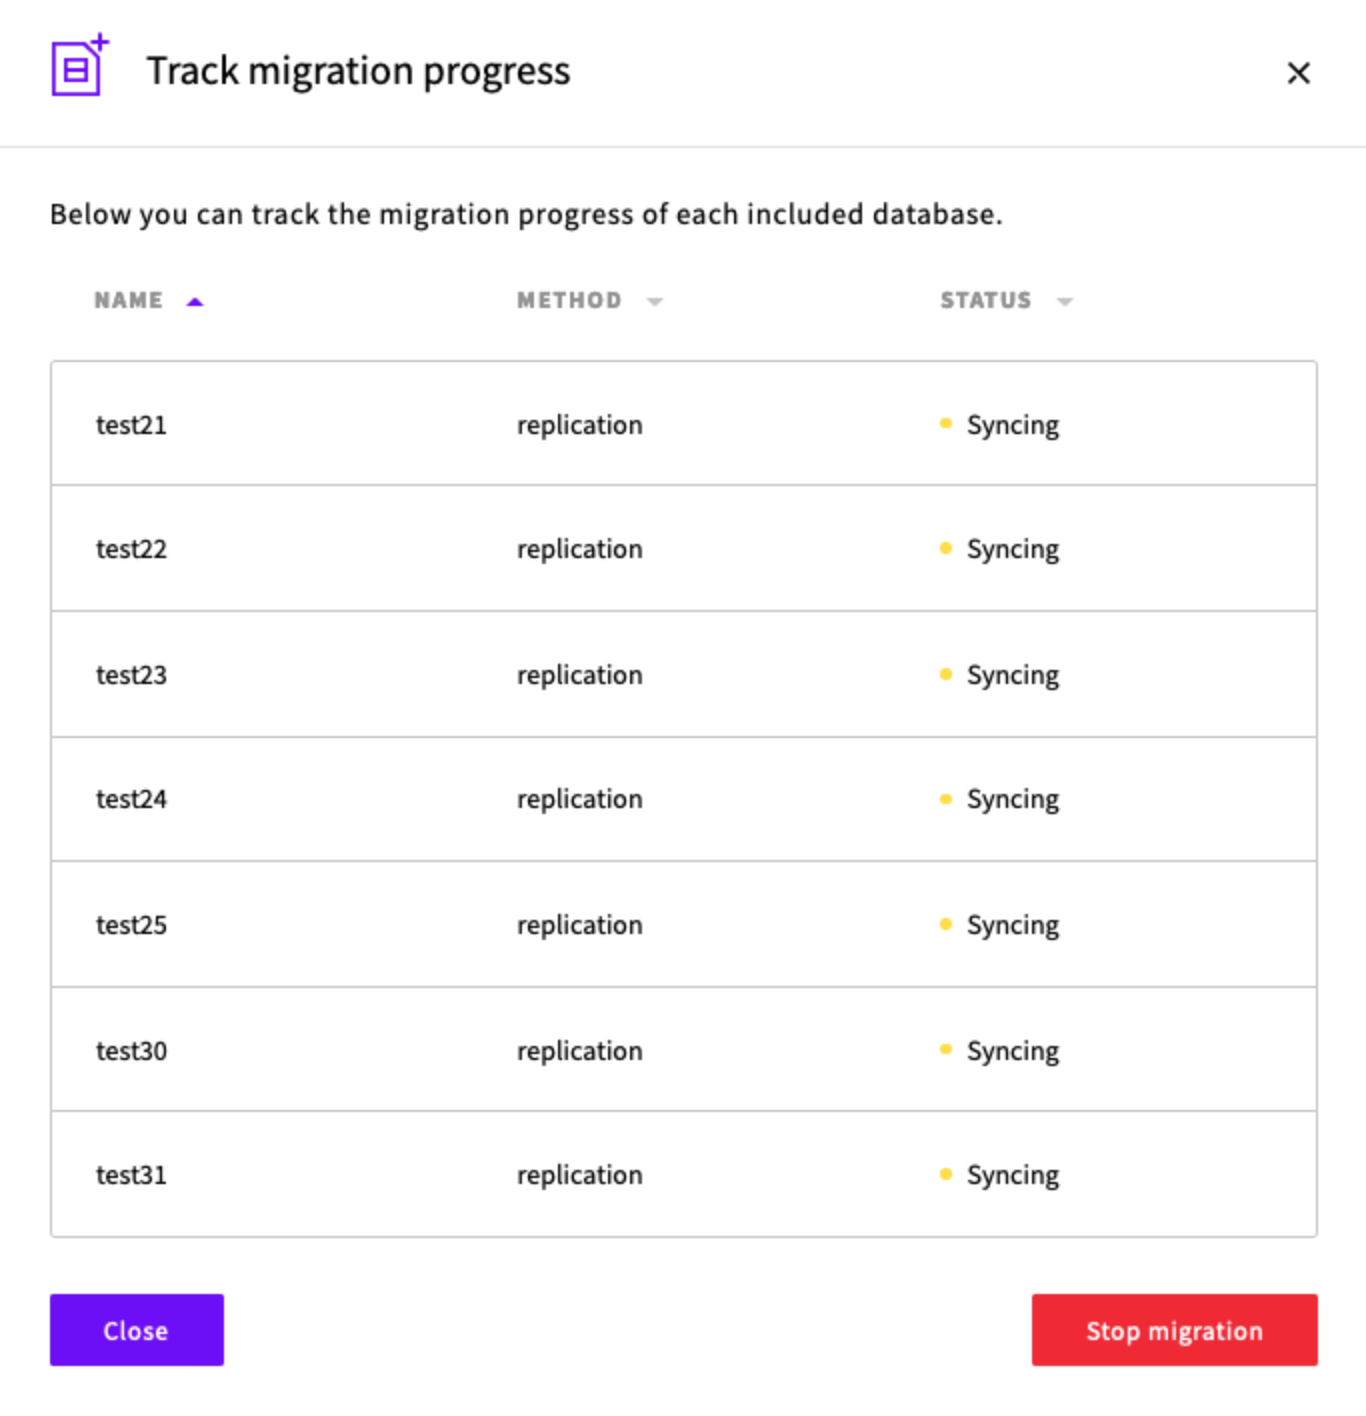
The migration time depends on the size of your databases and the complexity of your data. Small databases might migrate in minutes, while larger ones could take a few hours.
Completing the migration
When the migration status shows as complete for all databases, it's time to finalise the process:
Verify your data has been transferred correctly by connecting to the new database and checking key tables and records.
Create your database users via the UpCloud Hub. Remember that user accounts aren't migrated automatically, so you'll need to recreate them with the appropriate permissions.
Update your application configuration to point to the new database. This involves changing the connection details in your application's configuration files or environment variables.
If you used the replication method, your source and target databases will remain in sync until you disable replication. This gives you a safety net – if anything goes wrong after switching to the new database, you can easily switch back while you troubleshoot.
Once you're confident everything is working correctly with the new database, you can disable replication from the settings page if you used that method.
Migrating with command-line tools
For those who prefer working from the command line or need to automate the migration process, UpCloud provides a set of bash scripts that perform the same functions as the Control Panel interface.
start-migration-pre-checks.sh: This script validates your migration settings before you begin the actual migration. It is a good way to identify potential issues early in the process.
start-migration.sh: Use this script to start migration to an existing UpCloud Managed Database instance. If you've already created your UpCloud Managed database through the Control Panel or other means, this script initiates the migration process.
create-dbaas-and-migrate.sh: This script creates a new UpCloud Managed Database instance and immediately starts migration from your source database. It's useful when you want to set up a new Managed Database and migrate in a single step.
monitor-dbaas.sh: Once migration has started, this script lets you to monitor its progress. It provides regular updates on the status of each database being migrated.
disable-replication.sh: After completing a migration that uses the replication method, this script disables the ongoing replication when you're ready to fully disconnect from the source database.
Setting up your environment
Before using the scripts above, you'll need to set up your environment with your UpCloud API credentials. This allows the scripts to authenticate with UpCloud's API.
We recommend authenticating with an API token by setting the UPCLOUD_TOKEN environment variable:
export UPCLOUD_TOKEN=ucat_Your_API_TokenAlternatively, you can export the username and password of a dedicated UpCloud subaccount (create one if you don't have one) as environment variables:
export UPCLOUD_USERNAME=Your_username
export UPCLOUD_PASSWORD=Your_password
Validating your migration settings
It's always good to validate your migration settings before starting the actual process. The pre-checks script helps you identify potential issues that might prevent successful migration.
Here's how to use it:
bash start-migration-pre-checks.sh \
  -u YOUR_DATABASE_UUID \
  -H SOURCE_HOST_IP \
  -U SOURCE_USERNAME \
  -p SOURCE_PASSWORD \
  -P SOURCE_PORT \
  -d INITIAL_DATABASE \
  -m replication \
  -s true \
  -i database_to_ignore
You'll need to replace the placeholder values with your actual database details:
YOUR_DATABASE_UUIDis the UUID for your existing UpCloud Managed DatabaseSOURCE_HOST_IPis the hostname or IP address of your source databaseSOURCE_USERNAMEandSOURCE_PASSWORDare the credentials for accessing your source databaseSOURCE_PORTis the port typically 3306 for MySQLINITIAL_DATABASEis the name of a database to use for the initial connection- The
-mparameter specifies your preferred migration method (replicationordump) - The
-sparameter indicates whether to use SSL (trueorfalse) - The
-iparameter lets you specify database to exclude from migration. To exclude multiple databases, provide their names as a comma-separated list without spaces (e.g., database1,database2,database3).
When you run this command, the script will check whether your source database is accessible and whether your chosen migration method is suitable. It will provide detailed feedback, helping you adjust your settings if needed.
# Example command
bash start-migration-pre-checks.sh \
  -u 09f499df-ec32-4cc7-b9df-86ab95d11916 \
  -H 185.70.198.14 \
  -U root \
  -p YourPassW0rd \
  -P 3306 \
  -d defaultdb \
  -m replication \
  -s true \
  -i database1,database2
# Example output
Creating migration check task…
Success: migration check task created
id: b7f28f02-e25d-4be6-8dcb-a429623845fa
Polling for migration check task result...
Task Result : Poll #1
{
"create_time": "2024-10-31T08:39:38Z",
"operation": "mysql_migration_check",
"id": "b7f28f02-e25d-4be6-8dcb-a429623845fa",
"result_codes": [],
"result": "All pre-checks passed successfully, preferred migration method will be [Replication]",
"success": true
}Starting migration to an existing Managed Database
If you already have a Managed Database instance set up and you've validated your migration settings, you can start the migration process with the start-migration.sh script:
bash start-migration.sh \
  -u YOUR_DATABASE_UUID \
  -H SOURCE_HOST_IP \
  -U SOURCE_USERNAME \
  -p SOURCE_PASSWORD \
  -P SOURCE_PORT \
  -d INITIAL_DATABASE \
  -m dump \
  -s false
The parameters are the same as for the pre-checks script. This command configures your UpCloud Managed Database to connect to your source database and begin the migration process.
The script will output details about your Managed Database service, including the updated migration settings. If everything is configured correctly, the migration will start immediately.
# Example command
bash start-migration.sh \
  -u 09bb9f50-6f52-4da6-b58f-905a0708d7e4 \
  -H 185.70.198.14 \
  -U superuser \
  -p YourPassW0rd \
  -P 3306 \
  -d defaultdb \
  -m dump \
  -s false
# Example output
{
"backups": [
{
"backup_time": "2024-10-17T07:55:54.691923Z",
"data_size": 1872141684
}
],
...
"plan": "2x2xCPU-4GB-50GB",
"powered": true,
"properties": {
"automatic_utility_network_ip_filter": true,
"ip_filter": [],
"long_query_time": 20,
"migration": {
"dbname": "defaultdb",
"host": "185.70.198.14",
"method": "dump",
"password": "YourPassW0rd",
"port": 3306,
"ssl": false,
"username": "superuser"
}
},
"uuid": "09bb9f50-6f52-4da6-b58f-905a0708d7e4",
"state": "running",
"title": "upcloud-db",
"type": "mysql",
...
}Monitoring migration progress
Once you've started the migration, you'll want to keep an eye on its progress. The monitor-dbaas.sh script provides regular updates on the status of your migration:
bash monitor-dbaas.sh -u YOUR_DATABASE_UUID# Example command
bash monitor-dbaas.sh -u 09bb9f50-6f52-4da6-b58f-905a0708d7e4# Example output
{
"method": "",
"seconds_behind_master": 0,
"source_active": true,
"status": "done",
"databases": []
}
{
"method": "mysqldump",
"seconds_behind_master": 0,
"source_active": true,
"status": "running",
"databases": [
{
"dbname": "test21",
"method": "mysqldump",
"status": "running"
}
]
}
{
"method": "mysqldump",
"seconds_behind_master": 0,
"source_active": true,
"status": "done",
"databases": [
{
"dbname": "test23",
"method": "mysqldump",
"status": "done"
},
{
"dbname": "test21",
"method": "mysqldump",
"status": "done"
},
{
"dbname": "test22",
"method": "mysqldump",
"status": "done"
},
{
"dbname": "test24",
"method": "mysqldump",
"status": "done"
}
]
}This script polls the migration status every few seconds and displays the current state of each database being migrated. The output includes:
- The overall migration status
- The migration method being used
- For replication, how far behind the target is in applying changes
- Individual status for each database
The script runs continuously, refreshing the status information every 10 seconds. You can stop it with ctrl+c when you no longer need to monitor the progress.
As each database completes migration, its status will change from "running" to "done." When all databases show as done, the migration is complete.
Creating a new Managed Database and starting migration
If you prefer to create a new Managed Database instance and start migration in a single step, you should use the create-dbaas-and-migrate.sh script:
bash create-dbaas-and-migrate.sh \
  -n YOUR_DATABASE_HOSTNAME \
  -S DATABASE_PLAN \
  -z DATABASE_REGION \
  -H SOURCE_HOST_IP \
  -U SOURCE_USERNAME \
  -p SOURCE_PASSWORD \
  -P SOURCE_PORT \
  -m dump \
  -s false
This script has additional parameters for creating the UpCloud Managed Database instance:
YOUR_DATABASE_HOSTNAMEis the hostname prefix for your new UpCloud Managed Database serviceDATABASE_PLANspecifies the Managed Database plan (adjust according to your needs)DATABASE_REGIONis the data centre location for the new Managed Database
The script will create the new UpCloud Managed Database , configure it for migration, and start the migration process. It will output the UUID of the new service, which you'll need for monitoring the migration's progress.
# Example command
bash create-dbaas-and-migrate.sh \
  -n upcloud-db \
  -S 2x2xCPU-4GB-50GB \
  -z pl-waw1 \
  -H yoursourceserver.com \
  -U root \
  -p YourPassW0rd \
  -P 3306 \
  -m dump \
  -s false
# Example output
{
"backups": [],
"components": [
{
"component": "mysql",
"host": "upcloud-db-mystmtdaytdt.db.upclouddatabases.com",
"port": 11550,
"route": "dynamic",
"usage": "primary"
},
...
"name": "upcloud-db",
"node_count": 2,
"node_states": [],
"plan": "2x2xCPU-4GB-50GB",
"powered": true,
"properties": {
"automatic_utility_network_ip_filter": true,
"ip_filter": [],
"migration": {
"dbname": "mysql",
"host": "185.70.198.14",
"ignore_dbs": "",
"method": "dump",
"password": "YourPassW0rd",
"port": 3306,
"ssl": false,
"username": "root"
}
},
"uuid": "09bb9f50-6f52-4da6-b58f-905a0708d7e4",
"state": "rebuilding",
"title": "upcloud-db",
"type": "mysql",
"update_time": "0001-01-01T00:00:00Z",
"service_uri": "mysql://upadmin:AVNS_uYlk8kQ6Tna1lkOJT_F@upcloud-db-mystmtdaytdt.db.upclouddatabases.com:11550/defaultdb?ssl-mode=REQUIRED",
"service_uri_params": {
"dbname": "defaultdb",
"host": "upcloud-db-mystmtdaytdt.db.upclouddatabases.com",
"password": "AVNS_uYlk8kQ6Tna1lkOJT_F",
"port": "11550",
"ssl_mode": "REQUIRED",
"user": "upadmin"
},
...
"zone": "pl-waw1"
}
UUID of created DBaaS service: 09bb9f50-6f52-4da6-b58f-905a0708d7e4Completing the migration
After the migration has completed successfully, follow these steps to finish the process:
Verify that all your data has been migrated correctly by connecting to the new database
Create your database users through the UpCloud Control Panel
Update your application configuration to use the new database connection details
If you used the replication method, you can disable replication when you're ready with the
disable-replication.shscript:
bash disable-replication.sh -u YOUR_DATABASE_UUIDThis script removes the migration configuration from your UpCloud Managed Database, stopping the replication process. Only run this when you're confident that your applications are working correctly with the new database.
Post migration
Regardless of which migration method you used, there are a few important tasks to complete after migration.
Setting up database users
Your database users and their permissions don't get migrated automatically. You'll need to create them manually on your new UpCloud Managed Database instance.
To see the users in your old database, you can run:
mysql -h <SOURCE_HOST> -P <PORT> -u <USERNAME> -p -e "SELECT user, host FROM mysql.user;"This will show you a list of all users and the hosts they're allowed to connect from. Make note of the users that your applications need.
Then, for each necessary user, connect to your new UpCloud Managed Database service and create the user with appropriate permissions:
mysql -h <YOUR_DATABASE_HOSTNAME> -P <ASSIGNED_PORT> -u upadmin -p

CREATE USER 'appuser'@'app.server.ip' IDENTIFIED BY 'secure_password';
GRANT ALL ON database_name.* TO 'appuser'@'app.server.ip';
FLUSH PRIVILEGES;
Replace appuser, app.server.ip, secure_password, and database_name with your actual values. The app.server.ip should be the IP address or hostname of the server where your application runs.
Updating application configurations
Now it's time to update your applications to use the new database. This typically involves changing connection details in configuration files.
For example, if you're running a WordPress site, you'd edit the wp-config.php file:
// ** MySQL settings - You can get this info from your web host ** //
/** The name of the database for WordPress */
define( 'DB_NAME', 'wordpress_db' );

/** MySQL database username */
define( 'DB_USER', 'wordpress_user' );

/** MySQL database password */
define( 'DB_PASSWORD', 'your_password' );

/** MySQL hostname */
define( 'DB_HOST', 'your-dbaas-hostname.db.upclouddatabases.com:11550' );
Note that the hostname includes both the server name and port number, separated by a colon.
For other applications, consult their documentation to find out where database connection settings are stored.
Verifying your migration
Before considering the migration complete, it's important to verify that everything works as expected:
- Connect to your new database and check that all expected tables and data are present.
- Run your application against the new database and test all key functionality.
- Check that database users have the correct permissions by testing each application function that interacts with the database.
- Monitor database performance to ensure it's meeting your expectations.
If you discover any issues, you can investigate and address them before fully decommissioning your old database. If you used the replication method, your source database remains in sync with the target until you disable replication, giving you a safety net during this verification process.
Troubleshooting common issues
Even with careful planning, you might encounter issues during the migration process. Here are some common problems and their solutions:
Access denied errors
If the UpCloud Managed Database cannot log in to your source database, you might see an error like this:
Oct 17 08:51:21 mysql1-test mysqld[1024]: 10:36:54 112 [Warning] Access denied for user 'root'@'185-70-198-14.pl-waw1.upcloud.host' (using password: YES)This happens because MySQL restricts access based on the connecting host. To fix it, you need to grant permissions for the UpCloud Managed Database IP address:
GRANT ALL PRIVILEGES ON *.* TO 'username'@'dbaas.ip.address' IDENTIFIED BY 'password' WITH GRANT OPTION;
FLUSH PRIVILEGES;
Replace username, dbaas.ip.address, and password with your actual values. The UpCloud Managed Database IP address will be visible in the error message.
Docker MySQL issues
When migrating from MySQL running in Docker, you might encounter specific access issues because Docker containers often have restrictive network configurations. If you see:
2024-10-26T14:09:59.136938Z 1162746 [Note] Access denied for user 'root'@'%' to database 'mysql'You'll need to grant more specific privileges:
GRANT ALL PRIVILEGES ON mysql.* TO 'root'@'<Your source IP address>' WITH GRANT OPTION;GTID mode errors
If you're using the replication method and encounter an error related to GTID mode:
"error": "MySQL Errno - 13117: The replication receiver thread cannot start because the master has GTID_MODE = OFF and this server has GTID_MODE = ON."This indicates that your source database doesn't have GTID mode enabled, which is required for replication. To fix it, run these commands on your source database:
SET GLOBAL gtid_mode=ON;
SET GLOBAL enforce_gtid_consistency=ON;
Note that enabling GTID mode might require a database restart in some cases.
IPv6 related issues
The migration tool currently works best with IPv4 addressing. If you're experiencing connection issues and IPv6 addresses are involved, try specifying an IPv4 address explicitly:
error reconnecting to master 'repluser@fda7:a938:5bfe:5fa6:0:3ba:4284:cbd9:11552' - retry-time: 60 retries: 1 message: Can't connect to MySQL server on 'fda7:a938:5bfe:5fa6:0:3ba:4284:cbd9:11552Use the -H parameter with an IPv4 address instead of a hostname that might resolve to IPv6.
Missing data after migration
If you notice that some tables or data are missing from your migrated database, it could be because changes were made to the source database after migration completed. In such cases, you can re-run the migration to transfer the missing data.
The migration tool will identify and transfer only the data that's missing or has changed since the previous migration.
Conclusion
Migrating your MySQL databases to UpCloud Managed Databases using the migration tool is a straightforward process that can significantly reduce the operational overhead of database management. Whether you choose the replication method for minimal downtime or the mysqldump method for simplicity, the migration tool guides you through each step of the process.
With proper planning and the right approach, you can move your databases to UpCloud's Managed Database service with confidence, knowing that your data is safe and your applications will continue to function seamlessly.
For additional support or questions about the migration process, don't hesitate to reach out to our customer support team, who are available 24/7 to assist with your database migration needs.