UpCloud CDN is in closed beta. To request access, contact Customer Support. Features shown in this guide may change before general availability.
How to serve an existing website through UpCloud CDN
Beta notice
If you have an existing website, such as www.example.com, you can serve the whole site through UpCloud CDN by pointing its hostname at the CDN. Your site stays on your server, and the CDN fetches it from there.
The CDN can only get a certificate for your hostname once its DNS record points at the CDN, so during the switch visitors can briefly see a certificate warning. Following the steps in order, at a quiet time for your site, keeps this as short as possible.
If you're setting up a new site, or want to serve only your site's images, stylesheets, and scripts from a hostname such as cdn.example.com, follow How to add a custom domain to UpCloud CDN instead.
Websites with logins
UpCloud CDN removes the cookies that your server sets, so logins, shopping carts, and other features that rely on them don't work through the CDN. For example, you can't log in to a WordPress site's dashboard. For such websites, serve only images, stylesheets, and scripts through the CDN, as described in How to add a custom domain to UpCloud CDN.
Before you start
You need:
- An UpCloud CDN. To create one, see How to get started with UpCloud CDN.
- Your website running over HTTPS on your own server, such as a Cloud Server, with a public IP address.
- Access to your domain's DNS records at your DNS provider.
digandcurlon your computer for the checks in this guide.
This guide uses www.example.com for your website, 203.0.113.10 for your server's public IP address, and mysite.b-cdn.net for the CDN's default hostname. Replace them with your own.
Prepare for the switch
Lower the TTL of the
www.example.comrecord at your DNS provider, for example to 60 seconds, so that visitors pick up the change quickly. Do this at least one current TTL before the switch.Check that Let's Encrypt can issue your certificate. The CDN gets the hostname's certificate from Let's Encrypt. If your domain has CAA records, which limit the certificate authorities that can issue certificates for it, they must include Let's Encrypt. To check, run the following command with your domain:
dig +short example.com CAAIf the command returns nothing, your domain has no CAA records, so there's nothing to change. If it returns records and none of them contain
letsencrypt.org, add a CAA record with the value0 issue "letsencrypt.org"alongside the existing ones.Point the CDN's origin at your server's IP address. In the Control Panel, open CDN in the left-hand menu and select your CDN. On the Overview tab, select Edit in the Origin type section, select Origin URL, enter
https://followed by your server's public IP address, such ashttps://203.0.113.10, and select Save.Check two origin settings in the same section: Forward Host header must be on, so that your server still receives
www.example.com, and Follow redirects must be off, so that your site's own redirects reach visitors.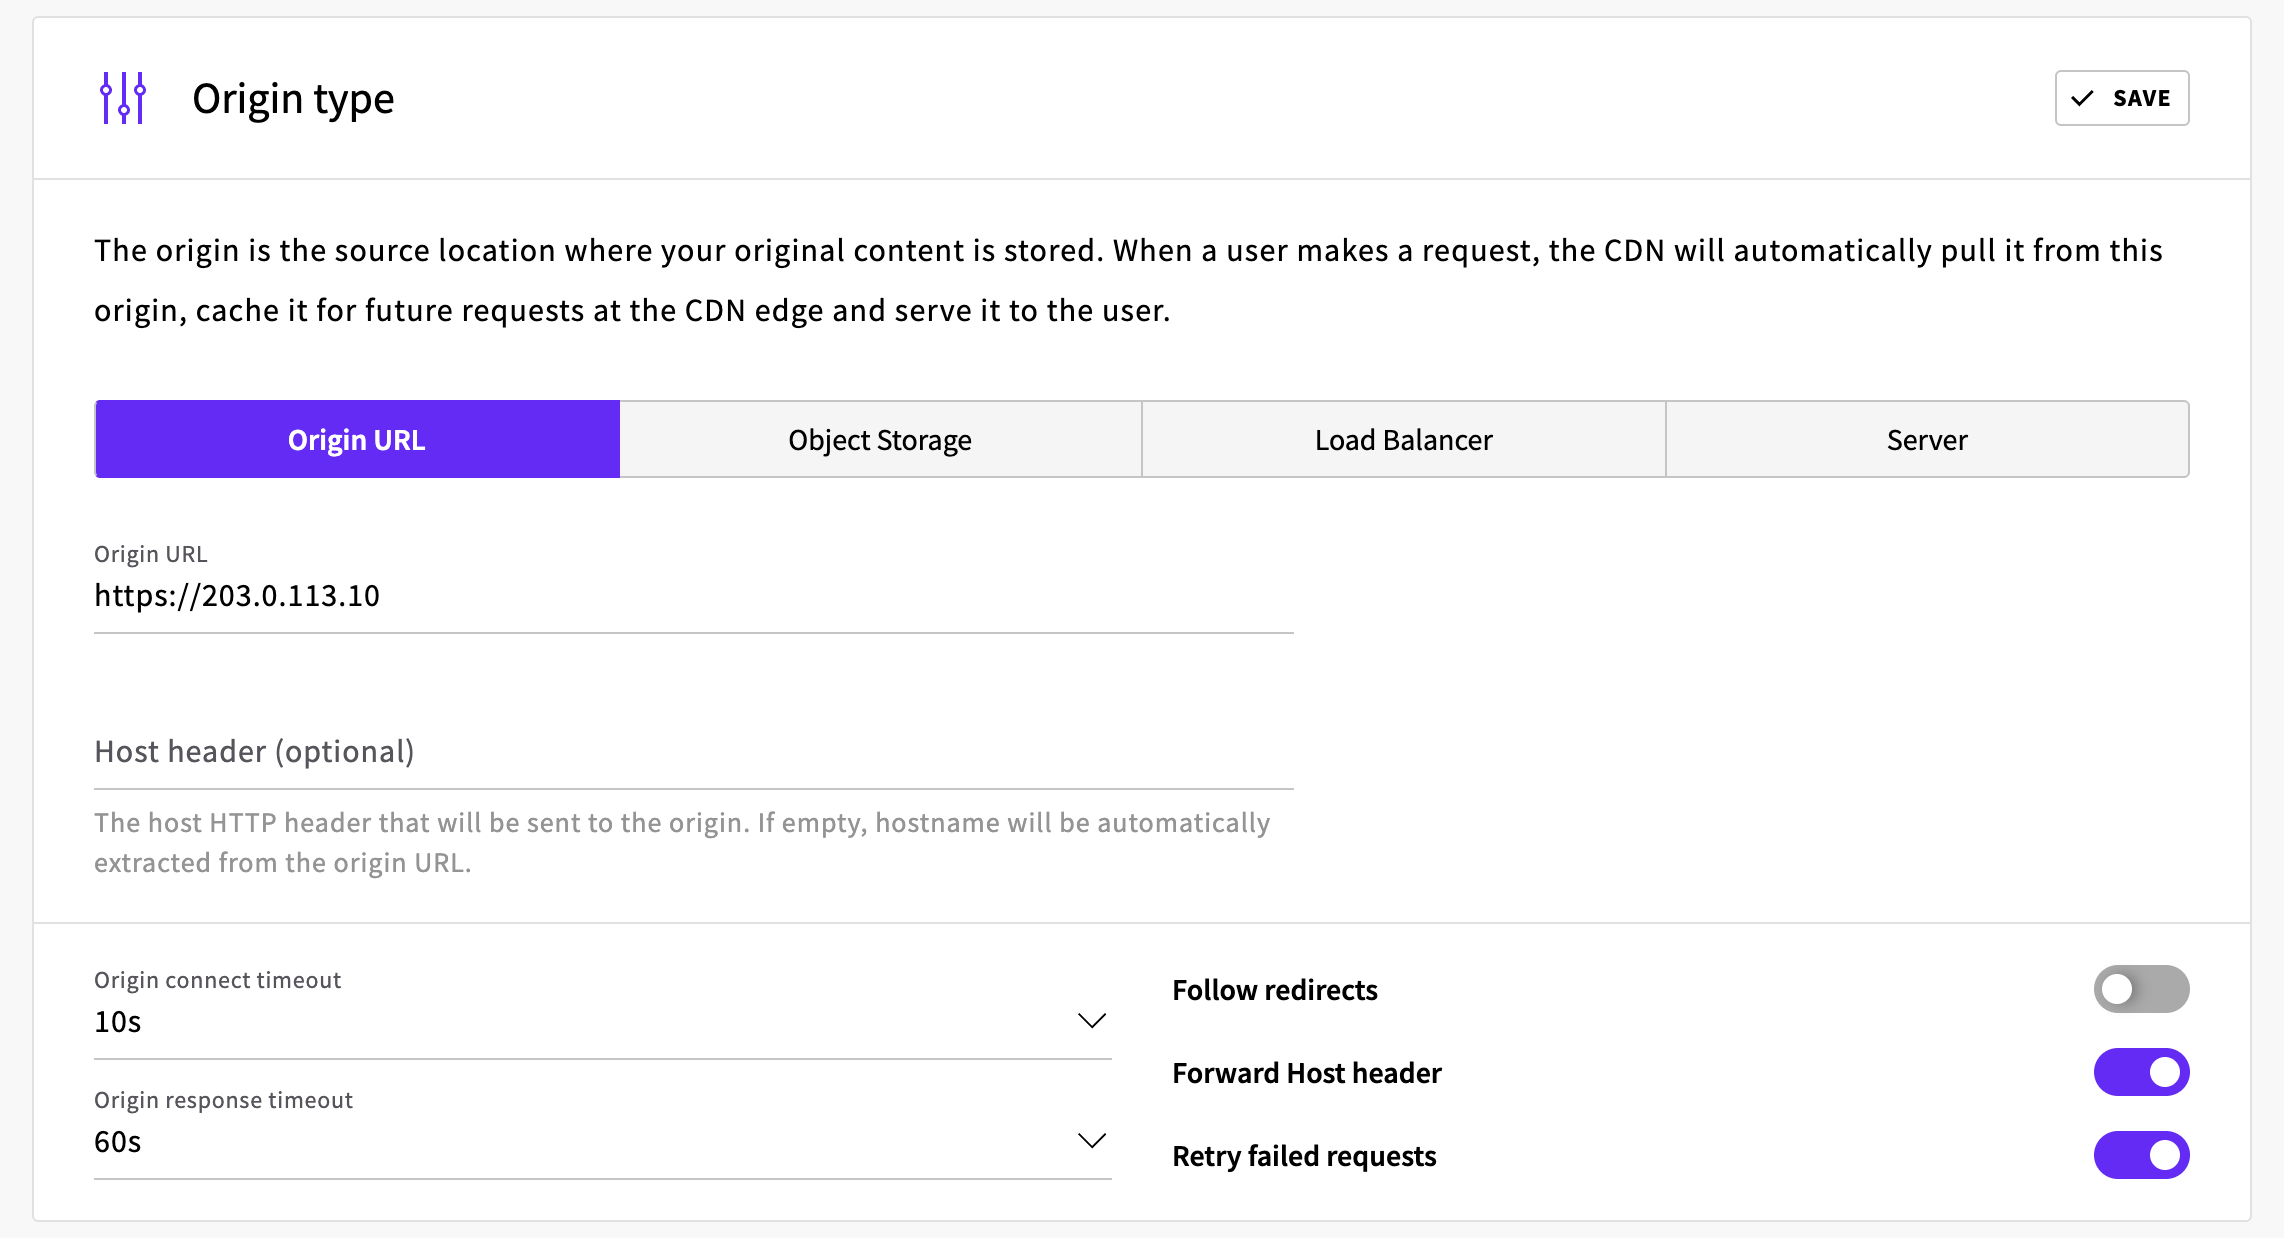
Add
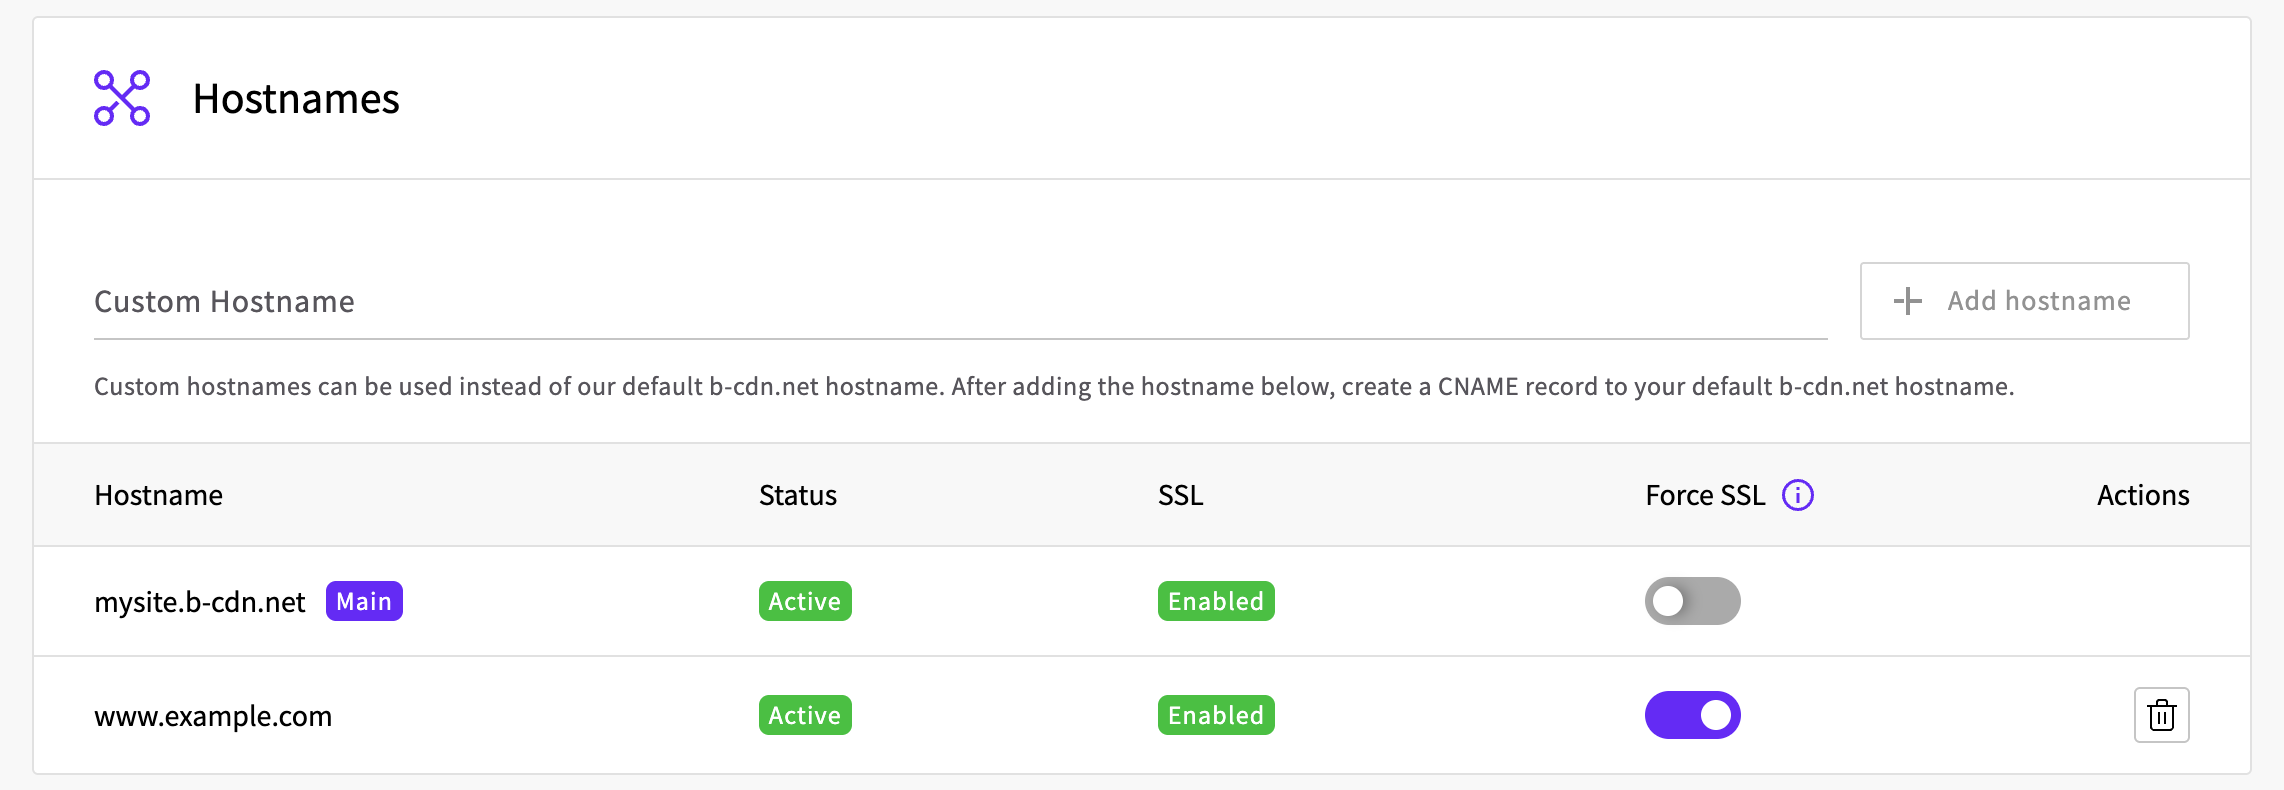
www.example.comto the CDN. On the Overview tab, enterwww.example.comin the Hostnames section and select Add hostname. Close the Set up CNAME DNS record dialog without creating the record. The hostname stays atCNAME missing, and your server keeps serving visitors.
Test the site through the CDN
The following command sends a request for www.example.com to the CDN over HTTP without changing DNS:
curl -sSI --connect-to www.example.com:80:mysite.b-cdn.net:80 http://www.example.com/A 200 response shows that the CDN reaches your server and gets your site:
Output
HTTP/1.1 200 OK
...
A 403 Forbidden response means the CDN is still setting up the new hostname. Wait a moment, and then run the command again.
Switch to the CDN
Change the DNS record for
www.example.comto aCNAMErecord that points atmysite.b-cdn.net, replacing any existingArecord. For a root domain such asexample.com, use the CNAME-flattened, ALIAS, or ANAME record that your DNS provider offers instead.If your domain's DNS is at Cloudflare, turn off the proxy (orange cloud) on the record. With the proxy on, the CDN can't verify the hostname.
Set up SSL straight away. Select Verify CNAME in the hostname's row, and as soon as the hostname shows
Active, select Set up SSL and then Enable free SSL.Turn on Force SSL for the hostname, so that the CDN redirects HTTP requests to HTTPS, which your server's own redirect no longer does.
Check the site
Request your home page through the CDN:
curl -sSI https://www.example.com/A response without a certificate error shows that the certificate is in place, and the cdn-cache header shows that it came through the CDN. For pages, the header is always MISS, because the CDN never caches HTML:
Output
HTTP/2 200
content-type: text/html
...
cdn-cache: MISS
...
If curl reports the following error instead, the edge locations aren't serving the hostname's certificate yet, so run the command again:
Output
curl: (60) SSL: no alternative certificate subject name matches target host name 'www.example.com'
...
To check the HTTP redirect, request the page over HTTP:
curl -sSI http://www.example.com/Output
HTTP/1.1 301 Moved Permanently
...
Location: https://www.example.com/
...
Switch back to your server
Change the DNS record back to its previous value. The hostname and its certificate stay on the CDN, so if you switch to the CDN again later, HTTPS works from the start.
Troubleshooting
Visitors get 508 Loop Detected.
The CDN is requesting your site from itself. Check that the origin URL is https:// followed by your server's IP address, not www.example.com, and that Follow redirects is off, as described in Prepare for the switch.
Browsers report that the site redirected too many times.
The origin URL starts with http://, and your server redirects HTTP requests to HTTPS, so every response sends visitors back to the same address. Change the origin URL to https:// followed by your server's IP address, as described in Prepare for the switch.
Browsers show a certificate warning after the switch.
The hostname doesn't have its certificate yet, or the edge locations aren't serving it yet. Check that the SSL column shows Enabled, and then check the site again in a moment.
Enabling free SSL fails with an error. Check your domain's CAA records as described in Prepare for the switch, and then select Set up SSL again.
For other problems with the hostname or its certificate, see How to add a custom domain to UpCloud CDN.