
How to set up site-to-site VPN connection
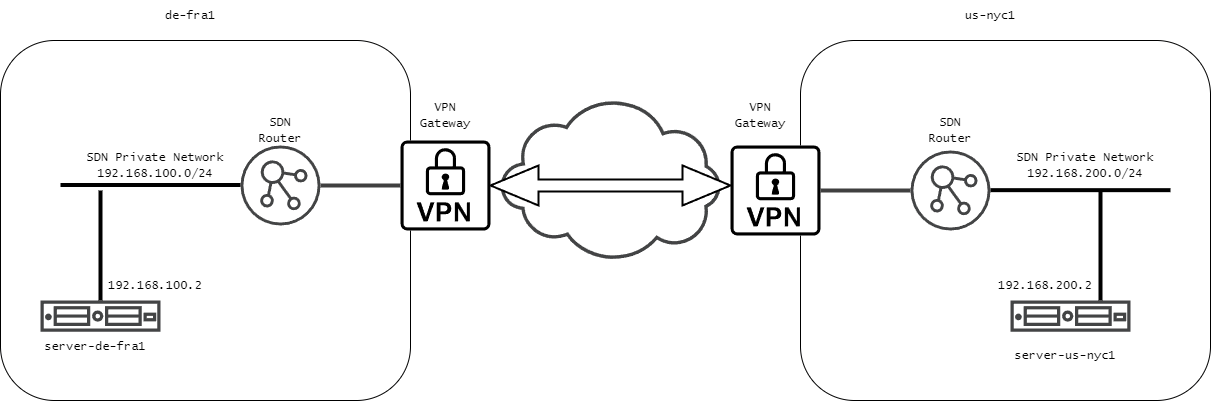
VPN Gateway is used to connect securely to external networks through a VPN endpoint. It operates in conjunction with our SDN Router, which can connect with one or multiple SDN Private Networks. All Cloud Servers connected to an SDN Private Network can access the external networks via the Gateway.
In this guide, we will demonstrate how to set up a VPN connection between two UpCloud VPN Gateways by completing the following steps:
- Create two SDN Private Networks in two different data centres
- Create two Cloud Servers and connect them to those SDN Private Networks
- Connect each of the SDN Private Networks with the VPN Gateways through SDN Routers
- Connect the VPN Gateways with a VPN tunnel
Please note that the feature is a route-based site-to-site VPN. Policy-based VPN is not currently supported.
The VPN instances can be in different locations or even on different UpCloud accounts. Furthermore, this concept can also be used to set up VPN connections to any other IPsec VPN endpoint, including other cloud providers.
Overview
For this example, we will use the following configuration:
- Our locations will be DE-FRA1 and US-NYC1.
- SDN Private Networks will use IP subnets 192.168.100.0/24 and 192.168.200.0/24, respectively.
- Servers will be automatically assigned an IP address from those networks, and since they are the first and only servers in those networks, they will get IP addresses 192.168.100.2 and 192.168.200.2. The router automatically reserves the first IP in a connected network.
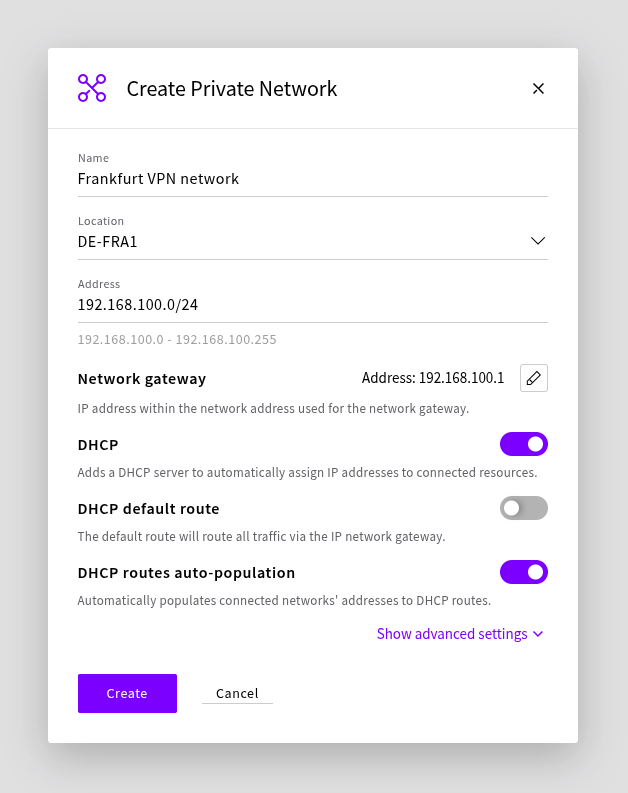
Creating SDN Private Networks
Start by creating the SDN Private Networks, log in to your UpCloud Control Panel and go to the Private Networks section under the Networks menu.
Create the following SDN Private Networks. Ensure the IP ranges don’t overlap with your existing networks.
DHCP is configured to automatically provide IP addresses to the servers and a route towards the private network on the other side of the VPN tunnel.
| Network in DE-FRA1 | Network in US-NYC1 |
|---|---|
|
|
The configurations should look as follows:

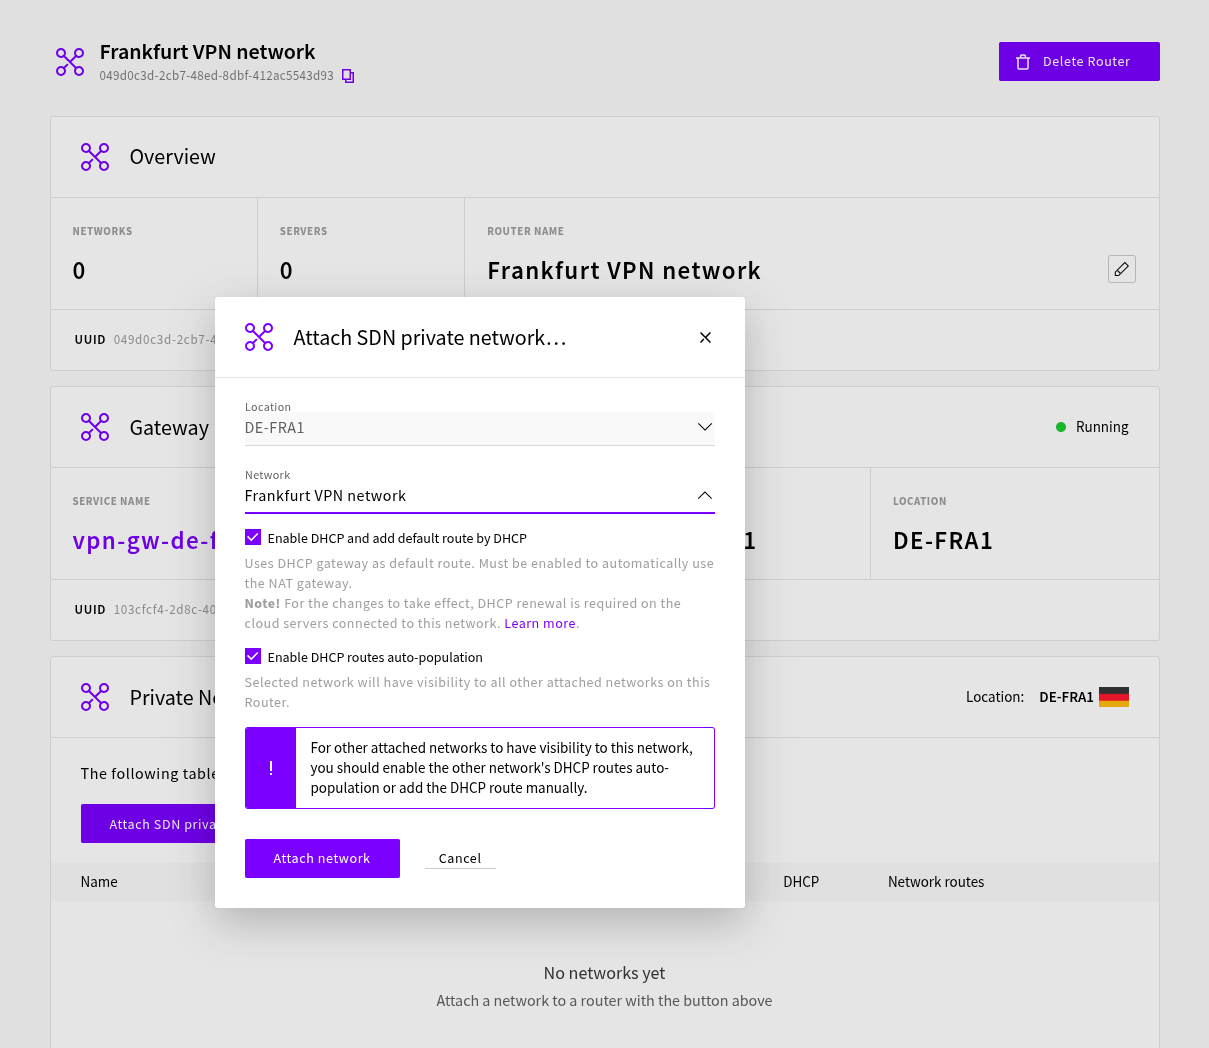
Creating SDN Routers
Next, we will create two SDN Routers that will connect the SDN Private Networks with VPN Gateways. SDN Routers are created in the Routers section under Network.
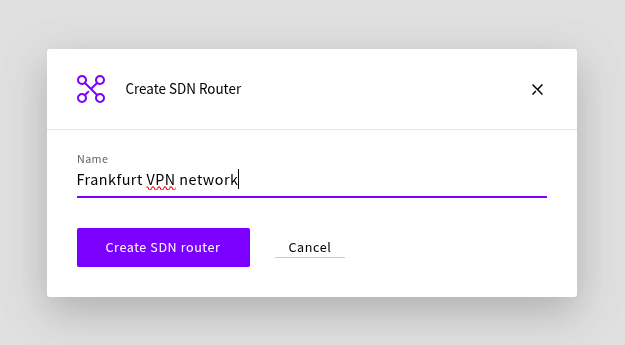
Create two routers, for example, a “Frankfurt VPN router” and a “New York VPN router”, and attach the newly created SDN Private Networks to these. Keep the default options selected, as shown in the picture below, then click the Attach network button.
Creating Cloud Servers
To continue, you will need Cloud Servers in both locations to test the VPN connection. These can be created from the Servers section under the Cloud Servers by clicking the Deploy server button.
Create one in DE-FRA1 and another in US-NYC1. We will use Ubuntu 24.04 LTS for this guide, but any other operating system will work similarly.
During the Cloud Server configuration, you must select to attach a SDN Private Network from each location in the Attach private network dialogue. Choose the private networks we set up for VPN in each location and click the Create interface button.
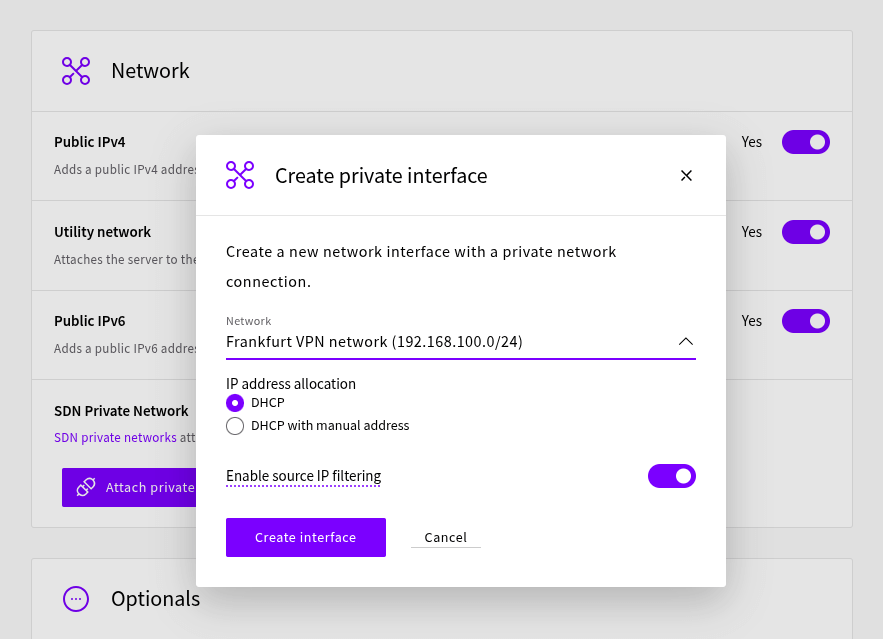
In this guide, we’ll leave the public IPv4, the Utility network and public IPv6 connections enabled, as they help connect to the servers without the VPN connection being available yet.
Note that if you plan to use IPs from the 10.0.0.0/8 range in your SDN networks, the Utility network will overlap as it occupies the whole range by default. Disabling public connectivity and only connecting to the servers from a private network is highly recommended in a secure production setup.
Creating VPN Gateways and configuring the VPN tunnel
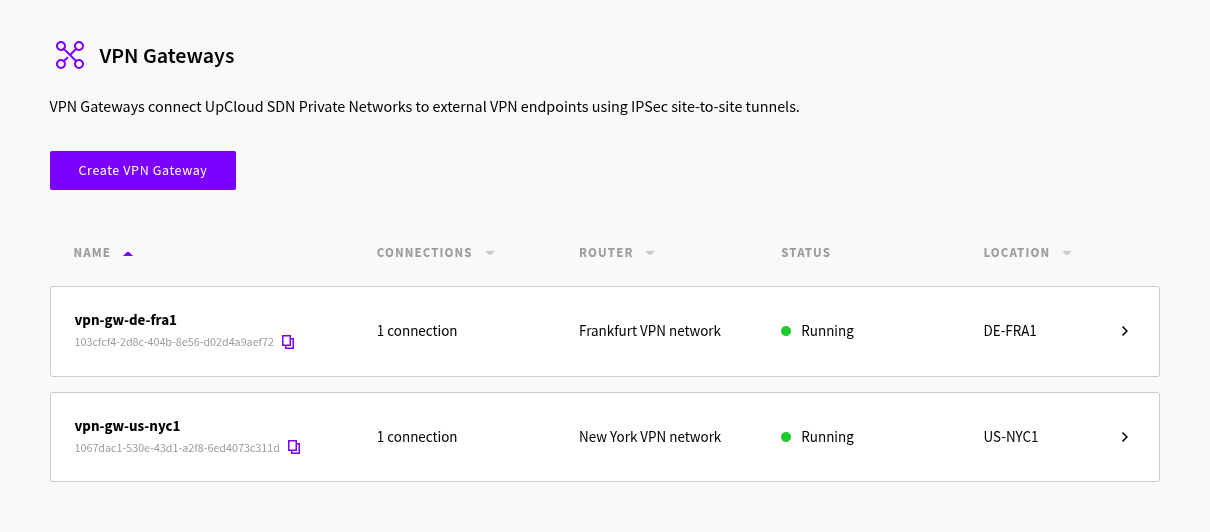
Finally, with the necessary setup done, you can create the VPN Gateways. This is done in the VPN Gateways menu under the Network section. Create one VPN Gateway for each of the locations. You will need to pick the newly created SDN Routers when creating each of the gateways. Wait until the configured status of both gateways changes from Configuring to Running.
You should now see both gateways on the VPN page. Open the details page for each gateway and note both gateways’ public IP addresses.
Open the gateway created in DE-FRA1, go to the VPN connections tab, and choose Configure connections. Then choose “Add new tunnel” and add the public IP address of the US-NYC1 gateway as the Remote IP address.
The configuration in DE-FRA1 should look as follows:
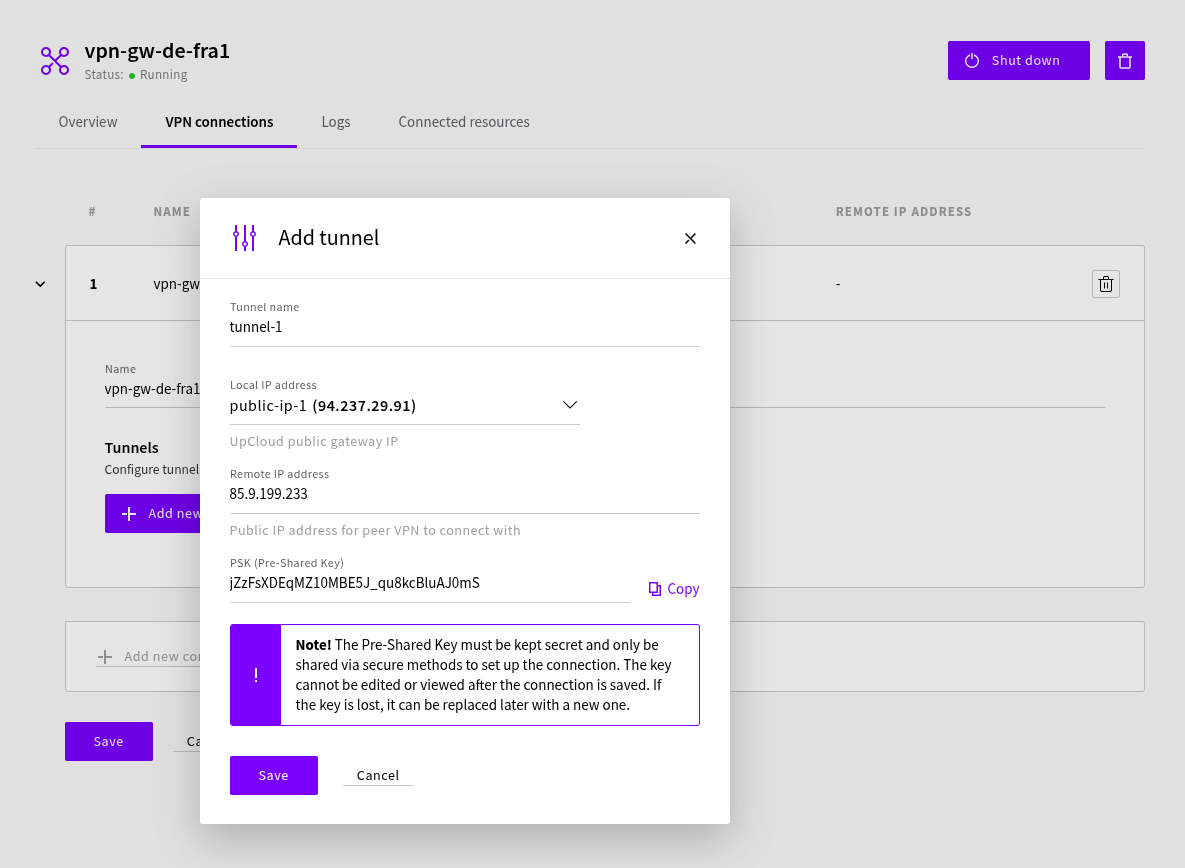
Notice that the automatically generated pre-shared key is provided, secure and of adequate length. Copy the Pre-Shared Key, which you will need when configuring the other end of the tunnel. Store the key somewhere locally. Once saved, the Pre-Shared Key cannot be viewed again and will require replacement if lost.
Add the following local and remote routes:
- Local route: 192.168.100.0/24
- Remote route: 192.168.200.0/24
Next click Add on both lines to apply the settings and finally Save the VPN connection itself.
Afterwards, open the gateway created in US-NYC1 and configure it similarly:
- Remote IP address: the DE-FRA1 VPN gateway public IP address
- Pre-Shared Key: the same key used as in DE-FRA1
- Local route: 192.168.200.0/24
- Remote route: 192.168.100.0/24

Verify the VPN connection
The networks are now securely connected through the VPN gateways. The servers have received IP addresses automatically from the DHCP server.
For example, our server in DE-FRA1 has the following configuration on the SDN Private Network interface (eth3).
root@vpn-server-de-fra1:~# ip a show dev eth3
5: eth3: <BROADCAST,MULTICAST,UP,LOWER_UP> mtu 1500 qdisc fq_codel state UP group default qlen 1000
    link/ether aa:aa:12:23:9a:25 brd ff:ff:ff:ff:ff:ff
    altname enp0s6
    altname ens6
    inet 192.168.100.2/24 metric 100 brd 192.168.100.255 scope global dynamic eth3
       valid_lft 3107sec preferred_lft 3107sec
    inet6 fe80::a8aa:12ff:fe23:9a25/64 scope link
       valid_lft forever preferred_lft forever
The server has received routes from DHCP, and we can see how servers on the New York SDN Private Network are routed using the server’s routing table. The network is reachable through the router on 192.168.100.1 from the same eth3 interface.
root@vpn-server-de-fra1:~# ip route get 192.168.200.2
192.168.200.2 via 192.168.100.1 dev eth3 src 192.168.100.2 uid 0
    cache
Lastly, we will test the connectivity by pinging the New York server from Frankfurt. Note that due to the stateless nature of IPsec connections, it is normal for the connection to take a few seconds to form. Therefore, it is normal for the first packets to be dropped.
root@vpn-server-de-fra1:~# ping 192.168.200.2
PING 192.168.200.2 (192.168.200.2) 56(84) bytes of data.
64 bytes from 192.168.200.2: icmp_seq=1 ttl=60 time=79.1 ms
64 bytes from 192.168.200.2: icmp_seq=2 ttl=60 time=78.2 ms
64 bytes from 192.168.200.2: icmp_seq=3 ttl=60 time=78.4 ms
Conclusions
That’s it! You should now have a secure site-to-site VPN connecting your SDN Private Networks in two different locations. Following the same configuration model, you could connect your UpCloud resources with any other IPsec VPN endpoint, even other cloud providers.