
The admin host accepts no incoming ICMP, so ping and traceroute from the admin host get no replies. To use them, add an accept rule for incoming ICMP above the final drop rule.
Build the multi-tier application design
This page lists everything the multi-tier application design needs and how to configure each part. Build it with the tool you prefer: the Control Panel, the API, upctl or Terraform. Each step ends with a check that confirms the step worked.
Prerequisites
- An SSH key pair. The same public key goes on all four servers.
- The public IP address you connect from, or its range. Step 6 allows SSH to the admin host from this address only.
- Free ranges: 172.16.1.0/24, 172.16.2.0/24 and 172.16.3.0/24 must not be in use in your account, including in other zones. To use other ranges, change them in steps 1 and 3. See Private ranges outside 10.0.0.0/8.
What the build creates
The build creates these resources. See Products used for what each one does in the design.
- 1 SDN Router
- 3 SDN Private Networks: front-net, restricted-net and admin-net
- 1 NAT Gateway
- 3 SDN Firewall rulesets: front, restricted and admin
- 4 Cloud Servers: front-01, front-02, restricted-01 and admin-host
- 1 Managed Load Balancer
These are the example's counts. To use a different number of servers, see Adapt the design and the notes in steps 4, 5 and 7.
The numbers on the diagram show which step creates each part.
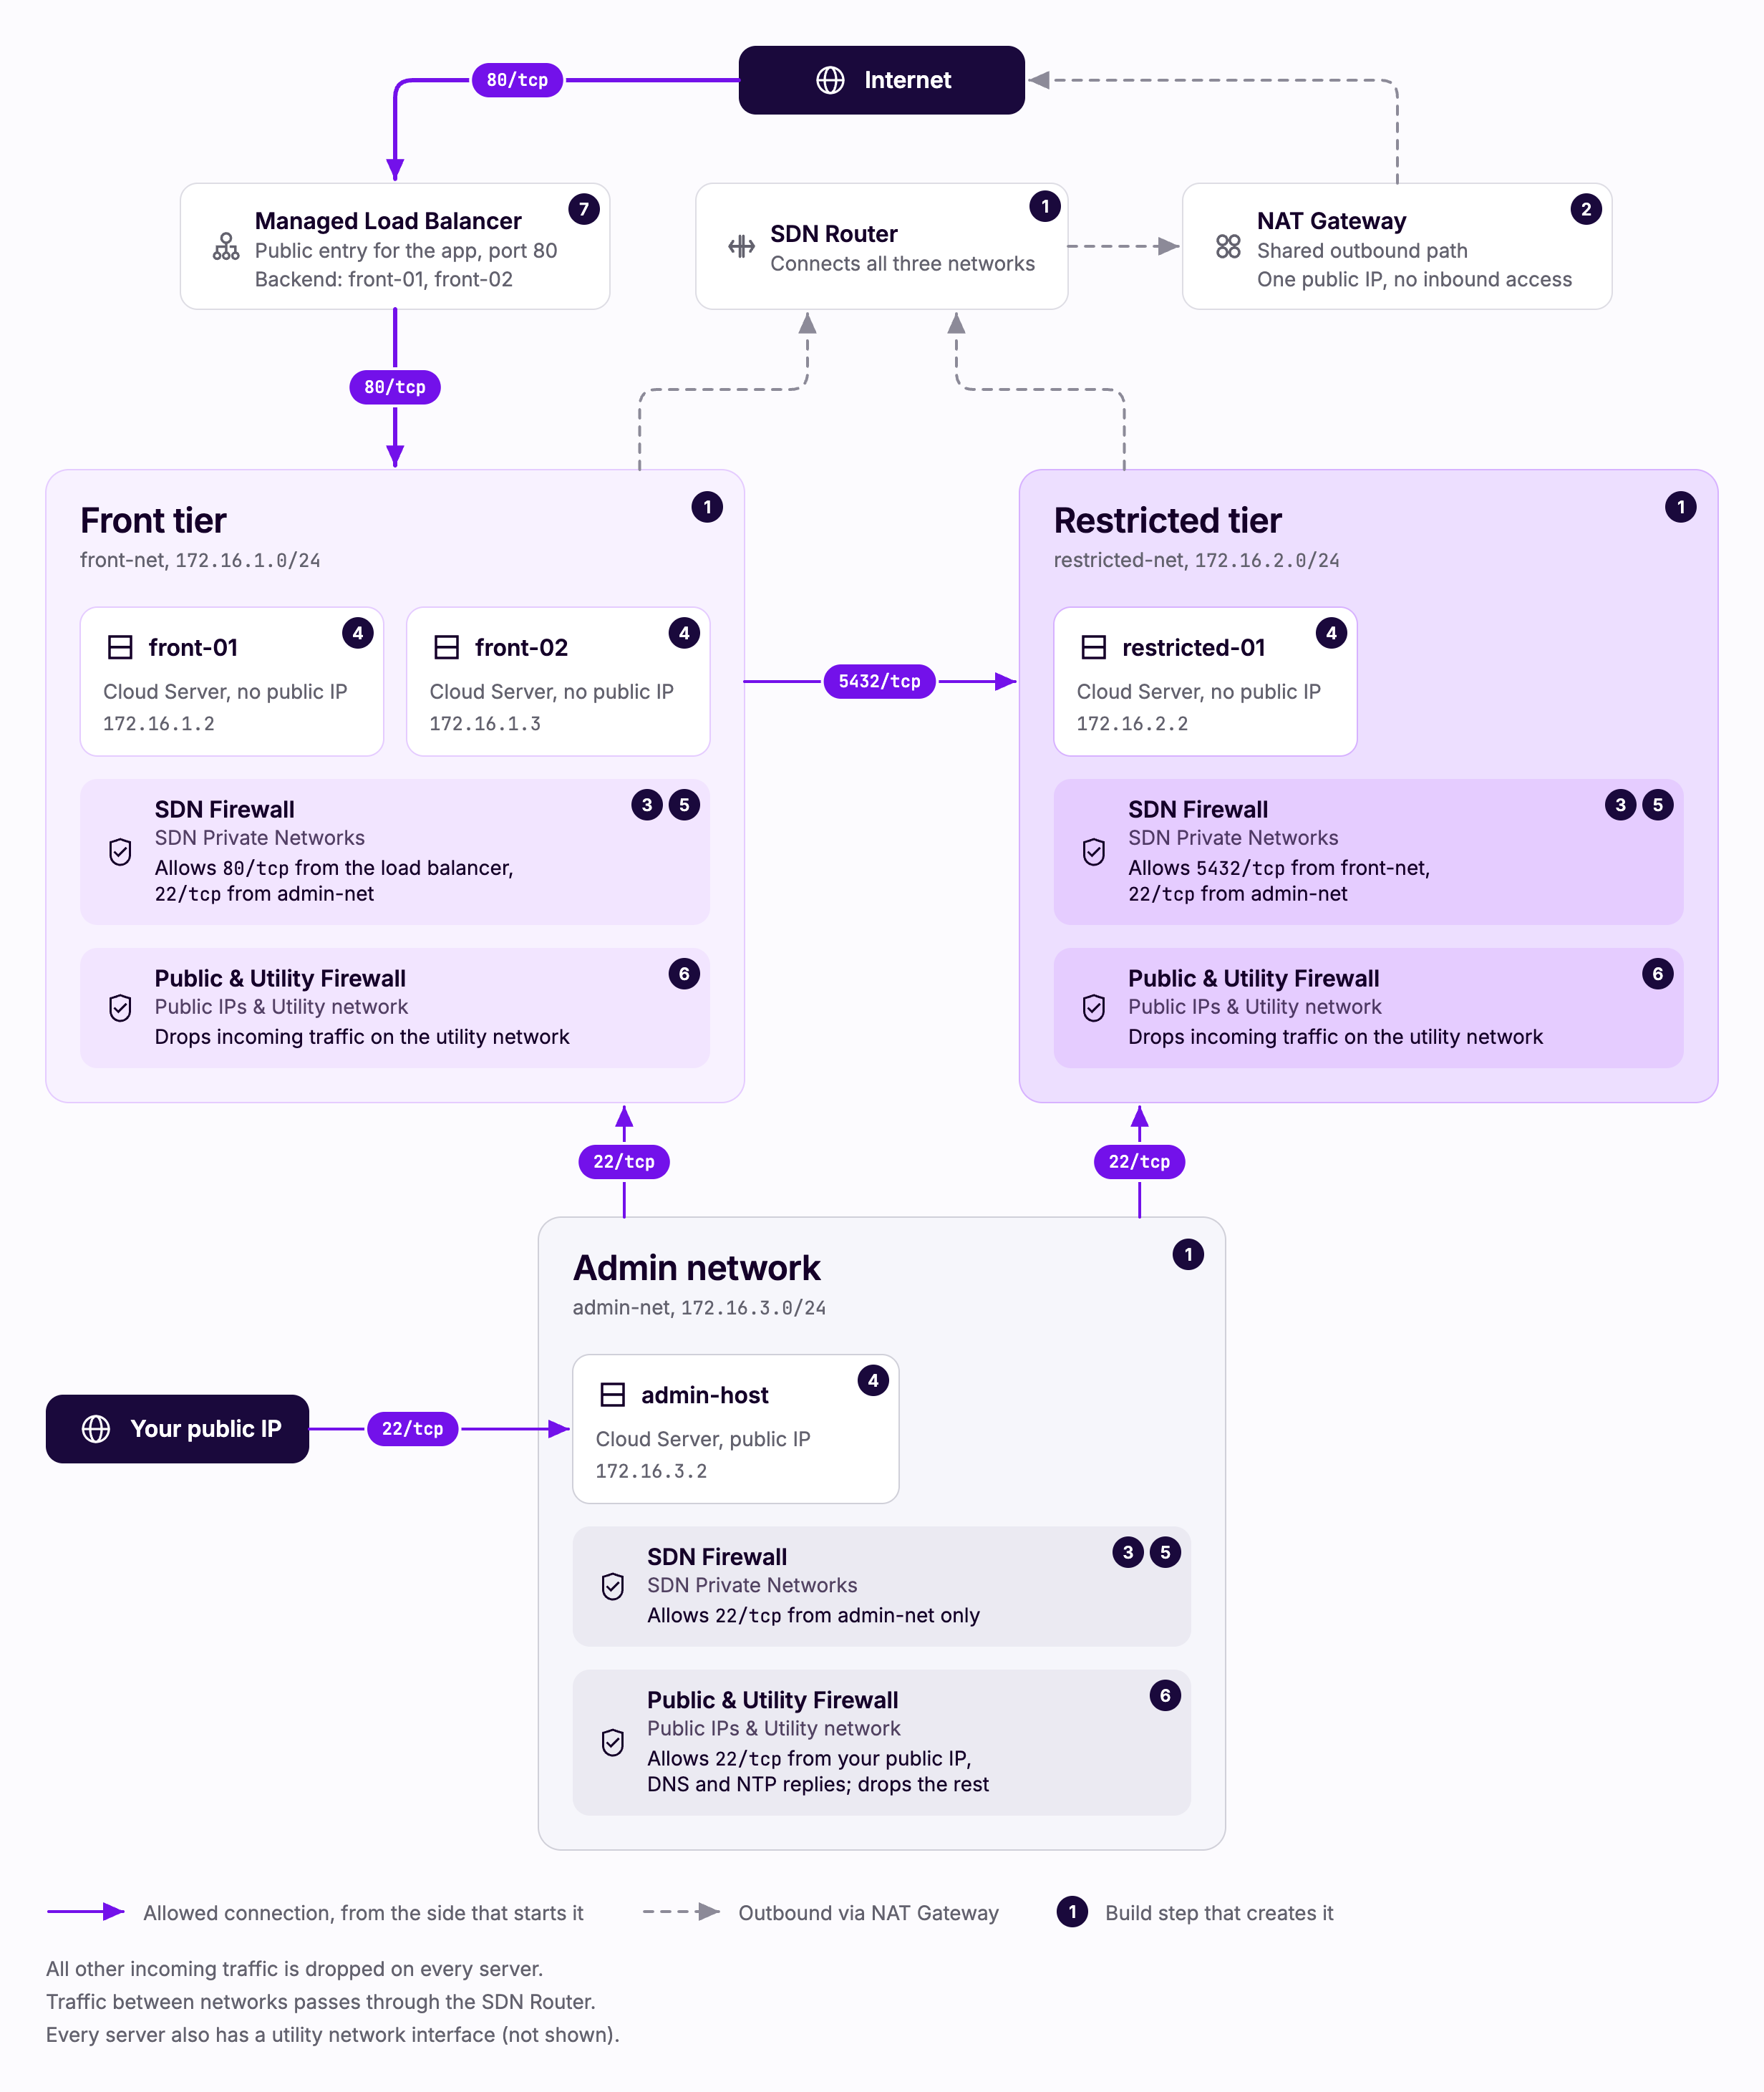
1. Create the router and networks
Create one SDN Router and three SDN Private Networks attached to it. Set the DNS servers before you create any servers, so the first DHCP lease already carries them.
All three networks are attached to the router, with DHCP on, DNS servers 94.237.127.9 and 94.237.40.9, and route auto-population off.
| Network | Range | Routes handed out |
|---|---|---|
| front-net | 172.16.1.0/24 | Default route |
| restricted-net | 172.16.2.0/24 | Default route |
| admin-net | 172.16.3.0/24 | No default route. Static routes to 172.16.1.0/24 and 172.16.2.0/24 |
Make sure:
- The DHCP default route is off on admin-net. The admin host's default route goes through its public interface. See Admin host routes.
- Route auto-population is off on admin-net. The Control Panel switches it on by default.
- Both DNS servers are set on every network. Without them, the tier servers cannot resolve names. See DNS servers.
API: create router, create SDN network
upctl: create router, create SDN network
Terraform resources: router, network
Check: each network shows the router, both DNS servers and its default route setting, and admin-net lists the two static routes.
2. Create the NAT Gateway
Create a NAT Gateway with the NAT feature, attached to the router. It gives both tiers one shared path out to the internet. Any plan works for the design. The examples use essentials.
Make sure:
- The gateway reaches the
runningstate before you test outbound connections. This usually takes several minutes and can take longer.
API: create NAT Gateway
Terraform resources: gateway
Check: the gateway is running and has a public IP address, and the router has a static route of type service for 0.0.0.0/0. See NAT Gateway route.
3. Create the firewall rulesets
Create one SDN Firewall ruleset for each tier and one for the admin host. Every ruleset is stateful, and every rule accepts incoming IPv4 TCP traffic. Replies to allowed connections need no rules of their own. See Isolation comes from firewall rules.
| Ruleset | Port | From | Purpose |
|---|---|---|---|
| front | 22 | admin-net | SSH from the admin host |
| restricted | 22 | admin-net | SSH from the admin host |
| restricted | 5432 | front-net | Application traffic from the front tier |
| admin | 22 | admin-net | SSH within admin-net only |
The sources are the networks' ranges from step 1. Port 80 on the front ruleset, from the load balancer, is added in step 7, once its addresses are known.
Make sure:
- Each ruleset is created with
"stateful": true. The API returns a 400 error when the field is missing or set tofalse. - Each rule is enabled. Through the API, pass
"enabled": trueon every rule. A singlePOSTto/firewall-ruleset/{uuid}/rulecreates a rule disabled, while a bulkPUTto the same path creates it enabled. - Every ruleset has at least one rule before you attach it.
API: create ruleset, add rules
Terraform resources: ruleset
Check: read each ruleset back and compare every rule with the table above. Servers enforce exactly what is configured.
4. Create the servers
Create the three tier servers without a public IP address, and the admin host with one. Every server has a utility network interface, your SSH key and the same operating system. The examples use the PREMIUM-1xCPU-1GB plan and Ubuntu Server 24.04.
| Server | Private network | Public IP |
|---|---|---|
| front-01 | front-net | No |
| front-02 | front-net | No |
| restricted-01 | restricted-net | No |
| admin-host | admin-net | Yes |
Make sure:
- The networks have their DNS servers set before you create the servers. See step 1.
- You note each server's private address. Servers get their addresses by DHCP in the order they start, so front-01 and front-02 can end up with either of 172.16.1.2 and 172.16.1.3. Step 7 needs the front servers' addresses.
For a different number of front servers, create each one on front-net in the same way.
API: create server
upctl: create server
Terraform resources: server
Check: each server is started and has the interfaces in the table, and the tier servers have no public interface.
5. Attach the rulesets
Attach each server's ruleset and switch on its private firewall. With the private firewall on, the default actions are drop for incoming traffic and accept for outgoing traffic.
| Server | Ruleset |
|---|---|
| front-01 | front |
| front-02 | front |
| restricted-01 | restricted |
| admin-host | admin |
Make sure:
- The private firewall is on for every server. Without it, an attached ruleset filters nothing. Terraform attaches rulesets but cannot switch the private firewall on, so do that in the Control Panel or through the API.
For a different number of front servers, attach the front ruleset to each of them.
API: attach ruleset, switch on the private firewall
Terraform resources: ruleset attachment
Check: on each server, the ruleset's applied_version matches its version, for example with GET /1.3/server/{uuid}/firewall_ruleset_relationships/private. The rollout is asynchronous. The first rollout to a new server can take a few minutes.
6. Close the utility network and open SSH on the admin host
Switch on the Public & Utility Firewall on every server, so that no other server in your account can reach them over the utility network. Rules apply in order, and each server ends with a rule that drops all other incoming traffic. See Keep the utility network closed.
The tier servers, front-01, front-02 and restricted-01, each get two rules: an accept rule for all outgoing traffic, then a drop rule for all incoming traffic.
The admin host gets six:
| Position | Rule | Purpose |
|---|---|---|
| 1 | In, TCP 22 from your address, accept | SSH |
| 2 | In, UDP from 94.237.127.9 port 53, accept | DNS replies |
| 3 | In, UDP from 94.237.40.9 port 53, accept | DNS replies |
| 4 | In, UDP from port 123 to ports 1024–65535, accept | NTP replies |
| 5 | Out, all, accept | Outgoing traffic |
| 6 | In, all, drop | Everything else |
All rules are IPv4. To allow a range for SSH instead of one address, use the range as the source.
Make sure:
- The firewall is switched on for every server. Switching it on can fail while setting the rules succeeds, and a server with its firewall off accepts traffic on the utility network.
- Every rule is in place. A failed request can leave a rule missing while the others succeed.
Note
API: set firewall rules, switch on the firewall
upctl: add firewall rule, switch on the firewall
Terraform resources: firewall rules, server
Check: every server shows its firewall as on, with 2 rules on the tier servers and 6 on the admin host. The rules can take a minute or two to apply.
7. Create the load balancer
Create a Managed Load Balancer with a public frontend on port 80 and a backend that forwards to both front servers on front-net.
| Setting | Value |
|---|---|
| Plan | Any. The examples use development. |
| Networks | A public IPv4 network, and front-net |
| Frontend | Port 80, HTTP mode, on the public network |
| Backend | Static members on port 80: the private addresses of front-01 and front-02 |
For a different number of front servers, add one member for each.
API: create load balancer, read its addresses
Terraform resources: load balancer, frontend, backend, member
Check: the load balancer is running. This takes several minutes.
Allow the load balancer through the front ruleset
The load balancer's addresses on front-net are only known once it is running. It holds two: its private frontend address, marked "listen": true, and its node address, marked "listen": false. Your servers see requests and health checks from the node address. See Load balancer addresses.
Add one rule to the front ruleset for each address:
| Port | From | Purpose |
|---|---|---|
| 80 | The node address, as /32 | Requests and health checks |
| 80 | The frontend address, as /32 | The load balancer's private frontend |
Make both changes in one request, then read the ruleset back. The new version reaches both front servers on its own within a minute or two. To roll it out at once, attach the ruleset to one of the front servers. See Change rules later.
Make sure:
- The rules name the load balancer's addresses, not the whole of front-net. A front-net source would let any other server on front-net reach port 80.
API: add rules, attach ruleset
Terraform resources: ruleset, ruleset attachment
Check: both front servers report the ruleset's new version as applied. Once your application listens on port 80, the load balancer shows both members as up.
8. Deploy your application and verify
Install your application on the tier servers: the front tier serves port 80 and the restricted tier listens on port 5432. Until something listens on port 80, the load balancer's health checks mark the front servers as down.
Reach the tier servers through the admin host, as described in Reach the servers. For example:
ssh -J root@ADMIN_PUBLIC_IP [email protected]Then run the tests in Verify it works.
Change rules later
A saved change to a ruleset reaches every server that uses it on its own, usually within a minute or two. To change rules safely:
- Make the whole change in one request. Each saved change goes live as soon as it rolls out, so changing related rules one at a time can leave the servers with a half-finished set for a while. Replacing the ruleset's rules in one request avoids that.
- Read the ruleset back and check every rule, because servers enforce exactly what is configured.
- Check that each server's
applied_versionmatches the ruleset'sversion. To roll the change out at once instead of waiting, attach the ruleset to any one of its servers. One attach rolls the current version out to every server that uses the ruleset.