
Build the self-hosted RAG design
This page lists everything the self-hosted RAG design needs and how to configure each part. Build the infrastructure with the tool you prefer: the Control Panel, the API, upctl or Terraform. Step 8 sets up the example software, Open WebUI and vLLM, on the servers. Each step ends with a check that confirms the step worked.
Prerequisites
- An SSH key pair. The same public key goes on all servers.
- The public IP address you connect from. Step 7 allows SSH to the admin host from this address only.
- A domain name where you can create DNS records, for the HTTPS certificate in step 9.
- A GPU available to your account in fi-hel2. Check your plan with the command in GPU availability.
- Free ranges: 172.16.11.0/24, 172.16.12.0/24 and 172.16.13.0/24 must not be in use in your account, including in other zones. To use other ranges, change them in steps 1, 3 and 8.
What the build creates
The build creates these resources in fi-hel2. See Products used for what each one does in the design.
- 1 SDN Router
- 3 SDN Private Networks: app-net, inference-net and admin-net
- 1 NAT Gateway
- 3 SDN Firewall rulesets: app, inference and admin
- 1 Managed Object Storage instance with 2 buckets and 2 users
- 1 Managed PostgreSQL service and 1 Managed Valkey service
- 3 Cloud Servers: app-01, app-02 and admin-host
- 1 GPU Server: gpu-01
- 1 Managed Load Balancer with a certificate for your domain
The numbers on the diagram show which step creates each part.
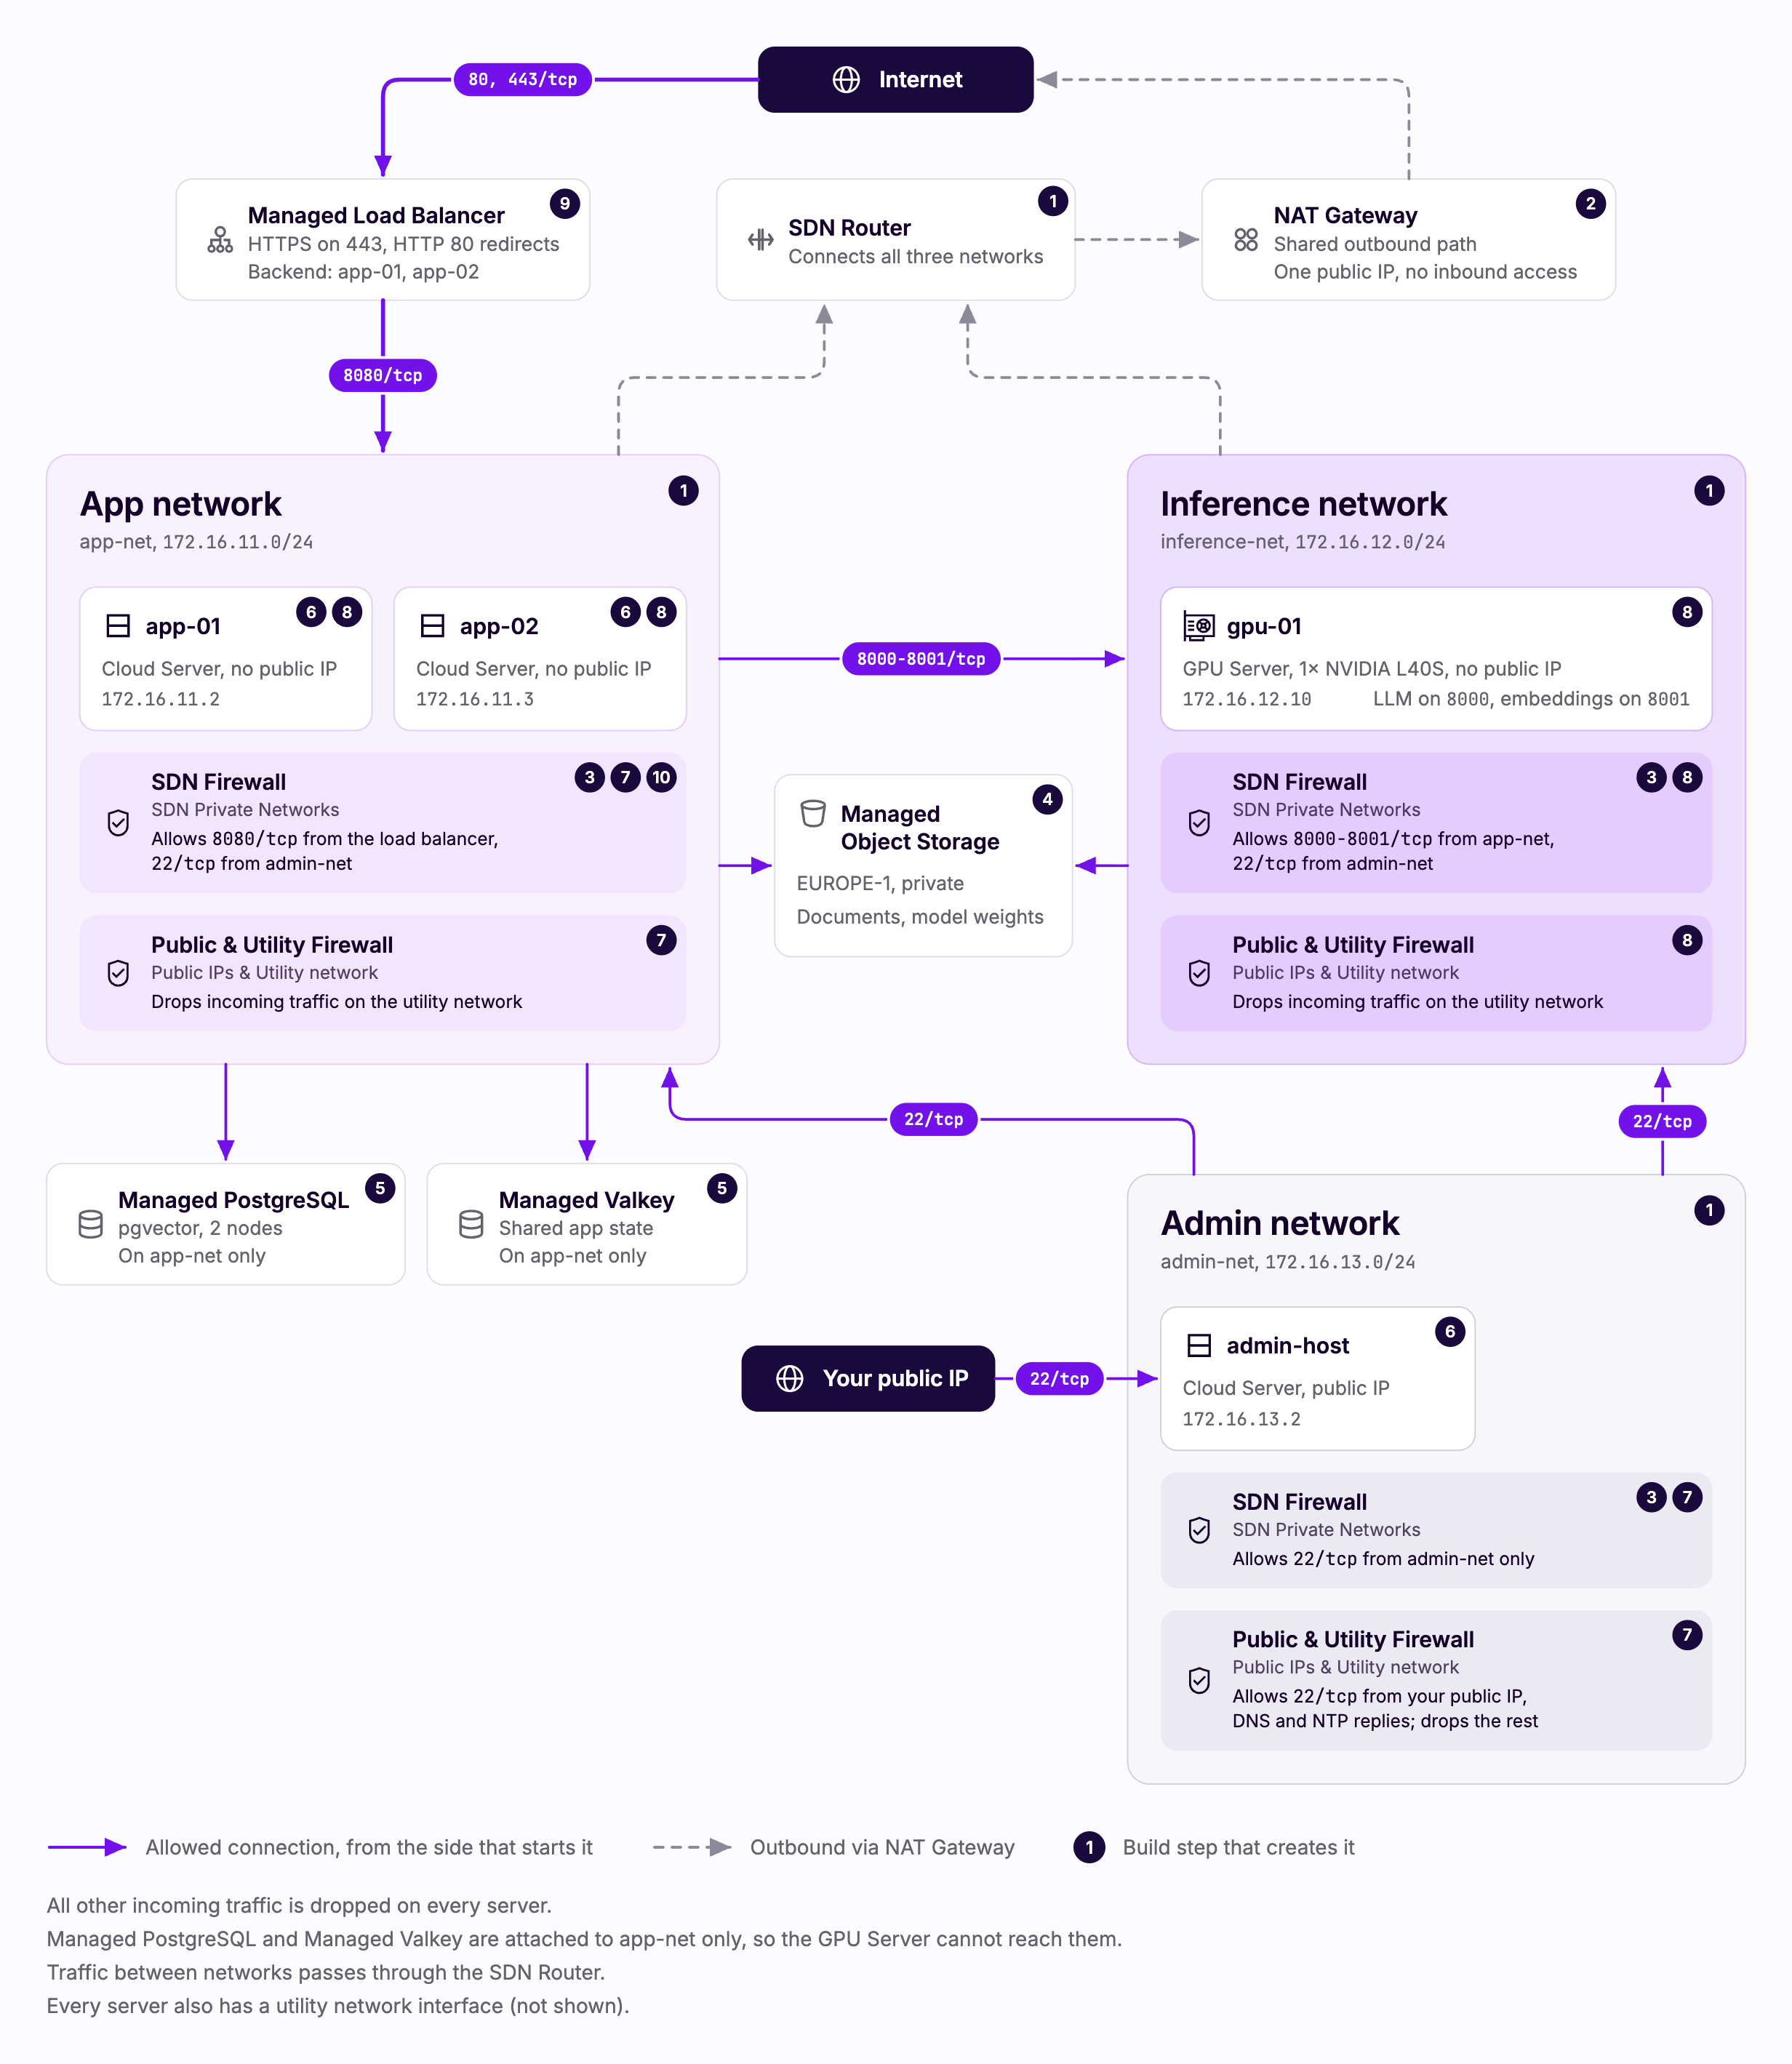
1. Create the router and networks
Create one SDN Router and three SDN Private Networks attached to it in fi-hel2. Set the DNS servers before you create any servers, so the first DHCP lease already carries them.
All three networks are attached to the router, with DHCP on, DNS servers 94.237.127.9 and 94.237.40.9, and route auto-population off.
| Network | Range | Routes handed out |
|---|---|---|
| app-net | 172.16.11.0/24 | Default route |
| inference-net | 172.16.12.0/24 | Default route |
| admin-net | 172.16.13.0/24 | No default route. Static routes to 172.16.11.0/24 and 172.16.12.0/24 |
Make sure:
- The DHCP default route is off on admin-net. The admin host's default route goes through its public interface. See Default route.
- Route auto-population is off on admin-net. The Control Panel switches it on by default.
- Both DNS servers are set on every network. The app servers and the GPU Server resolve names only through them.
API: create router, create SDN network
upctl: create router, create SDN network
Terraform resources: router, network
Check: each network shows the router, both DNS servers and its default route setting, and admin-net lists the two static routes.
2. Create the NAT Gateway
Create a NAT Gateway in fi-hel2 and attach it to the router. The examples use the Essentials plan.
API: create NAT Gateway
Terraform resources: gateway
Check: the gateway is running and has a public IP address, and the router has a static route of type service for 0.0.0.0/0. See The router's service route.
3. Create the firewall rulesets
Create one stateful SDN Firewall ruleset per network. Every rule accepts incoming IPv4 TCP traffic and has "enabled": true. Replies to allowed connections need no rules. See Configure the SDN Firewall.
| Ruleset | Port | Source |
|---|---|---|
| app | 22 | 172.16.13.0/24 (admin-net) |
| inference | 22 | 172.16.13.0/24 (admin-net) |
| inference | 8000-8001 | 172.16.11.0/24 (app-net) |
| admin | 22 | 172.16.13.0/24 (admin-net) |
Port 8080 on the app ruleset, from the load balancer, is added in step 10, once its addresses are known.
Make sure:
- Every ruleset has at least one rule before you attach it.
API: create ruleset, add rules
Terraform resources: ruleset
Check: read each ruleset back and compare every rule with the table.
4. Create Object Storage
Create a Managed Object Storage instance in the EUROPE-1 region with a private network connection to app-net and to inference-net, and no public connection. Then create two buckets, and one user per bucket with a policy that allows access to that bucket only.
| Bucket | Holds | User |
|---|---|---|
| documents | Uploaded documents, written by the application | app user |
| weights | Model weights, read by the GPU Server | GPU user |
A policy for one bucket allows s3:* on the bucket and on its objects:
{"Version":"2012-10-17","Statement":[{"Effect":"Allow","Action":["s3:*"],"Resource":["arn:aws:s3:::documents","arn:aws:s3:::documents/*"]}]}Make sure:
- You note the private endpoint's domain name, which ends in
-private.upcloudobjects.com. Both networks use the same endpoint. - You create an access key for each user and keep the keys for step 8.
- When you create the policy through the API, the
documentfield is the policy JSON, URL-encoded.
API: create service, create bucket, create policy, create user, attach policy to user, create access key
upctl: create service
Terraform resources: object storage, bucket, policy, user, user policy, access key
Check: the instance is running and both networks list a route to the endpoint's range among their effective DHCP routes.
5. Create the databases
Create a Managed PostgreSQL service and a Managed Valkey service in fi-hel2, each connected to app-net only, with public access off.
| Service | Example plan | Notes |
|---|---|---|
| PostgreSQL | 2x2xCPU-4GB-50GB, version 18 | Two nodes, with the vector extension (pgvector) |
| Valkey | 1x1xCPU-2GB | For production, see Valkey availability. |
Make sure:
- Neither service is connected to inference-net, so the GPU Server cannot reach them.
- You note each service's hostname, port, user and password for step 8. For PostgreSQL, use the primary hostname and port, not the replica or connection pool ones. Connections use TLS.
API: create database
upctl: create database
Terraform resources: PostgreSQL, Valkey
Check: both services are running, and app-net lists a route to the databases' address range among its effective DHCP routes. The vector extension is created in step 8, once a server can reach the database.
6. Create the servers
Create the admin host and the two app servers. The GPU Server follows in step 8, once its model weights are in Object Storage. Every server has a utility network interface and your SSH key, and runs Ubuntu Server 24.04.
| Server | Plan | Private network | Public IP |
|---|---|---|---|
| app-01 | PREMIUM-2xCPU-4GB | app-net | No |
| app-02 | PREMIUM-2xCPU-4GB | app-net | No |
| admin-host | PREMIUM-1xCPU-1GB | admin-net | Yes |
Make sure:
- You note the app servers' private addresses for the load balancer in step 9.
API: create server
upctl: create server
Terraform resources: server
Check: each server is started and has the interfaces in the table, and the app servers have no public interface.
7. Attach the rulesets and close the utility network
Attach each server's ruleset and switch on its private firewall. Then switch on the Public & Utility Firewall on every server, so that no other server in your account can reach it over the utility network.
| Server | Ruleset | Public & Utility Firewall rules, in order |
|---|---|---|
| app-01, app-02 | app | Accept outgoing; drop incoming |
| admin-host | admin | Accept TCP 22 from your address; accept UDP from source port 53 of 94.237.127.9; the same for 94.237.40.9; accept UDP from source port 123 to ports 1024-65535; accept outgoing; drop incoming |
Make sure:
- The private firewall is on for every server. Without it, an attached ruleset filters nothing. Terraform's server resource has a setting for the Public & Utility Firewall only, so switch the private firewall on through the API.
API: attach ruleset, switch on the private firewall, set firewall rules
upctl: add firewall rule, switch on the firewall
Terraform resources: ruleset attachment, firewall rules
Check: each server's applied_version for its ruleset matches the ruleset's version, and you can reach the app servers over SSH through the admin host, as described in Reach the servers.
8. Deploy the models and the application
This step sets up the example software: vLLM on the GPU Server, and Open WebUI with Apache Tika on the app servers. The models are Qwen3-8B for answers and Qwen3-Embedding-0.6B for embeddings, both under the Apache 2.0 license.
Database extension
From one of the app servers, create the vector extension in PostgreSQL:
CREATE EXTENSION IF NOT EXISTS vector;Model weights
Download both models once from Hugging Face, Qwen/Qwen3-8B and Qwen/Qwen3-Embedding-0.6B, and upload them to the weights bucket from one of the app servers, using the GPU user's access key. The GPU Server copies them from the bucket over the private network when it is created.
Make sure:
- The server has about 18 GB of free disk space for the two models. Delete the local copy after the upload.
- On a server with 4 GB of memory, download one file at a time, for example with
hf download <model> --max-workers 1andHF_HUB_DISABLE_XET=1. Larger parallel downloads run out of memory. - The bucket holds one folder per model,
qwen3-8b/andqwen3-embedding-0.6b/, each with itsconfig.jsonand weight files.
GPU Server
Create the GPU Server with user data that sets everything up when it is created, then give it its ruleset and firewalls like the other servers in step 7.
| Server | Plan | Operating system | Private network | Public IP |
|---|---|---|---|---|
| gpu-01 | GPU-8xCPU-64GB-1xL40S, 150 GB MaxIOPS storage | Ubuntu Server 24.04 LTS (with NVIDIA drivers & CUDA) | inference-net, address 172.16.12.10 | No |
The user data:
- Installs
rcloneand copies the weights bucket to/models, using the private endpoint and the GPU user's key. - Pulls the
vllm/vllm-openai:v0.31.0image. - Creates and starts two systemd services that run vLLM in Docker with the GPU:
| Service | Port | Model | Options |
|---|---|---|---|
| vllm-embed | 8001 | /models/qwen3-embedding-0.6b, served as qwen3-embedding | --runner pooling --gpu-memory-utilization 0.15 |
| vllm-llm | 8000 | /models/qwen3-8b, served as qwen3-8b | --gpu-memory-utilization 0.75 --max-model-len 32768 --enable-auto-tool-choice --tool-call-parser hermes |
| Server | Ruleset | Public & Utility Firewall rules, in order |
|---|---|---|
| gpu-01 | inference | Accept outgoing; drop incoming |
Make sure:
- The private interface has the fixed address 172.16.12.10, set when you create the server. The app servers use this address, and a replacement server takes the same one. See Replace the GPU Server.
- Both vLLM services use
--api-keywith the same secret key. The app servers send it with every request. - vllm-llm starts after vllm-embed answers on
/health, so that the two do not size GPU memory at the same time. Both services restart on their own after a reboot. - vllm-llm has the tool-calling options. The Open WebUI chat interface asks the model for tool calls, and vLLM refuses those requests without them.
- The private firewall is on, as in step 7.
Application servers
On both app servers, install Docker and run Open WebUI (ghcr.io/open-webui/open-webui:v0.11.4) and Apache Tika (apache/tika:4.1.0-full) with Docker Compose. Open WebUI uses the server's own network, so the SDN Firewall rule for port 8080 applies to it directly. Tika listens on 127.0.0.1:9998 only.
| Open WebUI setting | Value |
|---|---|
WEBUI_SECRET_KEY | The same random value on both servers |
ENABLE_SIGNUP | false |
DATABASE_URL, PGVECTOR_DB_URL | postgresql://<user>:<password>@<host>:<port>/defaultdb?sslmode=require |
VECTOR_DB | pgvector |
REDIS_URL | rediss://<user>:<password>@<host>:<port>/0 |
WEBSOCKET_MANAGER, WEBSOCKET_REDIS_URL | redis, and the Valkey URL ending in /1 |
ENABLE_WEBSOCKET_SUPPORT | true |
STORAGE_PROVIDER | s3 |
S3_ENDPOINT_URL, S3_REGION_NAME, S3_BUCKET_NAME | https://<private endpoint domain>, europe-1, documents |
S3_ACCESS_KEY_ID, S3_SECRET_ACCESS_KEY | The app user's access key |
CONTENT_EXTRACTION_ENGINE, TIKA_SERVER_URL, TIKA_SERVER_VERSION | tika, http://127.0.0.1:9998, 4 |
OPENAI_API_BASE_URL, OPENAI_API_KEY | http://172.16.12.10:8000/v1, the vLLM API key |
RAG_EMBEDDING_ENGINE, RAG_EMBEDDING_MODEL | openai, qwen3-embedding |
RAG_OPENAI_API_BASE_URL, RAG_OPENAI_API_KEY | http://172.16.12.10:8001/v1, the vLLM API key |
ENABLE_OLLAMA_API | false |
ENABLE_COMMUNITY_SHARING | false |
UVICORN_WORKERS, THREAD_POOL_SIZE | 1, 2000 |
ENABLE_DB_MIGRATIONS | true on app-01, false on app-02 |
Make sure:
Start app-01 first, so that it creates the database schema, then app-02.
Open WebUI stores many settings in the database on its first start, and later changes to the environment do not replace them. To change one later, such as
TIKA_SERVER_VERSION, use the Open WebUI API, for examplePOST /api/v1/retrieval/config/updatefor the document settings.Create the administrator account before you create the load balancer. Open WebUI makes the first account that signs up its administrator, and
ENABLE_SIGNUPset tofalsestill allows that first sign-up. Open a tunnel to one of the app servers through the admin host, then sign up athttp://127.0.0.1:8080in your browser:ssh -N -J root@ADMIN_PUBLIC_IP -L 8080:127.0.0.1:8080 [email protected]Every later sign-up is refused.
Check: both endpoints on gpu-01 answer /health, http://172.16.12.10:8000/v1/models answers from an app server with the API key and refuses requests without it, and http://127.0.0.1:8080/health answers on both app servers.
9. Create the load balancer and the certificate
Create a Managed Load Balancer in fi-hel2 on the Production Small plan, with a public network and app-net.
| Part | Configuration |
|---|---|
| Backend | Members app-01 and app-02 on port 8080. HTTP health check on /health, expecting 200. timeout_server set to 300 seconds. |
| HTTP frontend | Port 80 on the public network, with a rule that redirects to HTTPS |
| HTTPS frontend | Port 443 on the public network, in HTTP mode, with a dynamic certificate for your hostname |
Make sure:
timeout_serveris raised from its default of 10 seconds. See Load balancer timeouts.- Once the load balancer is running, you create a CNAME record from your hostname to the load balancer's DNS name, and check it resolves, before you attach the certificate to the HTTPS frontend. See Managed Load Balancer SSL certificates.
- Sticky sessions are not needed. The app servers share their state through Valkey.
API: create load balancer, modify backend, create certificate bundle, create frontend, attach certificate to frontend
Terraform resources: load balancer, backend, member, frontend, frontend rule, certificate bundle, frontend TLS config
Check: the certificate bundle has a certificate with an expiry date, and http:// on your hostname redirects to https://. The members stay down until step 10.
10. Allow the load balancer through the app ruleset
The load balancer's addresses on app-net are only known once it is running. With two nodes, it holds four: two marked "listen": true and two marked "listen": false. The app servers see requests and health checks from the "listen": false addresses. See Addresses on private networks.
Add one rule per "listen": false address to the app ruleset, accepting TCP port 8080 from that address with a /32 mask. Send them in one request with the existing SSH rule.
API: get load balancer, add rules
Terraform resources: ruleset
Check: both backend members pass their health checks, and https:// on your hostname shows the Open WebUI sign-in page.
11. Verify
Run the checks in Verify it works, including the paths that are supposed to fail, and the end-to-end question about an uploaded document.
Change rules later
Each ruleset belongs to one network's servers, so a change to the app ruleset reaches both app servers. Send the complete set of rules in one request. To start the rollout straight away, attach the ruleset again to each of its servers and check applied_version. See Change rules later in the SDN Firewall guide.