SimpleBackups is an all-in-one website & database backup automation service built for the cloud. It offers extensive support for databases such as MySQL, MongoDB and PostgreSQL as well as most cloud storage options. Furthermore, SimpleBackups allows you to quickly and easily store backups securely in UpCloud Object Storage.
In this tutorial, we’ll show you how to save your file backups in UpCloud Object Storage.
Prerequisites
To be able to utilise the services on both UpCloud and SimpleBackups, you will need to register on both. Begin by signing up for an account if you haven’t yet.
- Register on SimpleBackups
- Sign up on UpCloud
Once you’ve created accounts on both platforms, continue below with creating your Object Storage.
1. Creating your UpCloud Object Storage
Get started by logging in to your UpCloud Control Panel and head over to the Object Storage section.
Object Storage has become the de-facto mass storage cloud solution thanks to its flexibility and connectivity options. It makes a great location to securely store your backups without worry.
Begin by clicking the New Object Storage button then make the following selections.
- Select the location for your storage. The number of locations available within the EU can help you comply with GDPR regulations if applicable.
- Make sure to keep the Public network access option enabled
- Name your storage
- Select Yes, create a bucket now and finally give your bucket a name
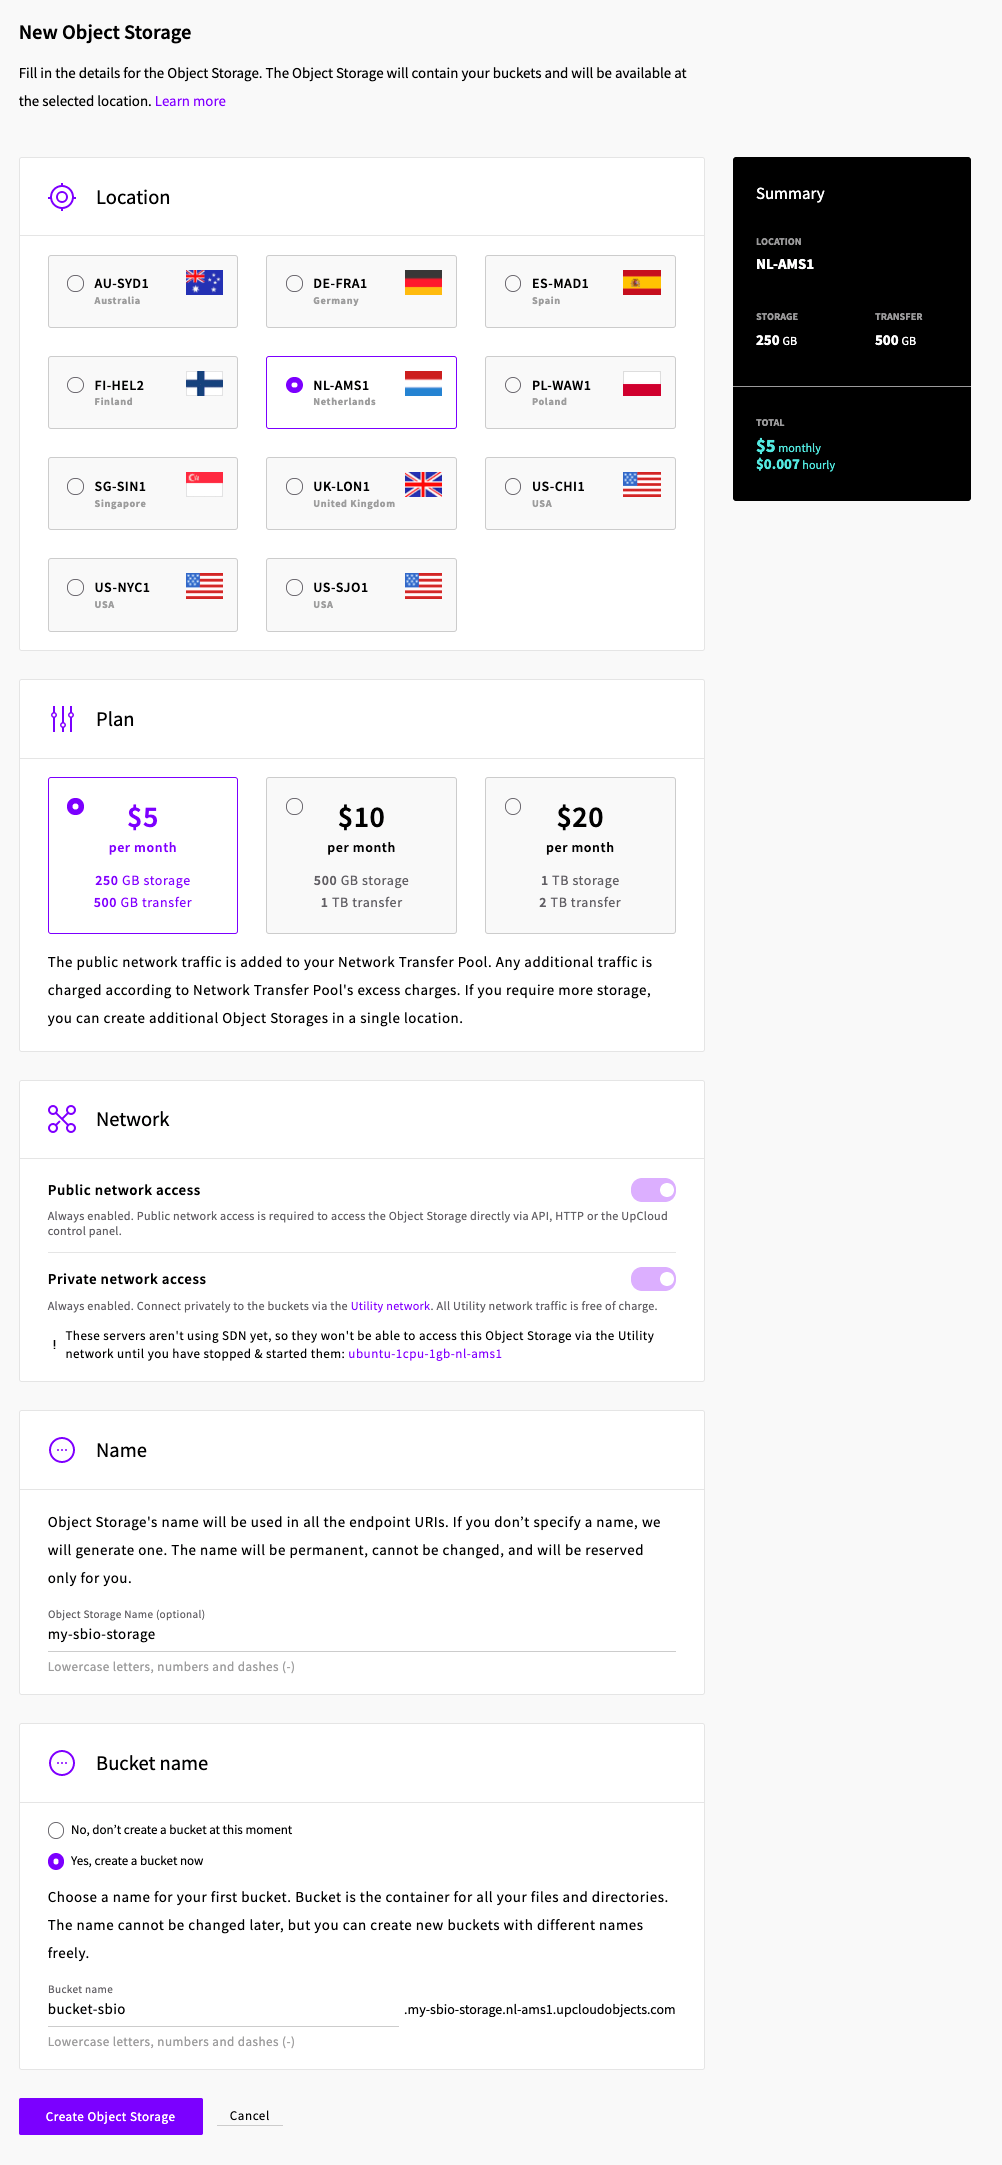
When done, click the Create Object Storage button at the end of the configuration options.
You’ll then get a note of the newly generated Access and Secret keys corresponding to your new Object Storage. Click the Download keys as .txt button and store them somewhere safe.
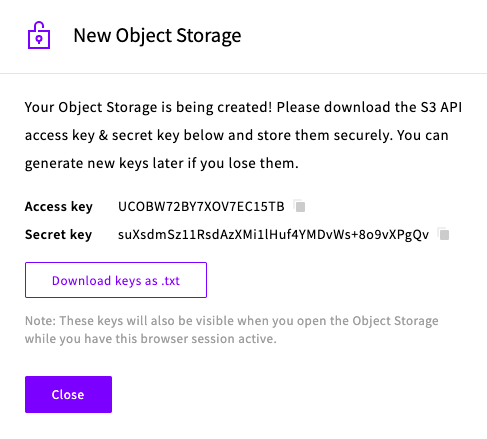
Good job, your UpCloud bucket is created! Open the Object Storage details by clicking its name at your UpCloud Control Panel.
Then make note of the following details that you’ll need later.
- Bucket name, in this example “bucket-sbio”
- Object Storage region, in this example “nl-ams1”
- Object Storage endpoint, in this example “my-sbio-storage.nl-ams1.upcloudobjects.com.” This can be found by clicking the S3 API access link in the object storage details.
- Access and Secret keys are also shown in the notification for newly created Object Storage devices.
Note that once the notification is closed, you will need to generate new keys if you lose access to your Object Storage. So make sure to save your keys.
2. Creating your ‘Files backup’
With your UpCloud Object Storage up and ready, let’s go to SimpleBackups and get that backup configured.
When backing up your data you have the option to back up databases, files/directories or both.
On the Create Backup screen, you are able to configure what data you’re backing up, where you want it to be saved (in this case your UpCloud Object Storage), and how often you want this to be done.
Note that this section would be the same, no matter what backup storage you pick. And that’s the beauty of it! If you want to change storage, just select another one from the list and you are good to go.
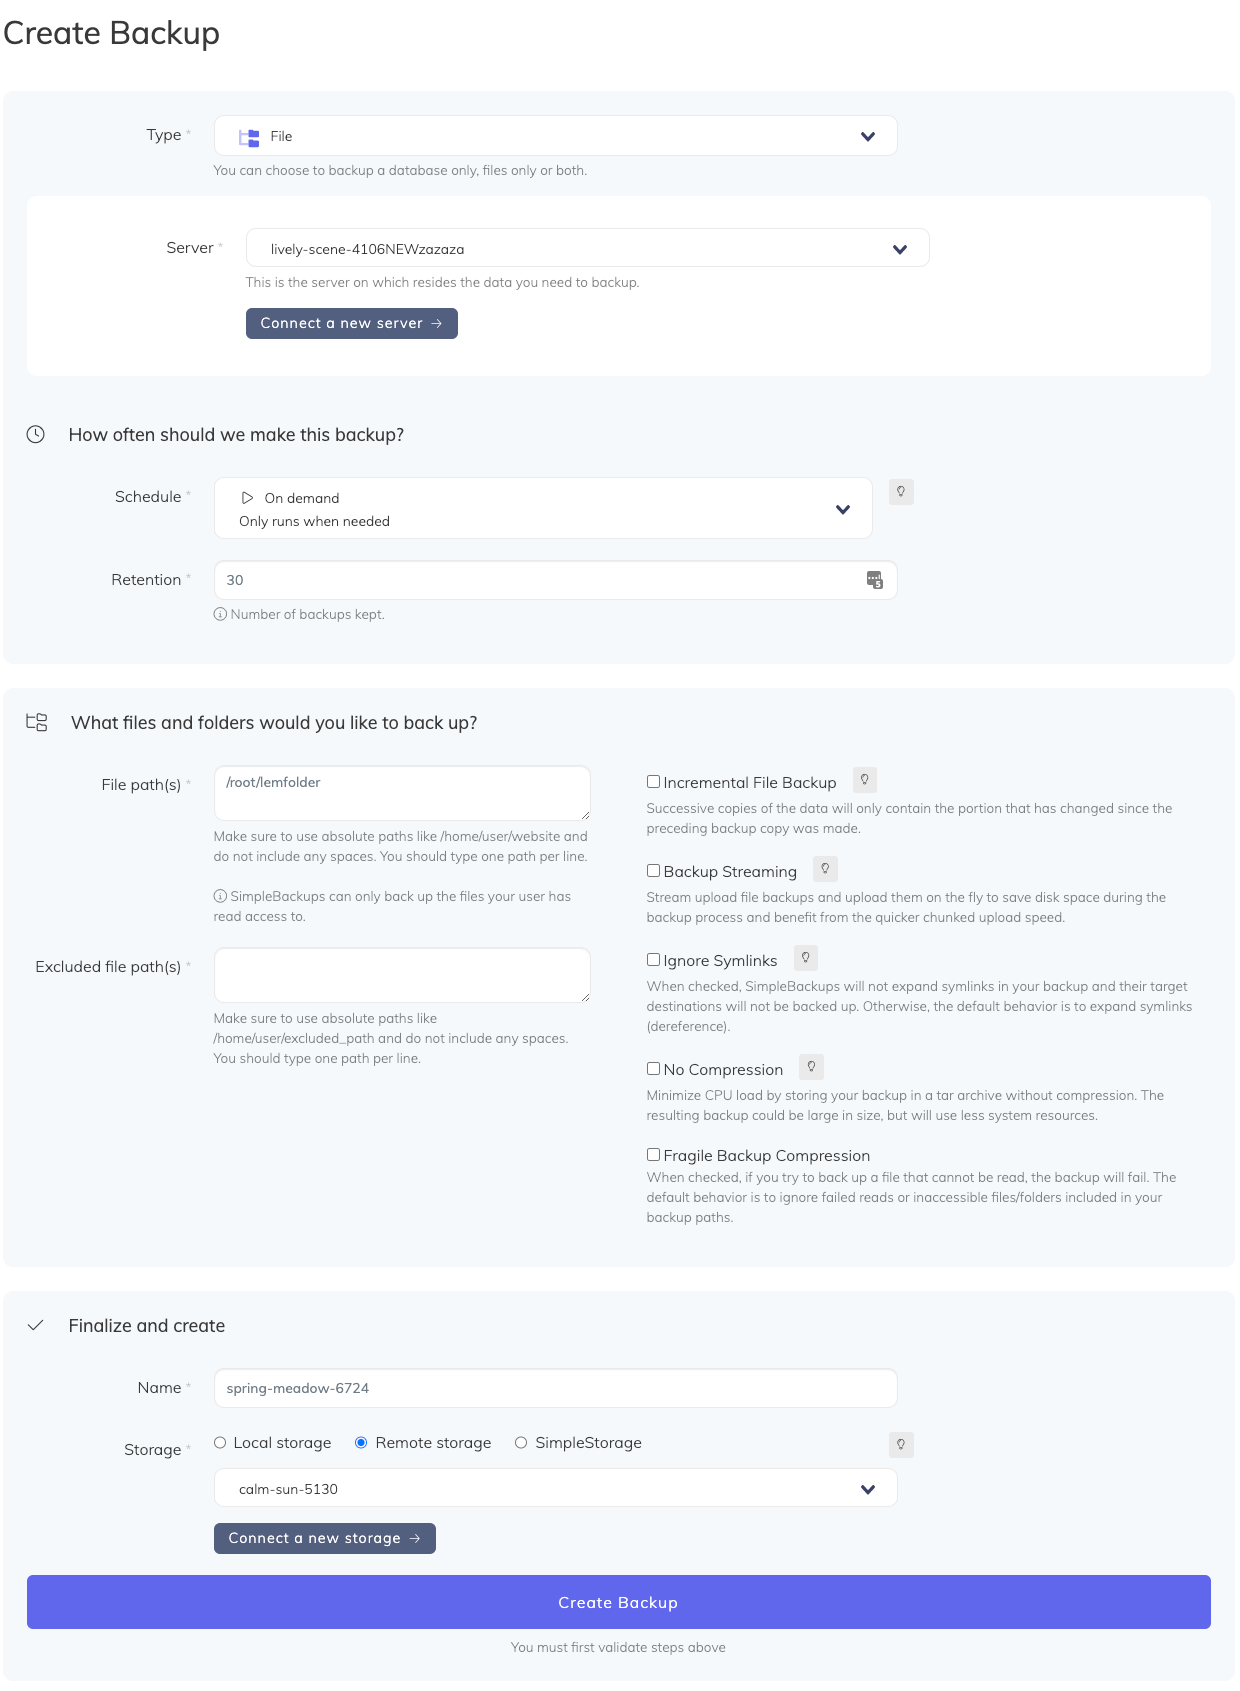
- Select ‘Files’ for this example
- Select the server on which your files are stored
If you haven’t yet configured any server check our tutorial for getting your server configured first.
- Select your schedule option. You can select a pre-defined schedule between daily, weekly, monthly, or a custom option. This allows you to schedule backups using standard CRON syntax.
- For example, a CRON schedule for “20:00 every Tuesday” would be 0 20 * * 2
In CRON syntax the numbers are set in the following order: minute 0-59, hour 0-23, day 1-31, month 1-12, weekday 1-7 and the star means every value in that range. - Finally, the “On-demand” option won’t schedule anything but will allow you to trigger the backup manually or using our API.
- For example, a CRON schedule for “20:00 every Tuesday” would be 0 20 * * 2
- Define backup retention, which is the number of backups you want to keep. Depending on the frequency of your backups, retention determines the length of your backup history.
- Select the type of your database, in this case, ‘Files’
- Define the files & folder you want to include or exclude
- Validate this step. We’ll make sure we can access these folders before moving to the next step.
Finalize and create
- Give your backup a name that will allow you to identify them in the SimpleBackups interface.
- Lastly, select your Storage where you want to save your backups, remote in this case. Then click the Connect a new storage button and continue with the instruction in the next section.
3. Connecting your UpCloud Object Storage
To allow SimpleBackups to access your UpCloud Object Storage, you’ll need to connect it.
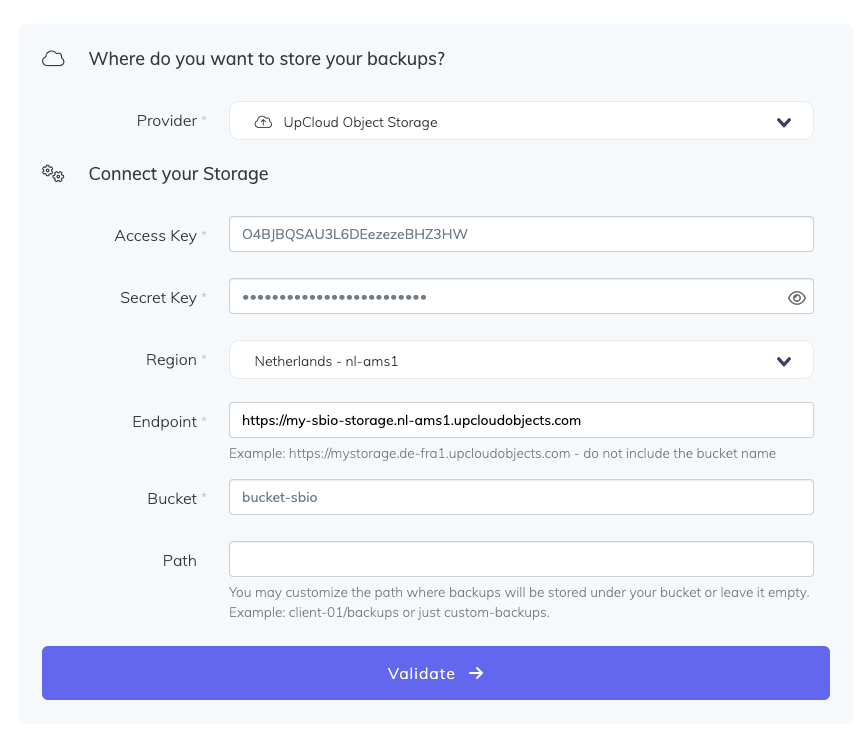
By selecting Remote storage and click the Connect a new storage button in the “Finalize and create” section you will then see the following configuration screen.
Where do you want to store your backups?
- Select “UpCloud” as storage provider and fill in the “Connect your storage” form with the information from step 1.
Connect your Storage
- Access Key: Your UpCloud Object Storage Access Key as described in the first section
- Secret Key: Your Object Storage Secret Key as described in the first section
- Region: The data centre your Object Storage is located
- Endpoint: Storage endpoint described in step 1. Make sure not to include the bucket name but only the storage (as described in the helper).
- Bucket: Bucket name described in step 1
- Then click the Validate button to test the connection
- Finally, give your storage a name. This can be anything but we like to use the Bucket name. Then click the Save new storage button to confirm.
Congratulations, you will now have your files backed up on UpCloud!
Run the backup job once manually using the Run snapshot button from the snapshots list. Running the job will trigger your first snapshot backup!
