Terraform is a simple yet powerful open-source infrastructure management tool developed by HashiCorp. It allows you to safely and predictably manage your cloud infrastructure by codifying APIs into declarative configuration files. You can make quick work of deploying a high-availability web app with Terraform.
In this guide, we will show you how to deploy a highly-available web app using Terraform on UpCloud. With this example configuration, you’ll have a great starting point for creating your own cloud infrastructure for many use cases.
Designing cloud infrastructure
Building a highly-available web app requires adequate infrastructure to support your services and avoid downtime. In the cloud, this can be accomplished by adding redundancies to your cloud services. In practice, you’ll need to have more than one of each critical component of your web application. Consequently, redundancies ensure that a failure at any point in your cloud infrastructure does not bring down the entire service.
Terraform is an excellent option for deploying and managing cloud infrastructure. It allows you to easily configure any number of cloud servers as well as all the required connections and features to ensure security, redundancy and scalability.
In this guide, we will be configuring a group of cloud servers that can be used to host a scalable web app using Terraform. The examples here are intended to demonstrate the different features and possibilities afforded by the UpCloud Terraform module. As such, to maintain the focus of this tutorial, we are not delving into the software-level configurations.
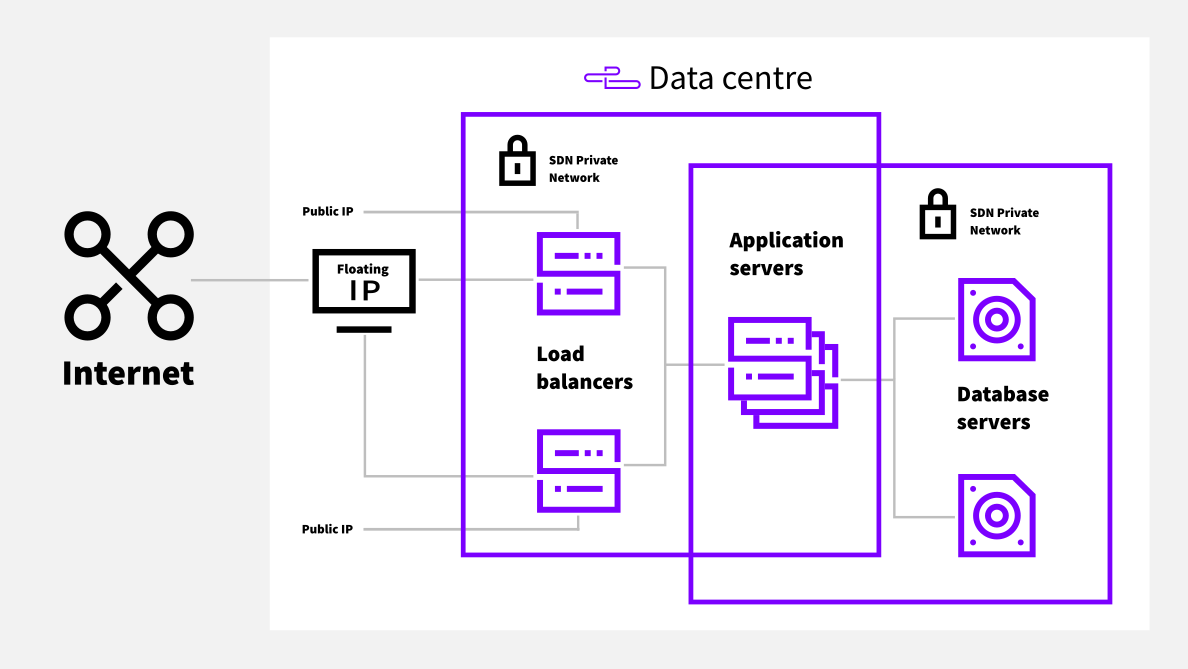
Below, you can see an illustration of the cloud infrastructure we’ll be configuring in this example.
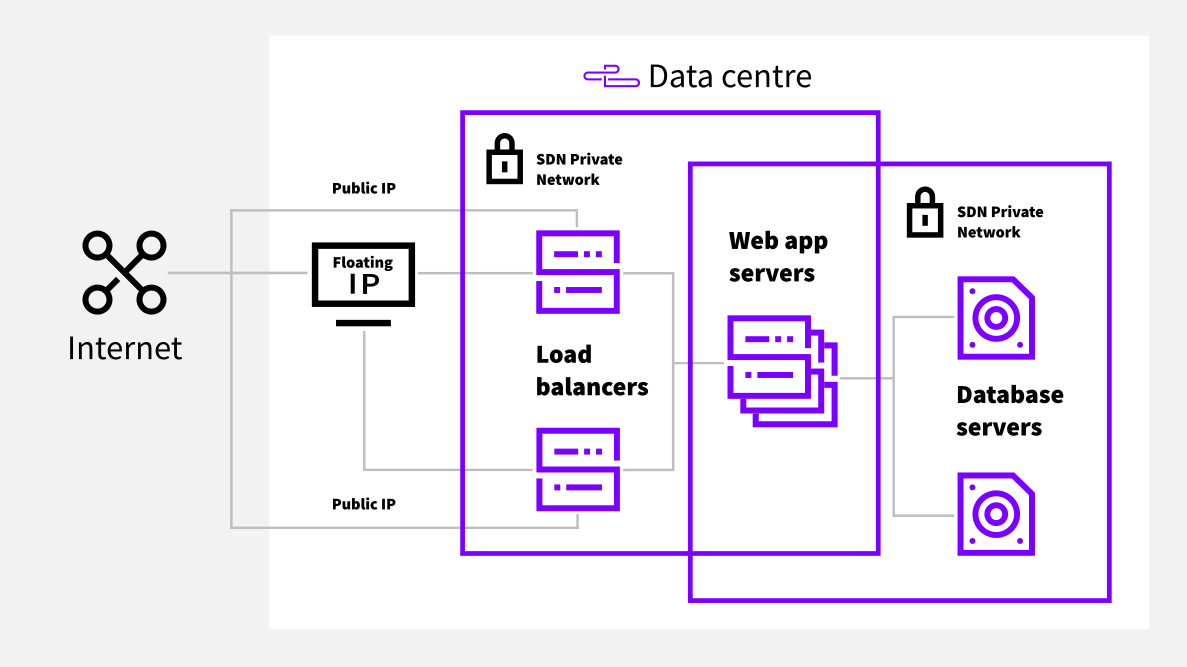
For this example setup, we’ve elected to use a pair of load balancer servers behind a shared floating IP address. These distribute the traffic via a private network between the application servers which in turn employ a pair of separate database servers.
Continue in the next section to begin configuring your Terraform web app deployment.
Initialising Terraform directory
Terraform works across a host of cloud providers and services by using provider-specific modules. UpCloud is among the Terraform-verified providers and can be run with a simple provider definition.
Start by creating a directory to organise the configuration files.
Then make the following provider definition.
versions.tf
terraform {
  required_providers {
    upcloud = {
      source  = "UpCloudLtd/upcloud"
      version = "~>2.0.0"
    }
  }
}

provider "upcloud" {
  # Credentials should be stored in the environmental variables
  # export UPCLOUD_USERNAME="Username for UpCloud API user"
  # export UPCLOUD_PASSWORD="Password for UpCloud API user"
  # Optional configuration options
}
If you haven’t used Terraform before, follow our getting started tutorial to install Terraform and enable access to your UpCloud account.
Next, run the following command to initialise the Terraform web app configuration directory.
terraform init
Terraform will then download the required provider plugin and sets up the configuration directory.
Setting up variables
For the sake of re-usability, Terraform allows defining much of the infrastructure via variables. These can be set separately or even outside the Terraform configuration directory and called at deployment.
Create a variables file as shown below. Make sure to include at least one public SSH key to have access to the cloud servers after deployment.
variables.tf
variable "public_key" {
  type = string
  default = "ssh-rsa key"
}

variable "template" {
  type = string
  default = "Debian GNU/Linux 10 (Buster)"
}

variable "app-scaling" {
  default = 3
}
variable "plans" {
  type = map
  default = {
    "lb"  = "1xCPU-2GB"
    "app" = "2xCPU-4GB"
    "db"  = "4xCPU-8GB"
  }
}

variable "storages" {
  type = map
  default = {
    "1xCPU-2GB"  = "50"
    "2xCPU-4GB"  = "80"
    "4xCPU-8GB"  = "160"
    "6xCPU-16GB" = "320"
  }
}

variable "zone" {
  type = string
  default = "pl-waw1"
}
These variables can also be used to make later changes to your Terraform web app configuration. Have a look at our guide on how to use Terraform variables if you want to learn more.
Configuring the load balancers
Load balancers are an essential part of any high-availability cloud infrastructure. Not only does load balancing enables your application servers to handle the usage more evenly, but they can also work as the edge of your cloud network and secure it using a firewall.
In this example, we are deploying the load balancer servers using the Terraform count parameter. It tells Terraform to deploy two identical instances as configured and names them according to their position in the list.
We are configuring the cloud servers using the variables we set earlier. This gives us an easy overview of the resources each server type will use. If you want to increase the server resources, simply increase the plan definition for the load balancers in the variables file. The storage afforded by the cloud server plan is updated dynamically to match the selected plan as defined in the variables.
We are also configuring the load balancers to be attached to an SDN Private Network. The private network will serve to securely connect the load balancers with our web app servers. The network itself will be configured at a later step.
load-balancers.tf
resource "upcloud_server" "lb" {
  count    = 2 # Number of cloud instances to deploy
  zone     = var.zone # de-fra1
  hostname = "lb${count.index + 1}.startup.io"
  plan     = var.plans["lb"] # 1xCPU-2GB
  firewall = true
  # URL for setup script (or inline)
  # user_data = ""

  login {
    user = "root"
    keys = [
      var.public_key,
    ]
    create_password   = false
    password_delivery = "none"
  }

  template {
    size    = var.storages[var.plans["lb"]] # 50 GB
    storage = var.template # Debian GNU/Linux 10
  }

  network_interface {
    type = "public"
  }

  network_interface {
    type    = "private"
    network = upcloud_network.app_network.id
  }
}
Configuring the application servers
Your web application itself should be able to handle a variety of demand levels. Therefore, a great way to improve flexibility is to enable scalability. Using Terraform and the count parameter, we can deploy as many cloud servers as needed. Simply by increasing or decreasing the count parameter, we can scale the application across any number of cloud servers.
Furthermore, this example configuration uses UpCloud’s SDN Private Networks for connecting the load balancers to the application servers. By using the SDN Private Network, the application servers do not need a public IP and won’t be exposed to the internet directly.
Additionally, a custom SDN networking allows us to already know all the IP addresses of each Terraform web app server. This way, we can configure the load balancers to make use of every application server. Furthermore, it’ll be possible to dynamically add new ones as they are deployed by Terraform.
We are also connecting the application servers to a second SDN Private Network. It will be used for secure communication between the application and database servers.
app-servers.tf
resource "upcloud_server" "app" {
  zone     = var.zone # de-fra1
  hostname = "app${count.index + 1}.startup.io"
  plan     = var.plans["app"] # 2xCPU-4GB
  count    = var.app-scaling # default 3 as set in the variables

  # URL for setup script (or inline)
  # user_data = ""

  login {
    user = "root"
    keys = [
      var.public_key,
    ]
    create_password   = false
    password_delivery = "none"
  }

  template {
    size    = var.storages[var.plans["app"]] # 80 GB
    storage = var.template # Debian GNU/Linux 10
  }

  network_interface {
    type    = "private"
    network = upcloud_network.app_network.id
  }
  network_interface {
    type    = "private"
    network = upcloud_network.db_network.id
  }
}
Configuring the database and replica servers
Web application data is commonly stored in dedicated database servers that are run separately from the application hosts. This approach adds to the flexibility of the configuration and allows you to optimise both the application and database servers independently.
Our database configuration uses much the same format as the application and load balancer servers. However, instead of using the count parameter, we’ve defined two database hosts separately. This allows the backup schedules to be set independently with different backup times. While the backup process does not affect the cloud server performance, we recommend staggering backup schedules.
databases.tf
resource "upcloud_server" "db1" {
  zone     = var.zone # de-fra1
  hostname = "db1.startup.io"
  plan     = var.plans["db"] # 4xCPU-8GB

  # URL for setup script (or inline)
  # user_data = ""

  login {
    user = "root"
    keys = [
      var.public_key,
    ]
    create_password   = false
    password_delivery = "none"
  }

  template {
    size    = var.storages[var.plans["db"]] # 160 GB
    storage = var.template # Debian GNU/Linux 10

    backup_rule {
      interval  = "daily"
      time      = "0400"
      retention = 8
    }
  }

  network_interface {
    type    = "private"
    network = upcloud_network.db_network.id
  }
}

resource "upcloud_server" "db2" {
  zone     = var.zone # de-fra1
  hostname = "db2.startup.io"
  plan     = var.plans["db"] # 4xCPU-8GB

  # URL for setup script (or inline)
  # user_data = ""

  login {
    user = "root"
    keys = [
      var.public_key,
    ]
    create_password   = false
    password_delivery = "none"
  }

  template {
    size    = var.storages[var.plans["db"]] # 160 GB
    storage = var.template # Debian GNU/Linux 10

    backup_rule {
      interval  = "daily"
      time      = "0500"
      retention = 8
    }
  }

  network_interface {
    type    = "private"
    network = upcloud_network.db_network.id
  }
}
Configuring networking
In addition to deploying cloud servers, Terraform is also able to configure networking. Here we are taking advantage of the software-defined SDN Private Networks. Using custom SDN networking you get a private connection with predictability in the server IP addresses. Furthermore, all transfer within SDN Private Networks is always free of charge.
In the below example, we have configured two SDN Private Networks as well as a floating IP address for the load balancers.
networking.tf
resource "upcloud_network" "app_network" {
  name = "Application network"
  zone = var.zone # de-fra1

  ip_network {
    address = "172.20.1.0/24"
    dhcp    = true
    family  = "IPv4"
  }
}

resource "upcloud_network" "db_network" {
  name = "Database network"
  zone = var.zone # de-fra1

  ip_network {
    address = "172.20.2.0/24"
    dhcp    = true
    family  = "IPv4"
  }
}

resource "upcloud_floating_ip_address" "lb_vip" {
  depends_on = [upcloud_server.lb[0]]
  zone        = var.zone # de-fra1
  mac_address = upcloud_server.lb[0].network_interface[0].mac_address
}
Adding load balancer firewall rules
Using SDN Private Networks we can omit the public network connections from the application and database cloud servers. This can greatly increase the security of the backend servers and only leaves a single point of entry at the load balancers.
However, the security of the load balancers then becomes ever more important for the overall security of your cloud infrastructure. To ensure only the necessary connections are allowed, we are setting up a firewall for our web app using Terraform.
firewall.tf
resource "upcloud_firewall_rules" "myapp_firewall" {

  count      = length(upcloud_server.lb)
  depends_on = [upcloud_server.lb[0],upcloud_server.lb[1]]
  server_id  = upcloud_server.lb[count.index].id

  firewall_rule {
    action                 = "accept"
    comment                = "http"
    destination_port_start = 22
    destination_port_end   = 22
    direction              = "in"
    family                 = "IPv4"
  }

  firewall_rule {
    action                 = "accept"
    comment                = "http(IPv6)"
    destination_port_start = 22
    destination_port_end   = 22
    direction              = "in"
    family                 = "IPv6"
  }

  firewall_rule {
    action                 = "accept"
    comment                = "http"
    destination_port_start = 53
    destination_port_end   = 53
    direction              = "in"
    family                 = "IPv4"
  }

  firewall_rule {
    action                 = "accept"
    comment                = "http(IPv6)"
    destination_port_start = 53
    destination_port_end   = 53
    direction              = "in"
    family                 = "IPv6"
  }

  firewall_rule {
    action                 = "accept"
    comment                = "http"
    destination_port_start = 80
    destination_port_end   = 80
    direction              = "in"
    family                 = "IPv4"
  }

  firewall_rule {
    action                 = "accept"
    comment                = "http(IPv6)"
    destination_port_start = 80
    destination_port_end   = 80
    direction              = "in"
    family                 = "IPv6"
  }

  firewall_rule {
    action                 = "accept"
    comment                = "https"
    destination_port_start = 443
    destination_port_end   = 443
    direction              = "in"
    family                 = "IPv4"
  }

  firewall_rule {
    action                 = "accept"
    comment                = "https(IPv6)"
    destination_port_start = 443
    destination_port_end   = 443
    direction              = "in"
    family                 = "IPv6"
  }

  firewall_rule {
    action    = "drop"
    direction = "in"
    family    = "IPv6"
  }

  firewall_rule {
    action    = "drop"
    direction = "in"
    family    = "IPv4"
  }
}
Deploying the infrastructure
Once you’ve created all the necessary Terraform configurations, you are just about ready to deploy your cloud infrastructure. But before you instruct Terraform to begin deploying, you should check that the configuration will execute as expected by using the Terraform plan feature.
Testing the Terraform configurations is pretty simple. The following plan command checks how the configuration would be applied and saves the plan for later use.
terraform plan -out=tfplan
Check the output of the plan command to make sure Terraform has interpreted our cloud infrastructure configuration correctly.
Next, granted that everything on the plan looks correct, you can deploy the entire configuration with Terraform’s apply command.
Since we already saved the plan in the previous step, we can now use the output file to apply the configuration. Using a saved plan we can be sure of the actions Terraform is going to take before committing to the deployment.
terraform apply tfplan
Then sit back and wait for Terraform to do its thing.
Once the deployment has completed, your cloud infrastructure is up and running.
Log in using SSH and your private key via either of the load balancer servers. You should also make sure your SSH client allows agent forwarding. This is required so that you’ll be able to also connect to the backend servers.
Mikael
Hi, thanks for a great guide to get started with a practical terraform setup.
One question on the firewall setup for load-balancers, is it possible to make the “depends_on” statement dynamic instead of as now listing all servers statically? I’m assuming if there is a third load-balancer that would need to go in this list as well?
` depends_on = [upcloud_server.lb[0],upcloud_server.lb[1]]`
Best Regards,
Mikael
Janne Ruostemaa
Hi Mikael, thanks for the question. The depends_on statement could be simplified to just [upcloud_server.lb] which by itself is an array of all load balancers. This should allow Terraform to apply the firewall rules to all load balancers as they come up.
Emil
Hi, nice guide!
Is it possible to attach SDN Private Network to your managed databases?
Janne Ruostemaa
Hi Emil, thanks for the question. Managed Databases are connected to the private Utility network by default and only accessible by your Cloud Servers in the same zone. All Utility network traffic is free of charge.