Set up your first SSH keys
Use SSH keys for authentication when you are connecting to your server, or even between your servers. They can greatly simplify and increase the security of your login process. When keys are implemented correctly they provide a secure, fast, and easy way of accessing your cloud server.
Follow our guide and learn how to set up your first SSH keys for authentication using OpenSSH or PuTTY ssh client.
Preparing your server
To add an SSH key pair, first, create a hidden folder to your user account home directory on your cloud server with the following command.
mkdir -p ~/.ssh
Then restrict the permissions to that directory to just yourself with the command below.
chmod 700 ~/.ssh
This creates a secure location for you to save your SSH keys for authentication. However, note that since the keys are stored in your user home directory, every user that wishes to connect using SSH keys for authentication has to repeat these steps on their own profile.
Using OpenSSH to generate a key pair
Now continue on your own computer if you are using Linux or any other OS that has OpenSSH. PuTTY users should skip to the next section.
1. Generate a new key pair in a terminal with the next command
ssh-keygen -t rsa
The key generator will ask for the location and file name to which the key is saved. Enter a new name or use the default by pressing enter.
2. (Optional) Create a passphrase for the key when prompted
This is a simple password that will protect your private key should someone be able to get their hands on it. Enter the password you wish or continue without a password. Press enter twice. Note that some automation tools might not be able to unlock passphrase-protected private keys.
3. Copy the public half of the key pair to your cloud server using the following command
Replace the user and server with your username and the server address you wish to use the key authentication on.
ssh-copy-id -i ~/.ssh/id_rsa.pub user@server
This also assumes you saved the key pair using the default file name and location. If not, just replace the key path ~/.ssh/id_rsa.pub above with your own key name.
Enter your user account password for that SSH server when prompted.
You can now authenticate to your server with the key pair, but at the moment you would need to enter the passphrase every time you connect.
4. (Optional) Set up SSH Agent to store the keys to avoid having to re-enter the passphrase at every login
Enter the following commands to start the agent and add the private SSH key.
ssh-agent $BASH
ssh-add ~/.ssh/id_rsa
Type in your key’s current passphrase when asked. If you saved the private key somewhere other than the default location and name, you’ll have to specify it when adding the key.
Afterwards, you can connect to your cloud server using the keys for authentication and only have to unlock the key by repeating the last 2 steps once after every computer restart.
Using PuTTY to generate a key pair
If you are running Windows using the PuTTY SSH client, you can use the built-in key generator from PuTTY to create a new key pair.
1. Click the Keygen button at the bottom of the PuTTY Configuration window to get started.
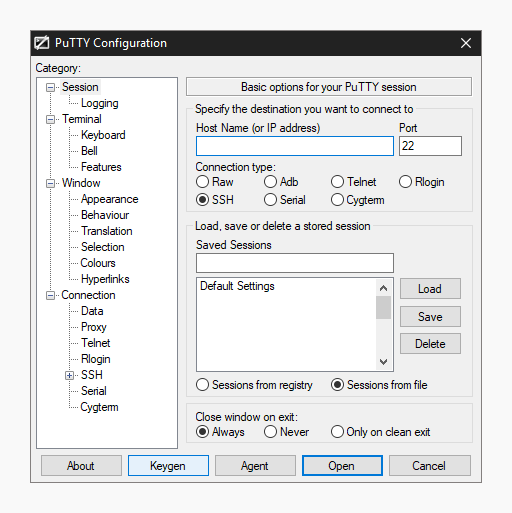
Then in the Key Generator window, check that the Type of key to generate at the bottom is set to SSH-2 RSA. The older SSH-1 was the standard’s first version but is now considered obsolete. Most modern servers and clients support SSH-2.
2. Click the Generate button to begin.
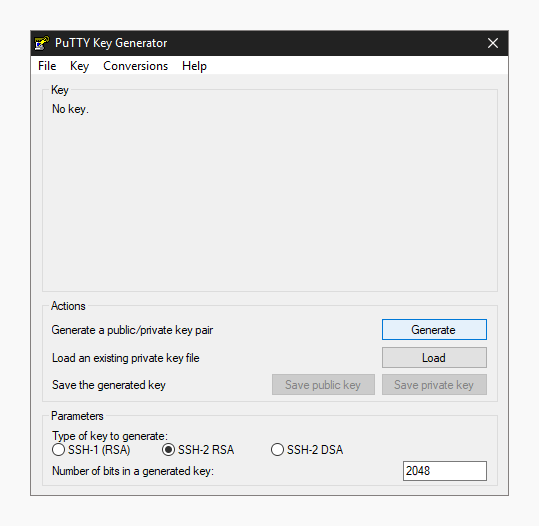
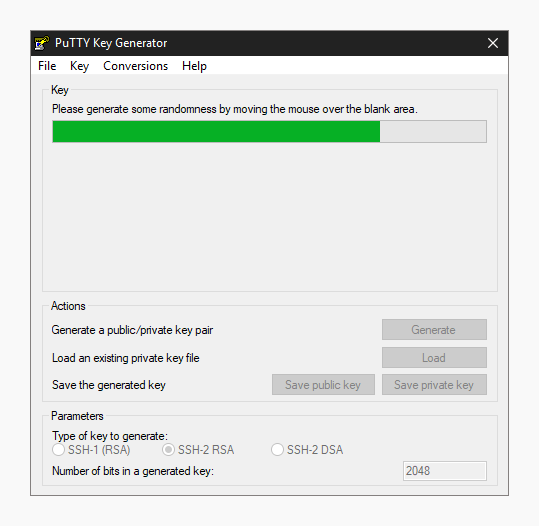
3. Keep moving your mouse over the blank area in any manner to help generate randomness for a few moments until the progress is complete.
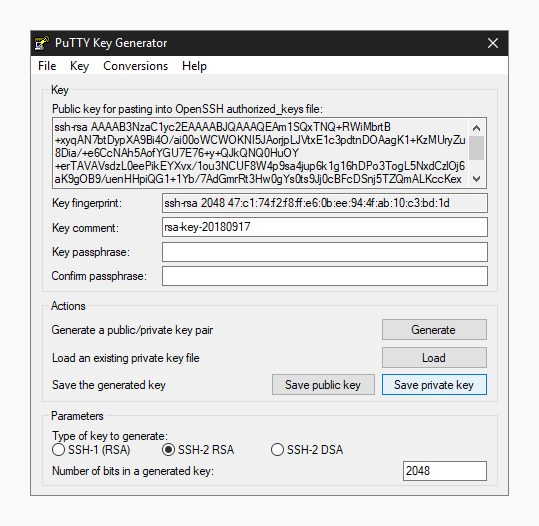
With the keys finished, PuTTY will show the relative information about the pair along with the public key for easier copying.
4. (Optional) Enter a key passphrase in the 2 empty fields for the added security before continuing. The passphrase will protect your key from unauthorized use should someone be able to copy it. However, some automation tools might not be able to unlock passphrase-protected private keys.
5. Click the Save private key button and store it somewhere safe. Generally anywhere in your user directory is fine as long as your PC is password protected. Before closing the keygen, you may want to copy the public key to your clipboard, but you can always get it later as well.
Now that you have a new key saved on your computer, you’ll need to import it into the PuTTY key agent.
6. Click the Agent button to open the key manager in the PuTTY Configuration window.
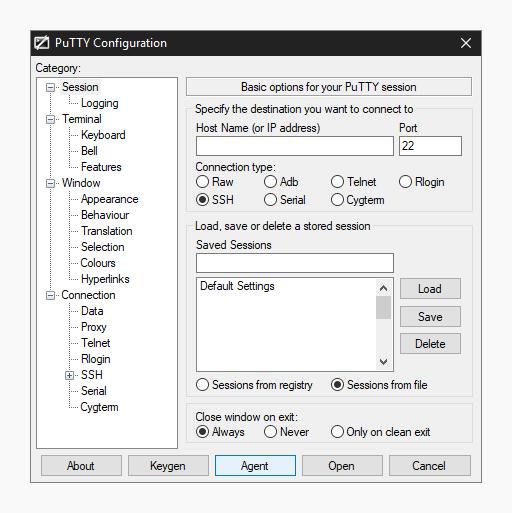
7. Click Add Key button in the Key List, then browse to the location you saved the private key, select it and click Open.
Enter your key passphrase if asked.
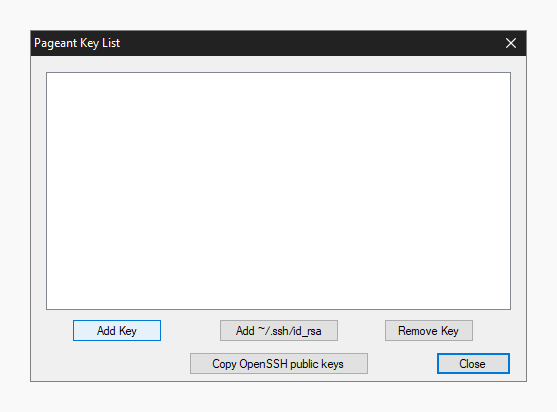
This will import the key to your PuTTY client, but you still need to copy the public key over to your server.
8. Open an SSH connection to your cloud server and go to the SSH key directory.
cd ~/.ssh/
9. Open or create the default file OpenSSH looks for public keys called authorized_keys.
sudo nano authorized_keys
10. Paste the public key into the file by right-clicking the SSH client window. Make sure the key goes on a single line for OpenSSH to be able to read it. Note that the key type needs to also be included, ssh-rsa as shown in the example below.
ssh-rsa AAAAB3NzaC1yc2EAAAADAQABAAABgQDEeV/UKOVqNUwmED8PO1E6wY3ITEbWx30rAgGudzTGnYI8fB176nlmIS+O01vaI4fMYwO9Chg3mzVT2+4AkTBm1sXnDdzhNNnkclipMXdmAHnRtzU9kREFZU0/yyOhorzqxWBi0LQxpjTAZawi+8ysH7PGnNlX3FUObZcmHis0oD/C7ll6DwX4WVSjh2JGcaIhbhB+sovxW5duTDqyuyKpRsbyBD0+wNjSuJFjh5MnXJqcqrEUaPRoe2wQ9k7q0K2KOXAmYYPUWrLY6N+jjYdnkyP9XWWkz6c7Qvx7m/dBfgpyJbPryWbSZ8PsvSgtDTIND/jNfwmgQjOCGgsZlmCsvRIixzh2uNmFCg75wyD6f/wdZ5gq1HPFdyLblHs46P9ClfMbWJt9APx7c1SRE+qMbdLf/5/vNGiGHr6bBXKRX70+XODl04shFQpjm1kKkG9qHkp3bOSot4Da987dRHMhAbd0d3QdS8wCg7s6NPk4qDVnR6BCxiM2vbOD1B4gWQ8= user@server
When you’ve copied the public key over to the authorized keys list, save the file and exit the editor. You can now test the public key authentication by logging in to your server again. You should not get asked for your password, but instead logged straight in with the key. If it’s not working, check that your private key is unlocked at your SSH Agent and try again.
Turn off password authentication
With SSH key authentication configured and tested, you can disable password authentication for SSH altogether to prevent brute-forcing. When logged in to your cloud server.
1. Open the SSH configuration file with the following command.
sudo nano /etc/ssh/sshd_config
2. Set the password authentication to no to disable clear text passwords.
PasswordAuthentication no
3. Check that public key authentication is enabled, just to be safe and not get locked out from your server. If you do find yourself unable to log in with SSH, you can always use the Web terminal at your UpCloud control panel.
PubkeyAuthentication yes
Then save and exit the editor.
4. Restart the SSH service to apply the changes by using the command below.
sudo systemctl restart sshd
With that done your cloud server is now another step towards security. Malicious attempts to connect to your server will result in authentication rejection, as plain passwords are not allowed, and brute-forcing an RSA key is practically impossible.
Conclusions
Remember to always keep your private keys safe. You can use the same key from multiple computers if you wish, or generate new ones on each client connecting to your cloud server for added security. Each user should generate their own key pair and passphrase for secure access control. With proper management, even in case one of the private keys gets compromised you won’t have to replace them all.
Walt
Already setup ssh keys on server and running well. But now my local computer is dead and maybe motherboard is dead and cannot connect to server as private keys were saved in computer. Now lost private keys with computer and cannot connect to server. How to fix this problem?
Pls send detailed answers how to connect again to server.
Thanks
Walt
Janne Ruostemaa
Hi Walt, sorry to hear about your computer. If you can’t recover the private key from your hard drive, you can always reset the root password following these steps: https://upcloud.com/community/
/tutorials/reset-root-password-cloud-server/
Sarun
Awesome! thanks for the information. I was trying to generate the private key for the appuser to use it in Azure ADO service connection and this really helped.
Daniel
Hey there bud,
So im trying to follow your guide because I have an assignment that requires me to get access to the ubuntu server from ssh, without the need for passwords on the admins.
Yet at almost the very beginning of the guide im stuck, on my win10 laptop I tried to copy ssh, and it doesnt recognize the command. So what am I supposed to do here?
Janne Ruostemaa
Hi Daniel, thanks for the question. The terminal commands are intended for Linux systems but you can find instructions on how to do the same on Windows in the section about PuTTYTray. Alternatively, you could install the Windows Subsystem for Linux (WSL) allowing you to run Linux terminal commands on your Windows laptop.
Daniel
I used another program called WinSCP 5.15, since it was alot easier to actually pair the two pc’s together. Putty as shown in your guide isnt the same version I tried and got confused by other guides because they didnt seem to have the same guide either.
But got it sorted, thanks for the guide friend!
Janne Ruostemaa
Indeed, PuTTY is slightly different to PuTTYtray that is linked in this guide. WinSCP then again is more akin to an FTP client and doesn’t include SSH option. Each server different purposes but glad to hear you managed to complete the task.
ardan
I have try the instructions with Putty, but i have an issue I Cannot login with error “Access Denied”, even though I have double check my username is correct, and it ask to use password, so i use the passphrase from the private key.
How to fix it..?
Janne Ruostemaa
Hi Ardan, thanks for the question. By the sound of it, you haven’t yet copied the public half of your SSH key onto your server. Use PuTTY to SSH into your server and log in with the server password. The private key passphrase is just to unlock the key when you wish to use it, the server has its own password.
Bobby Zopfan
I’ve deleted all my private key files from my own windows pc (c:usersbob.sshidrsa) and still I’m able to connect to my DO droplet. How come?
And on Win10 Bash, I’ve deleted the keys from “C:UsersBobAppDataLocalPackagesCanonicalGroupLimited.Ubuntu18.04onWindows79rhkp1fndgscLocalStaterootfshomebobu.sshid_rsa” and still I’m able to connect. How come?
Janne Ruostemaa
Hi Bobby, thanks for the question. Your private key is still likely cached in memory by your SSH agent or similar if you are able to connect using it even after deleting the private key file itself. Restarting your computer should clear that.
Moamen
Hi Janne,
Is there a way to create ssh account for specific directory and it’s content ?
Janne Ruostemaa
Hi there, thanks for the question. There are a couple of ways to go about restricting SSH user permissions, one relatively simple solution would be using rbash.
Jason Dinh
hello Janne,
I have tried your method 1 (open ssh)
after turned PasswordAuthentication no
and restart the server then connect to server back I cannot login back to my server cause this problem “[email protected]: Permission denied (publickey)”
– can you help?
Janne Ruostemaa
Hi Jason, thanks for the question. It’s possible that your public SSH key is missing on the server or has too broad permissions for the SSH service to accept using it. On our cloud servers, you can always use the web console at your control panel to access the server terminal directly allowing password login.
valerio
Hello janne.
Can i access to a ssh server from another ssh server (or client) with the private key of the first ssh server without insert the password? I’m on a machine that wants to connect with this ssh server. I have his id_rsa (private key) and i tried to typing the following command: ssh -i id_rsa server@ip but still he keeps asking me for the password.
Thanks in advance for your time
Janne Ruostemaa
Hi Valerio, thanks for the question. Yes, you can. What you are referring to is called SSH agent forwarding. You need to enable it on your local SSH client by setting ForwardAgent yes e.g. in the /etc/ssh/ssh_config. It also needs to be enabled on all SSH servers you wish to use to connect through to another server by setting AllowAgentForwarding yes in the /etc/ssh/sshd_config file, this might be enabled by default. Once these are set, just reconnect using SSH with the private keys you have configured on your servers.
Taufique
Hello Janne!
thanks for the good post! I have a question actually, I want to format my Laptop, and I don’t want to lose my ssh keys because I used them to authenticate me on the server! can I copy the whole .ssh folder on USB driver and paste it in c/Users again after format laptop?? or there is another way to do that?
thanks for your answer!!
Janne Ruostemaa
Hi there, thanks for the question. You can backup your private SSH keys any way you want. Simply copying them onto a USB drive will work just fine. Alternatively, if you use any cloud storage services such as Google Drive or Dropbox, you could also save your SSH keys there granted you take care of your account security.
Dangelo
Very nice guide Janne, thank you so much!!!
I think its works great…
but, I do not have access to the root user right now lol. I can only get access with the newer user I created with sudo privileges. Is it ok?
Janne Ruostemaa
Hi Dangelo, thanks for the question. Now that you have sudo privileges, you can always switch to the root user for example with sudo -i command. Afterwards, return to your own user account simply with exit
Mike
Have you considered ftp?
Janne Ruostemaa
Hi Mike, thanks for the comment. You are right that FTP can be used to restrict access to only specific directory and files, but in contrast to SSH, it lacks the possibility to run programs.
Hans Zimmer
Please make sure, that the public key you copied over to authorized_keys has to start his ssh-rsa.
I ran into problems because I saved the public key into a file and not directly to clipboard.
Maybe you can add this advice to your otherwise flawless tutorial.
Janne Ruostemaa
Hi Hans, thanks for the suggestion. Indeed the key type is important to include in the authorized_keys file for SSH to know how to read it. We’ve added a note of this in the tutorial.
Patrick
Permission denied (publickey). Any help on this is greatly appreciated
Janne Ruostemaa
Hi Patrick, thanks for the comment. If you’ve placed your public SSH key in the auhtorized_keys file but are still unable to log in without a password, it’s possible SSH doesn’t have access to the key or the permissions are too open. You should check that only your user account has access to the ~/.ssh/authorized_keys directory and file.
Also check that public SSH key authentication is enabled in your /etc/ssh/sshd_config file by setting PubkeyAuthentication yes
at
MobaXterm it’s a good choice for you!
Dustin
Is it normal to have to enter the key password (if it is set when the key is generated) everytime you try and log into the server? Thank you for your work!
Janne Ruostemaa
Hi Dustin, thanks for the question. You might want to save your passphrase protected SSH key to an SSH agent which will avoid having to unlock the key on every use.
Anton
Is it possible to use an external AIM service for SSH authentication?
Thank you for any tips :)
Eli
Hi, thanks for the question! At the moment, we do not have a built-in support for IAM services yet nor do we have a guide about this. We do not foresee any issues that might prevent you on the infrastructure level, so you can go ahead with your own installation and configuration.
Chris David
To add to the story, I do this often with keys set up from my office desktop.
for i in server1 server2 server3 server4; do ssh mylogin@$i “hostname” ; done
This one line will login to the four servers and run the command hostname.
Saif H.
Hi, make sure you have set correct permission for the ssh key files as well as your .ssh directory. To fix permission type “chmod 700 id_rsa” and “chmod 700 id_rsa.pub” and then retry.