WireGuard is a fast and modern VPN that utilizes state-of-the-art cryptography. It’s much faster than OpenVPN or IPsec and has a smaller codebase that is easier to audit and maintain.
This tutorial will set up WireGuard on the Ubuntu 24.04 server and configure a firewall. WireGuard was originally launched as a DKMS kernel module but was later incorporated into the 5.6 kernel and newer.

Sign up with UpCloud
First things first, if you have not yet registered on UpCloud, begin by getting signed up.
Deploy a new cloud server
Deploying a new server on UpCloud is easy and straightforward. Log into your UpCloud Control Panel and select Deploy a Server under the Servers section.
The deployment page shows a number of options for customizing a new cloud server.
- Choose the server location from the available data centres
- Pick a configuration; the €3/mo Starter plan works great for testing
- Select Ubuntu 24.04 or a similar Debian-based operating system
- Add any SSH keys you want to use
- Give your server a hostname and description
- Deploy!
You can find more detailed instructions on server deployment at the UpCloud newcomer’s tutorials.
Installing WireGuard
When your new cloud server is up and running, log in using SSH.
WireGuard is available directly from the official repositories on Ubuntu 24.04. However, before installing WireGuard, ensure your system is up to date.
sudo apt-get update && sudo apt-get upgrade -yNow, we can install WireGuard itself and all of its dependencies.
sudo apt-get install wireguardRepeat the installation steps on each client you wish to connect to the WireGuard server.
WireGuard has software for most operating systems, so you can easily connect your Windows, Linux, or macOS devices and Android or iOS devices. The available packages are on their download page.
With WireGuard installed, continue configuring your server further using the steps below.
IP forwarding
Next, to connect through your WireGuard server, you’ll need to enable packet forwarding. This is only done on the WireGuard server and is not necessary for any clients.
Open the system variables file for editing.
sudo nano /etc/sysctl.confThen, uncomment the following line by removing the # at the beginning of the line.
net.ipv4.ip_forward=1Once done, save the file and exit the editor.
Then, apply the new option using the command below.
sudo sysctl -pnet.ipv4.ip_forward=1If you see the option repeated like above when reloading the system variables, it was enabled successfully.
Configuring firewall rules
You should also configure a firewall to block unwanted connections and keep your server secure. You can do this by installing a software firewall on your cloud server or using the Firewall service at your UpCloud Control Panel.
Using the command below, you can install the ufw, the Uncomplicated Firewall for Ubuntu servers.
sudo apt install ufwNext, add the following rules to allow SSH and WireGuard connections.
sudo ufw allow ssh
sudo ufw allow 51820/udp
Enable the firewall with the next command.
sudo ufw enableThen, confirm the command when prompted.
Command may disrupt existing ssh connections. Proceed with operation (y|n)? y
Afterwards, you can check the active firewall rules using the command below.
sudo ufw statusThe other option is to use UpCloud’s L3 firewall, which can secure your WireGuard server. To add firewall rules, open your UpCloud Control Panel and navigate to the Firewall tab in your server settings.
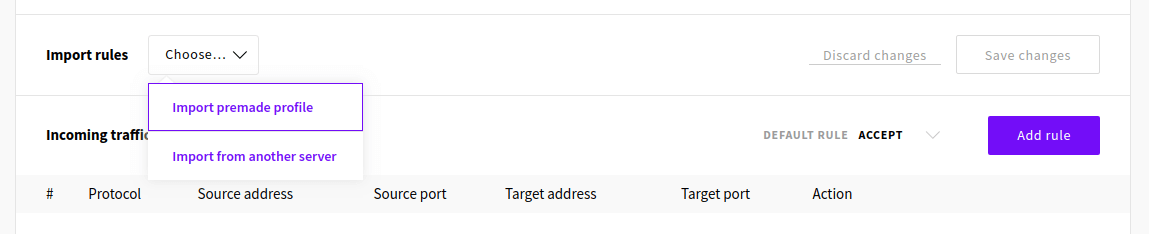
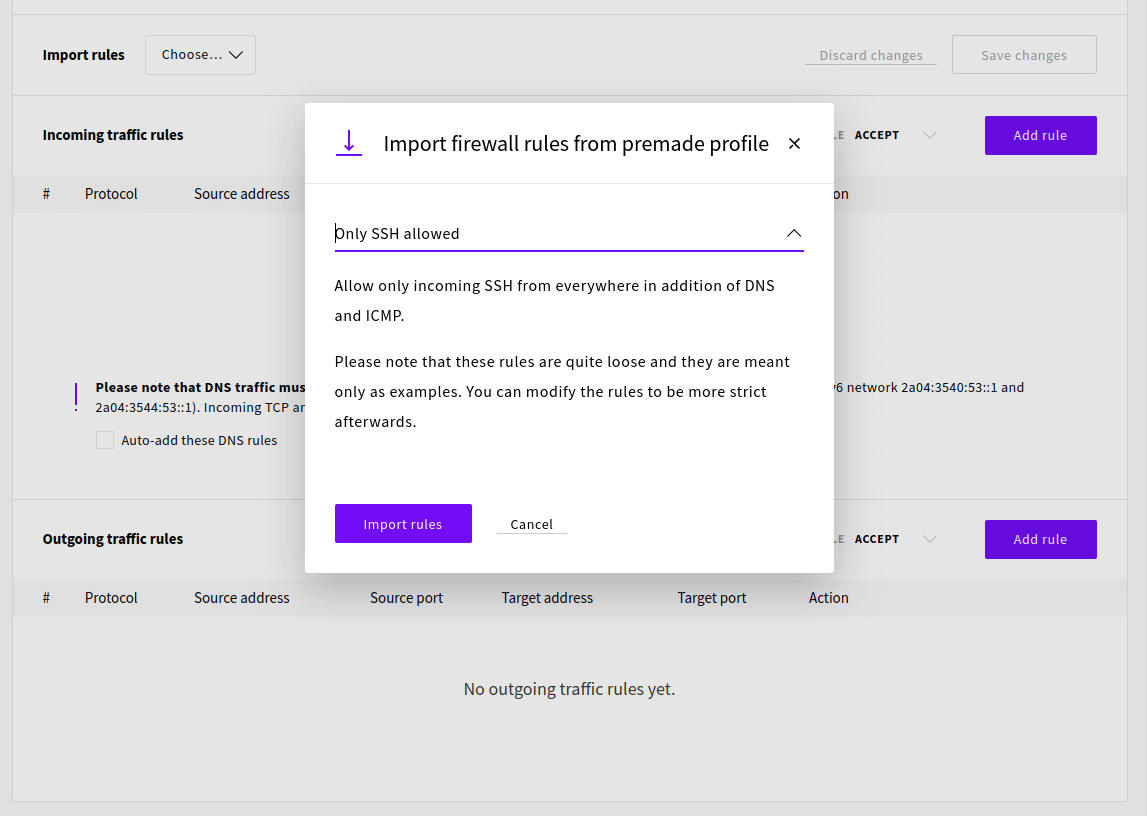
The easiest way to configure the firewall is to import a set of premade rules that work for our intended use case. To do so, click Import premade profile from the Import rules menu.
Then select the Only SSH allowed rule set and click the Import rules button.
We also need to allow WireGuard connections, which use the UDP protocol and can be configured to any port. We’ll be using port 51820, so add the following incoming traffic rule.
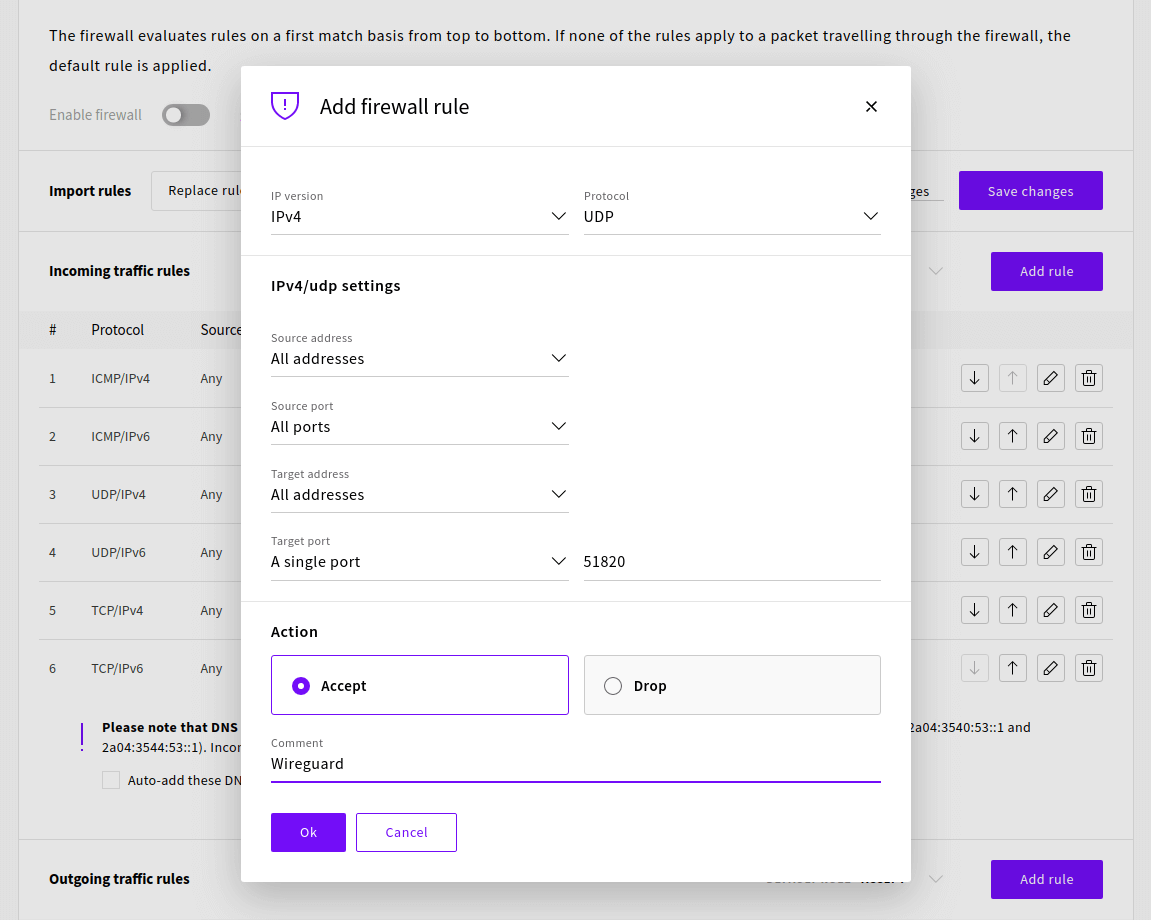
Once the rules have been added successfully, check that the default rule is set to drop, then click Save Changes and Enable firewall to confirm.
Generating private and public keys
WireGuard works by encrypting the connection using a pair of cryptographic keys. The key pair is used by sharing the public key with the other party, who then can encrypt their message so that it can only be decrypted with the corresponding private key. To make communication secure both ways, each party must have private and public keys, as each pair only enables one-way messaging.
For the use in WireGuard, the server and each client must generate their key pair and then exchange public keys.
To start generating the keys for the server, change into the WireGuard directory.
cd /etc/wireguardNext, set the permissions for the directory with the following command. You need to log in with the root account to do this.
umask 077Then, with the required permissions set, generate a new key pair using the command below.
wg genkey | tee privatekey | wg pubkey > publickeyRepeat these steps on each client you want to connect to the WireGuard server.
Remember that you should never share your private key with anyone.
Generate server config
We are then set to start configuring the WireGuard server. The config files are generally stored in the /etc/wireguard folder. Create a new configuration file called wg0.conf in that folder.
sudo nano /etc/wireguard/wg0.confThe configuration below will make your WireGuard server accept connections to 51820 and allow a client with the public key corresponding to the private key we made above.
Add the following directives to the configuration file.
[Interface]
PrivateKey = <contents-of-server-privatekey>
Address = 10.0.0.1/24
PostUp = iptables -A FORWARD -i wg0 -j ACCEPT; iptables -t nat -A POSTROUTING -o eth0 -j MASQUERADE
PostDown = iptables -D FORWARD -i wg0 -j ACCEPT; iptables -t nat -D POSTROUTING -o eth0 -j MASQUERADE
ListenPort = 51820

[Peer]
PublicKey = <contents-of-client-publickey>
AllowedIPs = 10.0.0.2/32
If your default network interface name differs, you might need to check it and replace eth0 with it in the config above.
ip route list defaultNote that the configuration file must include the actual keys, a string of letters, numbers and symbols. You can read the key files with the following commands.
sudo cat /etc/wireguard/publickey
sudo cat /etc/wireguard/privatekey
Then, save the file and exit the editor.
Starting WireGuard and enabling it at boot
With the configuration in place, we are ready to start the server. WireGuard has a convenient wrapper called wg-quick that can be used to start new interfaces without needing to go into the setup details. You can use it to start your configuration using the following command.
wg-quick up wg0Upon successfully starting the interface, you should see an output like the one below.
[#] ip link add wg0 type wireguard
[#] wg setconf wg0 /dev/fd/63
[#] ip -4 address add 10.0.0.1/24 dev wg0
[#] ip link set mtu 1420 up dev wg0
[#] iptables -A FORWARD -i wg0 -j ACCEPT; iptables -t nat -A POSTROUTING -o eth0 -j MASQUERADE
Your WireGuard server is then running. You can check your configuration with the following command.
wg showinterface: wg0
public key: pcDxSxSZp5x87cNoRJaHdAOzxrxDfDUn7pGmrY/AmzI=
private key: (hidden)
listening port: 51820
peer: gCQKfJL8Xff2MNmvceVQ0nQAmLsSM0tXClhvVNzSil4=
allowed ips: 10.0.0.2/32To enable WireGuard to start automatically at system boot, also enable the systemd service.
systemctl enable wg-quick@wg0If you get an error starting the server, use the example below.
RTNETLINK answers: Operation not supported
Unable to access interface: Protocol not supported
Make sure your server software is fully up-to-date.
sudo apt-get update && sudo apt-get upgrade -yThen, check that the WireGuard kernel module is loaded with the command below. If successful, you should not see any output.
sudo modprobe wireguardIf you get an error saying the module is missing, restart your WireGuard server and try again.
sudo rebootWhen the kernel module is loaded, you can try starting WireGuard again.
Client configuration
Once your WireGuard server is up and running, you must configure your client device. They offer software for most operating systems to connect your Windows, Linux, or macOS and Android or iOS devices easily. You can find available packages on their download page.
Create a new configuration file in the /etc/wireguard directory on a client computer.
sudo nano /etc/wireguard/wg0.confThen, add the following to that file. Remember to set the client private key and server public key to their corresponding places and include your WireGuard server’s public IP address.
[Interface]
Address = 10.0.0.2/32
PrivateKey = <contents-of-client-privatekey>
DNS = 1.1.1.1

[Peer]
PublicKey = <contents-of-server-publickey>
Endpoint = <server-public-ip>:51820
AllowedIPs = 0.0.0.0/0, ::/0
Note that setting AllowedIPs to 0.0.0.0/0, ::/0 will forward all traffic over the WireGuard VPN connection. If you want only to use WireGuard for specific destinations, set their IP address ranges in the list separated by a comma.
Once you’ve set the keys and the server address, save the file and exit the editor.
Start the connection with the command below.
sudo wg-quick up wg0You can also use the system command to start WireGuard as a service.
sudo systemctl start wg-quick@wg0Then, when you want to disconnect, use either of the following commands, depending on which method you used to start it.
sudo wg-quick down wg0
sudo systemctl stop wg-quick@wg0
WireGuard will then disconnect from the server and remove the related network settings.
Adding more clients
You can add more clients to your server if you want to use the WireGuard VPN on other devices. Adding clients is simple.
First, install WireGuard on your new client devices as before and create a new key pair.
Next, stop the server to be able to edit the configuration.
sudo wg-quick down wg0
sudo systemctl stop wg-quick@wg0
Then, edit the wg0.conf file on your WireGuard server.
sudo nano /etc/wireguard/wg0.confAdd the following entry at the end of the file to include your second client’s public key and set the IP address.
[Peer]
PublicKey = <content-of-client2-publickey>
AllowedIPs = 10.0.0.3/32
Afterwards, save the file and exit the editor.
Then, restart the service to update the configuration.
sudo systemctl start wg-quick@wg0All done! You can then connect with the new client as you did before.
James
In many of the tutorials I see that the address tends to be “ 10.0.0.x” should we keep it like that or change it to “192.168.0.x” to match our networks?
Anonymous
This is by far the most complete Wireguard setup tutorial I’ve seen so far.
Muhammad Fazil
Hi. How to remove a client from linux terminal? If I edit wg0.conf in server and remove the client entry, it is coming back again after the service is restarted. Do we have a command to remove the peer? I tried few commands, it says improper usage of command every time. Thank you.
Danny
Hello – Great tutorial. When I try to access my online banking, the connection is refused while on VPN. I’ve tried wireguard, shadowsocks proxy, openvpn all with same results. Is there any other tool I could use for privacy that won’t be detected by my bank? I always have to disable the VPN before I connect to my bank, and would like to avoid doing this. I use vultr’s cloud servers. My bank is bbvausa.com
Thanks!
Fabio Perez
Hello,
I just installed WireGuard on an LCX container using Proxmox. I created a Ubutu 18.04 machine and run all the instructions listed, but when I run the “wg-quick up wg0” command, I got the following error:
[#] ip link add wg0 type wireguard
Error: Unknown device type.
Unable to access interface: Protocol not supported
[#] ip link delete dev wg0
Cannot find device “wg0”
I also have another error by running:
root@WireGuard-VPN:/etc/wireguard# sudo modprobe wireguard
modprobe: FATAL: Module wireguard not found in directory /lib/modules/5.4.44-1-pve
root@WireGuard-VPN:/etc/wireguard#
How can I fix this?
Thank you.
Michael
When I attempted to add the repo in Ubuntu 18.04 it said:
“`$ sudo add-apt-repository ppa:wireguard/wireguard
Cannot add PPA: ‘ppa:~wireguard/ubuntu/wireguard’.
The team named ‘~wireguard’ has no PPA named ‘ubuntu/wireguard’
Please choose from the following available PPAs:“`
So I did “`sudo apt-get install wireguard“` and it installed but seems to be an old version (1.0.20200513-1~18.04.2). Current version would appear to be 1.0.20201112 from the wireguard website.
Suggestions?
duanow
Hello,
I already update to the least version but sitll get the same problem with Janne Ruostemaa, but i use the gcp vm with debain is that the problem let me get this error?
[#] ip link add wg0 type wireguard
RTNETLINK answers: Operation not supported
Unable to access interface: Protocol not supported
[#] ip link delete dev wg0
Cannot find device “wg0”
thx for your reply!
Dario
In server intereface address
Address = 10.0.0.1/24
I guess it should be /32
Dario
Also, I’m using ubuntu 20.04, when i run command
net.ipv4.ip_forward=1
i got response “net.ipv4.ip_forward=1: command not found”
Mario
Thank you for the helpful guide, everything is up and running except I want to use the DNS that’s on my server, which is connected to my home network. I’ve tried inputting the DNS IP that’s listed in my home modem/router settings, but the connection doesn’t transmit anything. Actually putting a DNS manually for the client seems to be mandatory as my connection won’t start transmitting anything without it, so it can’t seem to be configured automatically. Any ideas how I can use my home DNS on my client when using Wireguard?
Greg
I’m still quite new to this, but am very interested in using this as a possible solution for my use case.
Could you confirm for me that this would work:
Computer “A” has some inventory software on it, and
Remotely Computer “B” has a client that naturally connects to that software but is not located in the same location.
If I have a Wireguard VPN setup on a linux server, and I have both computers connect to it, will the 2 pieces of the software be able to communicate like they are on the same Local Network?
While connected, will the computers still be able to access the internet to do (for example) a Google Search?
Thanks for the help.
Michael S.
Might be worth mentioning that it’s not possible to follow these instructions to set up a VPN via a trial server https://upcloud.com/docs/free-trial/ because the firewall applied to these servers blocks the Wireguard port. (The firewall also can’t be removed.)
Serafim
thanks, man! It was really helpful
alex
Hello,
By following your tutorial, it works, but the dns will be exposed, please test your vpn connection at https://www.dnsleaktest.com/
or
https://dnsleak.com/
I also tried this tutorial to avoid DNS leaking and please check the part of Configure DNS:
https://www.ckn.io/blog/2017/11/14/wireguard-vpn-typical-setup/
But it still not work, and no luck to me.
I know you are expert here, is it possible to show a tutorials upon DNS configuration to avoid DNS leaking?
Thanks so much and have a nice day.
Bu
Hey, nice tutorial.
But my client has no internet.
Marc
how can I use this to forward a static public IP from upcloud to my home private VM lab I use when building servers and websites for clients before they get moved to upcloud for perm hosting???
mike
Good tutorial. Two things you might want to explain better:
– Add a note that the 10.0.0.1 & 10.0.0.2 address should not be changed or even modified to ones own IP (I did and it did not work…). Explain that they are intended to spawn a new network region or whatever.
– “AllowedIPs to 0.0.0.0/0, ::/0” – Maybe more explanation is necessary, because I still don’t know what do do if I just want to keep the tunnel open without routing anything to it, until I for example attach qBittorrent to that device. So what should I change it to in this case.
greetings
Coops
Thanks for the great guide!
I had an issue where the client (my android phone) would connect to the server (`wg show` would display a latest handshake time), however, the client would have no connectivity. Turns out my server’s network card was not “eth0” (it was “ens18”), so the iptables setup in PostUp/PostDown was not getting applied. I replaced eth0 with my actual network card and it works great now!
Emmanuel
Hi,
Great tutorial indeed. Is there a way my Mikrotik router and the wireguard vpn can work together?
Fabianus Harry
Hi, I had an issue of handshake won’t happen and no data is received. I used dual boot windows and ubuntu and I currently used my wireguard on ubuntu and from what I searched its all about system time issues since I get the warning of System Clock Wound Backward, but I’ve tried syncing the system clock and the handshake just won’t happen. But sometimes when I turn on my computer after several time it just works. Any idea why this is happening and how to prevent it from happening in the future?
Saqib
In linux how to configure routes to pass data through wireguard tunnel ??
Also how to configure routes to pass through wireguard vpn client??
Patrich
Tnx for the guide! Worked like a charm! it was really easy to understand after doing a few connections, keep up the good work!
pcunite
Is there a way to have multiple wg interfaces, so that I could use them as vlan interfaces? Scenerio: I have different wireguard clients connecting to my wireguard server and I need a way to tag their traffic to place them on different vlans. The wireguard server will be connected to a trunk port on a switch.
John
Hi,
Firstly thanks for the great tutorial.
I’m having an issue however with the wireguard server where it doesn’t seem to be sending any data :(
“wg show” says that data is being received on the server-side but no data is being sent in return.
Double-checked the configuration and all seems to be fine.
Was just wondering what your input is regarding this issue as I seem to be stuck and can’t find any relevant answers online either.
Any help would be greatly appreciated :)
Regards,
John
Antonymous
HI, Thanks for the great tutorial, I am trying to integrate wireguard with my ios app. Problem is we need to set different allowed IP for every Peer in wg0.conf (server config file). If we add manual entry in wg0.conf file then its ok we can add by incrementing allowed IP by one for newly added Peer. But in my case I have to do this programmatically. Is there any dynamic way to solve this problem? any recommendation as best practice from your side ?
Thanks again for the wonderful guide :)
Gouri Nayak
I have installed wireguard VPN on ec2 instance (Ubuntu server), for first few months it was working fine, however, from past few days, I am getting slow connection and connectivity timed out issue.
Darren
I don’t understand it … but I set the server wg.conf and the conf file on my phone as per above and it just worked … thank you!
tokagebo
Hello,
I’ve done everything that the tutorial said and checked if wg is working. Everything seems to be fine on paper, but any IP-checking website exposes my real IP. My computer also fails the DNS leak test. The only weird thing I’ve noticed is that when I run “wg show” it only shows public key, private key and listening port, and doesn’t add the [Peer] block. I would be grateful if you could help me.
Muhammad
I already make a wireguard server with ubuntu, but when client connect devices client can connect to the wireguard server but cannot connect to internet, how can i fix that ?
Bhupendra Singh
hey
I got a conf file from a friend heb said to enter to her server . they setup all server side functionality towards wireguard vpn but as if now in client side I can’t able to ssh from home network
[Interface]
PrivateKey = [private-key]
Address = 10.10.1.12/24
DNS = 1.1.1.1,1.0.0.1
MTU = 1420
[Peer]
PublicKey = [public-key]
PresharedKey = [preshared-key]
AllowedIPs = 10.10.1.0/24,10.10.2.0/24
PersistentKeepalive = 0
Endpoint = being-admin.piyush.co:51820
how we can perfrom ssh to exixting network with this conf file.
Janne Ruostemaa
Hi Bhupendra, thanks for the question. You can follow the “Client configuration” portion of this tutorial and enter your config file instead of the example we used. Do note that you should never share your private keys publicly, I’ve redacted the keys from your comment for your privacy.
Taj
Piece of advice if someone has followed the tutorial, got the hanshake but unable to access the Internet through VPN.
In wg0 config where you have copied the POST UP and POST down IP tables. In those lines there is a word ‘eth0’ which is the name of the network adaptor. This name could be different in your vps or your home lab server.
Run this command ‘ip route list default’ and you will find the name in the output command. Replace the word ‘eth0’ with the name on your system name in ‘wg0’ config file and restart wireguard.
Andrew Symons
Found this page by Google search. It does not say what operating system you are dealing with!
Janne Ruostemaa
Hi Andrew, thanks for the question. This tutorial is written for Ubuntu Linux but most of the commands should work with any Debian-based operating system.
Bora
Great explanation, thanks for that.
Are there instructions available to set up a connection with mobile devices, wireguard app?
Paul @ WDR
Thanks for the guide! Have a nice day.
ANDERS ÖSTLING
Janne, thank you for great guide.
Would you mind if I send you a longer question regarding WG and routing? I need to attach a drawing to explain my dilemma.
Lewis
Hey Anders! Sorry for the late reply, but fire away if you still need help. :D
LinMeister
“net.ipv4.ip_forward=1: command not found” – what’s wrong?
computer engineering
I’m using WireGuard on my VPS, but my home client is still behind my ISP’s router (NAT). If I only allow 51820/udp on the VPS, the handshake still returns ‘last seen = never’. It turns out I need to add a MASQUERADE iptables rule on the client as well. Could the next post discuss ‘road-warrior’ mode + ufw on the client side? This will save readers the hassle of constantly checking their home firewall.