Code-server is a Visual Studio Code instance running on a remote server, accessible through any web browser. It lets you code from any device with a browser, such as a tablet or a laptop, while keeping a single, consistent development environment.
Running your IDE on a cloud server also lets you offload demanding tasks such as tests, compilations, and large downloads to the remote machine. You preserve battery life when you are on the go, and you can do something else while heavy processes run on the server.
This tutorial sets up code-server on a cloud server running Ubuntu, and works for both Ubuntu 24.04 LTS (Noble Numbat) and Ubuntu 26.04 LTS (Resolute Raccoon). The steps are the same on both versions; the only difference is which template you select when deploying the server.
Requirements
Code-server needs:
- A 64-bit host
- At least 1 GB of RAM (2 GB or more is recommended; 2 CPU cores give a smoother experience)
- A secure connection over HTTPS, which we will set up with Nginx and Let’s Encrypt
- A domain name pointing to the server, which is needed to obtain an SSL certificate
The current releases of code-server bundle their own Node.js runtime, so you do not need to install Node.js separately.
Sign up on UpCloud
The first things first, you’ll need to sign up for an UpCloud account. So if you are not yet registered, create an account with UpCloud and you can get started on a free trial and continue with as little as 5 USD/month.
Once registered, log into your UpCloud Control Panel and get cracking!
Deploy a new cloud server
Click the Deploy a server button under the Servers section in the Control Panel.
You will need to do the following:
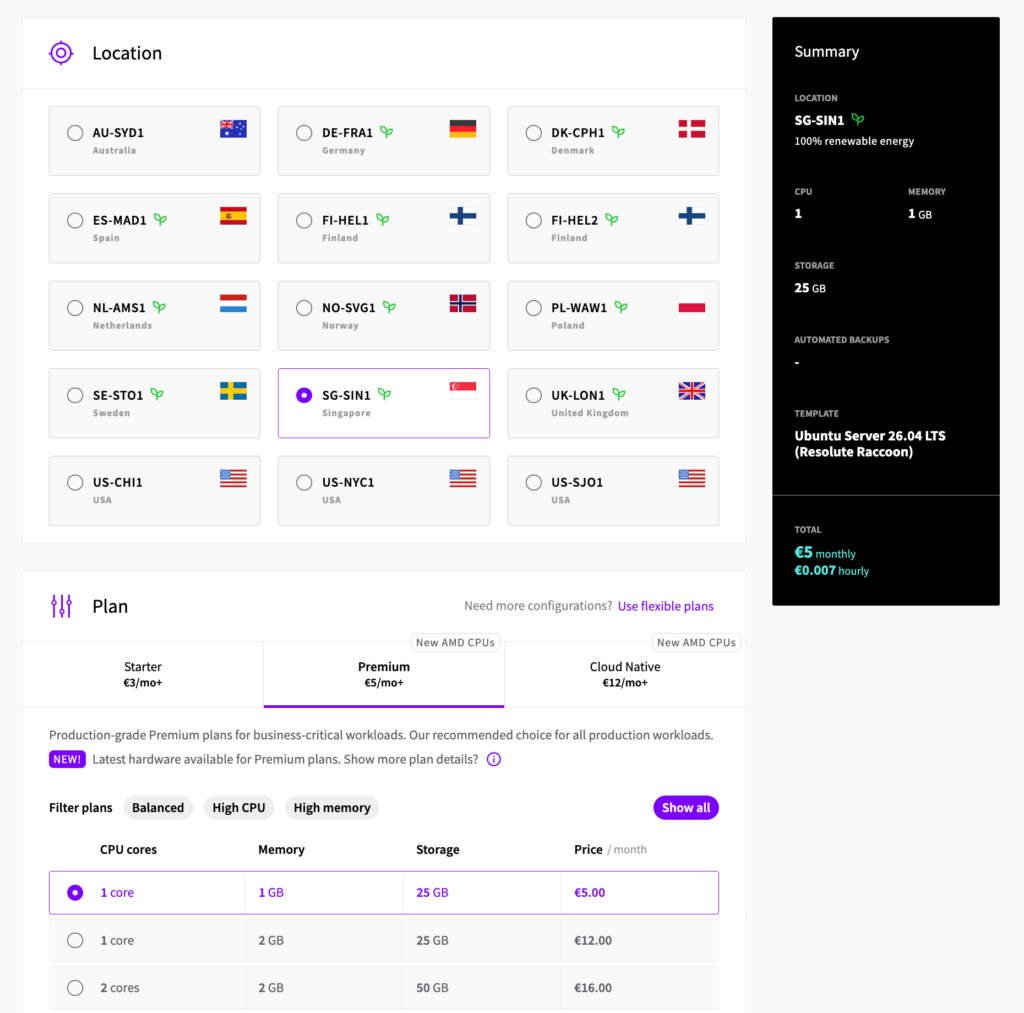
- Choose the server location from the available data centres
- Pick a configuration; the smallest plan is enough to get started
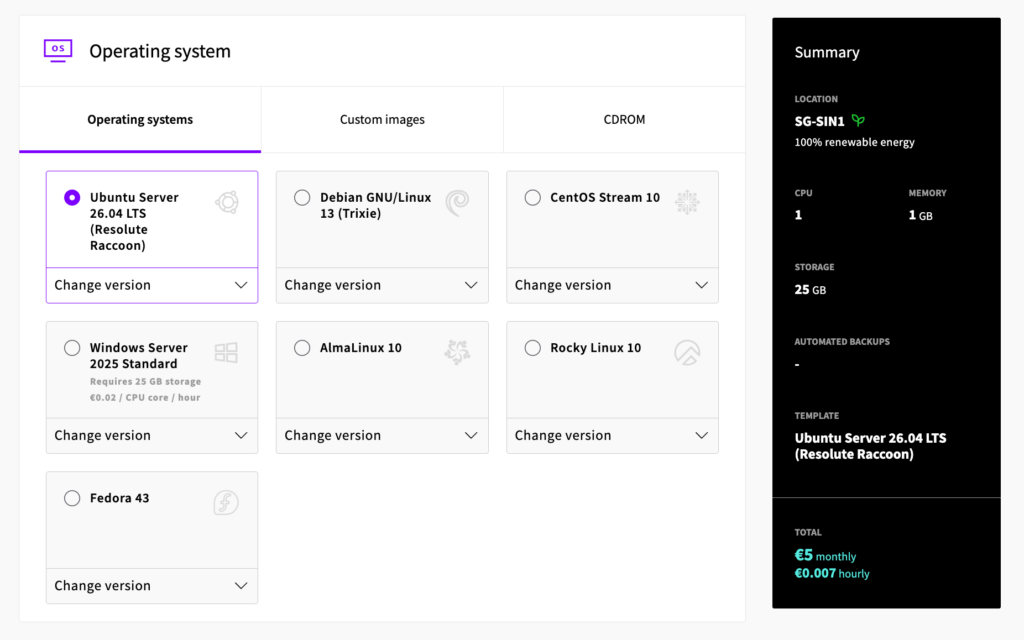
- Select the operating system: either Ubuntu 24.04 LTS (Noble Numbat) or Ubuntu 26.04 LTS (Resolute Raccoon)
- Add an SSH key. This is required because the Ubuntu cloud-init templates use SSH key authentication and do not set a login password
- Give your server a hostname and description
- When you are happy with your selections, click Deploy
You can find more detailed instructions in our guide to deploying a server.
Once the server has been deployed, you can find its public IP address in the server list.
Point a domain at your server
You will need a valid domain name to obtain an SSL certificate and serve code-server over HTTPS.
Point an A record for your chosen subdomain (for example code-server.example.com) at the public IPv4 address of your new server. This is done at your domain registrar or DNS provider. See our guide to the domain name system and configuring DNS records for details.
DNS changes can take a little while to propagate, so it is worth setting this up before you start, so the record has resolved by the time you request a certificate.
Connect to the server over SSH
Log in to your server over SSH as root, using the key you added during deployment. Replace <server-ip> with your server’s public IP address:
ssh root@<server-ip>Then update the installed packages:
sudo apt update
sudo apt upgrade -y
Install code-server
The code-server project provides an install script that detects your distribution and installs the correct package. On Ubuntu it installs the latest .deb package.
It is good practice to inspect what the script will do before running it. You can do a dry run first:
curl -fsSL https://code-server.dev/install.sh | sh -s -- --dry-runWhen you are happy with the output, run the installer:
curl -fsSL https://code-server.dev/install.sh | shCheck the installed version:
code-server --versionConfigure code-server
The package install already creates a configuration file at ~/.config/code-server/config.yaml, complete with sensible defaults and a strong, randomly generated password. Open it to take a look:
nano ~/.config/code-server/config.yamlIt looks like this, with a different password each time:
bind-addr: 127.0.0.1:8080
auth: password
password: 7f3c9a1e6b2d8045f1c4e90a
cert: false
These defaults are exactly what we want, so there is nothing you need to change to continue. Binding to 127.0.0.1 keeps code-server reachable only from the server itself. We will put Nginx in front of it to handle the public connection and HTTPS. Setting cert: false is correct here because Nginx terminates TLS, not code-server.
The generated password is secure, so you can keep it as it is. Make a note of it, since you will need it to log in later. If you would rather use a password of your own, change the password: line, then save the file. If you change it after the service is already running, restart it to pick up the change:
sudo systemctl restart code-server@$USERStart code-server as a service
The package ships a systemd service template, so there is no need to write a service file by hand. Enable and start it for your user in one command:
sudo systemctl enable --now code-server@$USERCheck that it is running:
systemctl status code-server@$USERYou should see the service active and listening on 127.0.0.1:8080. Code-server is now running in the background, but it is not yet reachable from outside the server. For that, we will set up Nginx as a reverse proxy with a Let’s Encrypt certificate.
Install and configure Nginx
Install Nginx:
sudo apt install nginx -yCreate a configuration file for the reverse proxy:
sudo nano /etc/nginx/sites-available/code-server.confAdd the following, replacing code-server.example.com with your own domain:
server {
    listen 80;
    listen [::]:80;
    server_name code-server.example.com;

    location / {
        proxy_pass http://localhost:8080/;
        proxy_set_header Host $host;
        proxy_set_header Upgrade $http_upgrade;
        proxy_set_header Connection upgrade;
        proxy_set_header Accept-Encoding gzip;
        proxy_http_version 1.1;
    }
}
The proxy_http_version 1.1 line and the Upgrade and Connection headers are needed for the WebSocket connections that code-server relies on. Without them the editor loads but the terminal and other features fail.
Remove the default site and enable your configuration:
sudo rm /etc/nginx/sites-enabled/default
sudo ln -s /etc/nginx/sites-available/code-server.conf /etc/nginx/sites-enabled/code-server.conf
Test the configuration and reload Nginx:
sudo nginx -t
sudo systemctl reload nginx
Make sure ports 80 and 443 are open. If you use the UpCloud firewall or UFW on the server, allow both, since Let’s Encrypt validates over port 80:
sudo ufw allow 'Nginx Full'Secure the connection with HTTPS
Code-server requires a secure connection, so we will obtain a free certificate from Let’s Encrypt using Certbot. Install Certbot and its Nginx plugin from the Ubuntu repositories:
sudo apt install certbot python3-certbot-nginx -yIf you would prefer the very latest Certbot client, the Certbot project recommends installing it via snap instead:
sudo snap install --classic certbotfollowed bysudo ln -s /snap/bin/certbot /usr/bin/certbot. The apt package used above works the same way for our purposes, including automatic renewal.
Request and install a certificate using the Nginx plugin. Replace the domain with your own:
sudo certbot --nginx -d code-server.example.comThe command runs an interactive setup. It will ask you to:
- Enter a contact email, used for renewal and security notices. You can press Enter to skip this
- Read and agree to the Let’s Encrypt terms of service
Certbot will then obtain the certificate, update your Nginx configuration to enable HTTPS, and add a redirect from HTTP to HTTPS. For this to work, the A record from earlier must already point at your server and have propagated.
Certbot sets up automatic renewal through a systemd timer, so the certificate will refresh before it expires without any action from you. You can confirm renewal works without making changes:
sudo certbot renew --dry-runLog in to code-server
Open your domain in a web browser. You should see the code-server login page.

Log in with the password from your config.yaml (the one generated during install, unless you changed it). Once logged in, you have a full VS Code environment running on your own cloud server.
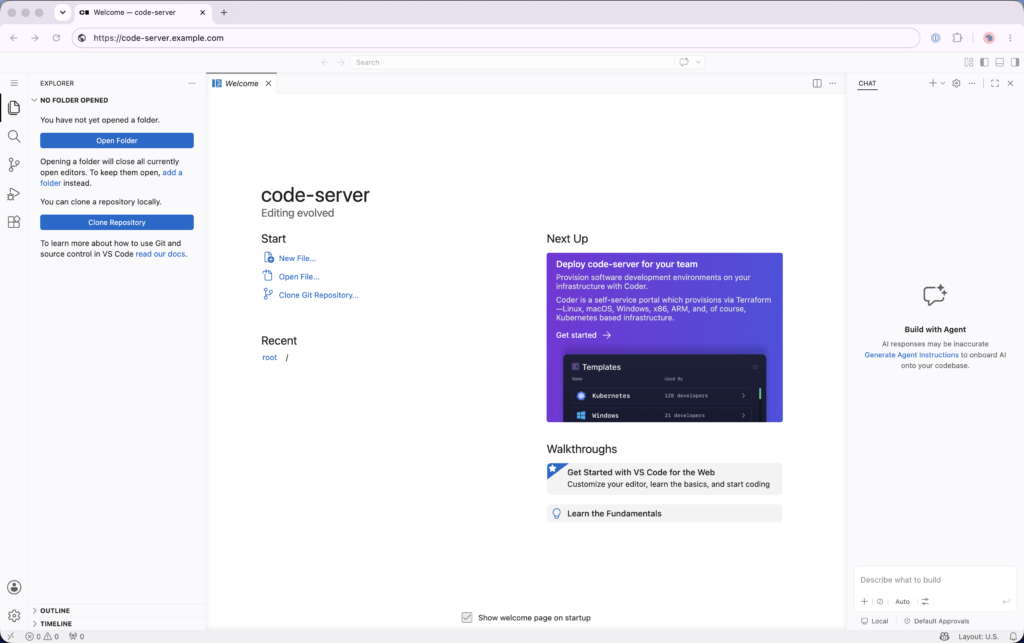
To open a terminal inside the editor, press Ctrl and the backtick key (`, just under Escape), or open the menu (the icon in the top-left of the window) and choose Terminal, then New Terminal. This gives you a shell on the server, the same as your SSH session.
Keeping code-server up to date
To update code-server later, run the install script again. It will detect the existing installation and upgrade it to the latest version:
curl -fsSL https://code-server.dev/install.sh | sh
sudo systemctl restart code-server@$USER
Best practices for production use
The setup above is enough to get you coding, and is fine for a personal test server. If you intend to rely on the server for real work, there are a few things worth tightening first.
Run code-server as a dedicated user rather than root.
Anyone who logs in to code-server gets a terminal with the privileges of the user the service runs as. In this guide, that user is root, so a leaked password means a root shell on the server. For production, create a dedicated user with only the access it needs, place the config file under that user’s home directory, and enable the service for them with sudo systemctl enable --now code-server@<username>. The service template handles the rest.
Keep the password strong, and treat it as the only lock on the door.
Code-server has no rate limiting or second factor by default, so the password is the entire gate between the internet and a shell on your server. Keep the generated one or set a long, unique password of your own, and do not reuse it elsewhere.
Limit who can reach the server at the network layer.
Because the only authentication is a password, reducing exposure is a meaningful second line of defence. You can use the UpCloud firewall to allow ports 80 and 443 only from IP addresses you trust, or place the server behind a VPN so it is not open to the whole internet. See our guide to the UpCloud firewall for how to set this up.
Enable backups.
If you are keeping work on the server, turn on UpCloud’s Simple Backups or Flexible Backups so you have a recent copy to restore from. Backups are configured per server in the Control Panel.
Keep everything patched.
Update code-server with the install script as shown above, run sudo apt update && sudo apt upgrade regularly for the operating system, and let Certbot’s timer handle certificate renewal on its own.
Discussion