Distributing your web application over a cluster of cloud computing resources can significantly improve performance and availability. Docker Swarm is the Docker native clustering solution, which can turn a group of distributed Docker hosts into a single large virtual server.
Docker Swarm provides a standard Docker API and it can communicate with any tool that already works with Docker daemon allowing easy scaling to multiple hosts. With resources pooled in a Swarm cluster, your application can run as if it was installed on a high-performance cloud server while allowing easy scaling by adding or removing resources at the same time. This guide goes through the steps for setting up a simple Docker Swarm consisting of three servers – a primary manager and two worker nodes.
Deploy your cloud servers
To start with, you are going to need to deploy some servers to run the Swarm. In this guide, the Swarm will consist of three servers; a primary manager and two worker nodes. However, a swarm can have as many nodes as required, and more can easily be added later.
When deploying the cloud servers for the Swarm, note that Docker itself will work on most Linux distributions. CentOS and other Red Hat variants might require additional steps to allow Swarm to communicate because of their stricter default firewall rules.
Log in to the UpCloud Control Panel and deploy three new servers for the Swarm cluster:
- manager1
- worker1
- worker2
Once the new hosts are all up and running, perform the usual security preparations e.g. update the system, add users and SSH keys. You can find help with these steps in the guides for Managing Linux User Account Security and Using SSH keys for Authentication.
Create SDN Private Network (Optional)
Although not necessary, it is possible to have the Swarm contained within a private network.
Private networks allow you to create isolated environments within zones. You can then define custom local networks with the IP ranges of your choosing and attach IPs statically or automatically using DHCP. See our guide for detailed information on how to create a private network.
For this guide we’ll be using a private network with the following private IP addresses:
Manager 1: 192.168.1.101
Worker 1: 192.168.1.102
Worker 2: 192.168.1.103
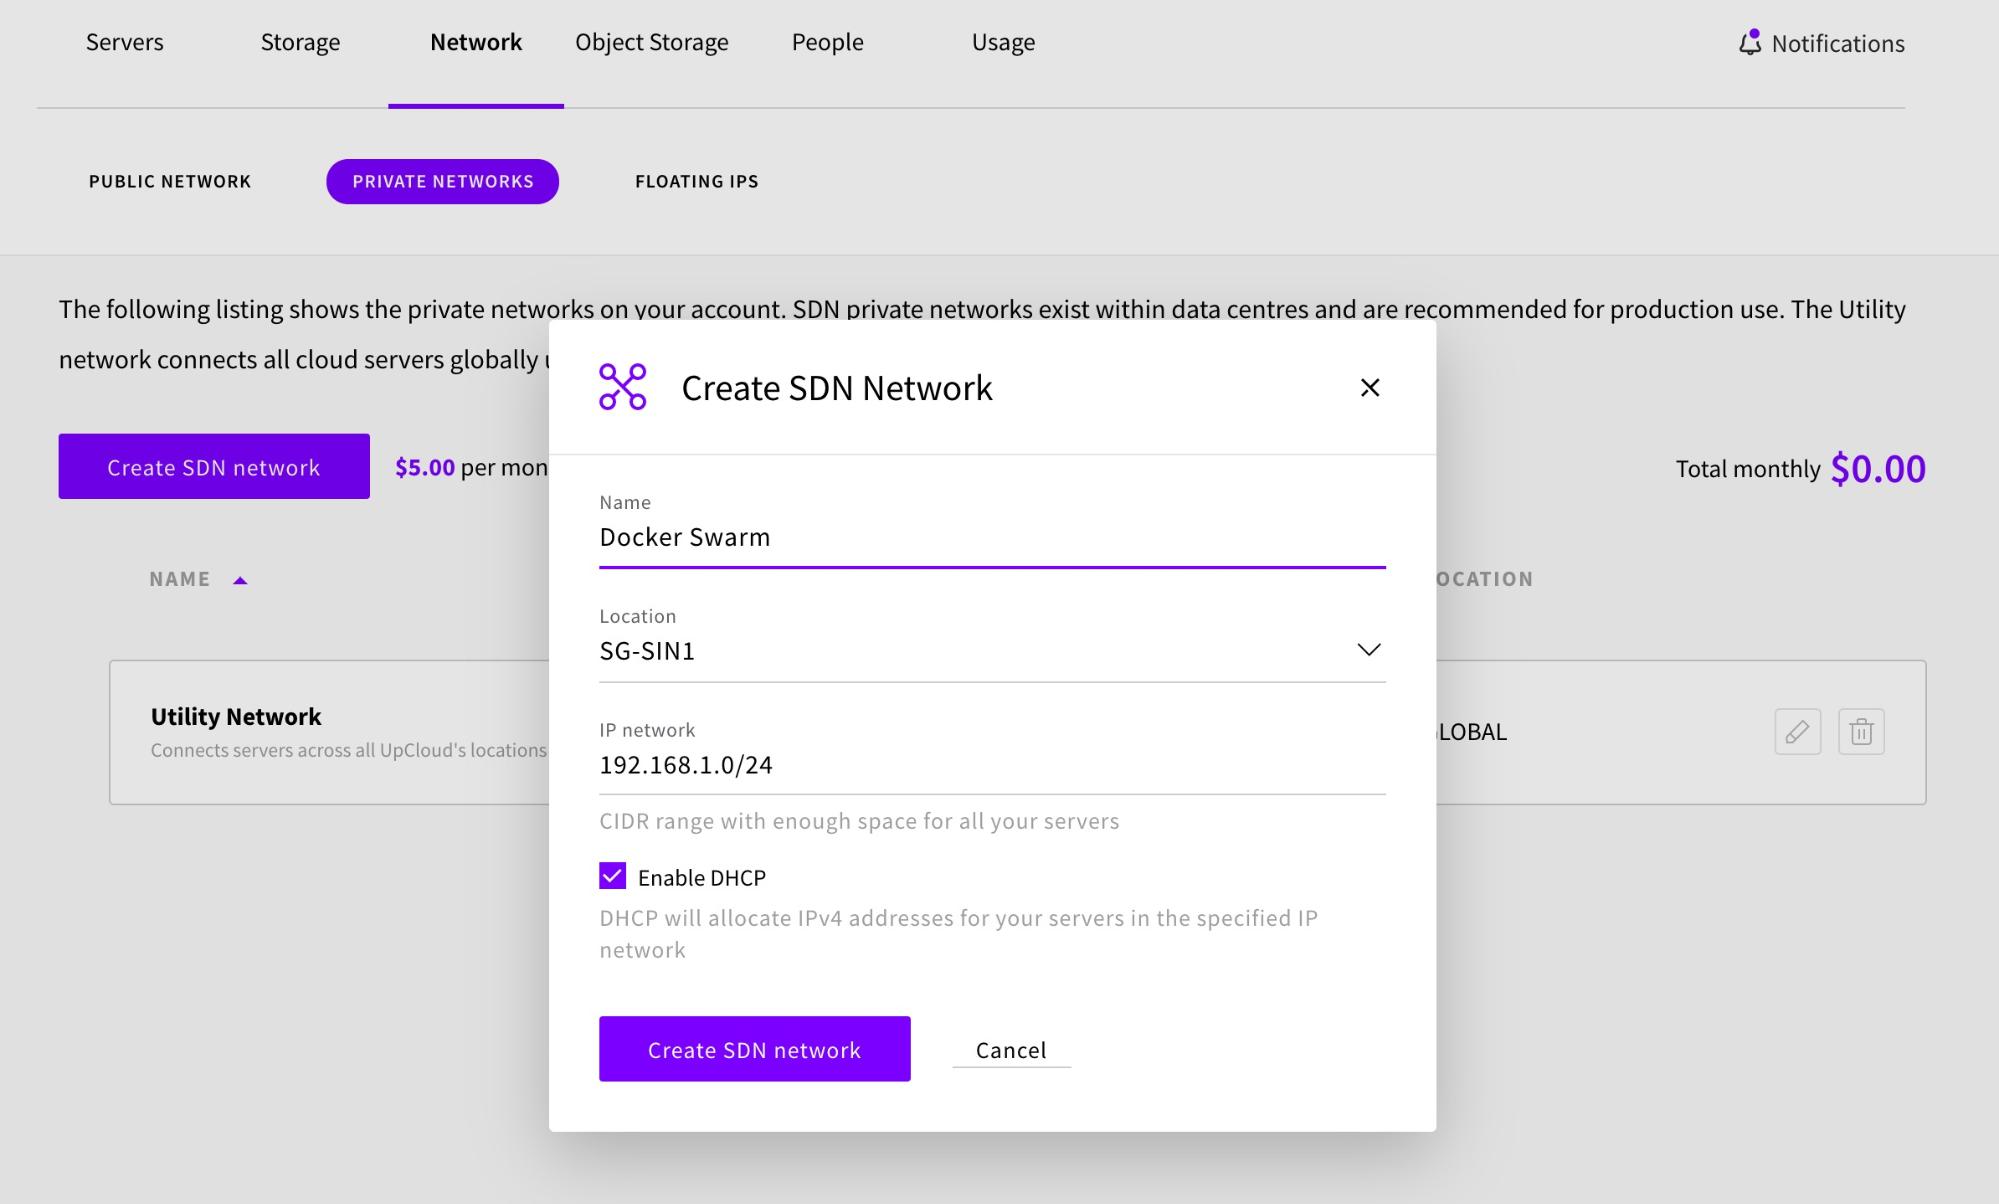
We’ll start by creating a new private network from the Private Network section under the Network menu. Click the Create SDN Network button to confirm. Then choose a name for the network, select a location, and specify an IP network as shown below:
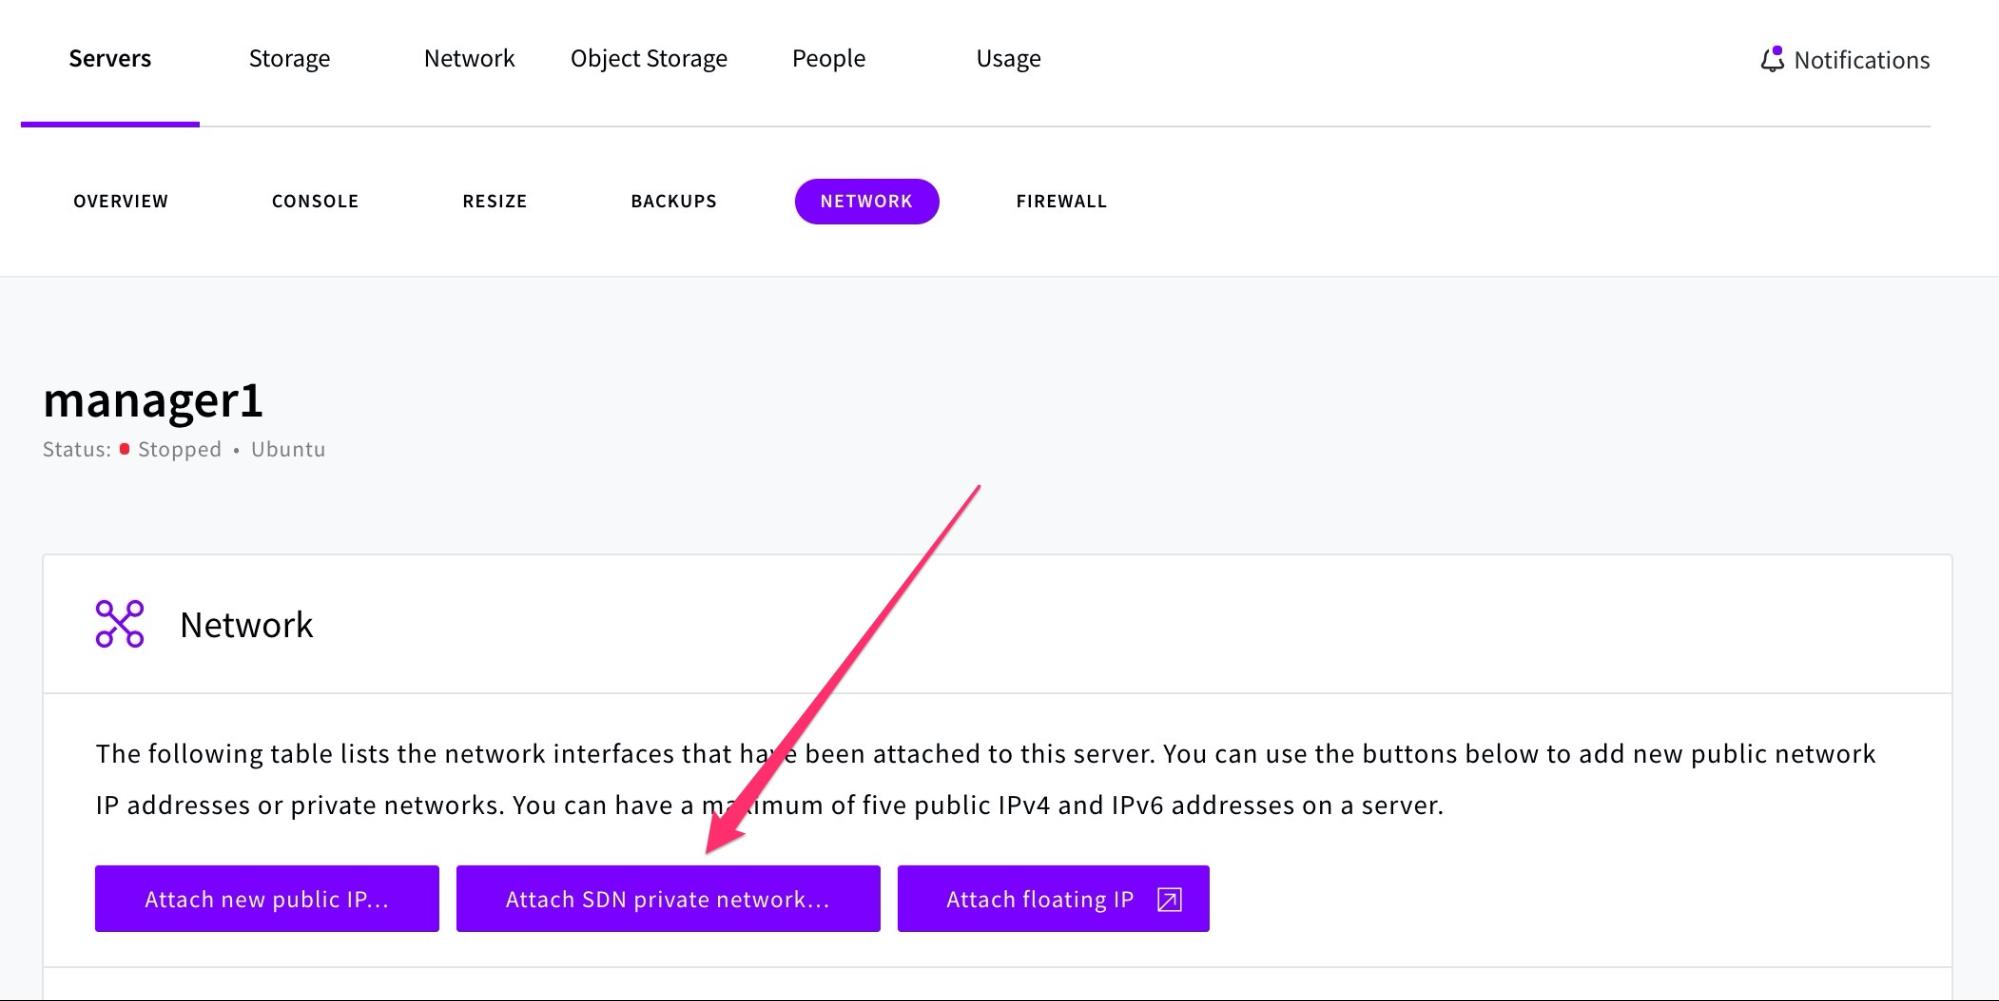
To add a server to the newly created network, first shut down the server and then navigate to the server’s Network tab. Next, click the Attach SDN private network button as shown below:
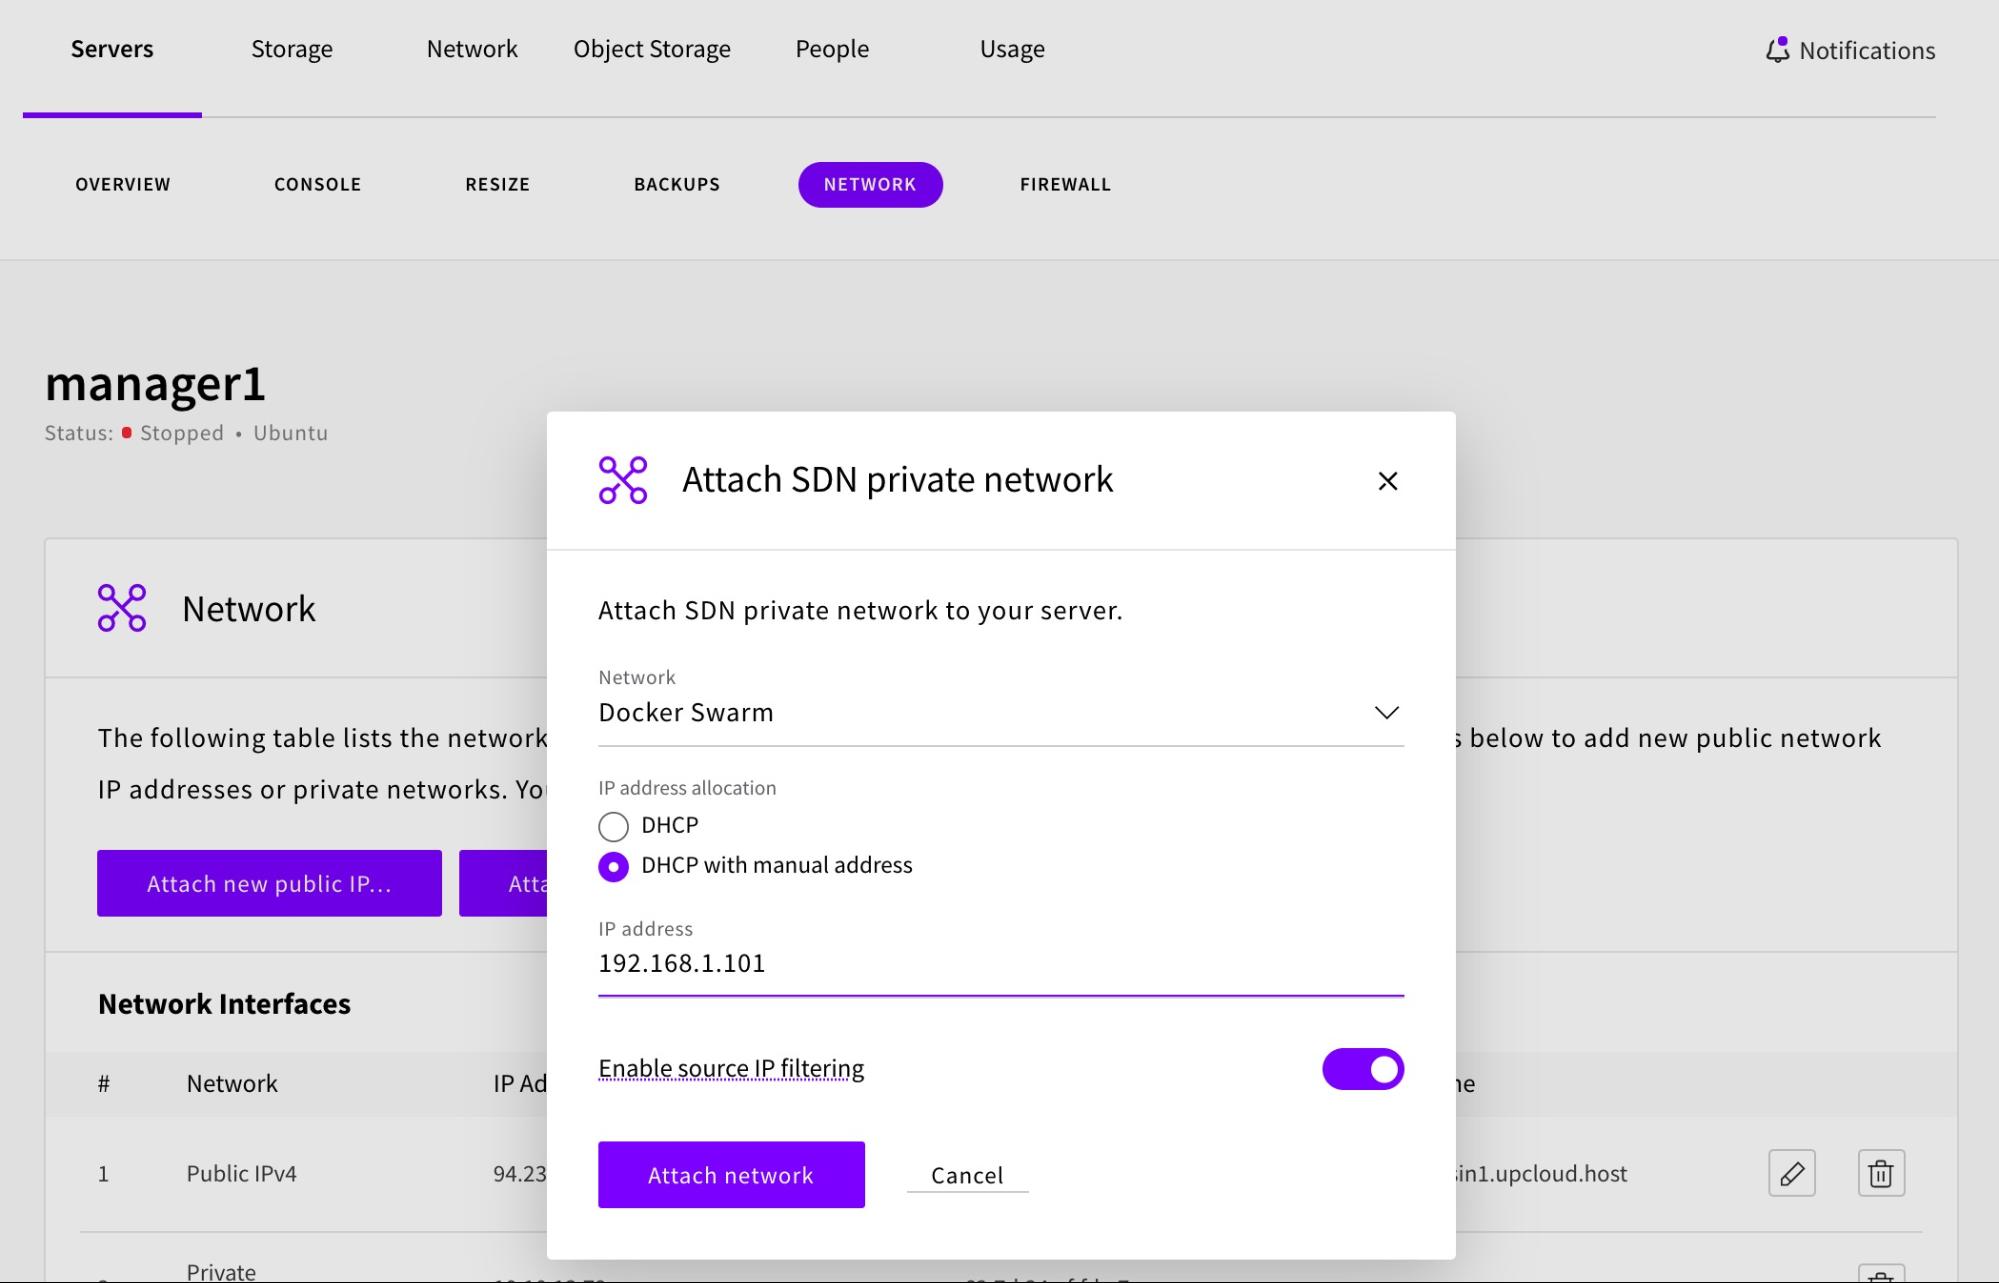
Select the SDN network that you created earlier and specify the private IP address that you would like to use for the server:
After attaching the server to the private network, you need to also configure a new network interface at your operating system level. Check the guide on how to add new IP addresses for instructions on how to do this.
Add the remaining servers to the private network by repeating the same steps from above.

Install Docker Engine on each node
With the initial configurations done and a new private network configured, we are now ready to install Docker Engine on each of the servers. You’ll find instructions for Ubuntu and CentOS below. The setup instructions for other operating systems can be found on the docker website.
Installing Docker Engine on Ubuntu
Remove any old versions:
sudo apt-get remove docker docker-engine docker.io containerd runc
Update the apt package index:
sudo apt-get update
Install packages to allow apt to use a repository over HTTPS:
sudo apt-get install apt-transport-https ca-certificates curl gnupg-agent software-properties-common
Add Docker’s official GPG key:
curl -fsSL https://download.docker.com/linux/ubuntu/gpg | sudo apt-key add -
Verify that you now have the key with the fingerprint 9DC8 5822 9FC7 DD38 854A E2D8 8D81 803C 0EBF CD88, by searching for the last 8 characters of the fingerprint:
sudo apt-key fingerprint 0EBFCD88
Set up the stable repository:
sudo add-apt-repository "deb [arch=amd64] https://download.docker.com/linux/ubuntu $(lsb_release -cs) stable"
Install the docker engine:
sudo apt-get update
sudo apt-get install docker-ce docker-ce-cli containerd.io
You can refer to the official Docker documentation for more information about installing Docker on Ubuntu.
Installing Docker Engine on CentOS
Remove any old versions:
sudo yum remove docker docker-client docker-client-latest docker-common docker-latest docker-latest-logrotate docker-logrotate docker-engine
Set up the stable repository:
sudo yum install yum-utils
sudo yum-config-manager --add-repo https://download.docker.com/linux/centos/docker-ce.repo
Install Docker Engine:
sudo yum install docker-ce docker-ce-cli containerd.io
You’ll be prompted to accept the GPG key. It should match 060A 61C5 1B55 8A7F 742B 77AA C52F EB6B 621E 9F35. If it does, accept it and continue.
You can refer to the official Docker documentation for more information about installing Docker on CentOS
Create the Swarm cluster on manager node
We are now ready to create the Swarm. SSH into the cloud server where you want to run your manager node and run the command below. Be sure to replace it with the IP address of your manager server. In this tutorial, all our servers are part of an SDN private network and the private IP address for the manager node is 192.168.1.101.
If you are not using a private network replace with the public IP address of your server:
docker swarm init --advertise-addr <manager-ip-address>
The output will look like the following:
docker swarm init --advertise-addr 192.168.1.101
Swarm initialized: current node (dxn1zf6l61qsb1josjja83ngz) is now a manager.

To add a worker to this swarm, run the following command:

    docker swarm join --token SWMTKN-1-3cg4q489c4fwf0du0ixgfb2e41fmw3mnhsv7zfa9sdy73hjcxu-39ug2o8u70xqimxvjo6zjl3ej 192.168.1.101:2377

To add a manager to this swarm, run 'docker swarm join-token manager' and follow the instructions.
Take note of the join command to add workers to the swarm as we will be using this later in the tutorial when adding our worker nodes.
To confirm that the manager node has created the new Swarm successfully, you can run the following command to view information about the Swarm:
docker node ls
ID                             HOSTNAME     STATUS    AVAILABILITY   MANAGER STATUS   ENGINE VERSION
k4vfyc4hgzlyp889033mzluob *    manager1     Ready     Active         Leader           19.03.6
The * next to the node ID indicates that you are currently connected to this node.
Add worker nodes to the Swarm
Now that the Swarm has been created, we can start attaching worker nodes to it. To do this, SSH into the server where you want to run a worker node and run the join command that was produced by the docker swarm init output in the previous section.
docker swarm join --token SWMTKN-1-3cg4q489c4fwf0du0ixgfb2e41fmw3mnhsv7zfa9sdy73hjcxu-39ug2o8u70xqimxvjo6zjl3ej 192.168.1.101:2377
If you don’t have the command available, you can SSH back into the manager node and run the following command to retrieve the join command for a worker:
docker swarm join-token worker
After running the join command, you will see a message indicating that the worker node has been successfully added to the swarm.
docker swarm join --token SWMTKN-1-3cg4q489c4fwf0du0ixgfb2e41fmw3mnhsv7zfa9sdy73hjcxu-39ug2o8u70xqimxvjo6zjl3ej 192.168.1.101:2377
This node joined a swarm as a worker.
Repeat this step for the second worker node to add that to the Swarm as well.
You should now have a total of three nodes in the Swarm. To confirm this, SSH back into the server where the manager node is running and enter the following command to see a list of all the nodes in the swarm:
docker node ls
ID                            HOSTNAME       STATUS       AVAILABILITY      MANAGER STATUS      ENGINE VERSION
k4vfyc4hgzlyp889033mzluob *   manager1       Ready        Active            Leader              19.03.6
aavmq0x3usmjygqaupwtt882a     node1          Ready        Active                                19.03.6
mg6hbmpk8mgx2lowwp7vztnqx     node2          Ready        Active                                19.03.6
You now have a fully functioning Swarm consisting of a manager node and two worker nodes.
Deploy a service to the Swarm
You can now start deploying services to the newly created swarm. For the remainder of this guide, we will be working with the example service called helloworld. To get started, SSH into the server where your manager node is and run the following command:
docker service create --replicas 1 --name helloworld alpine ping google.com
This creates a single container instance of the service called helloworld which then executes a ping call to google.com.
You can see the running services with the following command:
docker service ls
ID                  NAME                MODE                REPLICAS            IMAGE               PORTS
zevs3yd7j9qq        helloworld          replicated          1/1                 alpine:latest
With the service now deployed to the swarm, you can begin scaling the number of containers in the service. The containers running in services are called “tasks.”
To scale the number of tasks in the service to 5 for example, enter the following command:
docker service scale helloworld=5
This creates 4 new tasks bringing the total number in the swarm to 5. The tasks are all distributed between the three nodes of the swarm.
Run the command below to see the updated task list:
docker service ps helloworld
result:
ID                  NAME                IMAGE               NODE                DESIRED STATE       CURRENT STATE            ERROR               PORTS
ii4btsv6mlkq        helloworld.1        alpine:latest       worker2             Running             Running 13 minutes ago
zevs3yd7j9qq        helloworld.2        alpine:latest       manager1            Running             Running 21 seconds ago
r9fb6bl95uwn        helloworld.3        alpine:latest       worker1             Running             Running 20 seconds ago
tcumkkobk42d        helloworld.4        alpine:latest       worker2             Running             Running 20 seconds ago
u19v94j2w72d        helloworld.5        alpine:latest       worker1             Running             Running 20 seconds ago
You can get more details about the service by inspecting it with the command below:
docker service inspect helloworld
Running the scale command again with a smaller number will reduce the number of tasks.
Finally, to remove the running service run the following command:
docker service rm helloworld
Run the command below to verify that the swarm manager has indeed removed the service. You should get back a message saying that the service could not be found:
docker service ps helloworld
no such service: helloworld
Conclusions
Docker Swarm is an easy way to get started with computer clusters. It provides high availability regardless of the size of your deployment. Docker boasts results of up to a thousand nodes and fifty thousand containers with no performance degradation. Scaling your cluster is also convenient with the fast deployment of new hosts through your UpCloud Control Panel or the UpCloud API.
Now that you have a basic Swarm cluster set up, head over to the Docker documentation pages to learn more about Swarm mode.
Discussion