This article describes instructions and configuration examples for setting up two DNS servers and an administrative web interface with NicTool.
Introduction
Setting up a very basic DNS infrastructure for oneself isn’t really that hard. There are a lot of complete guides on the net for setting up a few BIND servers and making the first server notify and update the others. Also, the overall documentation on DNS server software is pretty good.
One thing outside of the basic setting, however, is the consolidated administration of every name server from a single place. Because a DNS zone (e.g. a domain name) needs two or more separate name servers, upon adding or removing a zone from the name server system there are configuration parameters that need to be updated on each of the domain’s name servers.
In a very basic setup, setting an administrator can make the changes to each of their servers’ configs by hand. Nowadays modern name servers can do zone transfers and update their zone information automatically from the master server in which case changes to config files by hand are not necessary unless adding or removing a zone. This method is the most straightforward to set up, has the smallest overhead, and works well for small and quite static setups.
On the other hand, if there are several administrators, many servers, or numerous zones which are added, modified, or removed often, the burden of making changes by hand becomes very pronounced. It’s also easy to make mistakes when editing configs by hand. To ease this administration routine, there exists a tool called NicTool which presents itself as a web interface to manage the data on a predefined set of name servers. The tool’s backend syncs all config and changes to the name servers and there is no need to touch anything other than the web UI.
Description of the setup
This document describes setting up two DNS name servers onto two separate hosts and the installation of DNS server administration tool NicTool. The article’s example was curated on CentOS 7 servers but you can, of course, use any Unix-like system of your liking.
The infrastructure is going to be as follows:
- ns1 (10.234.44.55) as a master NS with ISC BIND and the NicTool, and
- ns2 (10.234.55.66) as a slave NS with NSD.
NicTool itself is divided into two components:
- the client provides the web interface and manages the data in a MariaDB database which holds all information of managed zones and their data
- the server generates specific config files according to the current database and takes care of exporting them to each name server.
The article assumes the reader has the basic skills of administering their server machines.
Setup procedure
The setup will go along the following procedure:
- install and configure BIND named on ns1 [1]
- prepare for NicTool on ns1: install and configure MariaDB, Apache and SSL
- install NicTool itself on ns1 [2][3]
- configure configuration exports to other nameservers on ns1 [4]
- install NSD on ns2 [5]
- configure exports to ns2 [6]
Install ns1 named
Everything begins by installing BIND on ns1:
yum install bind bind-utils
Then, /etc/named.conf should have at least the following sections. Replace the IP address shown in red with the private IP of your slave nameserver, ns2:
acl "trusted" {
 10.234.55.66;
};

options {
 listen-on port 53 { any; };
 listen-on-v6 port 53 { any; };
 allow-query { any; };
 allow-transfer { trusted; };
 version "hmmm";

 recursion no;
};

include "/opt/nictool/ns1/named.conf.nictool";
A significant configuration directive is include with which we will feed the NicTool-generated configuration to BIND.
Because we are running an authoritative name server it’s important to ensure we are as widely reachable as possible (listen-on and allow-query). Equally important is not to allow recursion for unknown clients because of the amplification attack risk (US-CERT). Enabling allow-transfer only to trusted hosts limits potentially needlessly big transfers of data.
It’s recommended in many sources as a best practice to hide name server version information to hinder easy harvesting of exploitable systems in case vulnerabilities are found from the name server software. However, as of writing this article, at least querying several root servers for such information (CHAOS bind.version) gives mixed results; some servers seem to reveal their version and some others don’t. So far I haven’t encountered any proper research which would state if obscurity is actually beneficial from the viewpoint of server administration. That said, was the version info hidden or not, the most critical part is obviously to commit to continuous administration of the server and keeping it up to date.
Reminder and notes: authoritative and recursive name servers
Authoritative name server, as its name says, has authority over a zone (e.g. a domain and all of its possible subdomains). It means the authoritative name server is the master source of the information regarding the zone and it can also delegate some authority onwards to another server.
For example, the authoritative name servers for google.com are ns[1-4].google.com when writing this. These servers know every hostname and subdomain under the google.com zone and if they don’t, they know another server which knows. ns[1-4].google.com get their authority from .com top level domain name servers (which are [a-m].gtld-servers.net) which know every authoritative name server of every domain of com zone. In other words, they delegate the authority to other name servers and return the information about the delegated name servers to be queried next by the client.
Recursive name server, or resolver, then, is a server which answers to all kinds of queries by clients and does the resolving work for them. Recursive name servers are no source of original information as they get every piece of information they know from authoritative name servers. Resolvers work in between the authoritative name servers and clients and by caching the results obtained in previous queries, they can reduce the traffic leaving a network and the load on authoritative name servers. So a recursive name server is fine if it’s not openly queriable by everyone, but only a specified range of clients.
Recursive and authoritative server functions may reside in the same server instance but I would discourage it on the principle that authoritative name servers shouldn’t do recursion at all. That is on the grounds of performance issues and possible easy misconfiguration. In this example, the recursive function is altogether disabled in BIND configuration, and NSD isn’t even capable of doing recursion.
NicTool preparations and prerequisites
Now it’s time to install NicTool. First NicTool prerequisites are satisfied, then NicTool files are installed and the system configuration is done.
MariaDB (practically the GPL fork of Oracle MySQL) SQL DBMS is needed for information storage. Install MariaDB on ns1:
yum install mariadb mariadb-server mariadb-devel
systemctl enable mariadb
systemctl start mariadb
Apache web server is required for serving the frontend and we really want it secured. Install Apache with mod_ssl and Perl:
yum install httpd httpd-devel mod_ssl epel-release
yum install mod_perl mod_perl-devel
Note: You should check whether the epel-release fingerprint is valid, below an example:
Retrieving key from file:///etc/pki/rpm-gpg/RPM-GPG-KEY-EPEL-7
Importing GPG key 0x352C64E5:
 Userid     : "Fedora EPEL (7) <[email protected]>"
 Fingerprint: 91e9 7d7c 4a5e 96f1 7f3e 888f 6a2f aea2 352c 64e5
 Package    : epel-release-7-11.noarch (@extras)
 From       : /etc/pki/rpm-gpg/RPM-GPG-KEY-EPEL-7
Is this ok [y/N]: y
systemctl enable httpd
Install some Perl and other related stuff to satisfy NicTool install dependencies:
yum install curl gcc make gettext gettext-devel rsync libxml2 libxml2-devel perl-Net-IP perl-XML-Parser perl-XML-LibXML perl-Digest-HMAC perl-ExtUtils-MakeMaker
yum install cpan perl-Module-Build perl-LWP-Protocol-https
Get the NicTool bundle and prepare it for installation. By default, NicTool is to be installed to /usr/local but I decided it’s a more suitable and state-of-the-art way to install this kind of blob into /opt:
cd /opt
wget https://github.com/msimerson/NicTool/archive/master.zip
yum install unzip -y && unzip master.zip
mv NicTool-master nictool
rm master.zip
Add a user account for syncing the config files and chown NicTool files to the new user:
useradd -d /opt/nictool -c "nssync user" -rU -s /bin/sh nssync
chown nssync: nictool/
On many systems, there already exists a bind user account but as a little extra security measure, I decided to go for a totally separate account. That’s because I want to allow NicTool to alter only specific config files – not everything that bind user has write access to.
Installing NicTool files and dependencies
Run NicTool install scripts which install NicTool and seek to fulfil its dependencies:
cd nictool/client/
perl bin/install_deps.pl
perl Makefile.PL; make; make install clean
cd ../server/
perl bin/nt_install_deps.pl
perl Makefile.PL; make; make install clean
Some dependencies might fail installation and it’s not a big deal. Just install them directly from CPAN.
The following modules failed installation:
Apache::DBI
BIND::Conf_Parser
Crypt::KeyDerivation
Crypt::Mac::HMAC
CryptX
Net::DNS::ZoneFile
As of July 2018 perl-CGI has to be also installed from CPAN because the prepackaged version isn’t new enough:
yum remove perl-CGI
cpan
> install CGI Apache::DBI BIND::Conf_Parser Crypt::KeyDerivation Crypt::Mac::HMAC CryptX Net::DNS::ZoneFile
> quit
Now everything should be ready for setting up the NicTool itself.
NicTool system configuration
Here the NicTool database and NicTool’s own base configuration are set up.
First the SQL database is to be initialized:
# cd sql/
# perl create_tables.pl
Enter the database hostname and root password (that’s empty for default installs).
Enter parameters for creating the NicTool MariaDB user and the db itself;
Database name and user nictool are fine. Database password should be different from any other password as it’s used only with the database connection.
creating the nictool ‘root’ admin account in the db:
Give the script an email and a password for logging in at the NicTool GUI. The password should be totally solid, the infrastructure’s integrity depends on it.
You should probably record the information the script gives you.
Now to do NicTool server’s system configuration.
# cd ../lib
# cp nictoolserver.conf.dist nictoolserver.conf
Edit nictoolserver.conf, define the previously set database password in the nictoolserver.conf config file, and check the other config parameters are correct.
Then configuring the NicTool client.
# cd ../../client/lib/
# cp nictoolclient.conf.dist nictoolclient.conf
Edit nictoolclient.conf:
- change /usr/local/nictool/client to /opt/nictool/client
- here are the parameters to be used for default DNS values.
NicTool system configuration should be fine now but NicTool is yet waiting for the web server setup before it can be accessed.
Web server setup with Apache and Let’s Encrypt
NicTool client (frontend) is served with Apache web server, at this step it is going to be installed with encryption.
Let’s Encrypt
Install the Let’s Encrypt package:
yum install python2-certbot-apache
systemctl start httpd
Edit /etc/httpd/conf.d/default_vhost.conf to accommodate Let’s Encrypt temporary config, replace the server name with your domain and subdomain:
<VirtualHost _default_:80>
   DocumentRoot "/var/www/html"
   ServerName ns1.example.com
</VirtualHost>
The CentOS template on UpCloud includes firewalls, which blocks DNS, HTTP and HTTPS connections by default. Enable these with the following commands.
firewall-cmd --permanent --add-service http
firewall-cmd --permanent --add-service https
firewall-cmd --permanent --add-service dns
firewall-cmd --reload
Then, the real thing of this step asking for certbot to issue and install a new certificate:
certbot --apache -d ns1.example.com
Follow the instructions to complete the certificate acquisition. In the last question about whether to redirect HTTP traffic to the encrypted channel, choose yes.
"Please choose whether or not to redirect HTTP traffic to HTTPS, removing HTTP access."
-> answer 2.
Let’s Encrypt should request and install a new certificate, and modify the default vhost to make it redirect to HTTPS.
Make certbot renew the certificates regularly by adding an entry to /etc/crontab:
16 2 * * 7 root /usr/bin/certbot renew -n --apache
This tells cron to run the command as the ‘root’ user every Sunday (‘7’) at 2:16 o’clock.
Apache
Then to hone the Apache config. At a CentOS setup, begin by blanking the default ssl.conf. I backed it up to /root. Blanking the file prevents system updates from replacing it.
On other distributions or OS’es, your procedure may vary, but the desired config is presented later.
cp /etc/httpd/conf.d/ssl.conf /root/
echo > /etc/httpd/conf.d/ssl.conf
Get the NicTool example config for Apache:
cd /etc/httpd/conf.d/
wget http://www.nictool.com/download/nictool-24.conf
Edit the Apache config and migrate the SSL part from your default_vhost-le-ssl.conf to Apache NicTool configuration file:
nictool-24.conf:
PerlRequire /opt/nictool/client/lib/nictoolclient.conf

# shouldn't be needed:
#<VirtualHost _default_:80>
#    # force a https connection
#    ServerName ns1.example.com
#    Redirect / https://ns1.example.com/
#</VirtualHost>

Listen 443
<VirtualHost *:443>
    ServerName ns1.example.com

#    DocumentRoot /opt/nictool/client/htdocs
#    Alias /images/ "/opt/nictool/client/htdocs/images/"
    Alias /nictool/ "/opt/nictool/client/htdocs/"
    RedirectMatch 301 ^/$ https://example.com/

    DirectoryIndex index.cgi index.html

    SSLEngine on
    SSLCertificateFile /etc/letsencrypt/live/ns1.example.com/cert.pem
    SSLCertificateKeyFile /etc/letsencrypt/live/ns1.example.com/privkey.pem
    Include /etc/letsencrypt/options-ssl-apache.conf
    SSLCertificateChainFile /etc/letsencrypt/live/ns1.example.com/chain.pem

    <Files "*.cgi">
       SetHandler perl-script
       PerlResponseHandler ModPerl::Registry
       PerlOptions +ParseHeaders
       Options +ExecCGI
    </Files>

    <Directory "/opt/nictool/client/htdocs">
        Require all granted
    </Directory>
</VirtualHost>

<IfDefine !MODPERL2>
   PerlFreshRestart On
</IfDefine>
PerlTaintCheck Off

Listen 8082

PerlRequire /opt/nictool/server/lib/nictoolserver.conf

<VirtualHost *:8082>
    KeepAlive Off
    <Location />
        SetHandler perl-script
        PerlResponseHandler NicToolServer
    </Location>
    <Location /soap>
        SetHandler perl-script
        PerlResponseHandler Apache::SOAP
        PerlSetVar dispatch_to "/opt/nictool/server, NicToolServer::SOAP"
    </Location>
</VirtualHost>
Some notes about the config:
- The NicTool directory is aliased to /nictool/ instead of the server root
- RedirectMatch directive is there to redirect the NicTool host’s HTTP root to a real (e.g. company) website.
- One should switch comments at the beginning of the lines on DocumentRoot configuration block to host NicTool in the HTTP root of the server.
- In DirectoryIndex there has been added index.html as a fallback option so that some directories can have an HTML index page; try removing index.html if you encounter problems.
After configuration, apply the config into effect:
mv nictool-24.conf z_nictool.conf
rm default_vhost-le-ssl.conf
systemctl reload httpd
And then… using a web browser go to the website and log in! -> https://ns1.example.com/nictool
Now the NicTool client/frontend should be working. Next NicTool needs to be populated with the name server info and the server/backend which executes the exports needs to be configured.
Populating NicTool with information
Here NicTool is set up with the minimum required amount of information to ultimately complete the setup. The payload (other zones and resource records) can be added whenever it suits the user.
Firstly, one should add a user for themselves from the NicTool web user interface (UI) and log in with it.
When logged in at the web UI, at the Nameservers tab edit the name servers.
- First nameserver ns1:
- NS type bind,
- data directory /opt/nictool/ns1.
- Second nameserver ns2:
- NS type NSD,
- data dir /opt/nictool/ns2,
- remote login nssync.
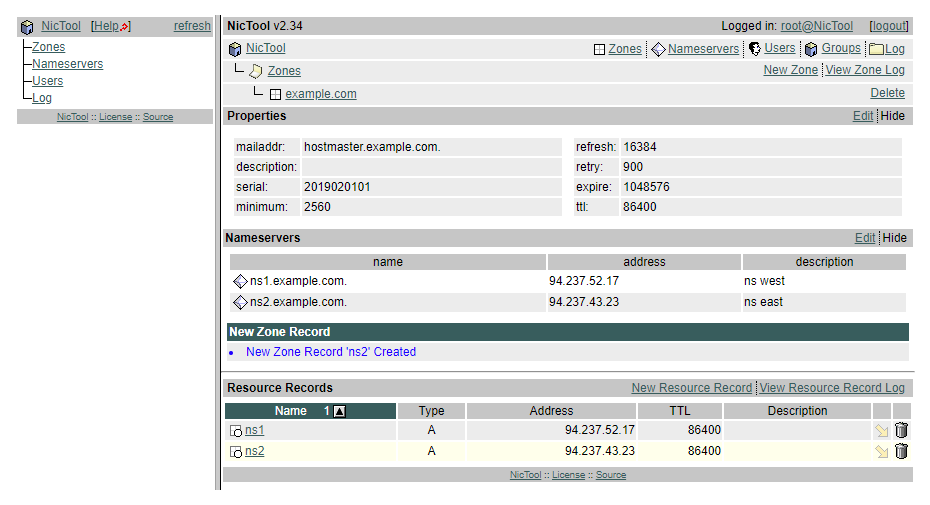
In the web UI’s Zones tab, there should exist at least one zone with the freshly edited name servers selected as the zone’s name servers (so that there is something for NicTool to export).
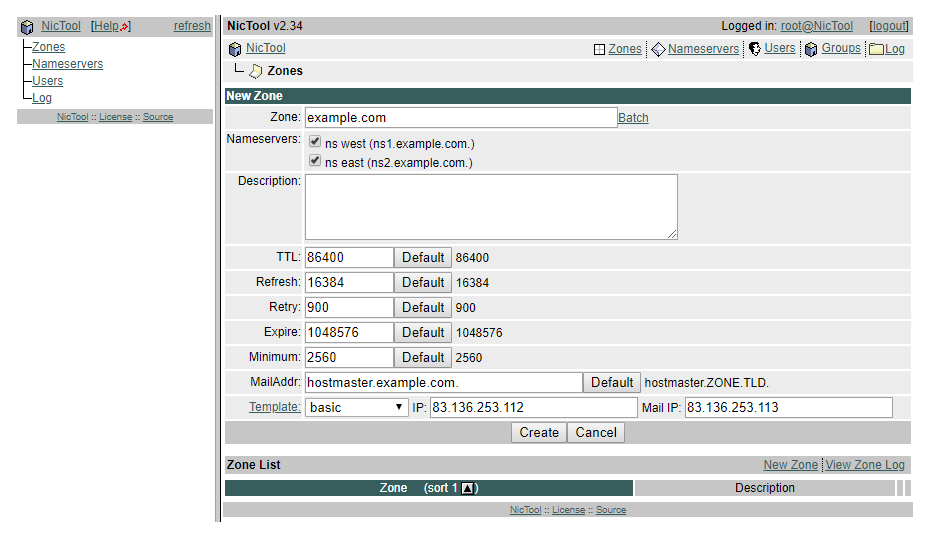
Then add at least A records for the name servers in the new zone.
Next, back at the shell, creating the config export directories for each name server:
cd /opt/nictool
su -m nssync -c "mkdir ns1 ns2"
Making the exports
One of the most powerful features of NicTool is the ability to create and push a coherent and up-to-date config for every name server set up in it. Now to configure the exports from the NicTool server side:
cd ns1
ln -s ../server/bin/nt_export.pl
su -m nssync -c ./nt_export.pl
-> Running nt_export.pl should show name servers that NicTool knows of.
Note: For me, there was something odd at this step and I didn’t get the listing as described in the documentation and elsewhere. Anyway, it seems one can get the nsid information from the NicTool GUI too: just look at the ID number in the link URLs when configuring each name server.
Because now we’re configuring ns1 which has NicTool’s nsid 1 we use -nsid 1 with the export script:
su -m nssync -c './nt_export.pl -nsid 1'
-> This generates the run file which is basically a nice wrapper script for executing the export.
Then open the run file in an editor and change the user name to nssync as below.
EXPORT_USER=nssync
Run the run file to get a Makefile:
./run
-> In the Makefile one can define which commands NicTool executes at different stages of the export. Edit the Makefile restart section:
restart: /opt/nictool/ns1/named.conf.nictool
        sudo rndc reload
        test 1
To give an unprivileged user the authority to reload the BIND config, sudo is used. The privilege must be granted in the /etc/sudoers file, open it using visudo.
visudo
Then add the following line:
nssync ALL=(ALL) NOPASSWD: /usr/sbin/rndc reload
-> The line gives nssync user the permission to run the BIND named reload command rndc reload via sudo and no password.
NicTool generated BIND config file can be customized with a template:
mkdir templates
touch templates/default
Then add the following to the default file. Replace the IP shown in red with the private IP address of the ns2 name server:
zone "ZONE" {
    type master;
    file "/opt/nictool/ns1/ZONE";
    notify yes;
    also-notify {
        10.234.55.66;
    };
    allow-transfer {
        10.234.55.66;
    };
 };
Actually, notify and transfer shouldn’t be needed since we push all the configs to slave servers. They’re here as an example, one should remove them at their discretion.
To start and enable BIND:
systemctl start named
systemctl enable named
Because the export is in the ns1 case done to the local filesystem, no remote login or other tricks are needed. Check the export is working like it should, i.e. config file is generated, put into a proper place, and the named server reloaded:
./run
Now the first name server should be working, then to install the second.
Install ns2
Up to this point all commands have been given to ns1. From now on the server is indicated before the command.
First, install the Extra Packages for Enterprise Linux (EPEL) on the ns2 as well:
ns2 # yum install epel-release
Install NSD and rsync along with the other requisites:
ns2 # yum install nsd rsync openssl sudo
Also, enable DNS port at firewalld on ns2:
ns2 # firewall-cmd --add-service --permanent dns
ns2 # firewall-cmd --reload
Then, prepare the ns2 for NicTool export:
ns2 # mkdir -p /opt/nictool/ns2
ns2 # useradd -d /opt/nictool -c "nssync user" -rU -s /bin/sh nssync
ns2 # chown -R nssync: /opt/nictool/
Edit /etc/nsd/nsd.conf:
server:
        # listen on IPv4/6 connections
        do-ip4: yes
        do-ip6: yes

        database: ""

        logfile: "/var/log/nsd.log"

        # Optional local server config
        include: "/etc/nsd/server.d/*.conf"

# Include optional local configs.
include: "/etc/nsd/conf.d/*.conf"

include: "/opt/nictool/ns2/nsd.nictool.conf"

remote-control:
        # Enable remote control with nsd-control(8) here.
        # set up the keys and certificates with nsd-control-setup.
        control-enable: yes
The last include: feeds our NicTool generated configuration to NSD. Although on CentOS 7 most of the defaults are fine, some things are explicitly defined in the configuration. You should follow the comments in the config file and read nsd.conf(5) manual when configuring your own server.
NSD keys and certs must be generated and the daemon enabled:
ns2 # nsd-control-setup
ns2 # systemctl enable nsd
ns2 # systemctl start nsd
nsd-control-setup should create the keys and certificates into the default place so separate configuration in nsd.conf shouldn’t be needed. You can of course explicitly define the files if you want.
After this, whenever needed, reload NSD config with:
ns2 # nsd-control reconfig && nsd-control reload
Setup exports for ns2
As earlier mentioned, the exports work like:
-> compile config files
-> push new confs to name servers
-> reload name servers’ configs
Setting up the export begins by doing the same magic as with ns1 export, but this time with -nsid 2:
ns1 # cd /opt/nictool/ns2
ns1 # ln -s ../server/bin/nt_export.pl
ns1 # su -m nssync -c './nt_export.pl -nsid 2'
Set the export user in run:
EXPORT_USER=nssync
Run the export – it will fail because login hasn’t been setup yet but it will generate the Makefile.
Tunc Makefile to suit ns2:
# NSD v4
compile: /opt/nictool/ns2/nsd.nictool.conf
        test 1

remote: /opt/nictool/ns2
        rsync -az --delete /opt/nictool/ns2/*.* nssync@10.234.55.66:/opt/nictool/ns2/

restart: /opt/nictool/ns2
        ssh nssync@10.234.55.66 "sudo nsd-control reconfig && sudo nsd-control reload"
The IP address in the above config example refers to ns2.
Giving nssync the ability to control NSD with sudo
Edit /etc/sudoers using visudo (export EDITOR if needed…) and add the following config line:
ns2 # visudo
nssync ALL=(ALL) NOPASSWD: /usr/sbin/nsd-control
The above line grants nssync user the ability to use nsd-control without password.
SSH public key authentication
Generate the keys which NicTool uses in export. Leave the key passphrase empty:
ns1 # su -m nssync -c 'ssh-keygen -t rsa'
On ns2 make the nssync user able to login via SSH public key:
ns2 # mkdir /opt/nictool/.ssh
Insert ns1’s public key (from /opt/nictool/.ssh/id_rsa.pub) into ns2’s /opt/nictool/.ssh/authorized_keys file. Replace the IP with the private IP and the domain with the server name of your first name server:
from="10.234.44.55" ssh-rsa AAAAB3NzaC1fae[...] nssync@ns1.example.com
In which the from= is the private IP of the master nameserver from where the key is accepted only.
SSH won’t accept authorized_keys without proper permissions:
ns2 # chown -R nssync: ~nssync/.ssh
ns2 # chmod 700 ~nssync/.ssh && chmod 600 ~nssync/.ssh/authorized_keys
The export might initially fail because the underlying ssh is confused about some things. I encountered two types of problems:
- SSH does not know about the private key to use in the authentication process, and
- SSH fails to check the remote host key.
In the first case the use of private key has to be stated by giving rsync the option -e 'ssh -i ~nssync/.ssh/id_rsa', as seen in the snippet from ns1’s /opt/nictool/ns2/Makefile:
remote: /opt/nictool/ns2
        rsync -az --delete -e 'ssh -i ~nssync/.ssh/id_rsa'
        /opt/nictool/ns2/*.* nssync@10.234.55.66:/opt/nictool/ns2/
In the second case, SSH wants to do the remote host key checking but the key doesn’t yet exist in ~nssync/.ssh/known_hosts. This can be solved by ensuring the ns2’s SSH host key is in the known_hosts file, something like this:
ns1 # su -m nssync -c 'ssh-keyscan -H 10.234.55.66 >> ~nssync/.ssh/known_hosts'
SSH may also be forced not to do the strict key checking by adopting this option in the rsync command: -e 'ssh -o StrictHostKeyChecking=no'. However, I wouldn’t recommend using it in a real-world environment.
Doing the exports automatically using cron
One of the last steps is to make the exports run automatically. As the export to a specific server is done by executing the corresponding run script, we can run each export periodically from cron.
Edit nssync user’s crontab on ns1:
ns1 # crontab -eu nssync
The following lines run the run scripts at the interval of 15 minutes. One line should exist for each synced nameserver. In other words, the changes made using the NicTool GUI are exported to nameservers every run. One should adjust the interval to their needs.
*/15 * * * * /opt/nictool/ns1/run
*/15 * * * * /opt/nictool/ns2/run
At this point each run file in /opt/nictool/ns?/ has to be checked that the command suited for periodical execution is uncommented and the command for interactive use is commented out.
######################################################
# For use with periodic triggers like cron and at
######################################################
exec /usr/bin/perl ./nt_export.pl -nsid 1 -pfextra | logger -t nt_export
...
######################################################
# For interactive human use.
######################################################
# Note that the -force option is included, as you likely want to export
# regardless of DB changes since the last successful export.
#exec su -m $EXPORT_USER -c " ./nt_export.pl -nsid 1 -force -pfextra "
Delegate authority to your nameservers
With the new name servers up and working, you migth want to delegate authority to them. The ns1 has already been configured as authoritative but your domain still needs to know where to find the server name records.
This process will depend on your domain name registrar but should be quite simple. Go to your domain name registrar and log in to their control panel or dashboard. In your domain’s management, find the option that allows you to specify custom name servers.
Enter the public IP addresses of the ns1 and ns2 in the available fields and save. Telling your domain name registrar to delegate authority over your domain to your new NS allows the setup to take control of the domain. Instead of the regular A records, the registrar will create a glue record to the specific IP addresses which tells other name servers on the internet who to ask about your records under domain.
Once done, the domain name registrar will begin to advertise the new name servers as authoritative over your domain. The changes might take some time to propagate, usually between 24-48 hour.
The final discussion
NicTool should be now able to export the respective configs to ns1 and ns2 automatically and reload the servers.
Making changes to DNS records from the GUI and running corresponding run scripts on ns1 should now be fully functioning and export each configuration without any further user intervention.
By adapting these instructions more name servers can be added to the system.
Discussion