Kubernetes is evolving beyond traditional data centers. With the increasing use of IoT devices, 5G networks, and latency-sensitive workloads, teams need clusters that can operate closer to where data is generated while remaining simple to manage.
UpCloud Kubernetes Service (UKS) offers a managed control plane that fits this direction. It lets you run lightweight, region-specific clusters with high-performance storage and private networking, which align with many edge patterns.
While several cloud providers offer managed Kubernetes, UKS stands out for its simplicity and developer-friendly design. You don’t need to provision multiple subresources or navigate complex networking setups; just define your network, pick a node plan, and start deploying.
A previous guide showed how to deploy a UKS cluster through the Control Panel. In this tutorial, you’ll take a hands-on approach using the UpCloud CLI to build an edge-ready cluster from scratch. By the end, you would have deployed a full application stack, gained practical experience with Upcloud’s edge-ready Kubernetes Architecture, and learnt how to troubleshoot real-world scenarios you’re likely to face in distributed environments.
UKS edge-aligned architecture overview
This tutorial deploys a simple three-tier Todo application on UKS using the CLI. Each YAML file defines a key component of the stack, and the setup follows a standard microservice architecture where each component runs as a Kubernetes workload.
- The PostgreSQL database is deployed using a StatefulSet and configured with persistent storage.
- The Backend runs as a Node.js/Express API service that handles requests and communicates with the database.
- The Frontend runs as a lightweight NGINX web server exposed publicly to users.
This environment demonstrates how UKS can host a self-contained, edge-style Kubernetes setup. All of the components run inside a private UpCloud network, storage remains local to the zone, and external traffic is routed through a single controlled entry point. This pattern mirrors how teams design clusters closer to their workloads or specific user regions.
The key UKS components leveraged in this architecture include:
- Servers (Nodes): Worker nodes provisioned by UKS to run your application pods.
- Networking: A dedicated router and private network connect all cluster nodes securely, while an external Load Balancer routes incoming traffic to the frontend service.
- Storage: MaxIOPS block storage attached to the PostgreSQL StatefulSet ensures low-latency data access and persistence across pod restarts.
- Load Balancers: Managed by UpCloud, providing reliable external access and automatic traffic distribution across healthy frontend pods.
Control Plane: Fully managed by UpCloud, maintaining the Kubernetes API server, etcd, and other control-plane components so you can focus on workloads.
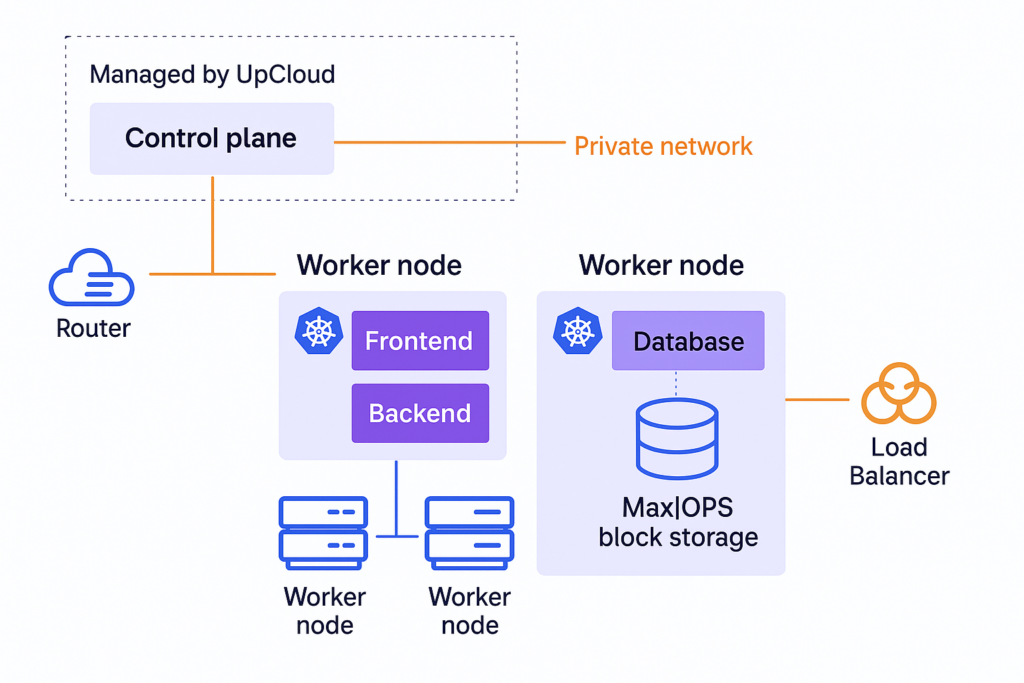
Architecture of the Todo application deployed on UpCloud Kubernetes Service (UKS), showing managed control plane, worker nodes, private networking, MaxIOPS storage, and external access through an UpCloud Load Balancer.
This architecture is compact yet production-like, offering a practical foundation for running edge-ready workloads on UpCloud before extending similar configurations to smaller or on-premise environments.
Let’s start by setting up the environment and the required tools.
Prerequisites
Before getting started, make sure the following requirements are in place:
- Kubernetes CLI
kubectis installed locally. - UpCloud CLI
upctlis installed and configured. - An active UpCloud account.
- A subaccount with API access (username and password) for CLI authentication.
The subaccount must have the following permissions enabled:
- Servers – Provision and manage virtual machines used as Kubernetes control plane and worker nodes.
- Storages – Create persistent volumes, manage block storage for nodes, and handle container image or data storage.
- Load Balancers – Expose services externally and distribute traffic across multiple pods or nodes.
- Private Networks – Create isolated networks for internal cluster communication and secure node-to-node traffic.
- Routers – Route traffic between private networks and connect cluster networks to the internet.
- Kubernetes – Create, manage, and delete Kubernetes clusters.
- API Connections – Allow CLI access to UpCloud’s API for resource creation. For this tutorial, you can allow access from all addresses. In production, always restrict API access to specific IP ranges for security.
Step 1: Create and populate the folder and file structure
- Start by creating a new project directory and the necessary files
Run:
mkdir upcloud_kubernetes_service
cd upcloud_kubernetes_service
Touch postgres-statefulset.yaml backend-deployment.yaml frontend-deployment.yaml .env
After creating the files, your structure should look like this:
upcloud_kubernetes_service/
├─ .env
├─ backend-deployment.yaml
├─ frontend-deployment.yaml
├─ postgres-statefulset.yaml- Next, populate the files with code.
Postgres-statefulset.yaml
Creates a PostgreSQL database using a StatefulSet (for stable storage) and a headless Service.
It stores data persistently on a 10 GB UpCloud volume and configures credentials for the database tododb, user todouser, and password todopass123.
For real deployments, make sure to use strong passwords and store credentials securely (for example, in Kubernetes Secrets) instead of hardcoding them.
apiVersion: v1
kind: Service
metadata:
name: postgres
spec:
ports:
- port: 5432
clusterIP: None
selector:
  app: postgres
---
apiVersion: apps/v1
kind: StatefulSet
metadata:
name: postgres
spec:
serviceName: postgres
replicas: 1
selector:
  matchLabels:
    app: postgres
template:
  metadata:
    labels:
      app: postgres
  spec:
    containers:
    - name: postgres
      image: postgres:15-alpine
      ports:
      - containerPort: 5432
      env:
      - name: POSTGRES_DB
        value: tododb
      - name: POSTGRES_USER
        value: todouser
      - name: POSTGRES_PASSWORD
        value: todopass123
      volumeMounts:
      - name: postgres-storage
        mountPath: /var/lib/postgresql/data
        subPath: postgres
volumeClaimTemplates:
- metadata:
    name: postgres-storage
  spec:
    accessModes: ["ReadWriteOnce"]
    storageClassName: upcloud-block-storage-maxiops
    resources:
      requests:
        storage: 10Gi
Backend-deployment.yaml
Deploys two replicas of a Node.js/Express API server that handles the Todo app’s CRUD operations.
The backend connects to PostgreSQL, initializes the todos table on startup, and exposes port 3001 via a ClusterIP Service (internal access only). The application code is also included in the chart to reduce file management
apiVersion: apps/v1
kind: Deployment
metadata:
name: backend
namespace: todo-app
spec:
replicas: 2
selector:
  matchLabels:
    app: backend
template:
  metadata:
    labels:
      app: backend
  spec:
    containers:
    - name: backend
      image: node:18-alpine
      workingDir: /app
      command: ["/bin/sh", "-c"]
      args:
        - |
          cat > /app/server.js << 'ENDJS'
          const express = require('express');
          const { Pool } = require('pg');
          const cors = require('cors');

          const app = express();
          app.use(cors());
          app.use(express.json());

          const pool = new Pool({
            host: 'postgres',
            database: 'tododb',
            user: 'todouser',
            password: 'todopass123',
            port: 5432,
          });

          const initDB = async () => {
            let retries = 5;
            while (retries > 0) {
              try {
                await pool.query(`
                  CREATE TABLE IF NOT EXISTS todos (
                    id SERIAL PRIMARY KEY,
                    title TEXT NOT NULL,
                    completed BOOLEAN DEFAULT FALSE,
                    created_at TIMESTAMP DEFAULT NOW()
                  )
                `);
                console.log('Database initialized');
                break;
              } catch (err) {
                console.log('Waiting for database...', err.message);
                retries--;
                await new Promise(resolve => setTimeout(resolve, 2000));
              }
            }
          };

          app.get('/api/todos', async (req, res) => {
            try {
              const result = await pool.query('SELECT * FROM todos ORDER BY id');
              res.json(result.rows);
            } catch (err) {
              res.status(500).json({ error: err.message });
            }
          });

          app.post('/api/todos', async (req, res) => {
            try {
              const { title } = req.body;
              const result = await pool.query(
                'INSERT INTO todos (title) VALUES ($1) RETURNING *',
                [title]
              );
              res.json(result.rows[0]);
            } catch (err) {
              res.status(500).json({ error: err.message });
            }
          });

          app.delete('/api/todos/:id', async (req, res) => {
            try {
              await pool.query('DELETE FROM todos WHERE id = $1', [req.params.id]);
              res.json({ success: true });
            } catch (err) {
              res.status(500).json({ error: err.message });
            }
          });

          app.get('/health', (req, res) => {
            res.json({ status: 'ok' });
          });

          initDB().then(() => {
            app.listen(3001, '0.0.0.0', () => {
              console.log('Backend running on port 3001');
            });
          });
          ENDJS

          cd /app
          npm init -y
          npm install express pg cors
          node server.js
      ports:
      - containerPort: 3001
---
apiVersion: v1
kind: Service
metadata:
name: backend
namespace: todo-app
spec:
type: ClusterIP
selector:
  app: backend
ports:
- port: 3001
  targetPort: 3001
frontend-deployment.yaml
Deploys two replicas of an Nginx web server with a lightweight HTML/CSS/JavaScript interface.
It also includes an Nginx config that proxies /api/* requests to the backend service and exposes port 80 through a LoadBalancer Service for external access.
apiVersion: v1
kind: ConfigMap
metadata:
 name: nginx-config
 namespace: todo-app
data:
 default.conf: |
   server {
       listen 80;
       server_name _;

       location / {
           root /usr/share/nginx/html;
           index index.html;
           try_files $uri $uri/ /index.html;
       }

       location /api/ {
           proxy_pass http://backend:3001/api/;
           proxy_set_header Host $host;
           proxy_set_header X-Real-IP $remote_addr;
           proxy_set_header X-Forwarded-For $proxy_add_x_forwarded_for;
       }
   }
---
apiVersion: apps/v1
kind: Deployment
metadata:
 name: frontend
 namespace: todo-app
spec:
 replicas: 2
 selector:
   matchLabels:
     app: frontend
 template:
   metadata:
     labels:
       app: frontend
   spec:
     containers:
     - name: frontend
       image: nginx:alpine
       ports:
       - containerPort: 80
       volumeMounts:
       - name: html
         mountPath: /usr/share/nginx/html
       - name: nginx-config
         mountPath: /etc/nginx/conf.d
     initContainers:
     - name: setup
       image: alpine
       command: ["/bin/sh", "-c"]
       args:
         - |
           cat > /html/index.html << 'HTMLEOF'
           <!DOCTYPE html>
           <html lang="en">
           <head>
               <meta charset="UTF-8">
               <meta name="viewport" content="width=device-width, initial-scale=1.0">
               <title>UpCloud K8s Todo App</title>
               <style>
                   * { margin: 0; padding: 0; box-sizing: border-box; }
                   body { font-family: 'Segoe UI', Tahoma, Geneva, Verdana, sans-serif; background: linear-gradient(135deg, #667eea 0%, #764ba2 100%); min-height: 100vh; padding: 20px; }
                   .container { max-width: 600px; margin: 0 auto; background: white; border-radius: 15px; box-shadow: 0 20px 60px rgba(0,0,0,0.3); padding: 30px; }
                   h1 { color: #667eea; margin-bottom: 10px; text-align: center; }
                   .subtitle { text-align: center; color: #666; margin-bottom: 30px; font-size: 14px; }
                   .input-group { display: flex; gap: 10px; margin-bottom: 20px; }
                   input { flex: 1; padding: 12px; border: 2px solid #e0e0e0; border-radius: 8px; font-size: 16px; }
                   button { padding: 12px 24px; background: #667eea; color: white; border: none; border-radius: 8px; cursor: pointer; font-size: 16px; transition: background 0.3s; }
                   button:hover { background: #5568d3; }
                   .todo-item { display: flex; justify-content: space-between; align-items: center; padding: 15px; background: #f8f9fa; margin-bottom: 10px; border-radius: 8px; animation: fadeIn 0.3s; }
                   @keyframes fadeIn { from { opacity: 0; transform: translateY(-10px); } to { opacity: 1; transform: translateY(0); } }
                   .delete-btn { background: #dc3545; padding: 8px 16px; font-size: 14px; }
                   .delete-btn:hover { background: #c82333; }
                   .empty { text-align: center; color: #999; padding: 40px; }
                   .status { text-align: center; padding: 10px; margin-bottom: 20px; border-radius: 8px; display: none; }
                   .status.error { background: #fee; color: #c00; display: block; }
                   .status.success { background: #efe; color: #0a0; display: block; }
               </style>
           </head>
           <body>
               <div class="container">
                   <h1>🚀 UpCloud K8s Todo App</h1>
                   <p class="subtitle">Powered by Kubernetes on UpCloud</p>
                   <div id="status" class="status"></div>
                   <div class="input-group">
                       <input type="text" id="todoInput" placeholder="Enter a new todo..." onkeypress="if(event.key==='Enter') addTodo()">
                       <button onclick="addTodo()">Add Todo</button>
                   </div>
                   <div id="todoList"></div>
               </div>
               <script>
                   const API_URL = '/api';

                   function showStatus(message, isError = false) {
                       const status = document.getElementById('status');
                       status.textContent = message;
                       status.className = 'status ' + (isError ? 'error' : 'success');
                       setTimeout(() => status.className = 'status', 3000);
                   }

                   async function loadTodos() {
                       try {
                           const res = await fetch(API_URL + '/todos');
                           if (!res.ok) throw new Error('Failed to load todos');
                           const todos = await res.json();
                           const list = document.getElementById('todoList');
                           if (todos.length === 0) {
                               list.innerHTML = '<div class="empty">📝 No todos yet. Add one above!</div>';
                           } else {
                               list.innerHTML = todos.map(todo => `
                                   <div class="todo-item">
                                       <span>${escapeHtml(todo.title)}</span>
                                       <button class="delete-btn" onclick="deleteTodo(${todo.id})">Delete</button>
                                   </div>
                               `).join('');
                           }
                       } catch (err) {
                           showStatus('❌ Error loading todos: ' + err.message, true);
                           document.getElementById('todoList').innerHTML = '<div class="empty">⚠️ Could not connect to backend</div>';
                       }
                   }

                   function escapeHtml(text) {
                       const div = document.createElement('div');
                       div.textContent = text;
                       return div.innerHTML;
                   }

                   async function addTodo() {
                       const input = document.getElementById('todoInput');
                       const title = input.value.trim();
                       if (!title) return;
                       try {
                           const res = await fetch(API_URL + '/todos', {
                               method: 'POST',
                               headers: { 'Content-Type': 'application/json' },
                               body: JSON.stringify({ title })
                           });
                           if (!res.ok) throw new Error('Failed to add todo');
                           input.value = '';
                           showStatus('✅ Todo added!');
                           loadTodos();
                       } catch (err) {
                           showStatus('❌ Error: ' + err.message, true);
                       }
                   }
.env
Holds your UpCloud sub-account credentials used to authenticate the CLI.
While this file is referenced in the tutorial for simplicity, note that the demo application hardcodes configuration values directly in the YAML files.
In production, always store credentials securely using Kubernetes Secrets or ConfigMaps.
export UPCLOUD_USERNAME="Your_sub_account_username"
export UPCLOUD_PASSWORD="Your_sub_account_password"
Step 2: Authenticate the UpCloud CLI
Make sure you are in the root of the project directory upcloud_kubernetes_service. Load your credentials into the shell:
source .envStep 3: Create a router
Run the following commands:
upctl router create --name todo-app-router
upctl router list
Copy the router UUID from upctl router list. You will use it when creating the network.
Step 4: Create a private network
Replace the router UUID with the one you created in Step 3.
upctl network create --name todo-app-network --zone de-fra1 --ip-network address=172.16.0.0/24,dhcp=true, --router <UUID>
upctl network list
Copy the network UUID when after running upctl network list for the cluster step.
Step 5: Create a UKS cluster
Replace the network UUID with the value from Step 4. After creation the cluster, run the kubernetes list command to show the cluster and its cluster UUID.
upctl kubernetes create --name my-todo-app --network <UUID> --node-group count=2,name=my-todo-app-node-group,plan=2xCPU-4GB, --zone de-fra1
upctl kubernetes list
Step 6: Get cluster credentials and access
You will need your cluster, node group identifiers, and a kubeconfig to talk to the running cluster.
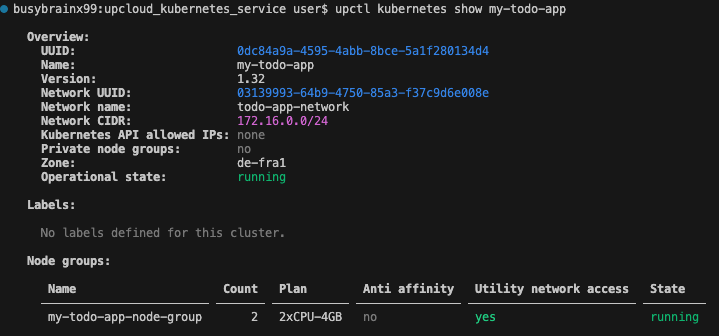
- Inspect the cluster and node group
Use these to view details about the cluster, which includes the version, zones, operational status and also the node group.
upctl kubernetes show my-todo-app
upctl kubernetes node-group show <cluster_UUID> --name my-todo-app-node-group
Make sure your cluster operational state indicates running and node groups are created before moving to the next step.
- Temporarily allow your IP to reach the Kubernetes API
For this tutorial, you’ll temporarily allow access from any IP so you can fetch credentials from your current machine without restrictions. In a production environment, however, its best to restrict access to your office or VPN IP range.
upctl kubernetes modify <cluster_UUID> --kubernetes-api-allow-ip 0.0.0.0/0- Generate a kubeconfig for the cluster
This exports a context that kubectl can use. The outputed file from the command below includes the cluster endpoint, certificate data, and an authentication token.
upctl kubernetes config <cluster_UUID> --output yaml --write ./my_kubeconfig.yaml- Activate the context locally
Replace your current kubeconfig temporarily so kubectl picks the UKS context by default.
cp ~/.kube/config ~/.kube/config.backup
cp my_kubeconfig.yaml ~/.kube/config- Verify connectivity
Confirm you can talk to the control plane and list worker nodes.
kubectl get nodesConfirm that the nodes are ready
Step 7: Create and target the namespace
kubectl create namespace todo-app
kubectl config set-context --current --namespace=todo-app
Step 8: Deploy the application
- Apply the Postgres manifest
Make sure Postgres is fully up before applying the backend to avoid connection retries stacking.
kubectl apply -f postgres-statefulset.yaml
# wait until Postgres is Running
kubectl get StatefulSet -n todo-app
Confirm that Postgres Ready status is 1/1 before deploying the other workloads

- Apply the backend and frontend manifest files.
kubectl apply -f backend-deployment.yaml
kubectl apply -f frontend-deployment.yaml
Step 9: Check status and get the app endpoint
Once all deployments are applied, verify that the pods and services are running correctly:
kubectl get pods -n todo-app
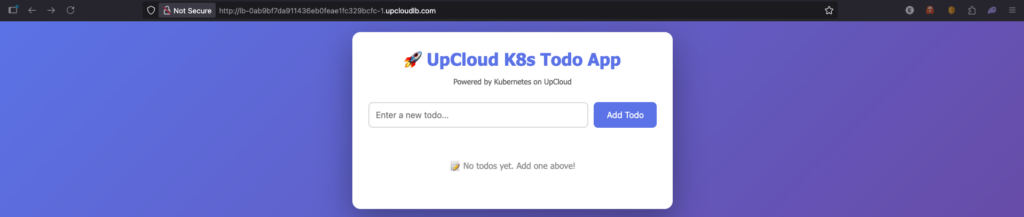
kubectl get services -n todo-app # look for the frontend Service external IPLook for the frontend Service in the list.
Its EXTERNAL-IP field shows the public load balancer address created by UpCloud.
It typically looks something like this:
lb-0ab9bf7da911436eb0feae1fc329bcfc-1.upcloudlb.comCopy your unique address and open it in a browser to access the Todo application.
Step 10: Clean up
After inspecting and testing the cluster, run the following commands to clean up the cluster.
# 1) Delete namespace (removes app resources)
kubectl delete namespace todo-app

# 2) Check if LoadBalancers are gone
upctl load-balancer list
# If any remain, delete manually:
upctl load-balancer  delete <LOADBALANCER_UUID>

# 3) Delete the cluster (nodes are removed automatically)
upctl kubernetes delete my-todo-app

# Wait till the kubernetes cluster has been terminated completely before running the other cleanup commands.
# 4) Inspect leftover infrastructure
upctl network list --zone de-fra1
upctl router list
upctl storage list

# 5) Delete network, router, and any orphaned storage
upctl network delete <NETWORK_UUID>
upctl router delete <ROUTER_UUID>
upctl storage delete <STORAGE_UUID>
The tutorial above demonstrates how straightforward it is to spin up a Kubernetes cluster on UpCloud and deploy workloads within it. It also highlights how simple it is to clean up your environment when you’re done.
Next, let’s look at some troubleshooting tips you can use if you run into issues while setting up or managing your cluster.
Troubleshooting Guide
1. API Access Denied
Error: UNAUTHORIZED_ADDRESS
Cause: The base IP from the computer used for CLI maybe not be whitelisted for API access.
Fix: Add your current IP in UpCloud → Account → Sub-accounts → API Access.
curl -s https://api.ipify.org # find your IP2. Network Creation Fails
Error: ROUTER_INVALID or DHCP not enabled
Cause: Your router UUID could be missing, or DHCP is disabled.
Fix:
upctl router create --name todo-app-router
upctl network create --name todo-app-network --zone de-fra1 --ip-network address=172.16.0.0/24,dhcp=yes, --router <ROUTER_UUID>
3. kubectl Connection Errors
Error: localhost refused or EOF
Fix:
- Regenerate kubeconfig:
upctl kubernetes config <CLUSTER_UUID> --output yaml --write ./kubeconfig.yaml- Ensure your IP is allowed:
upctl kubernetes modify <CLUSTER_UUID> --kubernetes-api-allow-ip 0.0.0.0/04. Backend deployment fails to connect to Database
Error: relation “todos” does not exist
Fix:
Restart backend after PostgreSQL is ready:
kubectl rollout restart deployment/backend -n todo-appUseful Debug Commands
kubectl get pods -n todo-app
kubectl describe pod <NAME> -n todo-app
kubectl logs <NAME> -n todo-app
kubectl get svc -n todo-app
kubectl get events -n todo-app --sort-by=.lastTimestamp
Wrapping up
By this point, you’ve gone from creating your own network and router to deploying a working application on an edge-ready UpCloud Kubernetes Service, all from the command line. You’ve seen how flexible the UpCloud CLI can be for setting up clusters, managing workloads, and keeping your environment clean when you’re done.
Now that you’ve had hands-on experience with UKS, it’s easier to appreciate how straightforward it is to set up. Despite its simplicity, UKS lets you deploy clusters with smaller-sized worker nodes, connect to high-performance MaxIOPS storage, and maintain data residency within your chosen region.
In our next article, we’ll compare how UKS stacks up against other managed Kubernetes platforms in real-world edge and distributed scenarios.
If you’d like to keep experimenting, check out the UpCloud Kubernetes documentation.
Discussion