When your Linux server experiences network connectivity issues, you need reliable tools and techniques to quickly identify and resolve the problem. This guide covers essential Linux commands for troubleshooting, including how to check network interfaces, test internet connectivity, and verify DNS records. Whether you’re using Ubuntu, CentOS, or Debian, these steps will help you diagnose network failures, check server configurations, and restore connectivity.
When your Linux server seems to be offline or otherwise inaccessible, you should always be able to log in with the web console at your UpCloud control panel or through a VNC connection. Once logged in, test your server’s internet connection using ping and a public IP address such as Google’s public DNS server, which is most likely to reply, provided your internet connection works.
ping -c 4 8.8.8.8
Your output should show something like
PING 8.8.8.8 (8.8.8.8) 56(84) bytes of data.
64 bytes from 8.8.8.8: icmp_seq=1 ttl=58 time=1.68 ms
64 bytes from 8.8.8.8: icmp_seq=2 ttl=58 time=1.70 ms
64 bytes from 8.8.8.8: icmp_seq=3 ttl=58 time=1.71 ms
64 bytes from 8.8.8.8: icmp_seq=4 ttl=58 time=1.69 ms

--- 8.8.8.8 ping statistics ---
4 packets transmitted, 4 received, 0% packet loss, time 3005ms
rtt min/avg/max/mdev = 1.686/1.699/1.718/0.051 ms
If the server is unable to reach the destination, there may be a problem with your configuration. Follow the steps described here in order to troubleshoot the most common network issues with Linux Cloud Servers.

Check your network configuration
If your Linux server is unreachable, start by checking your network interfaces. Use the ip addr command to view the status of all interfaces, ensuring critical connections like eth0 are enabled. Should you find any interfaces disabled, activate them with ifup. Troubleshoot persistent issues by restarting interfaces using the ifdown –force and ifup commands.
Make sure the network interfaces, such as eth0, are enabled. To see all the configured interfaces, use this command.
ip addr
The output of the command will show the status of each network interface on the server with “state UP” or “state DOWN”, for example, as below.
2: eth0: <BROADCAST,MULTICAST,UP,LOWER_UP> mtu 1500 qdisc pfifo_fast state UP group default qlen 1000
Turn on any disabled interfaces with the next command.
sudo ifup <interface name>
Here the interface name is one of the names listed in the ip addr command output such as eth0, eth1 or eth2.
When all network interfaces have been enabled, try using the ping command again. If the problem persists, check that the network interfaces have IPs assigned to them, and they match the information in the Network section of the UpCloud control panel.
Try restarting any problematic interface with the following commands.
sudo ifdown <interface name>
sudo ifup <interface name>
If either of these commands fails, the interface may be in a state unknown to the command script. Try the same commands again withthe —-force parameter to resolve any such issues.
sudo ifdown --force <interface name>
sudo ifup <interface name>
If restarting the network interface fixed the issue then great! If not, continue with the troubleshooting.
Check the network configuration file
Linux commonly stores network settings in specific files and reads them, for example, at boot or when using the ifup command. To make changes to the network configuration, you’ll need to open the right file in a text editor. In Debian and Ubuntu-based distributions, this can be done with
sudo nano /etc/network/interfaces
In most cases, the interfaces file should list the following interfaces.
auto lo
iface lo inet loopback

auto eth0
iface eth0 inet dhcp

auto eth1
iface eth1 inet dhcp
In CentOS and other Red Hat variants, these configurations are split into separate files for each network interface and stored in /etc/sysconfig/network-scripts/. The default interface for internet connection is usually called eth0, which opens the corresponding configuration file.
sudo vi /etc/sysconfig/network-scripts/ifcfg-eth0
The configuration file for eth0 should look like this.
DEVICE=eth0
BOOTPROTO=dhcp
ONBOOT=yes
If the interface configuration files do not match the example here, edit the file specific to your system to restore the original functionality. For any changes made to these files to take effect, you must restart the interfaces to which the changes apply as described previously with ifdown and ifup commands.
Check the server’s DNS records
If your server can ping an IP but fails to connect to domains, it may be a DNS issue. Use ping upcloud.com to test domain name resolution, and check DNS configuration with sudo cat /etc/resolv.conf. Ensure your DNS servers, such as UpCloud’s resolvers, are properly configured in this file or through your network interfaces file.
ping upcloud.com
If the domain does not reply, the problem is most likely with how your server resolves domain names to IP addresses. Check your server’s DNS records.
sudo cat /etc/resolv.conf
The list should contain a minimum of 1 name server. All default DNS resolvers at UpCloud have the same IP addresses regardless of the availability zone. The DNS servers are provided automatically by the DHCP protocol, and there should be no need for manual configurations in the operating system.
The UpCloud DNS resolver IPv4 addresses are:
- 94.237.127.9
- 94.237.40.9
If your server has a public IPv6 address, you can also use IPv6 with the following servers:
- 2a04:3540:53::1
- 2a04:3544:53::1
If the list is empty do not edit it manually, because if you have a nameserver manager installed any changes you make will just get reverted. Instead, you can try to update it on Ubuntu and some Debian systems with this command.
sudo resolvconf -u
On Debian servers, which do not have resolvconf installed, you can edit the resolv.conf file directly.
sudo nano /etc/resolv.conf
Add the lines shown below to the file, save and exit.
nameserver 94.237.127.9
nameserver 94.237.40.9
For those with resolvconf installed, in case resolv.conf is still empty after the update command, you can add nameservers to your interfaces file. Open it for editing.
sudo nano /etc/network/interfaces
Add a name server to the end of the eth0 section.
auto eth0
iface eth0 inet dhcp
dns-nameservers 94.237.127.9
Afterwards, save the file and exit. You will also need to restart the network service with the following command.
sudo service networking restart
In CentOS and other Red Hat variants the resolv.conf file is populated a little differently, if the file is empty, you can add up to two DNS entries in your network configuration file for the network interface responsible for the public IP. For example, open ifcfg-eth0 it with the next command.
sudo vi /etc/sysconfig/network-scripts/ifcfg-eth0
Edit the file to look like this.
DEVICE=eth0
BOOTPROTO=dhcp
ONBOOT=yes
DNS1=94.237.127.9
DNS2=94.237.40.9
Exit the editor and restart the interface which the configuration file you just edited using ifdown and ifup commands.
Test the connection both ways
Try pinging your server over the internet. Open a terminal or command prompt on your own computer and try pinging your server’s public IP, which you can find in the UpCloud control panel under the Network section.
On your own computer: ping <server public IP>
Test the internet connection by pinging another site from your server. For example, use the following command to ping Google’s public DNS.
ping 8.8.8.8
If you have a second server deployed on your account and the problem is with the interface assigned with the private IP address, try to ping your other server to and from it using the private IPs listed in the UpCloud control panel.
Should ping fail to receive a reply, try restarting your server’s network services. In Debian and Ubuntu 12.04 or older, use the command below.
sudo service networking restart
On CentOS and other Red Hat-based systems, restart the network with the command underneath instead.
sudo service network restart
In Ubuntu 14.04 and newer, you’ll need to run the command for each network interface separately. For example, you can restart eth0 simply by following the following.
sudo ifdown eth0 && sudo ifup eth0
After restarting the network services, try running ping again both ways. Check your firewall settings if ping works in one direction but not in the other.
Find out where the connection fails
When basic troubleshooting doesn’t resolve the issue, test network routes using tools like mtr, traceroute, or tracepath to identify where connectivity fails. These commands provide visibility into each node the connection passes through, helping pinpoint any network routing failures.
Ubuntu servers have a networking tool called mtr for this purpose. Start it with the following command.
mtr 8.8.8.8
To quit, just press q on your keyboard.
You can use traceroute instead on Debian systems where mtr is usually not installed by default.
traceroute -4 8.8.8.8
On CentOS servers, use tracepath command.
tracepath 8.8.8.8
Different distributions run different tools and the output of these tools also differs slightly. The mtr runs in the foreground until cancelled, updating the response table on each pass, example output is shown below.
                                My traceroute  [v0.85]
example.com (0.0.0.0)                                   Wed Jul 29 16:03:43 2015
Keys:  Help   Display mode   Restart statistics   Order of fields   quit
                                             Packets               Pings
 Host                                      Loss%   Snt   Last   Avg  Best  Wrst StDev
 1. 83.136.252.2                            0.0%     8    0.5   0.4   0.4   0.5   0.0
 2. te0-0-1-2.rcr11.lon10.atlas.cogentco.c  0.0%     8    0.8   0.8   0.7   1.1   0.0
 3. te0-7-0-13.ccr22.lon01.atlas.cogentco.  0.0%     8    1.2   1.2   1.1   1.3   0.0
 4. 149.14.8.150                            0.0%     8    1.3   2.7   1.1  13.0   4.1
 5. 216.239.47.25                           0.0%     7    1.9   1.8   1.8   1.9   0.0
 6. 216.239.47.59                           0.0%     7    1.8   1.9   1.8   2.0   0.0
 7. google-public-dns-a.google.com          0.0%     7    2.0   2.1   1.9   2.3   0.0
Traceroute and tracepath are very similar to one another, they run pass over the network to the given destination and show the latency to each node that replied. The example of the traceroute shown underneath has much of the same information as mtr.
traceroute to 8.8.8.8 (8.8.8.8), 30 hops max, 60 byte packets
 1  83.136.252.2 (83.136.252.2)  0.494 ms  1.010 ms  1.006 ms
 2  te0-0-1-2.rcr11.lon10.atlas.cogentco.com (149.11.22.93)  0.877 ms  1.415 ms  1.413 ms
 3  te0-7-0-13.ccr22.lon01.atlas.cogentco.com (154.54.75.65)  1.107 ms  1.643 ms  1.648 ms
 4  149.14.8.150 (149.14.8.150)  1.499 ms  1.495 ms  1.492 ms
 5  216.239.47.25 (216.239.47.25)  2.096 ms 64.233.174.213 (64.233.174.213)  2.097 ms 216.239.47.23 (216.239.47.23)  2.090 ms
 6  72.14.237.41 (72.14.237.41)  2.088 ms 216.239.47.59 (216.239.47.59)  1.717 ms 209.85.249.241 (209.85.249.241)  1.995 ms
 7  google-public-dns-a.google.com (8.8.8.8)  1.733 ms  2.250 ms  1.721 ms
Try the same from your own computer to the server using one of the tools mentioned above, for example, using the command below.
traceroute -4 <server public IP>
If an outbound trace does not reach even the first node, check your network settings and firewall. The firewall may also be responsible for connection rejections if the trace over the internet to your server falls short just before reaching the server.
Firewall settings
Check that your connection is not getting blocked by a firewall. CentOS and some other Red Hat-based distributions have strict firewall rules by default. The following command will list all server-side firewall rules on your system.
sudo iptables -L
Iptables is the Linux built-in software firewall, and the command above prints out the following.
Chain INPUT (policy ACCEPT)
target     prot opt source               destination
ACCEPT     all  --  anywhere             anywhere             the  RELATED,ESTABLISHED
ACCEPT     tcp  --  anywhere             anywhere             The firewall dpt:http
ACCEPT     tcp  --  anywhere             anywhere             tcp dpt:ssh
DROP       all  --  anywhere             anywhere

Chain FORWARD (policy ACCEPT)
target     prot opt source               destination

Chain OUTPUT (policy ACCEPT)
target     prot opt source               destination
This is an example of a simple firewall table. It has rules to allow SSH and HTTP traffic, but block all other input, which also blocks ping attempts. Check your server’s iptable for any is shown that might block your connection.
Your UpCloud control panel also provides an easily configurable firewall in your server settings under the Firewall tab.
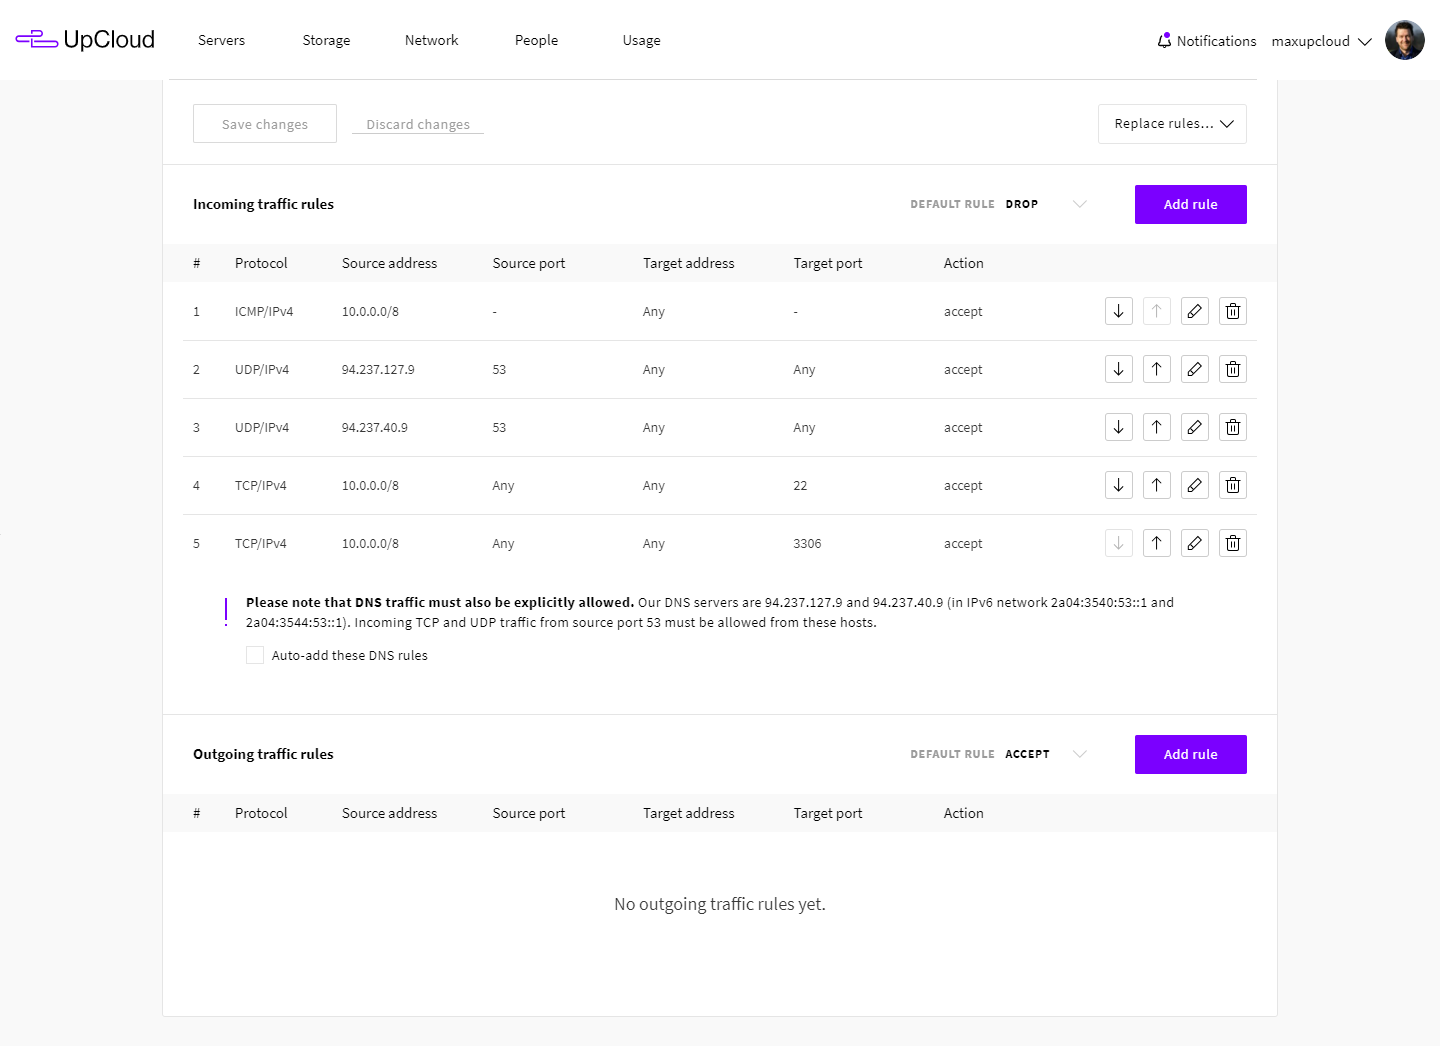
The example image above has a few accepted incoming rules, but the default rule is set to reject. Make sure there are no rules blocking your desired connection.
Host status information
Check the most up-to-date information on UpCloud infrastructure at status.upcloud.com, where you can also subscribe to updates by email, SMS, and Atom or RSS feeds.
If everything seems to be in order, but the network connection still just doesn’t work, or you are otherwise unable to troubleshoot the connection issues, don’t hesitate to ask for help.
Discussion