Large language models are trained on a fixed dataset and don’t have access to new or private data by default. This makes them unreliable for up-to-date or context-specific questions. This issue is what Retrieval-Augmented Generation solves. Developers combine a language model with vector search so applications can answer questions using their own documents.
Introductions
Most tutorials show this workflow using hosted APIs for embeddings, vector search, and model inference because it allows a working prototype to appear within minutes. And while that convenience works well early on, teams often begin to reconsider the architecture once real usage starts. Request-based pricing grows with traffic, documents move through several external services, and core application logic ends up tied to specific AI platforms. It also becomes harder to control where data is processed, how it is stored, and how portable the system is across environments.
As a result, open-source tooling and self-hosted stacks become more relevant. Teams start looking for ways to keep sensitive data within their own infrastructure, reduce reliance on vendor-specific services, and retain the flexibility to move across providers. That shift leads to a practical question in engineering discussions: can the same system run using open-source tools on infrastructure the team controls?
The answer today is increasingly yes. Modern inference servers expose OpenAI-compatible APIs, embedding models run comfortably on standard machines, and PostgreSQL can perform vector search through the pgvector extension. With object storage holding source documents and a small API service orchestrating retrieval and generation, the entire RAG pipeline can run on ordinary infrastructure rather than managed AI platforms. This reduces vendor lock-in and cost variability, but it also means taking on responsibility for operating and scaling the system, and performance may not match fully managed services without careful tuning or dedicated hardware.
This tutorial walks through building that stack using open-source components on UpCloud. Instead of focusing on RAG theory, the goal is to show how realistic it is to run a minimal but practical system using an open LLM runtime, a local embedding model, PostgreSQL with pgvector, and object storage. By the end, you will have a working self-hosted RAG pipeline that mirrors the architecture many teams now deploy in production.
What a Self-Hosted RAG Stack Looks Like
Before diving into the implementation, it helps to understand the main components that make up a typical RAG system. Even in self-hosted environments, most deployments follow a similar structure with a few clearly defined layers.
1. LLM Runtime
The language model runtime is responsible for generating answers. In self-hosted setups, this usually means running an open-source model behind an inference server that exposes an API.
Several runtimes now provide OpenAI-compatible endpoints, which allow applications to interact with local models using the same SDKs commonly used for hosted AI services. Popular options include vLLM, Ollama, and llama.cpp.
vLLM is typically used for GPU-backed inference, while CPU-focused setups are better suited to runtimes like llama.cpp or Ollama. Running larger models (such as Mistral-7B) purely on CPU is possible but tends to be significantly slower, so CPU mode is often used for demos or small-scale setups rather than production deployments.
2. Embedding Model
Embeddings convert text into numerical vectors that capture semantic meaning. These vectors allow the system to find relevant information even when the wording of a query differs from the source document.
Common open models include BGE, E5, and various sentence-transformer models. They can run locally using Python libraries such as sentence-transformers, making them easy to integrate into ingestion pipelines or query processing workflows.
3. Vector Search
The vector database stores embeddings and performs similarity searches to find relevant document chunks.
There are many systems designed for this task, including Qdrant, Milvus, and OpenSearch. In this tutorial, we use pgvector, a PostgreSQL extension that adds vector search capabilities directly to a relational database. It is widely supported, simple to deploy, and sufficient for many RAG workloads.
4. Document Storage
The original documents used by the system are usually stored separately from the vector index. Object storage works well for this layer because it handles large files efficiently and keeps the source material independent from derived embeddings.
During ingestion, documents are retrieved from storage, split into smaller chunks, and converted into embeddings before being stored in the vector database. This design allows documents to be reprocessed later if the chunking strategy or embedding model changes.
5. Retrieval and Application Layer
The final layer is a small application service that orchestrates the RAG workflow.
This service receives user queries, generates query embeddings, searches the vector database, assembles relevant document context, and sends a prompt to the language model. Frameworks such as FastAPI, Flask, or lightweight Node.js APIs are commonly used to implement this layer.
Together, these five components form the core of most RAG systems.
High-Level Architecture
Now that you know what the core components are, it helps to see how they interact during a typical request. A RAG system works by retrieving relevant information from a document index and using that information to guide the language model’s response.
At a high level, the flow looks like this:

When a user submits a question, the API service first converts the query into an embedding using the same model that was used during document ingestion. That embedding is then used to search the vector database for document chunks with similar semantic meaning.
The retrieved chunks are combined with the user’s question to construct a prompt. This prompt is sent to the language model running on the inference server, which generates a response grounded in the retrieved information.
This tutorial is intentionally minimal. It is designed to show the core mechanics of RAG without adding too many moving parts. In production systems, this pipeline is usually extended with better chunking strategies, reranking steps, caching, structured prompt templates, and monitoring around retrieval quality and latency.
Most teams also place a decision layer in front of retrieval, using either lightweight heuristics or an LLM to classify the query first. That layer can decide whether to trigger RAG at all, which index or tenant-specific corpus to search, and whether the request should be handled by a normal model response, a retrieval workflow, or another tool altogether. Let’s now understand the infrastructure needed to build this setup.
Infrastructure Used in This Tutorial
With the architecture in place, the next step is choosing the infrastructure needed to run it. A self-hosted RAG system does not require an overly complex environment. In many cases, a small number of services are enough to support a fully functional pipeline.
The most important component is compute for running the language model inference server. Depending on the model size, this can run either on CPUs or GPUs.
A typical CPU-based setup might look like this:
- 4–8 vCPU
- 16–32 GB RAM
This configuration is often sufficient for smaller instruction-tuned models such as Mistral or similar open models used in lightweight RAG systems.
For higher throughput or larger models, a GPU instance can significantly improve inference performance:
- 1× NVIDIA GPU
- 32 GB RAM
Next, the vector database stores embeddings and handles similarity search. In this tutorial, we will use PostgreSQL with the pgvector extension, which will allow vectors to be stored and queried directly inside a relational database. A managed PostgreSQL service simplifies setup while still keeping the architecture portable.
Document storage will be handled using object storage, which holds the original files that will later be processed and indexed. Keeping source documents separate from embeddings will allow the ingestion pipeline to be rerun later if chunking strategies or embedding models change.
Finally, a small Python API service will act as the application layer. This service performs document ingestion, generates embeddings, executes vector searches, and sends prompts to the language model.
Together, these components will mirror the infrastructure used by many production RAG deployments.
Now, let’s get started!
Step 1: Provision the UpCloud Infrastructure
Before setting up the RAG components, provision three resources on UpCloud:
- A VM for the application and model server
- A managed PostgreSQL database for pgvector
- An object storage bucket for source documents
Create an Ubuntu VM with enough compute for the API service and model inference.
Example configuration:
- 4–8 vCPU
- 16–32 GB RAM
- Ubuntu 22.04 LTS
Next, create an UpCloud Managed PostgreSQL instance. This database will store the document chunks and embeddings used during retrieval.
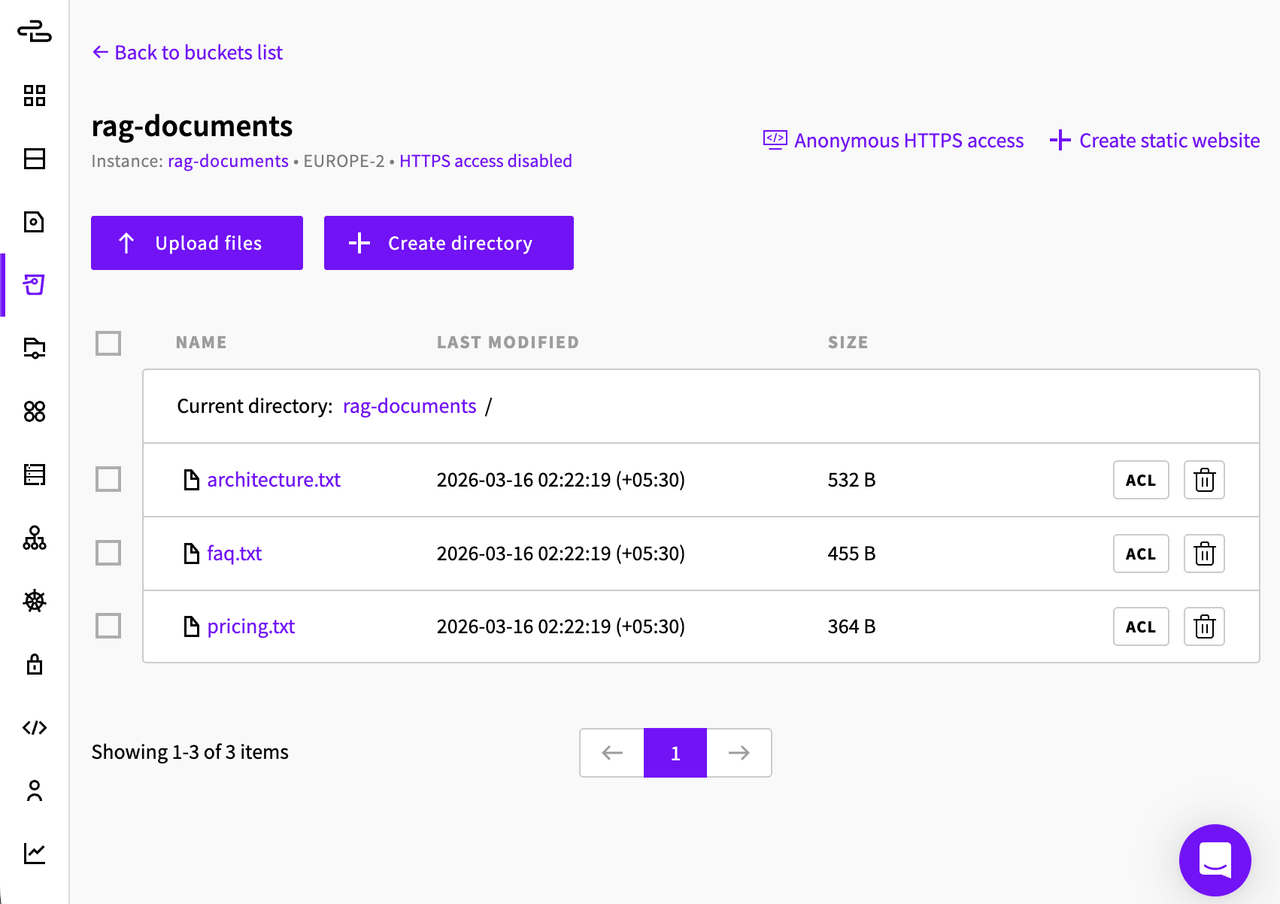
Finally, create an UpCloud Managed Object Storage bucket. This bucket will hold the documents that the RAG system will index. Name the bucket as rag-documents
Next, you will upload three small text files to this bucket so the system has a simple knowledge base to work with.
Example Documents for the Tutorial
Create the following files locally and upload them to your object storage bucket manually from the UpCloud dashboard:
pricing.txt
Product Pricing Plans

Starter Plan
Price: $19 per month
Includes:
- 5 GB storage
- 1 team member
- Email support

Pro Plan
Price: $49 per month
Includes:
- 50 GB storage
- Up to 10 team members
- Priority email support
- API access

Enterprise Plan
Price: Custom pricing
Includes:
- Unlimited storage
- Unlimited team members
- Dedicated support
- SLA guarantees
faq.txt
Frequently Asked Questions

Q: How do I upgrade my plan?
A: You can upgrade your plan from the billing section of the dashboard.

Q: Do you offer refunds?
A: Monthly subscriptions can be cancelled anytime but payments are not refunded.

Q: Is there an API available?
A: Yes. The Pro and Enterprise plans include API access.

Q: Where is customer support available?
A: Support is available through email for Starter users and priority email for Pro users.
architecture.txt
System Architecture Overview

The application runs on a cloud virtual machine.

Components:
- FastAPI service that handles API requests
- PostgreSQL database with pgvector for semantic search
- Object storage for storing raw documents
- vLLM server running an open source language model

User queries are embedded using a local embedding model.
The embedding is compared with stored vectors in PostgreSQL to retrieve relevant document chunks.
The retrieved chunks are then sent to the language model to generate the final response.
These files give the RAG system a small but predictable knowledge base. For example, the following questions should return grounded answers:
- “What does the Pro plan include?”
- “Does the service provide API access?”
- “What components make up the system architecture?”
Once you build a working pipeline, you can replace these files with real documentation or internal datasets.
Here’s how your bucket should look after you’ve uploaded all the files:
Step 2: Run an OpenAI-Compatible LLM Locally
Next, SSH into your VM and install Python and its required dependencies on the UpCloud VM.
apt install -y python3-pip python3-venv git gcc-12 g++-12 libnuma-dev libtcmalloc-minimal4 python3-dev
python3 -m venv .venv
source .venv/bin/activate
pip install --upgrade pip build
Since we’re using a CPU-only server for this tutorial, we’ll need to build vLLM from source, as the prebuilt vLLM wheels are meant for GPU-based VMs. To do that, clone the repository and install the CPU dependencies.
git clone https://github.com/vllm-project/vllm.git
cd vllm
pip install -v -r requirements/cpu-build.txt --extra-index-url https://download.pytorch.org/whl/cpu
pip install -v -r requirements/cpu.txt --extra-index-url https://download.pytorch.org/whl/cpu
VLLM_TARGET_DEVICE=cpu python -m build --wheel --no-isolation
pip install dist/*.whlThe CPU runtime also expects certain memory and threading libraries to be preloaded. These improve memory allocation performance and ensure OpenMP threading works correctly.
export VLLM_CPU_KVCACHE_SPACE=4
export OMP_NUM_THREADS=4
export MKL_NUM_THREADS=4
TC_PATH=$(find / -iname 'libtcmalloc_minimal.so.4' 2>/dev/null | head -n 1)
IOMP_PATH=$(find / -iname 'libiomp5.so' 2>/dev/null | head -n 1)
export LD_PRELOAD="$TC_PATH:$IOMP_PATH:$LD_PRELOAD"
Now start the inference server.
vllm serve mistralai/Mistral-7B-Instruct-v0.2 --max-model-len 4096The reduced --max-model-len keeps memory usage manageable on smaller machines. Without it, the model attempts to reserve a very large KV cache based on its default 32k context window, which can exhaust RAM even on a 4-CPU / 32 GB VM.
Once started, vLLM exposes a local API server that follows the OpenAI API format. Your apps can now send chat/completions or completions requests to the server just like they would with the OpenAI API.
Step 3: Set Up Vector Search with PostgreSQL and pgvector
Next, to set up your vector database, first connect to the UpCloud PostgreSQL instance using the psql CLI and your public database URL:
psql "postgres://username:password@host:5432/defaultdb"Once connected, enable pgvector:
CREATE EXTENSION IF NOT EXISTS vector;And create the table that will store document chunks and embeddings:
CREATE TABLE documents (
  id BIGSERIAL PRIMARY KEY,
  source_name TEXT NOT NULL,
  chunk_index INTEGER NOT NULL,
  content TEXT NOT NULL,
  embedding VECTOR(768) NOT NULL
);
Here, 768 must match the dimensionality of the embedding model you use. If you switch to a model with a different embedding size, inserts will fail unless you update the schema accordingly.
To make similarity search scale beyond very small datasets, add a vector index and analyze the table:
CREATE INDEX ON documents USING ivfflat (embedding vector_cosine_ops);
ANALYZE documents;
Each row will eventually contain a chunk from pricing.txt, faq.txt, or architecture.txt.
Step 4: Build the Document Ingestion Pipeline
Now that the database and object storage bucket are ready, the next step is to turn the uploaded text files into searchable vectors.
The ingestion flow looks like this:
UpCloud Managed Object Storage
            ↓
      Document Loader
            ↓
          Chunking
            ↓
      Embedding Model
            ↓
   PostgreSQL + pgvector
Install the required Python packages
If you have reconnected to the VM since installing vLLM, activate the virtual environment again first:
source .venv/bin/activateThen install the packages needed for ingestion:
pip install boto3 sentence-transformers psycopg[binary] python-dotenvCreate a .env file
Create a file named .env in your project directory:
nano .envAdd your database and object storage credentials:
DATABASE_URL=postgres://username:password@host:5432/defaultdb?sslmode=require
S3_ENDPOINT=https://your-object-storage-endpoint
S3_ACCESS_KEY=your-access-key
S3_SECRET_KEY=your-secret-key
S3_BUCKET=rag-documents
Use the actual values from your UpCloud account. Also, make sure to add your VM’s IP to the allowlist of your managed PostgreSQL instance before running the script.
Create the ingestion script
Create ingest.py:
nano ingest.pyPaste the following code:
import os
from dotenv import load_dotenv
import psycopg
import boto3
from sentence_transformers import SentenceTransformer

load_dotenv(".env")

DATABASE_URL = os.environ["DATABASE_URL"]
S3_ENDPOINT = os.environ["S3_ENDPOINT"]
S3_ACCESS_KEY = os.environ["S3_ACCESS_KEY"]
S3_SECRET_KEY = os.environ["S3_SECRET_KEY"]
S3_BUCKET = os.environ["S3_BUCKET"]

model = SentenceTransformer("BAAI/bge-base-en-v1.5")

s3 = boto3.client(
    "s3",
    endpoint_url=S3_ENDPOINT,
    aws_access_key_id=S3_ACCESS_KEY,
    aws_secret_access_key=S3_SECRET_KEY,
)

def load_document(key):
    obj = s3.get_object(Bucket=S3_BUCKET, Key=key)
    return obj["Body"].read().decode("utf-8")

def chunk_text(text, chunk_size=120, overlap=30):
    words = text.split()
    chunks = []
    step = chunk_size - overlap

    for i in range(0, len(words), step):
        chunk = " ".join(words[i:i + chunk_size])
        if chunk.strip():
            chunks.append(chunk)

    return chunks

def ingest_document(key):
    print(f"Ingesting {key}...")
    text = load_document(key)
    chunks = chunk_text(text)
    embeddings = model.encode(chunks, normalize_embeddings=True, batch_size=32)

    with psycopg.connect(DATABASE_URL, connect_timeout=5) as conn:
        with conn.cursor() as cur:
            for index, (chunk, embedding) in enumerate(zip(chunks, embeddings)):
                vector_str = "[" + ",".join(str(x) for x in embedding.tolist()) + "]"
                cur.execute(
                    """
                    INSERT INTO documents (source_name, chunk_index, content, embedding)
                    VALUES (%s, %s, %s, %s::vector)
                    """,
                    (key, index, chunk, vector_str),
                )
        conn.commit()

if __name__ == "__main__":
    ingest_document("pricing.txt")
    ingest_document("faq.txt")
    ingest_document("architecture.txt")
This script takes care of loading the document files from the object storage (load_document), chunking them (chunk_text), and inserting the chunks into the Postgres database (ingest_document). The script does this for all three of the files in the bucket.
In the ingest_document step, normalize_embeddings=True is used since we are using cosine similarity, as it can make retrieval more consistent. batch_size=32 helps optimize the operation for larger datasets, improving throughput and memory usage during embedding generation.
Run the ingestion script
Next, you need to run the script. To do that, run the following on your VM:
python ingest.pyA successful run should look like this:
Ingesting pricing.txt…
Ingesting faq.txt…
Ingesting architecture.txt…
At this point, the files stored in object storage have been converted into embeddings and inserted into PostgreSQL.
Step 5: Implement the Retrieval Step
Now that the documents are indexed, the next step is querying PostgreSQL for the most relevant chunks when a user asks a question.
The retrieval flow looks like this:
- Embed the user’s question
- Compare that embedding against the stored vectors
- Return the closest chunks
Create the retrieval module
Create retrieval.py:
nano retrieval.pyPaste the following:
import os
from dotenv import load_dotenv
import psycopg
from sentence_transformers import SentenceTransformer

load_dotenv(".env")

DATABASE_URL = os.environ["DATABASE_URL"]
model = SentenceTransformer("BAAI/bge-base-en-v1.5")

def retrieve_documents(query, limit=2):
    query_embedding = model.encode(query)
    vector_str = "[" + ",".join(str(x) for x in query_embedding.tolist()) + "]"

    with psycopg.connect(DATABASE_URL, connect_timeout=5) as conn:
        with conn.cursor() as cur:
            cur.execute(
                """
                SELECT content
                FROM documents
                ORDER BY embedding <=> %s::vector
                LIMIT %s
                """,
                (vector_str, limit),
            )
            results = cur.fetchall()

    return [row[0] for row in results]
The ::vector cast is important here. Without it, PostgreSQL will treat the query embedding as a regular float array, and the similarity operator will fail.
The choice of distance operator also matters. pgvector’s \<-> operator uses Euclidean distance (L2), which measures straight-line distance between two vectors. That can work, but many text embedding models such as BGE are more commonly compared using cosine similarity, which focuses on how closely two vectors point in the same direction rather than how far apart they are in raw space.
Since we are already normalizing embeddings during ingestion and query time, cosine distance is usually the more appropriate choice here, so this example uses \<=> instead of \<-> for more reliable semantic retrieval.
Test retrieval on its own
Create test_retrieval.py:
nano test_retrieval.pyPaste:
from retrieval import retrieve_documents

query = "What does the Pro plan include?"
results = retrieve_documents(query)

for i, chunk in enumerate(results, 1):
    print(f"\nResult {i}:\n{chunk}")
Run it:
python test_retrieval.pyIf everything is working, the results should include the pricing content and possibly the FAQ content, since both mention API access and plan details:
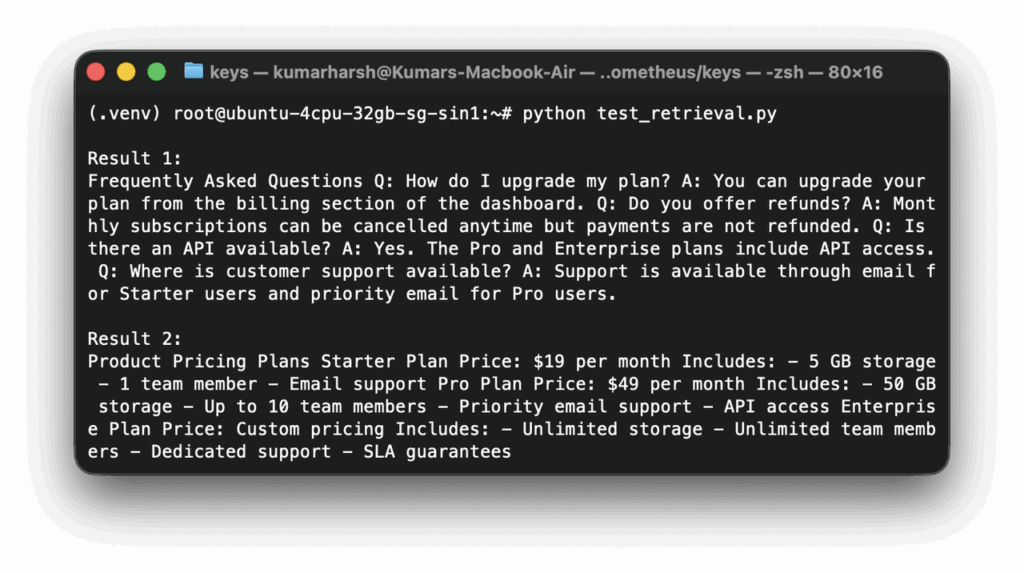
Step 6: Generate Answers with the LLM
Once retrieval works, the next step is sending the retrieved chunks to the local vLLM server and asking the model to answer using that context.
Before continuing, make sure the vLLM server is running. If it is not, start it again in another terminal:
source .venv/bin/activate
vllm serve mistralai/Mistral-7B-Instruct-v0.2
By default, vLLM exposes an OpenAI-compatible API on port 8000.
Install the OpenAI client library
If it is not already installed inside the virtual environment:
pip install openaiCreate the generation module
Create generation.py:
nano generation.pyPaste:
from openai import OpenAI

client = OpenAI(
    base_url="http://127.0.0.1:8000/v1",
    api_key="dummy",
)

def generate_answer(query, context_chunks):
    context = "\n\n".join(context_chunks)

    prompt = f"""Context:
{context}

Question:
{query}

Answer using only the context above. If the answer is not in the context, say you do not know.
"""

    response = client.chat.completions.create(
        model="mistralai/Mistral-7B-Instruct-v0.2",
        messages=[{"role": "user", "content": prompt}],
        temperature=0.2,
        max_tokens=300,
    )

    return response.choices[0].message.content
Test retrieval and generation together
Create test_rag.py:
nano test_rag.pyWith the following contents:
from retrieval import retrieve_documents
from generation import generate_answer

query = "What does the Pro plan include?"

chunks = retrieve_documents(query)
answer = generate_answer(query, chunks)

print("Retrieved chunks:")
for i, chunk in enumerate(chunks, 1):
    print(f"\nChunk {i}:\n{chunk}")

print("\nFinal answer:")
print(answer)

And run it:
python test_rag.py
A successful result should print the retrieved chunks followed by a grounded answer, such as:
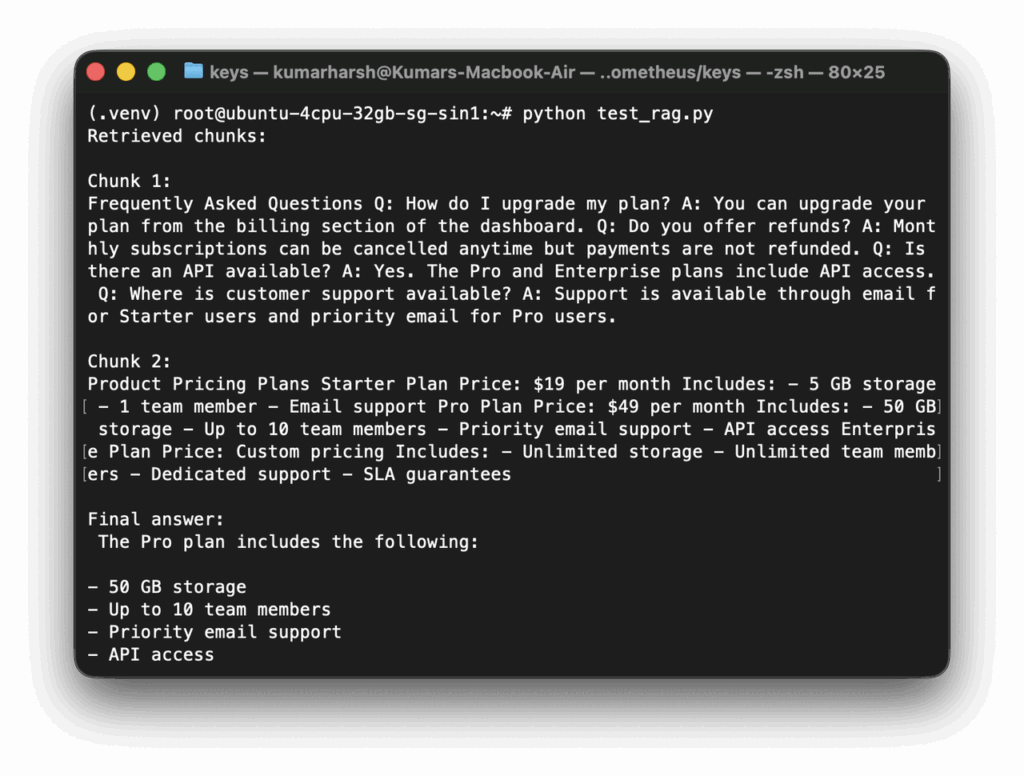
That confirms the retrieval and generation parts are now working together.
Step 7: Expose the End-to-End RAG API
With retrieval and generation working, the last step is wrapping everything in a small FastAPI application.
Install FastAPI and Uvicorn
Make sure the virtual environment is active:
source .venv/bin/activateThen install the API dependencies:
pip install fastapi uvicornCreate the API application
Create app.py:
nano app.pyAnd paste the following code in it:
from fastapi import FastAPI
from pydantic import BaseModel
from retrieval import retrieve_documents
from generation import generate_answer

app = FastAPI()

class Question(BaseModel):
    query: str

@app.post("/ask")
def ask(question: Question):
    chunks = retrieve_documents(question.query)
    answer = generate_answer(question.query, chunks)

    return {
        "query": question.query,
        "retrieved_chunks": chunks,
        "answer": answer,
    }
Start the API server
Finally, start the app with this command:
uvicorn app:app --host 0.0.0.0 --port 8080The API will now be listening on port 8080.
Send a test request
In another terminal on the VM, run:
curl -X POST http://127.0.0.1:8080/ask \
  -H "Content-Type: application/json" \
  -d '{"query":"What does the Pro plan include?"}'
Or, you can use your VM’s public IP to send requests from your local machine:
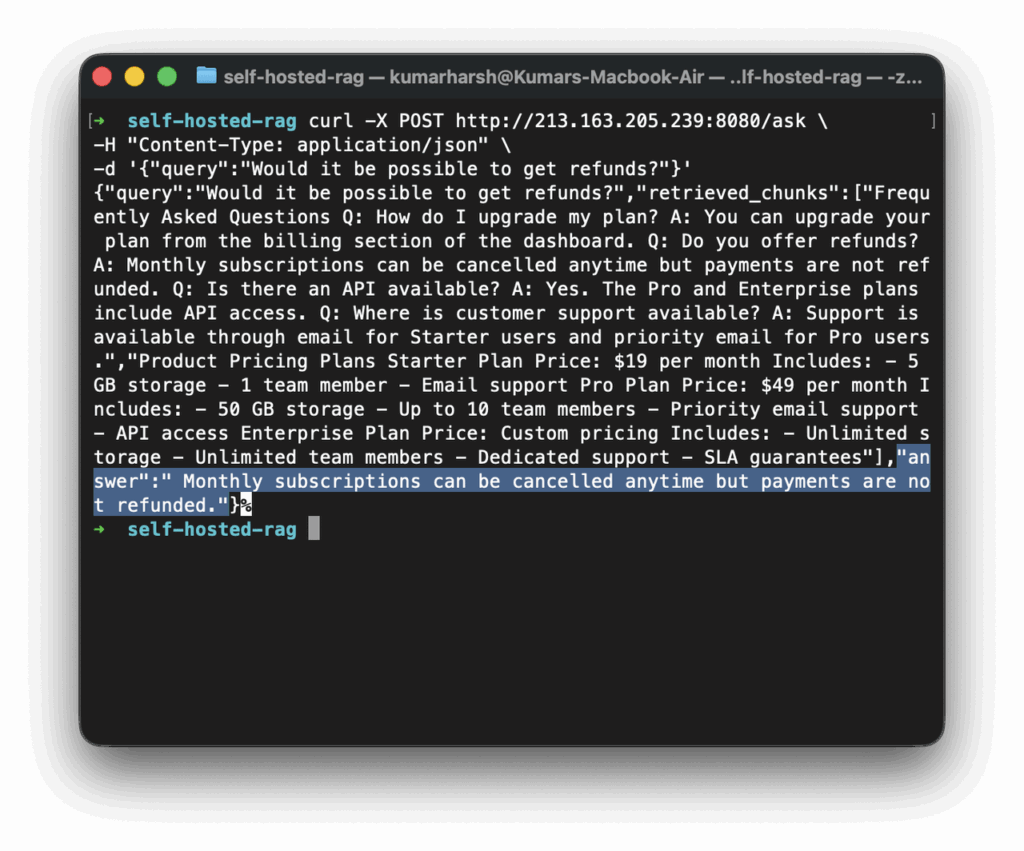
This request triggers the full RAG flow:
- The API receives the question
- It embeds the query
- PostgreSQL returns the nearest chunks using pgvector
- Those chunks are assembled into a prompt
- The prompt is sent to the local vLLM server
- The final answer is returned as JSON
At this point, the self-hosted RAG pipeline is fully working on UpCloud using object storage, PostgreSQL with pgvector, a local embedding model, and a vLLM-served open model.
Running This System in Production
The system built in this tutorial is intentionally minimal so the core ideas remain clear. In production environments, teams usually extend several parts of the pipeline to improve retrieval quality, reliability, and performance as traffic grows.
One of the first improvements typically happens in the document ingestion pipeline. Instead of basic chunking, production systems often introduce:
- Overlapping chunks to preserve context across document sections
- Parsers for structured formats such as PDFs, Markdown, and HTML
- Metadata fields like document titles, section headings, source URLs, or timestamps
- Automated ingestion jobs that index new files when they appear in object storage
These changes make the retrieval layer more accurate and help trace answers back to the original source documents.
The retrieval strategy itself may also evolve. While vector similarity search works well for many queries, production systems often combine it with other signals:
- Hybrid search that blends vector similarity with keyword search
- Metadata filters that restrict results by document type or category
- Re-ranking models that refine the top retrieved passages before sending them to the LLM
These techniques help improve answer quality, especially when datasets grow larger or more complex.
The LLM inference layer usually scales next. A single inference server is enough for testing, but production systems typically run:
- Multiple vLLM servers behind a load balancer
- GPU-backed instances for faster generation
- Query caching for frequently asked questions
This helps maintain consistent latency even as query volume increases.
Finally, teams usually introduce monitoring and operational tooling to track signals like:
- API request latency
- Embedding generation time
- Vector search query time
- LLM inference latency
These metrics help identify bottlenecks and guide infrastructure scaling decisions.
Why Self-Hosting RAG Is More Practical Today
Running a full RAG system on infrastructure you control used to be much harder than it is today. A few years ago, open-source models were weaker, inference servers were harder to operate, and vector search required specialized systems that were not widely adopted. As a result, most developers relied on managed AI services.
Several changes across the ecosystem have made self-hosted RAG systems far more practical.
- Stronger open-source models: Open models have improved rapidly. Models such as Mistral and newer Llama-family variants perform well for tasks like documentation search, support assistants, and internal knowledge retrieval.
- Production-ready inference servers: Running models locally has become much easier thanks to modern inference servers. Tools like vLLM provide efficient model serving and expose APIs compatible with the OpenAI API format.
- Vector search inside existing databases: Vector search is no longer limited to specialized databases. Extensions like pgvector make it possible for many applications to handle both structured data and vector retrieval in the same setup.
- Widely available infrastructure: High-memory VMs and GPU instances are now available from many infrastructure providers, including UpCloud. This allows teams to run inference workloads on standard cloud infrastructure rather than depending entirely on managed AI platforms.
- S3-compatible object storage: Object storage systems that follow the S3 API have also simplified document pipelines. Raw documents can be stored in object storage while the vector database stores the processed chunks and embeddings. This separation makes it easy to rebuild indexes, change embedding models, or reprocess documents later.
Taken together, these improvements have lowered the barrier to running AI systems outside proprietary platforms.
Final Thoughts
In this tutorial, we built a complete self-hosted Retrieval-Augmented Generation pipeline using open-source tools and standard infrastructure.
One of the main takeaways from this exercise should be how practical self-hosting has become. Platforms such as UpCloud provide the infrastructure needed to run this architecture, including compute for model inference, managed PostgreSQL for vector search, and object storage for document ingestion. Because each component of the system scales independently, you can start with a small deployment like the one built here and expand it as your application grows.
If you want to explore further, try extending this example by indexing larger document collections, experimenting with different embedding models, or adding hybrid retrieval. Once the core pipeline is in place, these improvements can significantly enhance the quality and performance of your RAG system.
Discussion