WordPress is one of the most popular content management software (CMS) due to its multitude of features and ease of use. However, setting up a new web host environment can be time-consuming especially if you need to do it often. Docker Compose manages to simplify the installation process to a single deployment command greatly reducing the time and effort required. Deploying WordPress with Docker Compose is fast and easy after the first time setup.
Docker is a container platform that allows simple and fast software installations on any system or OS. It wraps the piece of software in a complete file system that includes everything it needs to run such as code, runtime, system tools and libraries. This allows anyone to package an application with its dependencies into a standardized building block.
Installing Docker
Using Docker Compose requires having the Docker daemon running on your cloud server. Installing Docker itself is already easy. Firstly run the usual update command for your system to make sure you have the latest source lists.
# Debian and Ubuntu
sudo apt-get update
# CentOS
sudo yum update
Check that you have the curl command line utility.
curl -V
It comes preinstalled with most Linux distributions, but if it can not be found, install it manually with the appropriate command for your OS.
# Debian and Ubuntu
sudo apt-get install curl
# CentOS
sudo yum install curl
Use the command below to download and install Docker. The process requires root privileges so you will be asked for your sudo password on any non-root user.
curl -fsSL https://get.docker.com/ | sh
Towards the end of the installation process, you will see a suggestion to add your username to the Docker users group. Doing this allows you to run Docker commands without needing to invoke sudo every time.
sudo usermod -aG docker username
Log out and back in again after adding yourself to the Docker users group before continuing.
You can check that the installation was successful with the following test program:
docker run hello-world
You should see an output similar to the example below.
Unable to find image 'hello-world:latest' locally
latest: Pulling from library/hello-world
...
Hello from Docker.
This message shows that your installation appears to be working correctly.
...
If the command does not work immediately, restart the Docker service with the following and try to run the hello-world app again.
sudo systemctl restart docker
Docker should now be installed and working correctly. Continue on below with rest of the guide to install Docker Compose.
Installing Docker Compose
While installing applications in containers with simple commands is already easy enough, it still requires memorizing those commands and their parameters. Docker-compose allows combining the installation process for multiple containers. Install the additional components for Docker using the procedure below.
First, temporarily switch to your root account.
sudo -i
Use the install script below to download and apply the docker-compose packet.
curl -L https://github.com/docker/compose/releases/download/1.24.0/docker-compose-$(uname -s)-$(uname -m) -o /usr/local/bin/docker-compose
Set the execution permissions to it with:
chmod +x /usr/local/bin/docker-compose
And then exit the root user account to return to your normal username.
exit
You should now have the docker-compose application installed and available, test it by checking for the version number.
docker-compose -v
docker-compose version 1.24.0, build 0aa59064
With the Docker Compose installed you are now ready to start configuring your containerized WordPress environment.
Configuring WordPress with Compose
WordPress is officially available on Docker Hub and easy to set up, but it will not create a working website by itself, it requires a database to store the content. MariaDB is a community-developed relational database management system and a drop-in replacement for MySQL. It is also officially available on Docker and provides easy instructions with up to date images.
Setting up containers with Docker Compose works by creating a Dockerfile and docker-compose.yml in the desired working directory. Start off by creating your working directory, e.g. wordpress-compose.
mkdir ~/wordpress-compose && cd ~/wordpress-compose
Next, create a docker-compose.yml file. This will tell docker how to configure and start the WordPress and MariaDB containers.
nano docker-compose.yml
Copy the example underneath and set the parameters in the file. Replace the database password and public_ip with values appropriate to your cloud server. Make sure the password is the same for both environment variables so that WordPress will be able to access the database.
wordpress:
    image: wordpress
    links:
     - mariadb:mysql
    environment:
     - WORDPRESS_DB_PASSWORD=password
     - WORDPRESS_DB_USER=root
    ports:
     - 80:80
    volumes:
     - ./html:/var/www/html
mariadb:
    image: mariadb
    environment:
     - MYSQL_ROOT_PASSWORD=password
     - MYSQL_DATABASE=wordpress
    volumes:
     - ./database:/var/lib/mysql
When you are done editing the compose file, save it and exit the editor.
Now create the new containers with the command below. This starts both containers in the background and leaves them running. If you wish to see the output from the containers just leave out the -d to deploy the applications in the foreground.
docker-compose up -d
Wait for the installation to finish. You will see something like the example output below once the process is complete.
Creating wordpress-compose_mariadb_1 ... done
Creating wordpress-compose_wordpress_1 ... done
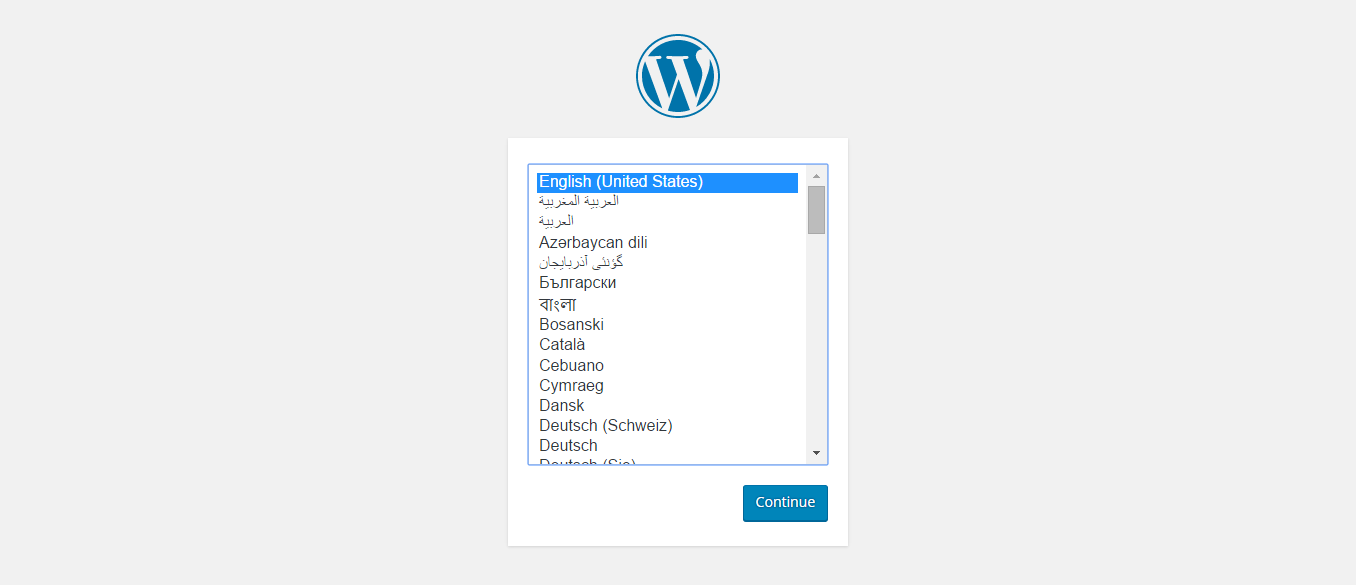
You can then open the public IP or domain of your WordPress server in your web browser to test the installation. You should be redirected to the WordPress initial setup page like the image shown below.
If you want to make changes to the configuration, simply update the files and run the docker-compose command again. If docker-compose detects the configuration or the image has changed since the container was created, it applies the changes by stopping and recreating the containers while preserving mounted volumes.
For example, you can check for updates on the WordPress and MariaDB images and push changes to your containers using the commands below.
docker-compose pull
docker-compose up -d
Other useful commands for docker-compose are start/stop, config, ps and down.
# Starts all stopped containers in the work directory
docker-compose start
# Stops all currently running containers in the work directory
docker-compose stop
# Validates and shows the configuration
docker-compose config
# Lists all running containers in the work directory
docker-compose ps
# Stops and removes all containers in the work directory
docker-compose down
Docker-compose also has its own command-line reference guide at the documentation page.
Conclusions
Congratulations, you should now have a docker-compose set-up with WordPress and MariaDB running in containers and an easy way to update the services when needed. While manually running Docker commands to create containers already simplifies application management, docker-compose takes it a step further and allows you to bundle multiple containers within a single working directory.
Before continuing on building your new WordPress site, make sure to pay attention to the security on your server. To find out more, check out our article on how to secure your Linux cloud server.
Discussion