Having the freedom of cloud infrastructure can be liberating but sometimes you just want a simple and easy solution to develop and deploy web applications. Dokku is an extensible, open-source Platform-as-a-Service that can run on any single server of your choosing. With Dokku CentOS you can easily set up your very own PaaS in a very small implementation that is not hungry for server resources. Powered by Docker, Dokku can help you build and manage your application lifecycle in the cloud.
This guide will help you get Dokku CentOS installed, configured, and tested, along with tips on getting the most out of your personal cloud platform. The instructions in this guide are intended for CentOS 7, but Dokku is also available on Ubuntu as well as on Debian.
Installing Dokku
Dokku runs on almost any hardware and is well at home in the cloud. To run Dokku, your server should have at least 1GB of RAM which makes the preconfigured 1CPU/1GB host an ideal starting point for testing your own PaaS.
Start by deploying a server with at least the minimum requirements.
If you have a domain name available, set the server hostname to a subdomain such as dokku.example.com. You should configure your DNS provider to point the subdomain including a wildcard to the public IP of your Dokku server. This will allow you to personalise the platform from the get-go.
We also recommend including your SSH keys to your server at deployment to make logging in more secure and also to make configuring Dokku easier later on. If you have not already added your public SSH keys to your UpCloud control panel, here is a quick introduction to Managing Your SSH Keys.
Once you have deployed your new Dokku server, follow the steps below to install the platform.
# Install epel for nginx packages to be available
sudo yum install -y epel-release
Dokku is built on Docker and employs it to isolate applications, continue by installing Docker with the command below.
# Install Docker
curl -fsSL https://get.docker.com/ | sudo sh
Then finally install Dokku and its core dependencies.
# Install Dokku
curl -s https://packagecloud.io/install/repositories/dokku/dokku/script.rpm.sh | sudo bash
sudo yum install -y herokuish dokku
sudo dokku plugin:install-dependencies --core
The commands above will install the required dependencies such as Docker Engine and Herokuish along with Dokku CentOS itself. The installation takes only a couple of minutes and works best on a freshly deployed system.
If you get an error saying your hostname could not be resolved or you do not have a domain name available you can use the default reverse DNS name of your UpCloud server for testing. It can be found in your UpCloud control panel in server settings under the IP Addresses tab. To change the hostname after deployment, set the system domain name in the /etc/hostname file on your server then restart the host.
Configuring the basic settings
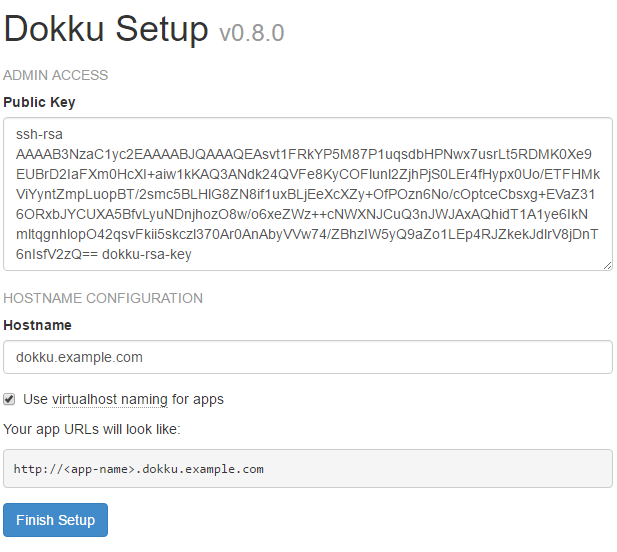
When the installation is complete, you will need to add your public SSH key to allow remote application deployment. All keys should be added under the dokku user account that is used to manage the application. Set at least one SSH key or include multiples each in their own files in the /home/dokku/.ssh/ folder.
Note: To secure your Dokku host, it is important to complete the web setup process.
If you already included an SSH key at the server deployment it should be stored in /root/.ssh/authorized_keys. Dokku will edit its own authorized_keys file for its requirements, and copy the key as a new file into the Dokku user directory.
sudo cp /root/.ssh/authorized_keys /home/dokku/.ssh/dokku.pub
sudo chown dokku:dokku /home/dokku/.ssh/dokku.pub
Then include the key file in Dokku.
sudo dokku ssh-keys:add dokku /home/dokku/.ssh/dokku.pub
In the Dokku CentOS version 0.8.0, virtual host naming for apps is enabled by default. You can verify this by checking that your domain name is set correctly in the /home/dokku/VHOST file. The feature configures applications under <app-name>.dokku.example.com subdomains when deployed on Dokku. Make sure to configure a wildcard A record for your domain to allow access to the application subdomains. If you do not have a domain name available, you can use the default reverse DNS name instead, and set it in the VHOST file.
A *.dokku.example.com <public IP address>
Your Dokku CentOS platform should now be installed and ready to deploy applications. Continue below with testing the platform with a simple example app.
Testing the platform
Dokku integrates well with GitHub and its tools. Deploying applications can be done through git commands from your local machine allowing Heroku-compatible applications to be easily pushed onto a server. The applications are built with Heroku build packs and run isolated in their own containers creating a single-host cloud Heroku setup.
To get the most out of Dokku, you will need a GitHub account. Sign up if you have not already and add an SSH key to your account for secure authentication from your local system. Make sure to add keys to your local SSH agent for both the GitHub and your Dokku server.
Start by creating a new application on your Dokku server using the command below.
# On your Dokku server
dokku apps:create ruby-rails-sample
The app will require a Postgres plugin which can be installed with the following command.
# Install Postgres plugin your Dokku server
sudo dokku plugin:install https://github.com/dokku/dokku-postgres.git
Then create a new database for the sample app.
# Create a database on your Dokku server
dokku postgres:create rails-database
The official datastore offers a method to link the database service to an application. Use the command underneath to enable the sample app to access the database reserved for it.
# Link the database to the application on your Dokku server
dokku postgres:link rails-database ruby-rails-sample
With the Dokku server ready to receive the application, continue by downloading the sample app from GitHub on your local computer. In case you do not already have Git installed, you can find quick installation instructions for many different operating systems over at the git download page. The commands below are intended to be run on a Linux system.
# On your local system
git clone [email protected]:heroku/ruby-rails-sample.git ~/ruby-rails-sample
Then change into the downloaded repository directory and add a new remote location for git that points to your Dokku server with the application name added to the end of the domain name as shown in the example command below. Replace the <dokku.example.com> with your domain name.
# On your local system
cd ~/ruby-rails-sample
git remote add dokku dokku@<dokku.example.com>:ruby-rails-sample
You can then push the application onto your Dokku server with the following command.
# On your local system
git push dokku master
Once the deployment finishes, the application should be available on your Dokku server at the URL shown at the end of the output ruby-rails-sample.<dokku.example.com> for example.
CentOS firewall blocks access to the HTTP port by default. Use the command below to enable the web service.
sudo firewall-cmd --permanent --add-service http
sudo firewall-cmd --reload
You can then click the link in your terminal or browse to the address to test the application.
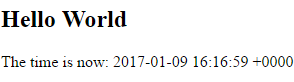
Congratulations, when you get a hello page similar to the example above, you have successfully deployed your first app on Dokku.
Conclusions
Deploying a single host scalable Platform-as-a-Service in the cloud could not be much easier than with Dokku. One of the strengths of Dokku is the extent of already available plugins, but also that Dokku is making it possible to write your own in any language. Sharing your plugins online and extending those already available will help the platform to grow. Dokku’s simple core is intended to be easy to hack and expand upon with features you need.
Discussion