Nextcloud is an open-source file sync and sharing software that can be used as a replacement for Google Drive, Yandex Disk and similar cloud-based storage. Nextcloud now has Onlyoffice to allow shared document editing and Nextcloud Talk, to enable video conferencing, so is a virtual office productivity solution.
In this tutorial, we will set up Nextcloud 18 on a single cloud server using nginx as the web server and PostgreSQL as the database engine.
Setting up a new cloud server
Login to UpCloud and deploy a new server. In this case, we are using a Simple plan server with 1GB Memory, 25 GB storage with the CentOS 8 template. Once your server is deployed login by using SSH.
ssh root@<your-ip-address>Once logged in change the password, then enter the new password twice.
passwd
To secure the server, it is good to prevent login as the root user, thus another user needs to be created.
Create a new username for yourself.
adduser nextcloud
Then give the new user a password
passwd nextcloud
Add the user to the wheel group to be able to invoke administrative privileges.
usermod -aG wheel nextcloud
Then prevent root login by editing the /etc/ssh/sshd_config file and set PermitRootLogin to no
nano /etc/ssh/sshd_config
PermitRootLogin no
Exit the editor and restart SSHD service. Once the reboot process is finished, disconnect and log back into with the new username
ssh nextcloud@<your-ip-address>CentOS 8 offers some security protection when SE Linux is enabled. The primary purpose of SE Linux is to control file access permissions by following the principle of least privilege so that programs only access files that they need to. This is especially helpful when running a service such as NextCloud, but it does increase the complexity of the setup.
We will change SE Linux from permissive mode to enforcing mode by setting the SELINUX=enforcing
sudo nano /etc/selinux/config
SELINUX=enforcing
Then save the file and exit the editor.
The changes will be applied at the next reboot but to save time, you can change the setting for the runtime using the command below.
sudo setenforce enforcing
If you then check that SELinux mode.
sestatus
The output should then give the following.
SELinux status:               enabled
SELinuxfs mount:              /sys/fs/selinux
SELinux root directory:       /etc/selinux
Loaded policy name:           targeted
Current mode:                 enforcing
Mode from config file:        permissive
Policy MLS status:            enabled
Policy deny_unknown status:   allowed
Memory protection checking:   actual (secure)
Max kernel policy version:    31
Lastly, update the installed software
sudo dnf -y update
Once done, continue below with the next step.
Configuring a domain name
You will need to configure a valid domain name to point to your cloud server IP address to be able to obtain SSL certificates as described later in this guide. If you do not have a domain name, you can use Freenom to get a free temporary domain name.
You can read more about domain name systems and how to configure DNS records to point your domain to the correct IP address at our guide to domain names.
Installing NGINX webserver
Next, we’ll install NGINX to work as the underpinnings of our NextCloud server.
But first, add the EPEL repository which
sudo dnf -y install epel-release
Then update the repositories and install Nginx
sudo dnf -y install nginx
Verify the installation
sudo nginx -v
should give an output similar to
nginx version: nginx/1.14.1
Enable (ensure Nginx automatically starts upon reboot) and start Nginx
sudo systemctl enable nginx
sudo systemctl start nginx
Check Nginx is running
curl -I 127.0.0.1
which should give an output similar to
HTTP/1.1 200 OK
Server: nginx/1.14.1
Date: Thu, 30 Jul 2020 16:34:40 GMT
Content-Type: text/html
Content-Length: 4057
Last-Modified: Mon, 07 Oct 2019 21:16:24 GMT
Connection: keep-alive
ETag: "5d9bab28-fd9"
Accept-Ranges: bytes
Create a firewall rule to allow web access
sudo firewall-cmd --zone=public --add-service=http --permanent
sudo firewall-cmd --zone=public --add-service=https --permanent
sudo firewall-cmd --reload
Getting Let’s Encrypt certificates
Edit Nginx configuration to indicate the domain name
sudo nano /etc/nginx/nginx.conf
Change the server name to use your domain, replace the my.domain.com with yours.
server_name my.domain.com www.my.domain.com;Afterwards, save and exit.
Then reload NGINX to apply the changes.
sudo systemctl reload nginx
Next, install Certbot which will automate setting up the certificate.
sudo dnf install -y certbot python3-certbot-nginx
Then obtain the certificates with the following command. Replace the my.domain.com again with yours.
sudo certbot --nginx -d my.domain.comOn the first run, you’ll need to provide Certbot with some details.
- It will then ask for your email address and that you read and agree to the terms of service.
- You can then choose to receive information from the Electronic Frontier Foundation (EFF).
- It should then indicate the my.domain.com and www.my.domain.com as domains to obtain certificates for, which you should agree to.
- Finally indicate that it should redirect all traffic from HTTP to HTTPS.
If successful, you’ll see a confirmation of Certbot having obtained certificates for your domain.
Installing PostGRESQL
Next, you’ll need to install a database. We will use the external repository to install the latest version of PostgreSQL, version 12.
Enable external PostgreSQL repository with the following command.
sudo dnf -y install https://download.postgresql.org/pub/repos/yum/reporpms/EL-8-x86_64/pgdg-redhat-repo-latest.noarch.rpm
Disable PostgreSQL from CentOS repository.
sudo dnf -qy module disable postgresql
Then install PostgreSQL from the external repository.
sudo dnf -y install postgresql12 postgresql12-server
Initialize the database and enable it to start automatically on when the server starts.
sudo /usr/pgsql-12/bin/postgresql-12-setup initdb
sudo systemctl enable postgresql-12
sudo systemctl start postgresql-12
Next, set a password for the postgres user account using the command below, then enter a new password twice.
sudo passwd postgres
Once done, change to the postgres user account with the next command.
su -l postgres
Enter the Postgres database software.
psql
Then create a database for NextCloud. Replace the password with something secure.
CREATE USER nextclouddbuser WITH PASSWORD 'nextclouddbuserpassword';Create a database
CREATE DATABASE nextclouddb;
Give NextCloud user rights to access the database.
GRANT ALL PRIVILEGES ON DATABASE nextclouddb TO nextclouddbuser;
Exit the database by typing in the following.
q
Afterwards, exit the postgres user account.
exit
To enable connections to the database, the configuration must be modified, edit the pg_hba.conf file.
sudo nano /var/lib/pgsql/12/data/pg_hba.conf
Then find the host IPv4 line and set it as shown below.
host all all 127.0.0.1/32 md5
Similarly, change the line IPv6 host.
host all all ::1/128 md5
Afterwards, restart the Postgresql service to enable the changes.
sudo systemctl restart postgresql-12
Database ready and set! Continue below with the next step of the installation.
Installing Redis
Redis is an open-source, in-memory data structure store we’ll be using as a cache.
Install Redis with the following command.
sudo dnf install -y redis
Then start and enable the Redis services.
sudo systemctl enable redis.service
sudo systemctl start redis.service
That’s all you need to do to configure Redis. Continue with PHP installation in the next section.
Installing PHP 7.4
Next, you’ll need to install PHP. To begin, enable the REMI repository.
sudo dnf -y install https://rpms.remirepo.net/enterprise/remi-release-8.rpm
Install the utility packages.
sudo dnf -y install yum-utils unzip policycoreutils-python-utils mlocate bzip2 wget tar
Enable module stream for the REMI repository.
sudo dnf module reset php
sudo dnf -y module install php:remi-7.4
Install PHP modules.
sudo dnf install -y php php-gd php-mbstring php-intl
php-pecl-apcu php-opcache php-json php-pecl-zip php-pear
php-pecl-imagick php-fpm php-pecl-redis5
php-intl php-pgsql php-common php-pdo php-xml
php-lz4 php-xml php-pecl-crypto php-pecl-rar
php-pecl-pq php-pecl-lzf php-cli php-pecl-apcu-bc
Then set up PHP by first editing the /etc/php-fpm.d/www.conf file.
sudo nano /etc/php-fpm.d/www.conf
Uncomment the following lines and change the admin memory limit to 512 megabytes.
;env[HOSTNAME] = $HOSTNAME
;env[PATH] = /usr/local/bin:/usr/bin:/bin
;env[TMP] = /tmp
;env[TMPDIR] = /tmp
;env[TEMP] = /tmp
...
;php_admin_value[memory_limit] = 128M
...
;php_value[opcache.file_cache] = /var/lib/php/opcache
Afterwards, the lines should be as shown below.
env[HOSTNAME] = $HOSTNAME
env[PATH] = /usr/local/bin:/usr/bin:/bin
env[TMP] = /tmp
env[TMPDIR] = /tmp
env[TEMP] = /tmp
...
php_admin_value[memory_limit] = 512M
...
php_value[opcache.file_cache] = /var/lib/php/opcache
Next, create the following directories to store temporary information.
sudo mkdir -p /var/lib/php/{session,opcache,wsdlcache}
sudo chown -R root:nginx /var/lib/php/{opcache,wsdlcache}
sudo chown -R nginx:nginx /var/lib/php/session
Once done, start and enable PHP to run at boot.
sudo systemctl enable php-fpm
sudo systemctl start php-fpm
Downloading Nextcloud
Get NextCloud server from their download page. You can download the installation package using the following command. Check the web page for the latest version.
wget https://download.nextcloud.com/server/releases/nextcloud-18.0.7.tar.bz2
Next, to verify the software package also download the SHA256 hash value, signature, and PGP key.
wget https://download.nextcloud.com/server/releases/nextcloud-18.0.7.tar.bz2.sha256
wget https://download.nextcloud.com/server/releases/nextcloud-18.0.7.tar.bz2.asc
wget https://nextcloud.com/nextcloud.asc
Then verify sha256sum with the command below.
sha256sum -c nextcloud-18.0.7.tar.bz2.sha256 < nextcloud-18.0.7.tar.bz2
The output should be such as the example underneath.
nextcloud-18.0.7.tar.bz2: OK
Verify the signature, by first importing the key.
gpg --import nextcloud.asc
Which should give the following.
gpg: directory '/home/nextcloud/.gnupg' created
gpg: keybox '/home/nextcloud/.gnupg/pubring.kbx' created
gpg: /home/nextcloud/.gnupg/trustdb.gpg: trustdb created
gpg: key D75899B9A724937A: public key "Nextcloud Security <[email protected]>" imported
gpg: Total number processed: 1
gpg:               imported: 1
Then check the signature.
gpg --verify nextcloud-18.0.7.tar.bz2.asc nextcloud-18.0.7.tar.bz2
Which should give output as below.
gpg: Signature made Wed 15 Jul 2020 20:07:06 UTC
gpg:                using RSA key D75899B9A724937A
gpg: Good signature from "Nextcloud Security <[email protected]>" [unknown]
gpg: WARNING: This key is not certified with a trusted signature!
gpg:          There is no indication that the signature belongs to the owner.
Primary key fingerprint: 2880 6A87 8AE4 23A2 8372  792E D758 99B9 A724 937A
To verify the key, check it on a public Keyserver such as https://pgp.mit.edu/, where you should search for 0xD75899B9A724937A
Next, decompress the package to a folder.
tar -xvf nextcloud-18.0.7.tar.bz2
Copy the folder to the NGINX root directory.
sudo rm -rf /usr/share/nginx/html
sudo cp -r nextcloud /usr/share/nginx/html
Also, make the following data directory.
sudo mkdir /usr/share/nginx/data
Make sure that NGINX can read and write to the NextCloud folder
sudo chown -R nginx:nginx /usr/share/nginx
Then restart NGINX.
sudo systemctl restart nginx
You’ll also need to configure SELinux to allow access to the appropriate folders.
sudo semanage fcontext -a -t httpd_sys_rw_content_t '/usr/share/nginx/data(/.*)?'
sudo semanage fcontext -a -t httpd_sys_rw_content_t '/usr/share/nginx/html/config(/.*)?'
sudo semanage fcontext -a -t httpd_sys_rw_content_t '/usr/share/nginx/html/apps(/.*)?'
sudo semanage fcontext -a -t httpd_sys_rw_content_t '/usr/share/nginx/html/.htaccess'
sudo semanage fcontext -a -t httpd_sys_rw_content_t '/usr/share/nginx/html/.user.ini'
sudo semanage fcontext -a -t httpd_sys_rw_content_t '/usr/share/nginx/html/3rdparty/aws/aws-sdk-php/src/data/logs(/.*)?'
sudo restorecon -R '/usr/share/nginx/html/'
sudo restorecon -R '/usr/share/nginx/data/'
sudo setsebool -P httpd_can_network_connect on
Configuring NGINX and PHP for NextCloud
Now setup NGINX and PHP configuration files. Change the /etc/nginx/nginx.conf to have the following contents.
sudo nano /etc/nginx/nginx.conf
# For more information on configuration, see:
# * Official English Documentation: http://nginx.org/en/docs/
# * Official Russian Documentation: http://nginx.org/ru/docs/

user nginx;
worker_processes auto;
error_log /var/log/nginx/error.log;
pid /run/nginx.pid;

# Load dynamic modules. See /usr/share/doc/nginx/README.dynamic.
include /usr/share/nginx/modules/*.conf;

events {
    worker_connections 1024;
}

http {
    log_format main '$remote_addr - $remote_user [$time_local] "$request" '
                    '$status $body_bytes_sent "$http_referer" '
                    '"$http_user_agent" "$http_x_forwarded_for"';

    access_log /var/log/nginx/access.log main;
    sendfile on;
    tcp_nopush on;
    tcp_nodelay on;
    keepalive_timeout 65;
    types_hash_max_size 2048;

    include /etc/nginx/mime.types;
    default_type application/octet-stream;

    # Load modular configuration files from the /etc/nginx/conf.d directory.
    # See http://nginx.org/en/docs/ngx_core_module.html#include
    # for more information.
    include /etc/nginx/conf.d/*.conf;

    server {

        # Load configuration files for the default server block.
        include /etc/nginx/default.d/*.conf;

        location / {
        }
    }
}
Next, create the NextCloud website configuration file /etc/nginx/conf.d/nextcloud.conf
sudo nano /etc/nginx/conf.d/nextcloud.conf
Include the following in the configuration file. Due to the length of the file, you may need to copy it in parts. Replace all occurrences of my.domain.com with your domain.
upstream php-handler {
    server unix:/run/php-fpm/www.sock;
}

server {
    listen 80;
    listen [::]:80;
    server_name my.domain.com;
    # enforce https
    return 301 https://$server_name:443$request_uri;
}

server {
    listen 443 ssl http2;
    listen [::]:443 ssl http2;
    server_name www.my.domain.com my.domain.com;

    ssl_certificate /etc/letsencrypt/live/my.domain.com/fullchain.pem; # managed by Certbot
    ssl_certificate_key /etc/letsencrypt/live/my.domain.com/privkey.pem; # managed by Certbot
    include /etc/letsencrypt/options-ssl-nginx.conf; # managed by Certbot
    ssl_dhparam /etc/letsencrypt/ssl-dhparams.pem; # managed by Certbot

    # Add headers to serve security-related headers
    # Before enabling Strict-Transport-Security headers please read into this
    # topic first.
    add_header Strict-Transport-Security "max-age=15768000; includeSubDomains; preload;" always;
    #
    # WARNING: Only add the preload option once you read about
    # the consequences in https://hstspreload.org/. This option
    # will add the domain to a hardcoded list that is shipped
    # in all major browsers and getting removed from this list
    # could take several months.
    add_header Referrer-Policy "no-referrer" always;
    add_header X-Content-Type-Options "nosniff" always;
    add_header X-Download-Options "noopen" always;
    add_header X-Frame-Options "SAMEORIGIN" always;
    add_header X-Permitted-Cross-Domain-Policies "none" always;
    add_header X-Robots-Tag "none" always;
    add_header X-XSS-Protection "1; mode=block" always;

    # Remove X-Powered-By, which is an information leak
    fastcgi_hide_header X-Powered-By;

    # Path to the root of your installation
    root /usr/share/nginx/html/;

    location = /robots.txt {
        allow all;
        log_not_found off;
        access_log off;
    }

    # The following 2 rules are only needed for the user_webfinger app.
    # Uncomment it if you're planning to use this app.
    #rewrite ^/.well-known/host-meta /public.php?service=host-meta last;

    #rewrite ^/.well-known/host-meta.json /public.php?service=host-meta-json last;

    # The following rule is only needed for the Social app.
    # Uncomment it if you're planning to use this app.
    #rewrite ^/.well-known/webfinger /public.php?service=webfinger last;

    location = /.well-known/carddav {
        return 301 $scheme://$host:$server_port/remote.php/dav;
    }
    location = /.well-known/caldav {
        return 301 $scheme://$host:$server_port/remote.php/dav;
    }

    location ^~ {

        # set max upload size
        client_max_body_size 512M;
        fastcgi_buffers 64 4K;

        # Enable gzip but do not remove ETag headers
        gzip on;
        gzip_vary on;
        gzip_comp_level 4;
        gzip_min_length 256;
        gzip_proxied expired no-cache no-store private no_last_modified no_etag auth;
        gzip_types application/atom+xml application/javascript application/json application/ld+json application/manifest+json application/rss+xml application/vnd.geo+json application/vnd.ms-fontobject application/x-font-ttf application/x-web-app-manifest+json application/xhtml+xml application/xml font/opentype image/bmp image/svg+xml image/x-icon text/cache-manifest text/css text/plain text/vcard text/vnd.rim.location.xloc text/vtt text/x-component text/x-cross-domain-policy;

        # Uncomment if your server is built with the ngx_pagespeed module
        # This module is currently not supported.
        # pagespeed off;

        location / {
            rewrite ^ /index.php;
        }

        location ~ ^/(?:build|tests|config|lib|3rdparty|templates|data)/ {
            deny all;
        }
        location ~ ^/(?:.|autotest|occ|issue|indie|db_|console) {
            deny all;
        }

        location ~ ^/(?:index|remote|public|cron|core/ajax/update|status|ocs/v[12]|updater/.+|oc[ms]-provider/.+).php(?:$|/) {
            fastcgi_split_path_info ^(.+?.php)(/.*|)$;
            set $path_info $fastcgi_path_info;
            try_files $fastcgi_script_name =404;
            include fastcgi_params;
            fastcgi_param SCRIPT_FILENAME $document_root$fastcgi_script_name;
            fastcgi_param PATH_INFO $path_info;
            fastcgi_param HTTPS on;
            # Avoid sending the security headers twice
            fastcgi_param modHeadersAvailable true;
            # Enable pretty urls
            fastcgi_param front_controller_active true;
            fastcgi_pass php-handler;
            fastcgi_intercept_errors on;
            fastcgi_request_buffering off;
        }

        location ~ ^/(?:updater|oc[ms]-provider)(?:$|/) {
            try_files $uri/ =404;
            index index.php;
        }

        # Adding the cache control header for js, css and map files
        # Make sure it is BELOW the PHP block
        location ~ ^/.+[^/].(?:css|js|woff2?|svg|gif|map)$ {
            try_files $uri /index.php$request_uri;
            add_header Cache-Control "public, max-age=15778463";
            # Add headers to serve security related headers (It is intended
            # to have those duplicated to the ones above)
            # Before enabling Strict-Transport-Security headers please read
            # into this topic first.
            #add_header Strict-Transport-Security "max-age=15768000; includeSubDomains; preload;" always;
            #
            # WARNING: Only add the preload option once you read about
            # the consequences in https://hstspreload.org/. This option
            # will add the domain to a hardcoded list that is shipped
            # in all major browsers and getting removed from this list
            # could take several months.
            add_header Referrer-Policy "no-referrer" always;
            add_header X-Content-Type-Options "nosniff" always;
            add_header X-Download-Options "noopen" always;
            add_header X-Frame-Options "SAMEORIGIN" always;
            add_header X-Permitted-Cross-Domain-Policies "none" always;
            add_header X-Robots-Tag "none" always;
            add_header X-XSS-Protection "1; mode=block" always;

            # Optional: Don't log access to assets
            access_log off;
        }

        location ~ ^/.+[^/].(?:png|html|ttf|ico|jpg|jpeg|bcmap)$ {
            try_files $uri /index.php$request_uri;
            # Optional: Don't log access to other assets
            access_log off;
        }
    }
}
Next, increase the PHP memory limit.
sudo nano /etc/php.ini
Change the memory_limit to 512 megabytes as below. You can use the search function in nano by pressing ctrl+w, typing in memory_limit and pressing the enter key.
memory_limit = 512M
Also, make the following change to the php-fpm configuration.
sudo nano /etc/php-fpm.d/www.conf
Change the user and group values from apache to nginx so that the lines read as shown underneath.
user = nginx
group = nginx
Installing NextCloud
Go to the NextCloud installation directory.
cd /usr/share/nginx/html
Then install Nextcloud using the following command. Note that all commands for php occ need to be called from the /usr/share/nginx/html directory. Make sure you set the database password the same as you did when creating the database. Also, create a password for your admin account on Nextcloud web panel.
sudo -u nginx php occ maintenance:install
--data-dir /usr/share/nginx/data
--database "pgsql"
--database-name "nextclouddb"
--database-user "nextclouddbuser"
--database-pass "nextclouddbuserpassword"
--admin-user "nextcloudadmin"
--admin-pass "nextcloudadminpassword"
The install will take a moment, once done, you’ll get a confirmation that Nextcloud was installed successfully.
Next, configure the database to secure the server by running the following command.
sudo -u nginx php occ db:add-missing-indices
Before running the file cache conversion, first, enable the maintenance mode.
sudo -u nginx php occ maintenance:mode --on
Then run the conversion and select yes when asked to confirm.
sudo -u nginx php occ db:convert-filecache-bigint
Afterwards, turn maintenance mode off again.
sudo -u nginx php occ maintenance:mode --off
Modify the file /usr/share/nginx/html/config/config.php to allow your domain name as a location to access Nextcloud from and to use caching.
sudo nano config/config.php
Change the contents to include the following. Replace my.domain.com again with your own and insert the memcache and redis configurations following the allowed domains array.
...
  array (
    0 => 'localhost',
    1 => 'my.domain.com',
  ),
  'memcache.distributed' => 'OCMemcacheRedis',
  'memcache.locking' => 'OCMemcacheRedis',
  'memcache.local' => 'OCMemcacheAPCu',
  'redis' => array(
    'host' => 'localhost',
    'port' => 6379,
  ),
  'datadirectory' => '/usr/share/nginx/data',
...
With all that done, reboot your Nextcloud server to make sure all settings have been applied successfully.
sudo reboot
Once the server is up again, all services should resume and the website comes online. Continue below with the finishing touches to install some apps and make sure your Nextcloud server is secure.
Configuring Nextcloud
Log in to your Nextcloud instance through the web interface. Go to your Nextcloud website and sign in using the admin user and password as set in the Nextcloud install command.
https://my.domain.com/login
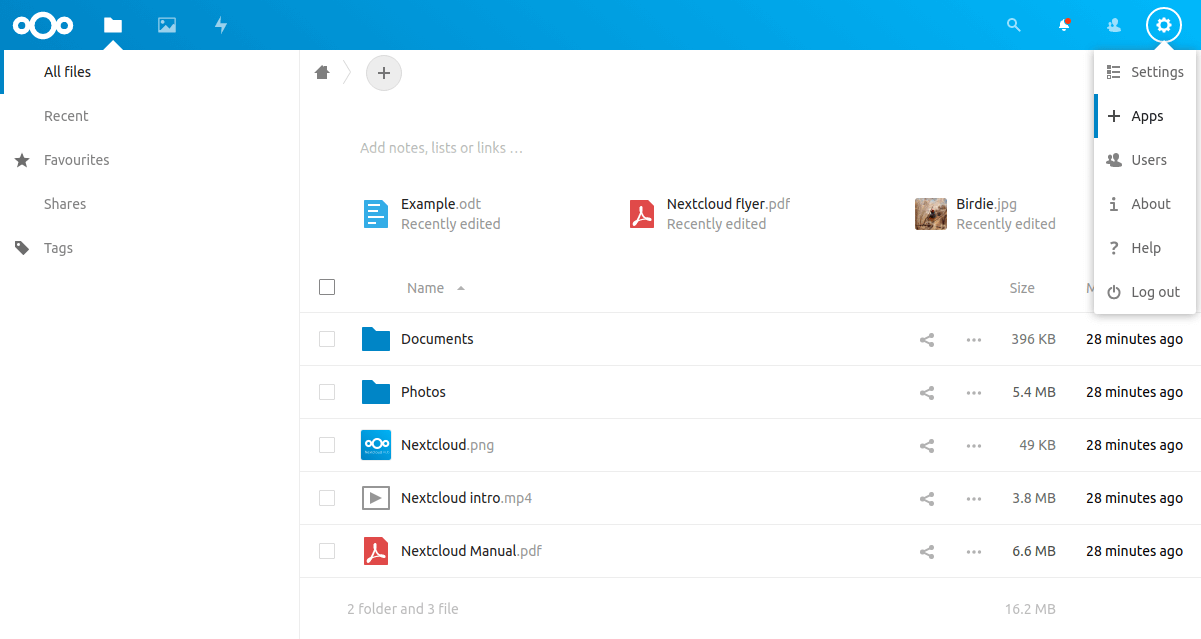
Once logged in, you’ll see the Nextcloud dashboard. To make the last few configurations, go to the Apps view by clicking the cogwheel and the Apps link.
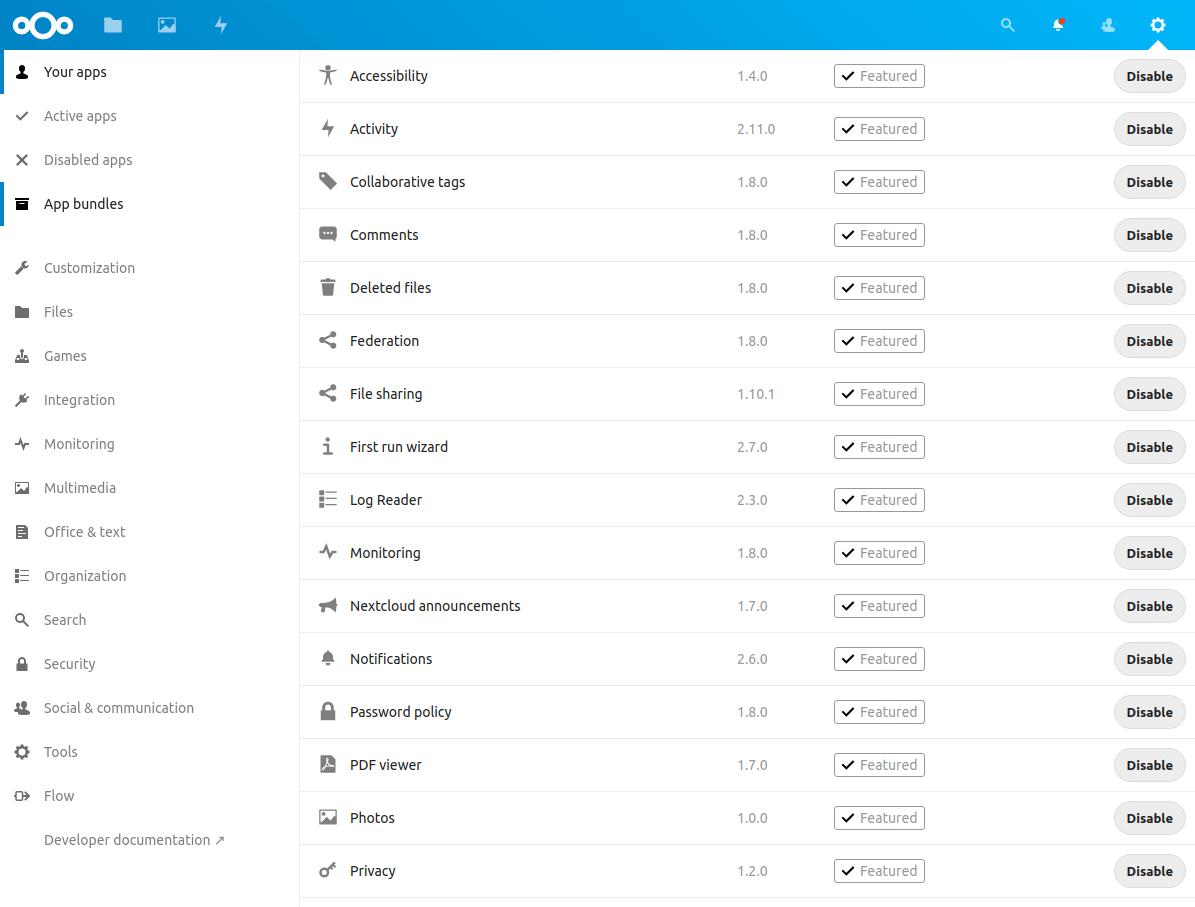
Then on the Apps list, go to the App bundles by clicking the menu link on the left.
In the App bundles view, enable and install the Hub bundle by clicking the Enable all button. Nextcloud will then begin downloading the selected apps and including them for your website.
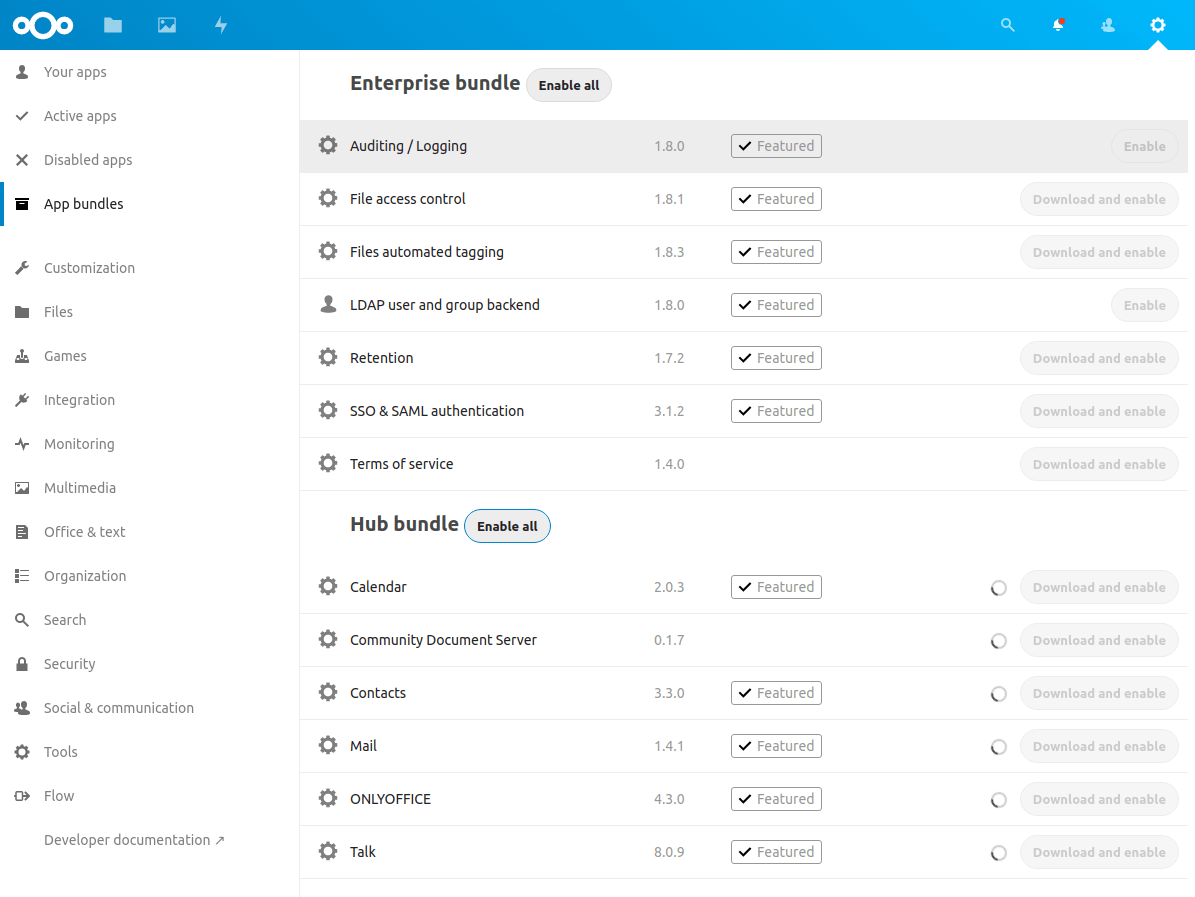
Afterwards, you should see the selected apps enabled.
Log out of your instance and reboot the server once more.
sudo reboot
Then, once the reboot process is complete, log back in.
Check that document editing (Only Office and Community Document Server) and Talk applications work. You can test these by opening the Example.md file for edit. You can close the editor by clicking the X on the top right corner.
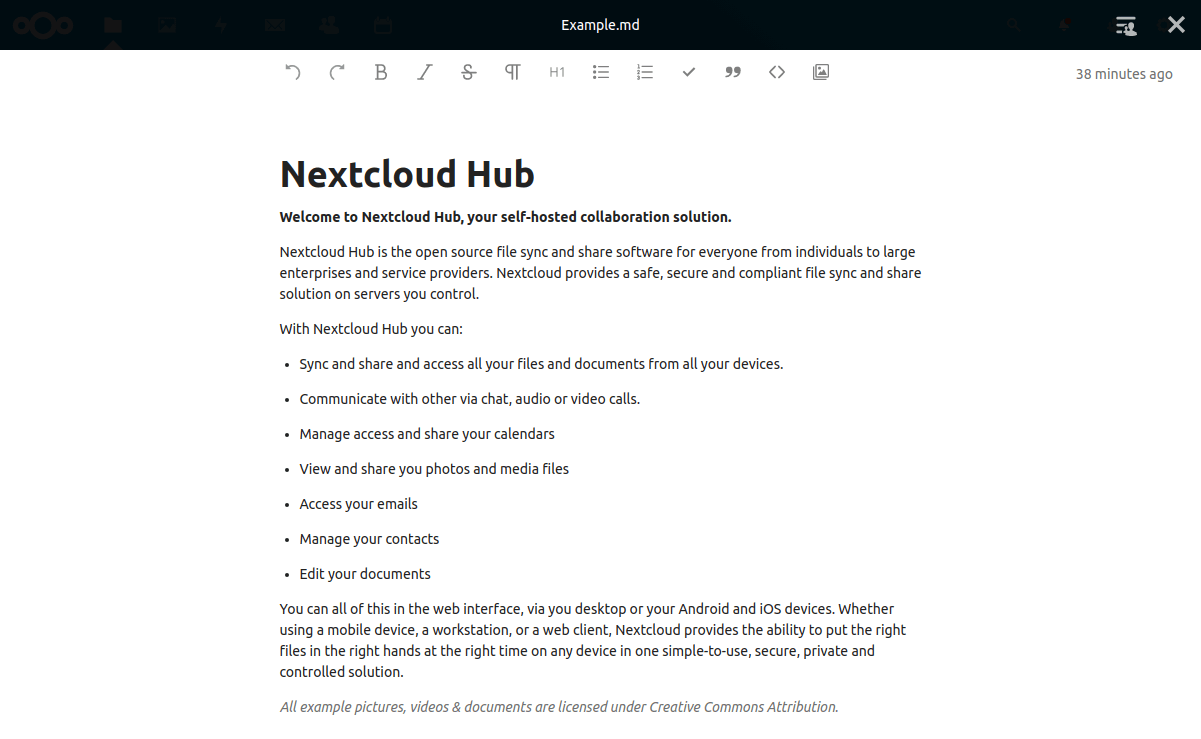
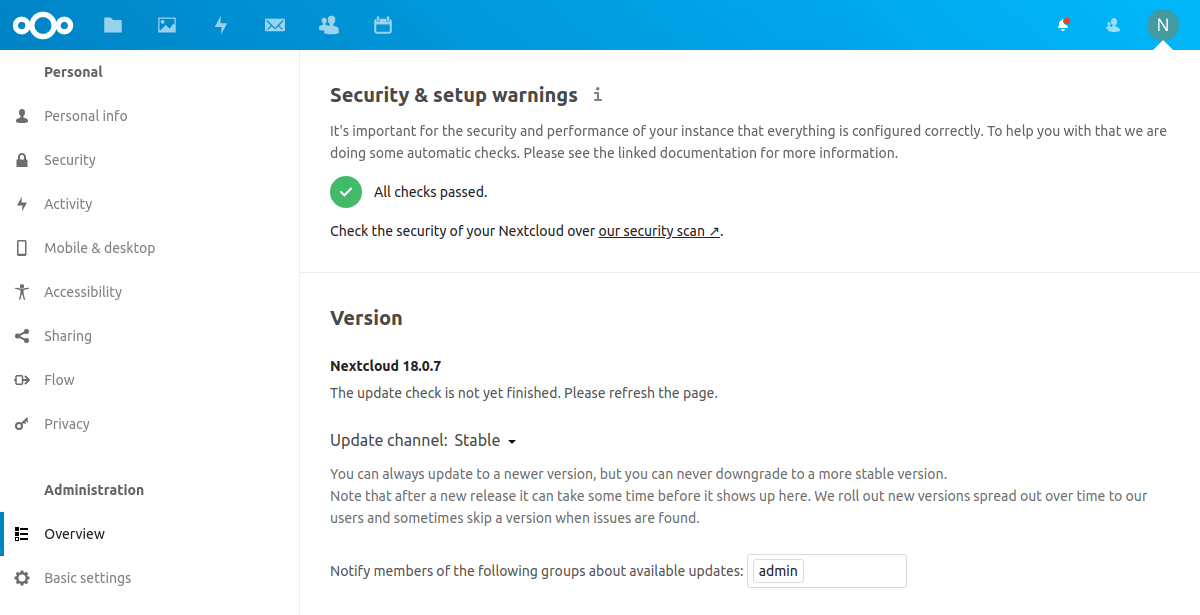
Next, check the server for any configuration warnings and that the software is up to date in the admin overview. If everything has been configured correctly, you should see a green check icon indicating all checks were passed.
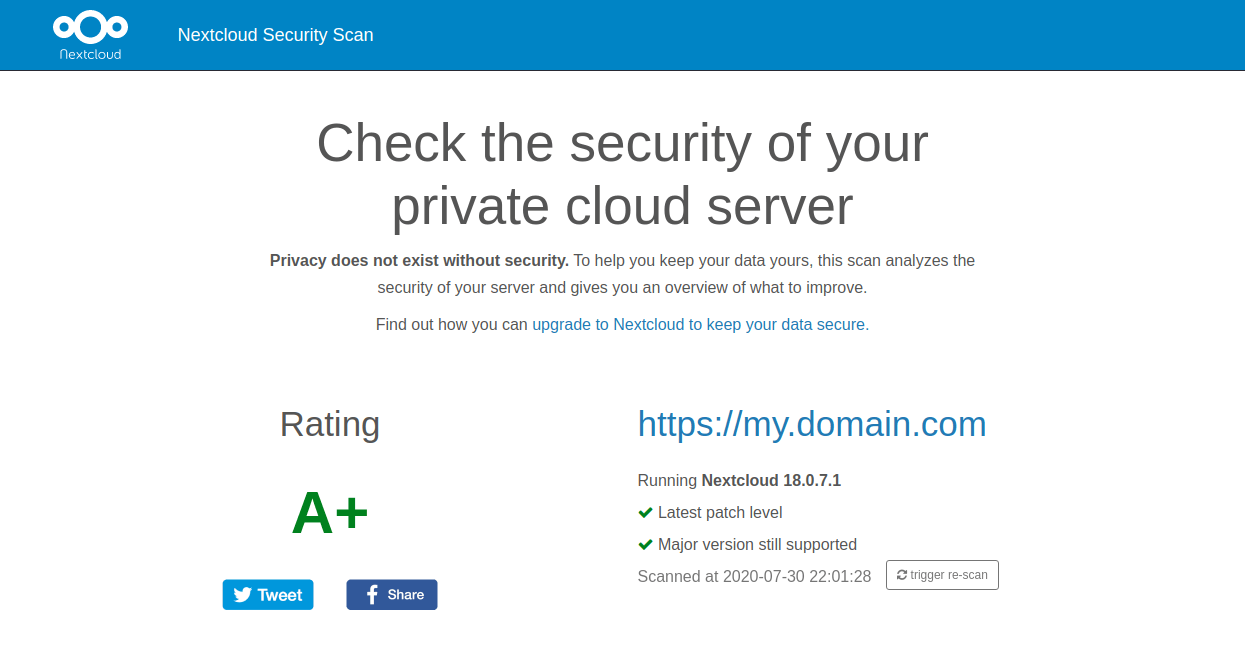
Lastly, you can also use the Nextcloud security scanner to check your Nextcloud installation. Go to https://scan.nextcloud.com/ and enter your Nextcloud domain name in the text field, then click scan.
You should get a full score with A+ results as shown below.
Afterwards, you should also consider to further secure your instance by, for example, installing Fail2Ban.
Augusto
Great tutorial!
But do you have any objection to use a docker-base install?
I usually prefer docker because is simpler to implement.
Joseph McMurry
amazing tutorial .. we were looking for a storage solution to store our website files and this sound just perfect
Janne Ruostemaa
Hi Augusto, thanks for the question. Nextcloud indeed maintains their own Docker image which is a great option for quickly setting up Nextcloud or running it as a microservice. However, deploying Nextcloud with Docker may create some added complexity in further configurations and maintenance related tasks which shouldn’t be a problem if you are already familiar with Docker.
Augusto
Got it, thank you!
Benson Muite
Joseph, thanks. Glad you like it.
Mark
If you remove http2 from the NGINX config uploads are much, much faster.
Janne Ruostemaa
Hi Mark, thanks for the comment. Disabling HTTP2 could increase upload speeds is certainly an option you can set as needed. However, HTTP2 is recommended to be enabled for overall page load speed with multiple requests.
Joao
Thanks for the great tutorial. But i have problem when trying to install nextcloud with php occ command.
Always keep saying password authentication failed, but i’m sure is not, because i test it.
Seems that is a permission problem because if i run the command with user postgres instead of nginx, the password error is gone, and warning about user postgres doesnt have permissions to write into the config folder which seems normal.
Did i miss something ? I’m using Centos 8 last update.
Best regards
Janne Ruostemaa
Hi Joao, thanks for the question. Make sure you are running the command within the /usr/share/nginx/html directory. Also, your postgres user wouldn’t have sudo privileges by following this guide. You should run the command with a user account that has sudo access or with root itself.
John Vincent
ive gone through this several times and wasted several hours getting stuck at the step where we load the web portal part of the setup.
i get NET::ERR_SSL_OBSOLETE_VERSION
im about ready to give up but there isnt a windows server host so i am forced to continue bashing my head a few more times. what am i doing wrong?
tried ip address both http and https
tried host name and domain name on local network
tried domain name on external network,
tried edge, chrome, firefox, and various mobile browsers. it will not load. my brain is crying inside. please help
Janne Ruostemaa
Hi John, thanks for the comment. The error is likely due to TLS 1.0 still being enabled on your web server. You should update the SSL protocols to only allow 1.1 and above. We’ve got some help for how to do this on nginx at our Let’s Encrypt tutorial.
Daniel Cordoba
Outstanding tutorial. Thanks for the time and dedication.
Tailer
Good time.
Thank you for the article.
I set everything up. Everything worked.
But it suddenly stopped. Doesn’t let you into the admin area. Error 504.
Doesn’t connect via dav.
What could be the reason?
Janne Ruostemaa
Hi Tailer, thanks for the comment. The error code 504 indicates a timeout which could be caused by nginx or another service running the web server being down. You should check that nginx, postgresql-12, redis, and php-fpm are all running and restart them if not.
tony
thank you very much.
I got the following error. can you please help?
— The unit nginx.service has entered the ‘failed’ state with result ‘exit-code’.
Feb 04 01:08:40 localhost. localdomain systemd[1]: Failed to start The nginx HTTP and reverse proxy server.
[root@localhost ~]# sudo nginx -t
nginx: [emerg] invalid number of arguments in “ssl_certificate” directive in /etc/nginx/conf.d/nextcloud.conf:18
nginx: configuration file /etc/nginx/nginx.conf test failed
Janne Ruostemaa
Hi Tony, thanks for the comment. Your nginx config check indicates to a likely typo in your nextcloud.conf file on ssl_certificate. Check that the SSL arguments are set correctly, e.g.
Then try restarting nginx again.
Zarandija
Hi.
First of all, thank you for the manual.
After the installation without any problem, when accessing, it is very slow and gives me continuously “504 Gateway Time-out”.
What could be the reason?
Thank you.
504 Gateway Time-out
Janne Ruostemaa
Hi Zarandija, thanks for the question. The time-out could be caused by the server still being in the maintenance mode. Try running the following command to turn it off and then restart nginx:
Temo
Hi,
“Also, make the following data directory.
sudo mkdir /usr/share/nginx/data”
is this Data folder, that will be used as a storage later?
Because I’ve got separate /srv partition to use for it and don’t want to make mistake :)
Janne Ruostemaa
Hi Temo, thanks for the question. If you use the find feature for /usr/share/nginx/data in your browser on the tutorial, you can see that the data directory is used in a couple of places. If you want to use a different location to save your data, make sure to replace the data directory path in each command that requires it.
Rohan
Well why don’t you guys (if possible) integrate Object Storage parallel to Nextcloud so that the storage can be drastically increased using http api and storage would be enough for starting out looking forward if that’s possible.
Like if we get a tutorial to link upcloud storage bucket (i know it’s for static content but nextcloud is a web app and it may use that as static content whatsoever)so theoretically it is possible rest i leave it to you to find if that’s possible as it would be a cost saving scenario for the community as well.
Luiz Danin
How can I use the nextcloud with UpCloud Object Storage? it is possible?
Janne Ruostemaa
Hi Luiz, thanks for the question. Nextcloud supports using object storage as the primary storage solution. Our Object Storage is fully S3 standard compliant so it should be pretty much plug-and-play. Check out the Nextcloud documentation on how to enable object storage.
Janne Ruostemaa
Hi Rohan, thanks for the comment. Nextcloud includes support for using object storage as the primary storage solution. Our Object Storage is fully S3 standard compliant so it should be pretty much plug-and-play but we’ll certainly look into making a tutorial on this as well. In the meanwhile, you can find instructions on how to enable object storage in the Nextcloud documentation.