Improving your website security through encryption, even on the most basic servers, can increase your visitors’ trust in your site and your ability to run it. Setting up encryption on your web host has generally been complicated and expensive, which often deters administrators whose web applications might not depend on user input. Let’s Encrypt aims to change this by simplifying the implementation of encryption on any website. It is an open and free project that allows obtaining and installing certificates through simple, automated commands.
Let’s Encrypt is a new Certificate Authority capable of issuing certificates cross-signed by IdentTrust, which allows their end certificates to be accepted by all major browsers. This guide outlines the steps for installing their certbot client and how to use it to manage certificates on Ubuntu 16.04 or a newer cloud server.
Installing the Certbot client
Let’s Encrypt greatly simplifies server management by automating the obtaining of certificates and configuring web services to use them. The client is fully featured and extensible for the Let’s Encrypt Certificate Authority or any other CA that uses the ACME protocol.
On Ubuntu servers, the client is available in a PPA maintained by the Certbot team. Install the package archive with the following command, confirming that you have the prerequisites.
sudo apt-get install software-properties-common
sudo add-apt-repository universe
sudo add-apt-repository ppa:certbot/certbot
sudo apt-get update
With the new PPA installed and repositories updated, install the Certbot client itself along with the Apache plugin. You will naturally also need Apache itself which is included below as well.
sudo apt-get install certbot python-certbot-apache apache2
Once installed, you can use the next command to see test the client is working correctly.
sudo certbot --help
Once the help command works, you are ready to continue with obtaining and installing certificates.
Obtaining certificates
Let’s Encrypt validates the domain it is installed on, similarly to a traditional CA process, by identifying the server administrator via a public key. The client generates a new key pair when interacting with the Let’s Encrypt servers for the first time and then aims to prove to the CA that the host has control over a particular domain in at least one of the two following ways:
- Provisioning a DNS record under the domain in question
- Provisioning an HTTP resource under a well-known URI on the domain
On top of one of the two challenges, the client also must sign a nonce with its private key to prove it controls that key pair.
To help the Certbot client accomplish these tasks, it supports a number of plugins for obtaining or installing certificates. With Apache2, you can use the dedicated plugin. The plugin automates both obtaining and installing certificates on an Apache web server. To use this plugin on the command line, simply include the flag—-apache.
Begin the process with the next command.
sudo certbot --apache
This command starts an interactive installation script that will ask questions to help you set up the certificate.
- You must enter a contact email on the first installation on any specific host.
- Next, go through the Let’s Encrypt Terms of Service and select Agree if you accept the terms and wish to use the service.
- Then, select whether you want to share your email address with the Electronic Frontier Foundation, a founding partner of the Let’s Encrypt project and the non-profit organization that develops Certbot.
- Enter the domain name hosted on the server you are installing the certificate on. If you have multiple domains on the same server, write them all here separated by a comma.
- Lastly, select whether you wish to use both HTTP and HTTPS or to redirect traffic to use encryption. We recommend using redirection for better security.
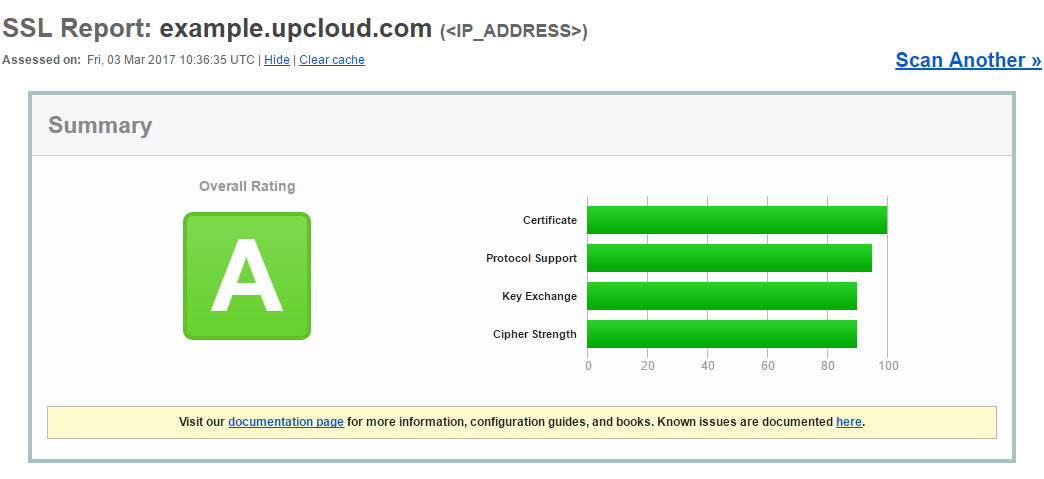
If everything worked correctly you’ll get a message that HTTPS was successfully enabled and a link pointing to SSL Labs test site. Click the SSL Labs link in your terminal to run a test on your web server or use the URL below.
https://www.ssllabs.com/ssltest/analyze.html
Let’s Encrypt has set certain rate limits for issuing certificates to ensure fair usage by as many people as possible. You can check the details and documentation at Let’s Encrypt community site.
If you are having problems using the client, make sure you are trying to register a domain or subdomain that currently resolves to that host. Also, check that you have the administrative privileges to run the commands and that Apache is working correctly.
Renewing certificates
At the end of the certificate installation script output, you will see the certificate’s expiration date which is usually 3 months from the day you installed it. Renewing a certificate is as easy as running a single command.
You can test the renewal process with the following command.
sudo certbot renew --dry-run --agree-tos
If the test succeeded without issues, you can actually renew the certificate by leaving out the additional parameters.
sudo certbot renew
Once the renewal is complete, reload Apache to update the configuration with the next command.
sudo systemctl reload apache2
Your certificate is now again valid for another 3 months.
The client will only request a renewal if the current certificate is about to expire. This can be useful for automating the process by creating a renew script similar to the example below.
sudo nano /etc/cron.daily/certbot-renew
#!/bin/sh
if certbot renew > /var/log/letsencrypt/renew.log 2>&1 ; then
   /etc/init.d/apache2 reload >> /var/log/letsencrypt/renew.log
fi
exit
sudo chmod +x /etc/cron.daily/certbot-renew
The example script runs the renewal while directing the output to a log file, then checks if it was successful, and finally reloads Apache to complete the renewal.
You can automate the script, for example, using Cron job. Open the root user crontab for edit with the command underneath.
sudo crontab -e
Include a line similar to the example below in the crontab file, then save and exit.
01 02,14 * * * /etc/cron.daily/certbot-renew
Let’s Encrypt recommends setting the automated renewal script to run twice a day on a random minute within the hour. The above example runs on 02:01 and 14:01 but you can select any time slot you wish.
Revoking certificates
If you wish to remove a certificate from your server it can be revoked using a subcommand with Let’s Encrypt client. The command below can be used to revoke a particular certificate. Replace the <domain_name> with the domain which certificate you wish to revoke.
certbot revoke --cert-path /etc/letsencrypt/live/<domain_name>/cert.pem
The process does not give a confirmation upon completion, but if you perform it again you will get a message that the certificate has already been revoked.
Enhancing security
The default settings adopted by Let’s Encrypt creates a good starting point for enabling HTTPS but there are additional steps you can take to further enhance security. Let’s Encrypt allows you to improve the site’s security options in a couple of different ways.
Certbot supports optional command line parameters when installing certificates. Alternatively, update the configuration file directly after installing the certificate. Below you can find a few tips on how to improve your site’s SSL security by updating the configuration.
The default SSL options for Apache set by Let’s Encrypt are stored in a config file /etc/letsencrypt/options-ssl-apache.conf that is included in the default Apache SSL config /etc/apache2/sites-available/000-default-le-ssl.conf.
Open the first in an editor and make the updates as suggested underneath.
sudo nano /etc/letsencrypt/options-ssl-apache.conf
Disable old insecure protocols
In the SSL options file, you’ll find that SSLv2 and SSLv3 protocols are already disabled. This is due to the insecurities in these protocols and they should not be used. In addition, TLS v1.0 is also already a legacy protocol and should not be used. However, it is still needed to allow older web browsers to work. Enable it only if absolutely necessary.
SSLProtocol all -SSLv2 -SSLv3 -TLSv1
Enhance cypher suites
The cypher suites enable security between your web server and visitors clients by defining how secure communication takes place. The example configuration below is designed for both RSA and ECDSA keys and works as a great starting point for improved security.
SSLCipherSuite ECDHE-ECDSA-AES128-GCM-SHA256:ECDHE-ECDSA-AES256-GCM-SHA384:
ECDHE-ECDSA-AES128-SHA:ECDHE-ECDSA-AES256-SHA:ECDHE-ECDSA-AES128-SHA256:
ECDHE-ECDSA-AES256-SHA384:ECDHE-RSA-AES128-GCM-SHA256:ECDHE-RSA-AES256-GCM-SHA384:
ECDHE-RSA-AES128-SHA:ECDHE-RSA-AES256-SHA:ECDHE-RSA-AES128-SHA256:
ECDHE-RSA-AES256-SHA384:DHE-RSA-AES128-GCM-SHA256:DHE-RSA-AES256-GCM-SHA384:
DHE-RSA-AES128-SHA:DHE-RSA-AES256-SHA:DHE-RSA-AES128-SHA256:DHE-RSA-AES256-SHA256
By using SSL protocols of SSLv3 or newer, the client tells the web server which cypher suites it supports and the servers chooses one option from that list. The important part of this functionality is that the cyphers on the server are listed in the prefered order from the strongest to the weakest and the cypher order is honoured. Make sure the option shown below is enabled in your Let’s Encrypt configuration file.
SSLHonorCipherOrder on
Disable SSL compression
In 2012, it was shown by the CRIME attack vulnerability that TLS compression cannot be implemented securely. Therefore, it should not be used and the only solution is to disable TLS compression completely. Check that the following is in your configuration file.
SSLCompression off
Enable HTTP Strict Transport Security (HSTS)
The Strict Transport Security safeguards TLS by not allowing any insecure communication with the websites that use it. It was designed to ensure security even in the case of configuration problems and implementation errors. HSTS automatically converting all plaintext links to a secure version. It also disables click-through certificate warnings which are an indicator of an active MITM attack and prevents users from circumventing the warning.
Enable HSTS in the /etc/letsencrypt/options-ssl-apache.conf configuration file by adding the option as shown below.
SSLOptions +StrictRequire
Then to further improve on this, enable the options to include subdomains and to preload in the Apache default SSL configuration file.
sudo nano /etc/apache2/sites-available/000-default-le-ssl.conf
Find the HSTS settings towards the end of the file and update it as shown below.
Header always set Strict-Transport-Security "max-age=31536000; includeSubDomains; preload"
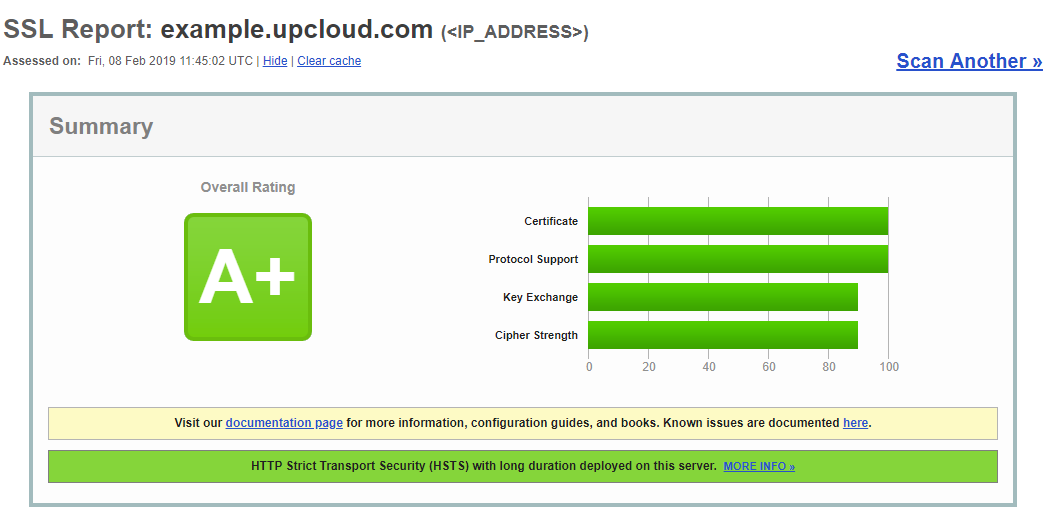
With the security enhancement done, reload the Apache configuration.
sudo systemctl reload apache2
Then re-test the SSL quality by clicking the Clear cache link at the results page.
Striking a balance
Perhaps contrary to common sense, with web servers, there is such a thing as too much security. The cost of the cryptographic handshake operations used to establish secure connections is highly influenced by the size of the private key. While using a too short key is obviously insecure, using a key that is too long can also cause problems due to slow operations.
By best practices, the ephemeral key exchange should use 2048bit RSA keys and 256bit for ECDHE. Using keys strong than these is considered a waste of CPU cycles with little effect on security. You can read more about SSL and TLS deployment best practices at SSLLabs.
Other plugins
In most cases simply installing and renewing your certificates as instructed above is enough, but the Let’s Encrypt client also supports some additional plugins for managing your certificates. This guide focuses on installing the certificate using the Apache plugin, though Let’s Encrypt also works just as well with other web servers software. Check out our other guide for how to install Let’s Encrypt on nginx. You can also find out about other supported options in the documentation for Let’s Encrypt.
Discussion