A virtual private network or VPN for short is a convenient way of setting up a secure connection to another networked host. OpenVPN Access Server is open-source software that implements VPN techniques through custom security protocols. VPN connections can be essential for development environments, allow secure browsing over public WiFi, or provide an anchor point for devices for which a static IP address might not be possible.
OpenVPN clients can be installed on Windows, Mac and Linux as well as Android and iOS while the OpenVPN Access Server (AS) is available for most Linux distributions. This introductory guide to OpenVPN goes through the steps for setting up and configuring your personal Access Server, and how to connect to it.
Installing OpenVPN Access Server
OpenVPN AS supports multiple configurations such as secure remote access to an internal network and private cloud network resources with fine-grained access control. The OpenVPN AS setup consists of three main components:
- The Access Server is the underlying component that does all of the background work like routing, tunnelling and encryption.
- Admin Web Interface makes server management simple through an easy-to-use control panel.
- Connect client, which can be downloaded directly from the Access Server, allows login through the AS web portal.
The server software is available for a variety of Linux distributions and versions. You can check out the OpenVPN Access Server Software Packages page or click the links below to find the correct software for your system.


Getting the Access Server installed is simple, download the appropriate package for your system and then use a package manager to install it. The installation process will set up a default configuration, which allows a quick and easy way to get a server running.
Once the installation is complete, you will see an output similar to the example below. You can then continue ahead with configuring your new VPN server.
The Access Server has been successfully installed in /usr/local/openvpn_as
Configuration log file has been written to /usr/local/openvpn_as/init.log
Please enter "passwd openvpn" to set the initial
administrative password, then login as "openvpn" to continue
configuration here: https://public_ip:943/admin
To reconfigure manually, use the /usr/local/openvpn_as/bin/ovpn-init tool.
Configuring the Access Server
As mentioned towards the end of the installation output, you will need to set a password for the default user to log into the AS. Set a new password for the user openvpn with the command underneath. Make sure the password is secure as the control panel is accessible from the public internet by default.
sudo passwd openvpn
With the password set, open the OpenVPN Access Server admin panel at the address specified by the installation output.
https://public_ip:943/admin
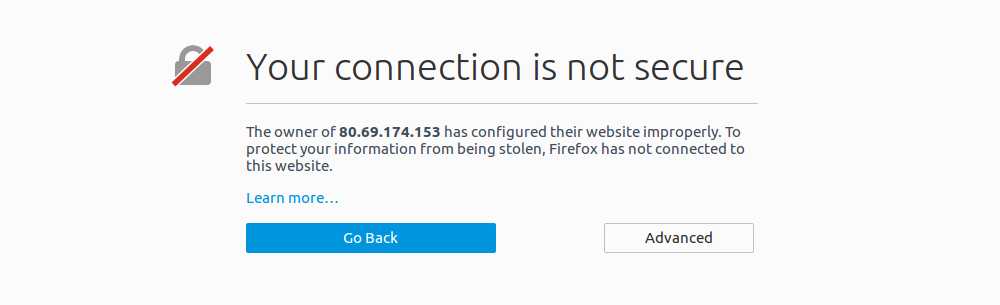
When opening the page for the first time, you will see a warning that your connection is not secure. This notice is normal as your web browser does not trust the OpenVPN self-signed SSL certificate by default. You will need to bypass the warning or add an exception on your web browser to continue to the login screen.
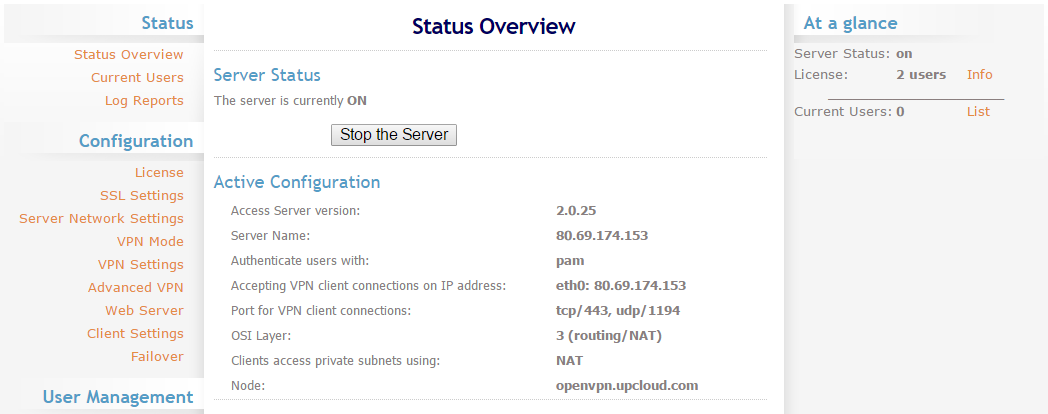
Log in with the username openvpn and the password you assigned. Once in, you will see the OpenVPN status page similar to the image below.
On the Status Overview, you can find a summary of the server settings and a start/stop button to turn the VPN server on or off. At the right side panel, is an At-a-glance server and connections status. The OpenVPN Access Server allows two concurrent users for free.
User Management
Once logged in, open the User Permissions tab under User Management. OpenVPN AS uses the same account credentials as the Linux server it is hosted on, this allows access control based on the user and group permissions defined in the control panel.
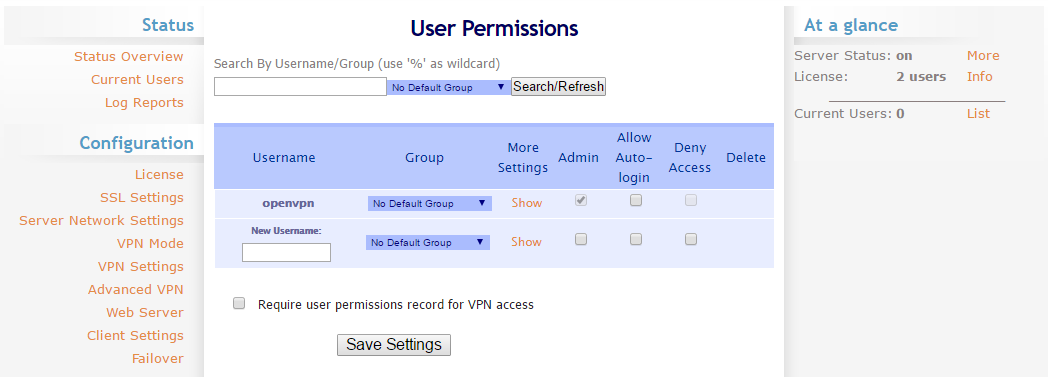
To make connecting and logging in easier, you should add your username to the User Permissions table.
- Type your username in the New Username field, select the admin permissions and auto-login if you wish, then press the Save Settings button.
- After making changes to the OpenVPN AS, restart the server to apply the new configuration by pressing the Update Running Server button.
- You can then log out from the control panel with the link at the top right corner, and back in again with your username and password.
For improved security, you might wish to lock the default user account; this can be done with the passwd terminal command shown below using the -l parameter. The same command with parameter -u will unlock the account later if needed.
passwd openvpn -l
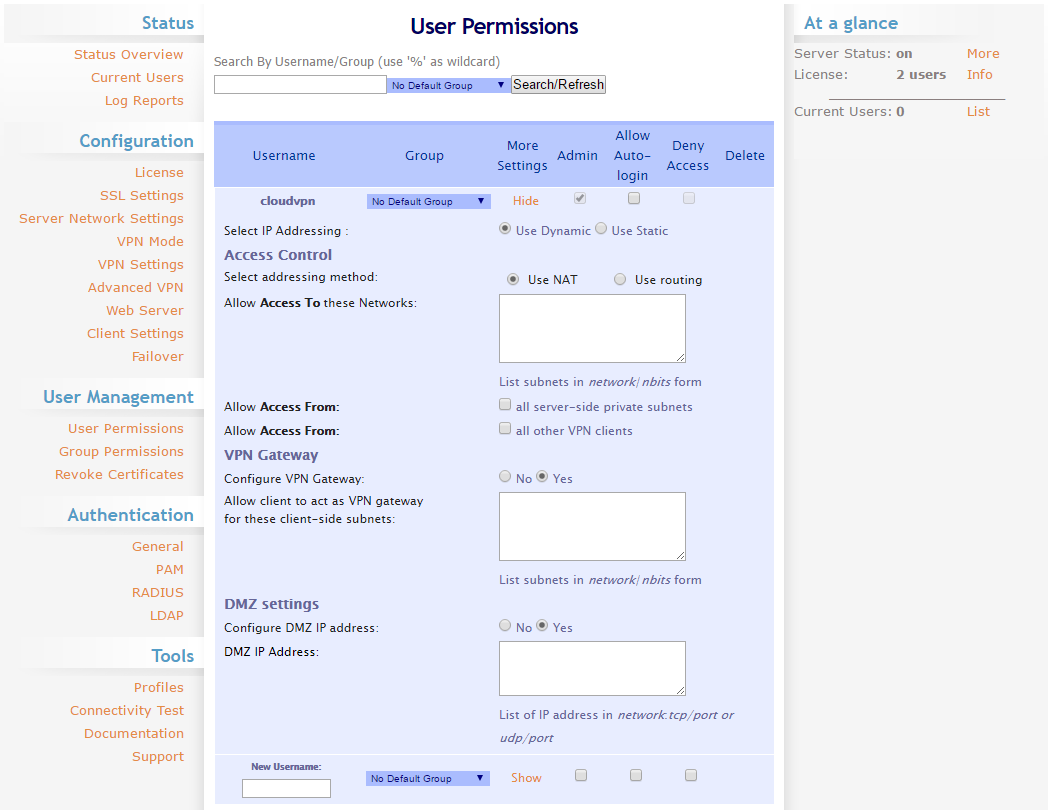
You can also control user-specific IP address settings under User Permissions by clicking the Show -link to open the advanced options. These settings allow you to assign a static IP address to each user, choose between NAT and routing, define the networks the users should have access to, configure a VPN Gateway, or set up DMZ addresses that allow connections to the client through the public IP of the VPN server.
If you are possibly going to have more than a couple of users connecting to the VPN, you might wish to define the permissions on the group level. Create a user group on your cloud server and add the same group name to the Group Permissions list, you can then give access to users directly from your server terminal, adding them to the authorised user group, without needing to add every user manually in the web admin panel.
Server Network Settings
The IP settings can be configured in the Server Network Settings under the Configurations -menu. By default, the AS listens for incoming connections on the first network interface, but if you have multiple public IP addresses, it is possible to select between the interfaces or to listen to all of them.
In the VPN Server settings, you will find the hostname, IP addresses and protocols, as well as the port numbers all easily configured straight from the control panel.
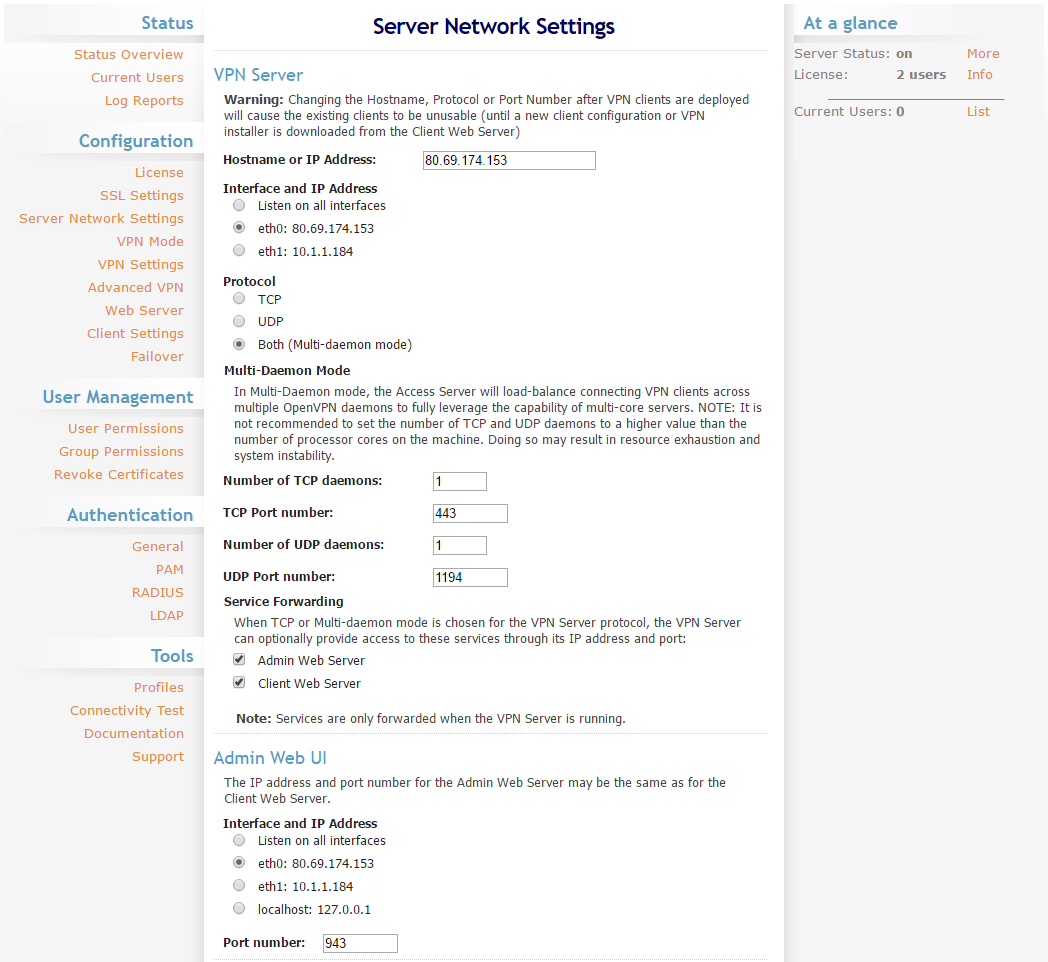
If you have a valid domain name configured for your server, you can set the hostname to the Hostname or IP Address -field to allow the AS to validate the configuration in the Web Server -settings. The hostname also sets the server address in the AS-generated profiles. Keep it set to the IP address the server is listening to if you do not have a DNS record pointing to the server’s IP.
Next are the IP address settings for the Admin Web control panel and port selection. Be careful when making changes to the admin IPs not to lock yourself out from the admin panel by changing the IP to something unreachable. In such a case, it is possible to reconfigure the AS manually at your cloud server side using the /usr/local/openvpn_as/bin/ovpn-init tool as mentioned in the installation output.
Advanced VPN
With the basic configuration settings, go to the Advanced VPN settings and scroll down to the bottom of the page. Here you will find the Additional OpenVPN Config Directives that allow you to specify any additional server and client options.
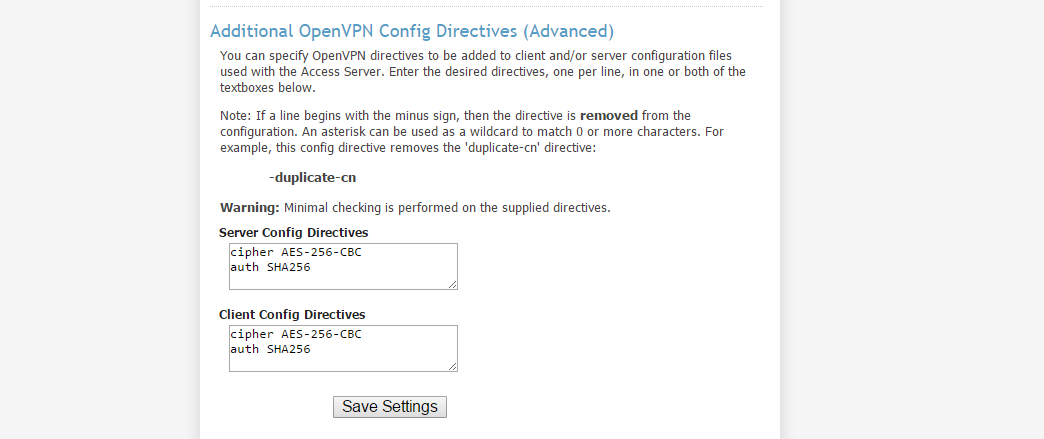
To improve the server-client encryption, include the following cypher and authentication options in both directives as shown above and then click the Save Settings button.
cipher AES-256-CBC
auth SHA256
Remember to reload the server with the prompt at the top of the page as well.
Connecting to the Access Server
For Mac and Windows users, the easiest way to set up a VPN client is to use OpenVPN Connect. It can be installed directly from your Access Server and allows connecting to the VPN by logging in through the web portal. Linux users should use the OpenVPN client available through their system package manager.
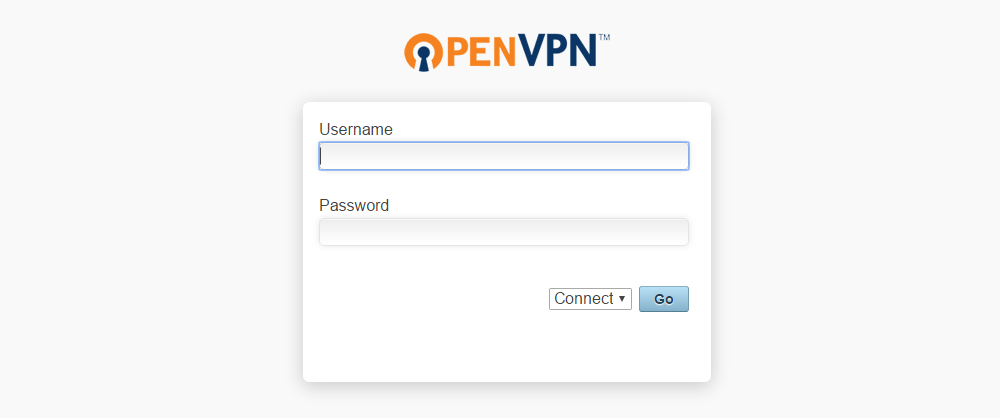
Open the web connection login page on your browser. By default, the connection page can be found at port 943 of your cloud server. You can use either the public IP address or domain name if you have one configured. Note that the connection needs to use HTTPS.
https://server_ip_or_domain:943
Opening the address will show a warning that your connection is not trusted. Acknowledge the warning and proceed to sign in with your username and password.
Mac and Windows
After logging in, click the link to continue. It will start a download for the Connect -client.
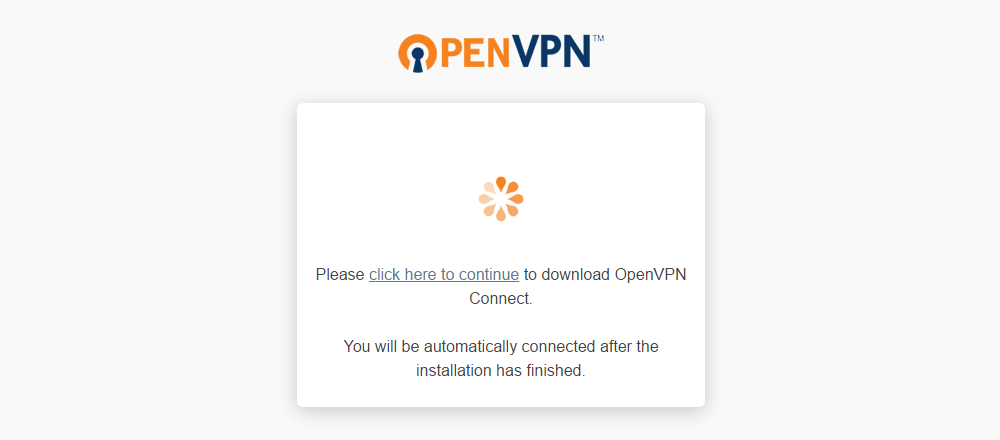
Install the client software, while keeping the OpenVPN connection page open. Follow the instructions in the installation wizard, and allow the application to connect to an untrusted SSL certificate when asked.
When the installation is complete, the client will automatically connect to the VPN and the login page will update to show the connection details. You can close the browser tab without interrupting the VPN, but it can be helpful for disconnecting from the Access Server.

Linux
When logged in, you will be greeted by a list of connection options and a profile download shortcut, click the Yourself (user-locked profile) link to download your OpenVPN profile.
Save the file anywhere you can find it later, e.g. in your ~/ home directory.
OpenVPN client for most distributions can be installed from the standard repositories.
# Debian and Ubuntu
sudo apt-get install openvpn
# CentOS
sudo yum install openvpn
That is all that is needed. You can then connect to the Access Server with the command below where the ~/client.ovpn is your profile saved in your home directory. Enter your username and password when prompted.
sudo openvpn --config ~/client.ovpn
When the VPN is up and running, you will see an output message like the one below, a timestamp and a confirmation that the connection was successful.
Tue Apr 26 04:17:24 2016 Initialization Sequence Completed
Keep the terminal open while you wish to remain connected to the OpenVPN server. You can disconnect at any time by stopping the client with Ctrl+c or by closing the terminal window.
Testing your connection
With the VPN connection up and running, you should check that everything is working as expected. First, make sure you have access to the internet. If that works, you should test where you are connecting. Below are some easy ways to verify that your connection is being routed through the OpenVPN Access Server.
Your IP to the internet
When connected to a VPN, your network traffic first goes through the VPN server before heading to its real destination. For anyone else on the internet, it seems that your requests originate from your AS. Many online services can show the source address of your connection. One such is a Google search for “my IP”, you can use the link below for a shortcut.
https://www.google.com/search?q=my+ip
If the IP address displayed above the search results matches that of your server’s public IP address, the VPN is routing correctly.
Using the private IP addresses
UpCloud servers have a private IP address only accessible to the cloud servers on your account. While connected through a VPN, your client is essentially linked to the server’s private network, but only on that host. As such, you should be able to reach the VPN server’s private IP address, which is listed in your UpCloud Control Panel under the Network menu and Private Network tab.
You can test the connections for example with the ping command in your client computer’s terminal or command prompt.
ping private_ip
If you get a reply, your OpenVPN Access Server is working and you can use the private IP address on your VPN server for other connections.
Note that CentOS and other Red Hat variants might block ICMP requests at their firewall by default, in such case, you can test the routing with SSH instead.
Conclusions
Having your personal VPN server can provide many advantages from improved security and privacy to the convenience of a fixed IP or a local area network between computers on different continents. OpenVPN Access Server is capable of much more than could be explained in a simple start-up guide. If you wish to learn more about the various configuration options, check out their Sysadmin Guide to OpenVPN AS.
Note that when using a VPN to connect to your cloud server, the VPN does not provide anonymity and any network traffic must comply with UpCloud Terms of Service and Acceptable Use Policy.
Discussion