New - NVIDIA B200 & B300 Dedicated GPU Clusters | Explore GPU clusters
Deploy a Production App on Coolify: From Git Push to Live with SSL and Backups
-
About
- Type
- Tutorial
- Categories
- BackupsDockerIntegrations
Posted on 13 November 2026
Running your own deployment platform is a trade. Heroku and Render charge a premium for work you never see: renewing certificates, taking backups, keeping the database off the public internet. Self-hosting hands all of that back to you, and whether the trade pays off depends on how much of it you get right on day one.
Coolify handles the parts that automate cleanly, so you get git-push deploys, automatic TLS, and managed databases on a server you control. This walkthrough takes you through the full Coolify setup for a production application. You harden the server, deploy a Node app from a Git push, attach Postgres, send nightly backups to UpCloud Object Storage, and restore one of them before calling the job done.
Everything runs on one UpCloud Cloud Server with Ubuntu 26.04 LTS, 4 GB of RAM, and 2 vCPUs. That is about $18 a month, plus a few dollars for the storage bucket.
You need:
- A domain you can add DNS records for
- A Git repository (GitHub, GitLab, or Bitbucket) containing a deployable web app
- An UpCloud account
- Basic SSH understanding, including generating a key pair and connecting to a remote host
Step 1: Provision and prepare the server
Deploy a Cloud Server running Ubuntu 26.04 LTS in the region closest to your users. Coolify’s own footprint is roughly 1 GB RAM idle, and a Node app with a small Postgres instance alongside it pushes total usage to somewhere between 1.5 and 2 GB under light traffic.
A 4 GB / 2 vCPU instance gives you enough headroom for build spikes and unexpected memory pressure without paying for capacity you never use. The memory pressure comes from builds, so size for the peak rather than the steady state.
After the server boots, log in as root and create a non-root user in the docker group. The docker group will be created by the Coolify install script in step 2, so create it manually first so the usermod call works:
adduser deploy
groupadd -f docker
usermod -aG sudo,docker deploy
Copy your SSH key across, then disable root login and password authentication:
rsync --archive --chown=deploy:deploy ~/.ssh /home/deploy
printf 'PermitRootLogin prohibit-password\nPasswordAuthentication no\nPubkeyAuthentication yes\n' \
> /etc/ssh/sshd_config.d/99-hardening.conf
systemctl restart ssh
sshd -T | grep -E 'permitrootlogin|passwordauthentication|pubkeyauthentication'
Two details here decide whether the rest of the guide works.
The drop-in file is what makes the change stick. Ubuntu’s main config pulls in /etc/ssh/sshd_config.d/*.conf before its own settings, the cloud image ships drop-ins there that already set these directives, and sshd keeps the first value it obtains for each keyword. Editing /etc/ssh/sshd_config with sed exits cleanly and changes nothing, which leaves you believing the server is locked down while password logins still work. The sshd -T call prints the resolved configuration after all includes, so it is the only honest confirmation.
The prohibit-password value is deliberate, and setting it to no breaks Coolify. Coolify manages this host by opening an SSH connection to [email protected] with a key its installer generates in step 2, so refusing root login entirely stops Coolify from reaching the machine it runs on. Server validation then fails, the proxy never starts, and nothing listens on 80 or 443. prohibit-password accepts that key and still refuses every password login, which is the security property worth having. Coolify’s OpenSSH guide documents the same requirement.
Coolify does offer a non-root path for servers you add later, but it’s worth knowing what it actually buys you: the setup grants the account unrestricted, passwordless sudo, root access through a different door, not less of it. Coolify’s own docs mark it experimental, and the installer doesn’t offer it for the server you’re setting up here; it configures root access for this one automatically.
Configure the host firewall to accept only the ports you actually use:
ufw default deny incoming
ufw default allow outgoing
ufw allow 22/tcp
ufw allow 80/tcp
ufw allow 443/tcp
ufw enable
That covers host processes, which on this box means SSH and anything else you install outside a container.
It does not cover Coolify. When Docker publishes a container port, it writes its own DNAT rules into the nat table and its own accept rules into the DOCKER chain, which hangs off FORWARD. Those packets reach the container by forwarding and never touch the INPUT chain where ufw keeps its rules, so a ufw rule naming a published port has no effect. Coolify publishes three: 8000 for the dashboard, 6001 for the WebSocket that streams live deployment logs and status, and 6002 for the browser terminal. All three answer from the internet the moment the install finishes, whatever ufw reports.
You need them reachable for first-run setup in step 2 and closed immediately afterwards. The most common mistake in Coolify writeups is leaving them open once the reverse proxy is serving the dashboard, because anyone who finds the server IP can still hit the raw login screen on 8000 while the domain works normally. Step 3 closes them with the one firewall Docker cannot route around.
On smaller instances (2 GB RAM or below), add swap. Nixpacks builds and Docker layer construction temporarily balloon memory usage, and running out of RAM during a build kills the container in awkward ways that surface as unclear error messages later:
fallocate -l 2G /swapfile
chmod 600 /swapfile
mkswap /swapfile
swapon /swapfile
echo '/swapfile none swap sw 0 0' >> /etc/fstab
mount -a
Step 2: Install Coolify and complete first-run setup
Coolify installs with a single shell script. Run it as root on the fresh server:
curl -fsSL https://cdn.coollabs.io/coolify/install.sh | bashThe script installs Docker, creates the coolify Docker network, and pulls four containers: the Coolify application itself, coolify-db for its Postgres backing store, coolify-redis, and coolify-realtime, which is the WebSocket service behind port 6001.
The Traefik proxy arrives separately. Coolify registers the host with Traefik selected as its proxy and the status recorded as exited, so docker ps shows those four containers after the install and nothing listening on 80 or 443. The coolify-proxy container appears later, the first time Coolify’s scheduled server check finds a reachable server with no proxy running, and it starts one. This matters because that check only runs against a server Coolify can open an SSH connection to. Refuse root login on the host, and the check fails, the proxy never starts, and every certificate in step 3 fails for a reason that looks like DNS.
Once the script finishes, the dashboard is reachable at http://YOUR_SERVER_IP:8000. Open it and create the first admin account within the next few minutes. The registration form on a fresh Coolify install has no authentication in front of it, so leaving the box running with port 8000 exposed and walking away for the afternoon lets the first person to scan the IP take over the instance.
Coolify registers the current host automatically as a server named localhost. You do not need to add another server for this guide.
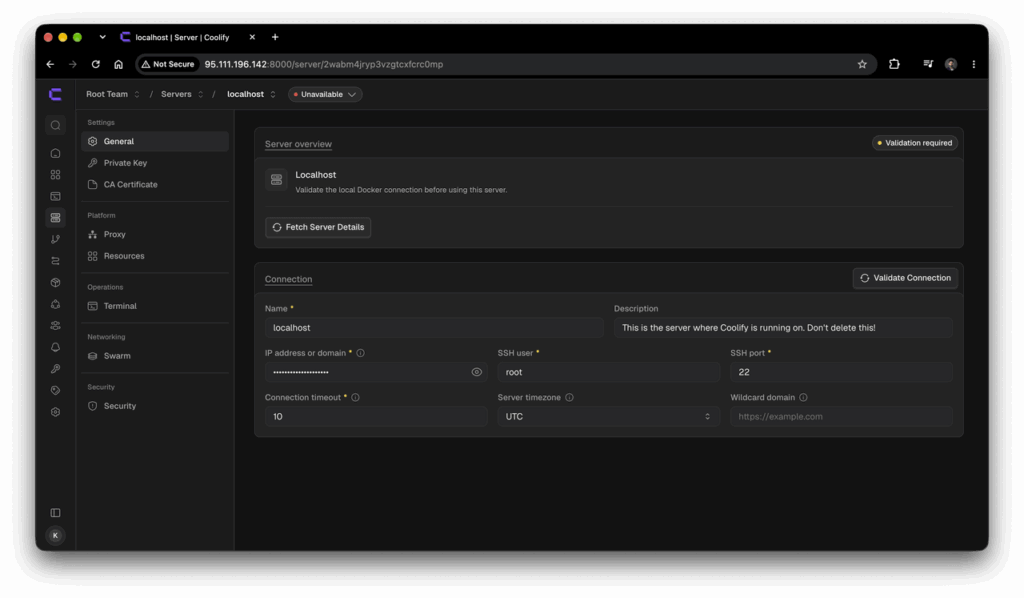
Both the Coolify control plane and your application workloads will run on this single box. That means one server failure takes out both the app and the tooling you use to redeploy it, which is the setup for the honest part of step 8.
Step 3: Point a domain at the instance and secure the dashboard
Add two DNS A records at your registrar:
coolify.example.compointing at your server IP for the dashboardapp.example.compointing at the same IP for the application
Both hostnames share one IP because Traefik uses the Host header on incoming HTTPS requests to decide which service to route to. DNS propagation usually completes within a few minutes, though certificate issuance can wait up to an hour if your nameservers are slow to update.
Inside the Coolify dashboard, go to Settings and set the Instance URL to https://coolify.example.com. Save:
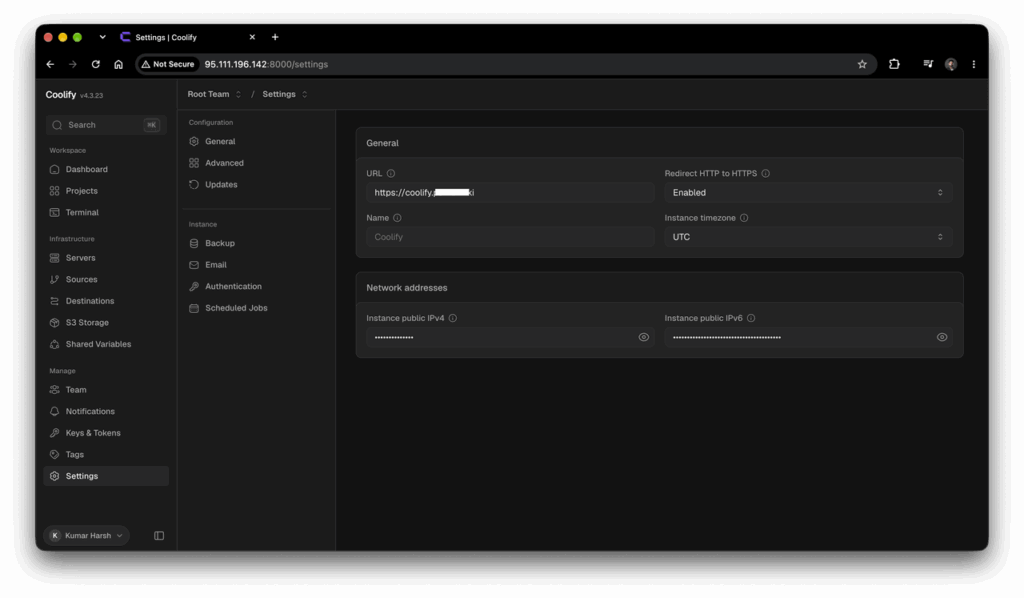
Traefik picks up the change, requests a Let’s Encrypt certificate for the dashboard hostname, and starts serving the UI over HTTPS at the new domain.
Next, confirm the dashboard answers at https://coolify.example.com with a valid certificate, then close ports 8000, 6001, and 6002. Traefik carries the dashboard, its WebSocket traffic, and the terminal over 443 once the instance URL is set, so nothing needs the raw ports anymore.
You can close the ports with the UpCloud firewall, which is configured per server in the control panel under the server’s Firewall tab. It filters at the network layer in front of the server’s network interface, so it applies before a packet reaches Docker’s rules and closes what ufw cannot. Permit 22, 80, and 443, deny the rest, and note that the public interface is stateless, so return traffic needs to be allowed explicitly. UpCloud’s documentation covers the rule syntax.
Run the following command from a local machine to verify access::
curl -m 5 -I http://YOUR_SERVER_IP:8000Running that on the server itself proves nothing, because traffic from a host to its own address takes a different path through the kernel and skips the filtering you just configured. From outside, it should time out. Then open the dashboard on its domain and start any deployment, confirming the log still streams live, which tells you the WebSocket is going through the proxy correctly.
Setting the instance URL before deploying an application saves you from reissuing certificates and editing configuration twice. Coolify caches the dashboard URL in the initial admin account, several database records, and Traefik’s live configuration. Changing it after apps are running means updating deployment targets, cleaning up stale certificates in Traefik’s storage, and confirming that no webhooks or callback URLs still point at the old address.
Step 4: Connect the Git repository
Coolify supports two ways to authenticate against GitHub: a GitHub App or a deploy key. You should use the GitHub App for anything you plan to keep running. It handles webhooks, commit statuses, and multi-repo access from a single connection, and revoking access from the GitHub side actually revokes it. A deploy key covers a single repo, needs manual webhook wiring, and leaves an SSH key sitting on the server that you have to remember to rotate.
In the Coolify dashboard, go to Sources, add a GitHub App:
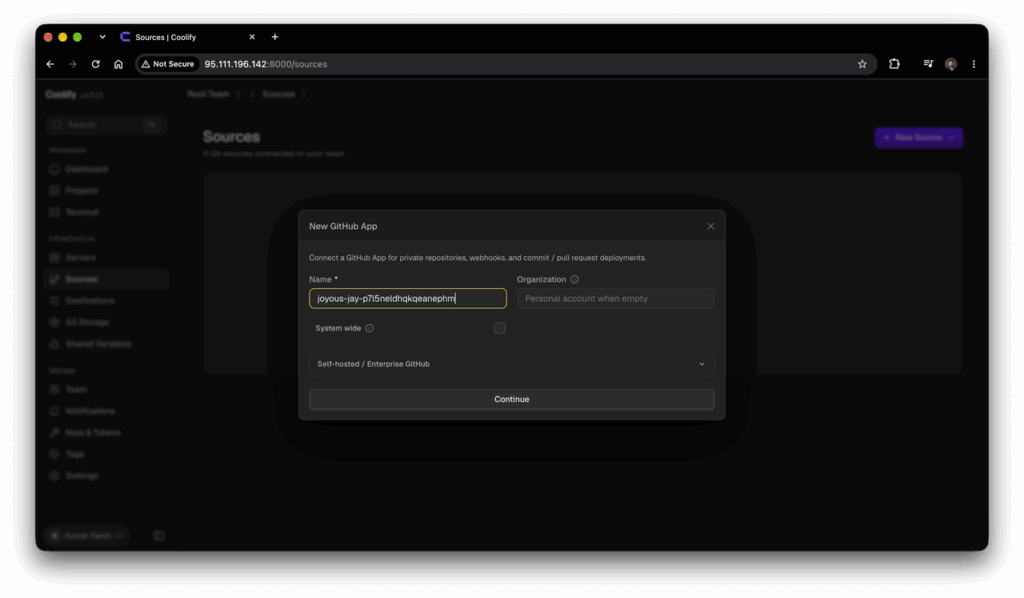
Watch the webhook endpoint on this form. Coolify offers a dropdown of addresses it can register with GitHub; it lists your server’s raw IP first, and it selects that by default even when the Instance URL is already set. Choose the domain from step 3. An app created against the IP points every webhook at a port you closed, and correcting it later means editing the URL by hand in GitHub’s app settings.
Follow the redirect to install it on your account and then on the target repository:
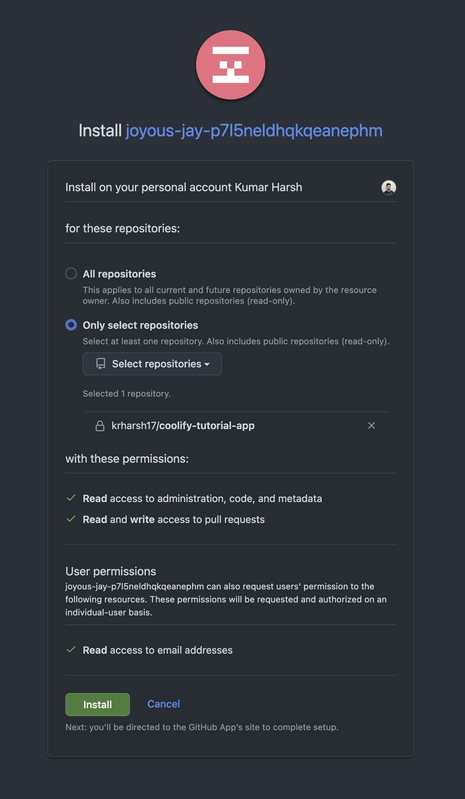
Once installed, the repo appears in the source dropdown when you create a new application:
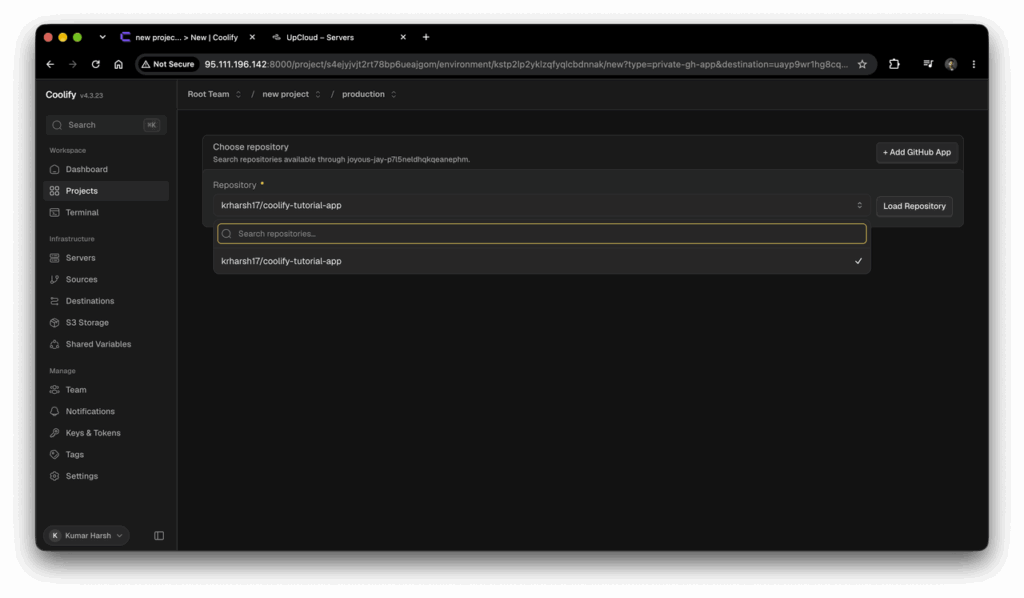
Seeing the repository there is all you need from this step. Coolify also configured a webhook on it during installation, and there is nothing for that webhook to trigger yet, since no application exists. Step 5 tests it once there is something to build.
Step 5: First deployment
In the dashboard, go to Projects, create a new project, and add an Application resource inside it. Point it at the GitHub App source from Step 4, pick the repository, and select a build pack:
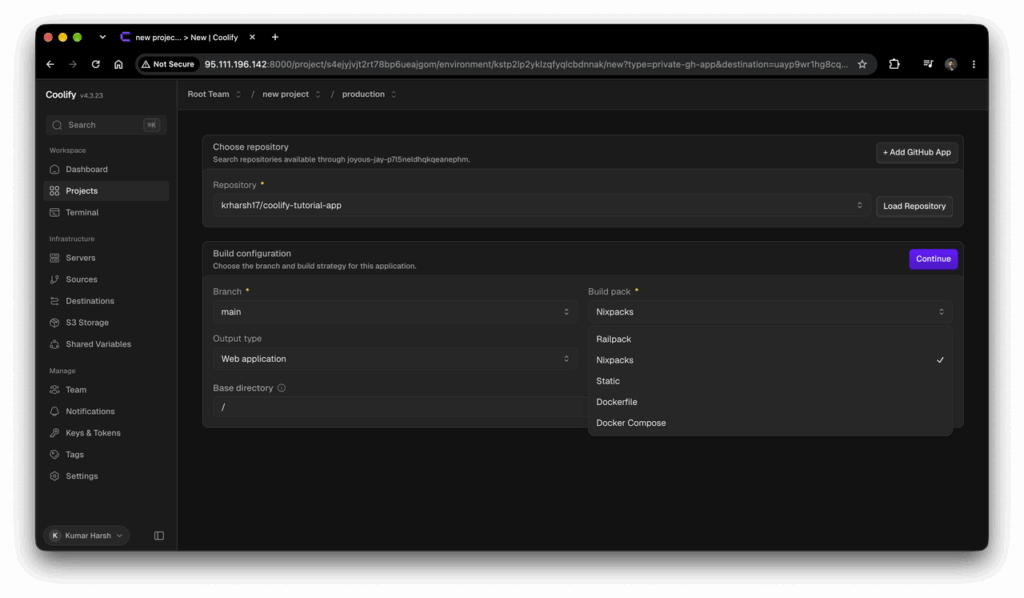
Coolify offers five build pack options. Three of them cover almost every case:
- Nixpacks detects the language and framework from your repo and builds a container without needing a Dockerfile. It works well for standard Node, Python, Go, and Ruby projects that follow common conventions.
- Dockerfile uses the Dockerfile in your repo. Choose this when your build steps are non-standard, when you need a specific base image, or when your team already maintains Dockerfiles for local development.
- Docker Compose runs a multi-service compose file. Reserve this for cases where the application actually needs multiple coordinated services beyond a single web process, and note that compose deployments give up the rolling update behaviour described below.
The remaining two are narrower. Static serves a repo that already contains finished website files, and Railpack is Railway’s newer detection system, still marked beta.
For a Node app with a standard package.json, Nixpacks handles the build without configuration.
Pick your production branch deliberately. Pointing production at main and letting everyone push directly means every commit is a deployment, which works for small teams with strong local testing habits and causes outages for everyone else. A safer pattern is to deploy from a production branch that receives commits through merge or fast-forward from main after checks pass.
Set the port your application listens on inside the container. This is where first deployments usually go wrong. Coolify’s proxy needs to know which port to forward traffic to, and it does not autodetect. If your Node app calls app.listen(3000), set the exposed port to 3000. Setting the wrong port produces a healthy container that Traefik cannot reach, which shows up as a 502 in the browser and a passing container in the dashboard.
Configure the build and start commands if Nixpacks needs a hint:
- Build command:
npm run build - Start command:
npm start
Once the deployment is created, make sure to add a health check pointing at a lightweight endpoint like /healthz or /. A passing health check is what enables Coolify’s rolling updates, where the new container starts alongside the old one and the old one stops only once the replacement reports healthy.
To do that, navigate to Healthcheck > Configuration from the left pane. On the health check page, under HTTP request, enter /healthz under Path:
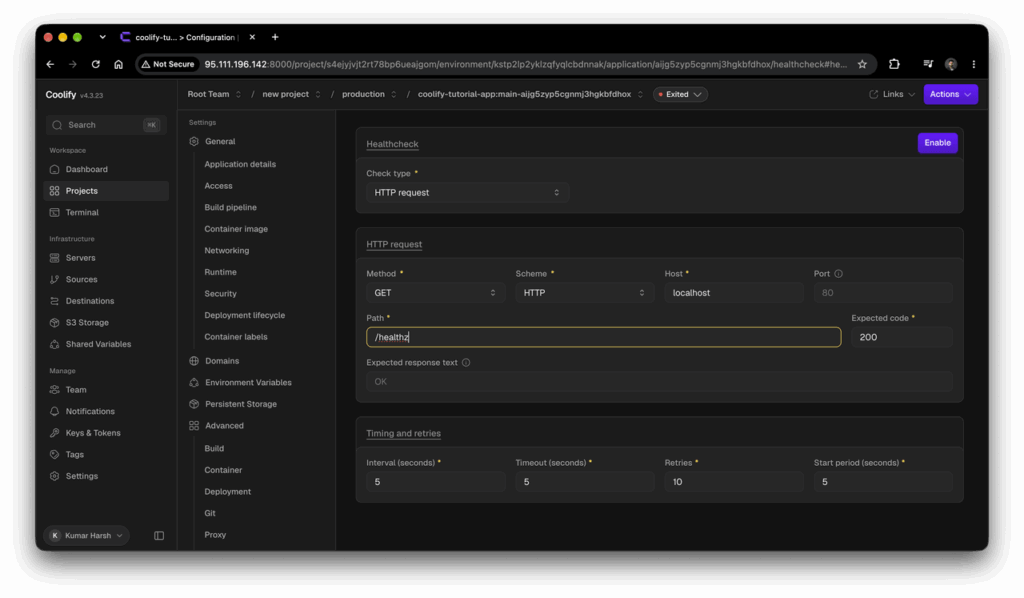
And click Enable to start it. Finally, click Actions > Deploy to start the first deployment.
If you need, you can add environment variables under the Environment Variables tab. Coolify encrypts the values at rest in its own database. Each entry carries independent Build Variable and Runtime Variable flags, and a new variable has both enabled by default, so turning off the ones you do not need is an active step.
Also, build variables are passed to docker build as --build-arg, which records them in the image metadata where anyone with the image can read them back. Use them for values that are public anyway, like an API URL a frontend framework bakes in at compile time, and disable the Build Variable flag on anything sensitive so it stays runtime-only. When a secret genuinely has to be present during the build, Coolify has a Use Docker Build Secrets option that mounts it through BuildKit so it leaves no trace in the final image.
Once the application deploys successfully, give it its domain. Navigate to General > Access from the left pane. Under Public access, Coolify will have generated an sslip.io URL already. Click Manage Domains to replace it:
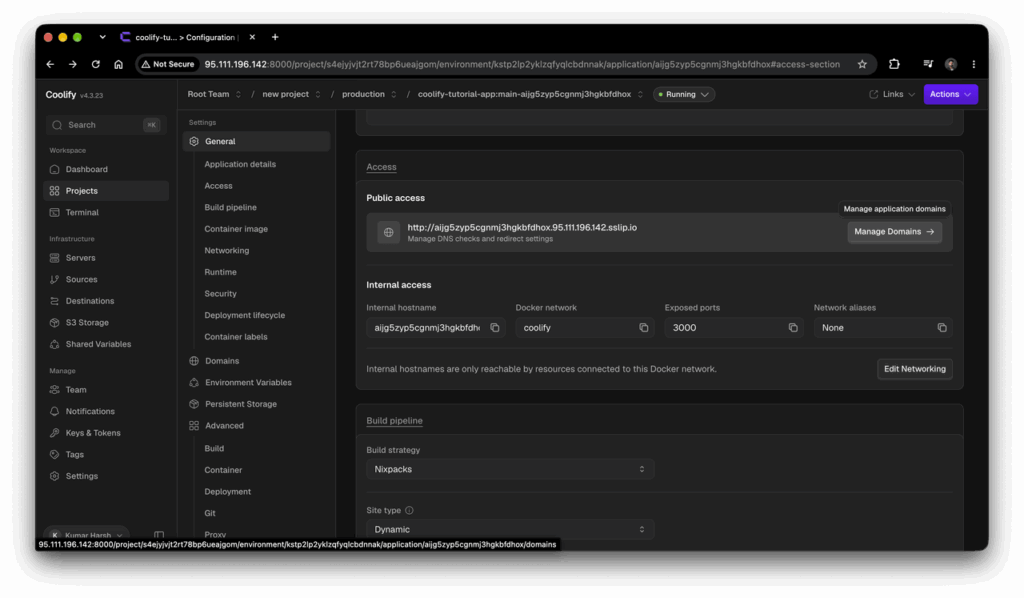
Enter the domain with its scheme:
https://app.example.com
The scheme is doing real work. Coolify parses this value as a URL, and https:// is what tells Traefik to request a certificate and serve the application on 443. A bare hostname or an http:// prefix saves without complaint and produces a router with no TLS.
Save the domain, then redeploy.
Once the deployment finishes, https://app.example.com serves your application with a valid Let’s Encrypt certificate.
Changing the domain later always needs a redeploy. Coolify writes Traefik’s routing as Docker labels when it creates the container, so saving a new domain updates the database while the running container keeps the labels it started with. The symptom is a plain-text 404 page not found from Traefik on the new hostname, served under a certificate whose issuer reads TRAEFIK DEFAULT CERT, while the old address still works. Confirm which certificate you actually got:
echo | openssl s_client -connect app.example.com:443 -servername app.example.com 2>/dev/null \
| openssl x509 -noout -issuer
Now that a deployment exists, test the webhook from step 4:
git commit --allow-empty -m "test webhook"
git push
A new build should appear in the application’s Deployments tab within a few seconds:
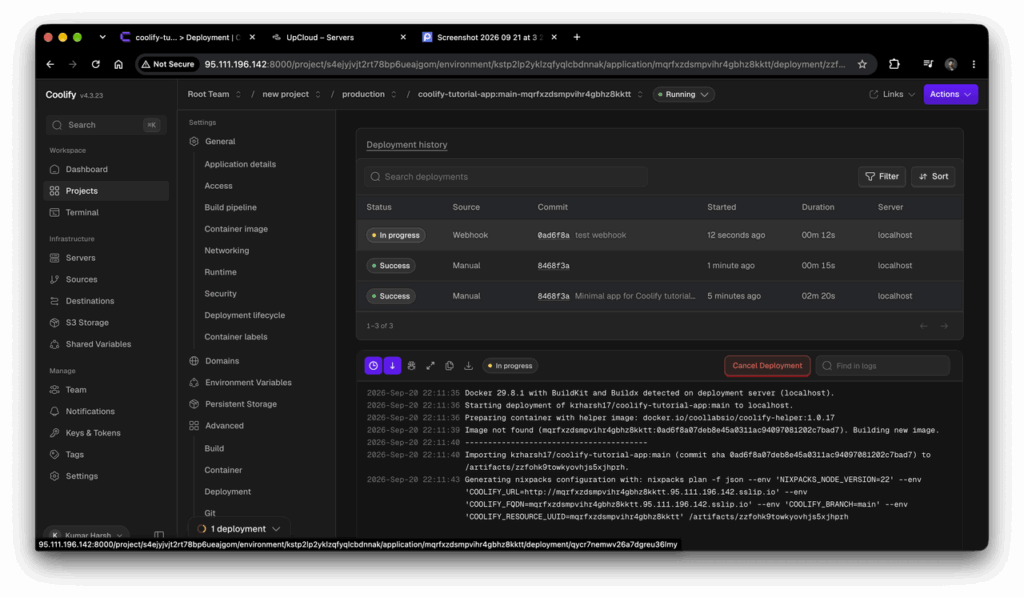
If nothing happens, open the repository’s webhook delivery log on GitHub and read the delivery attempts and response codes. A connection error or a 404 there usually points to the dropdown default flagged in step 4, where the app was registered against the server IP and now calls a closed port.
When a build fails, Coolify keeps the previous deployment running, and the failure appears in the deployment log without taking the site down. You still have to notice it, so wire the build status to a Slack channel or your team’s notification setup once the pipeline is stable.
Step 6: Attach a Postgres database
Back in the project view, add a Database resource and pick PostgreSQL:
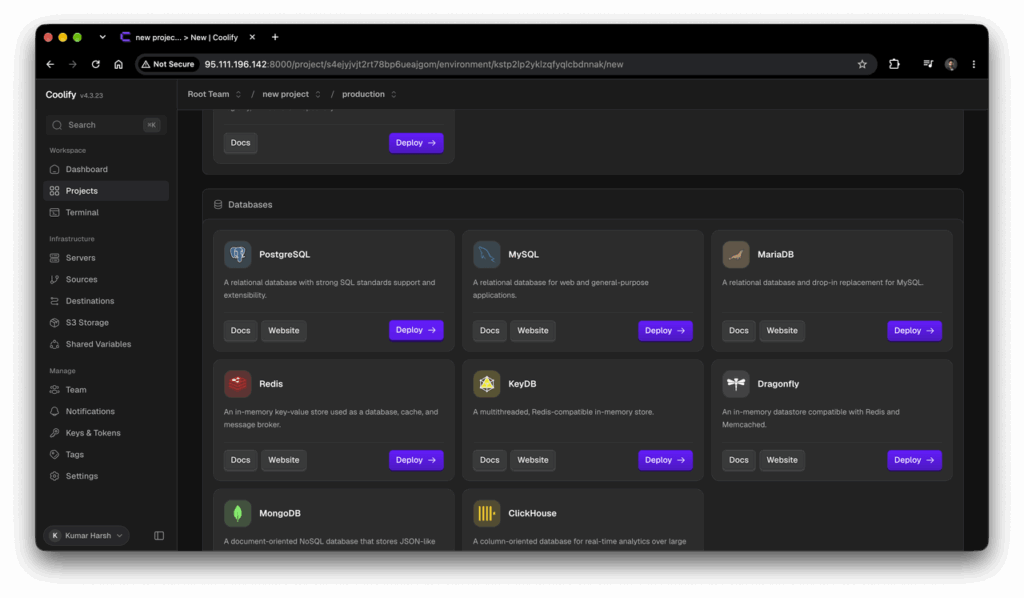
Coolify provisions a Postgres container attached to the same Docker network as your app. It also generates an internal connection string that resolves inside the Docker network:
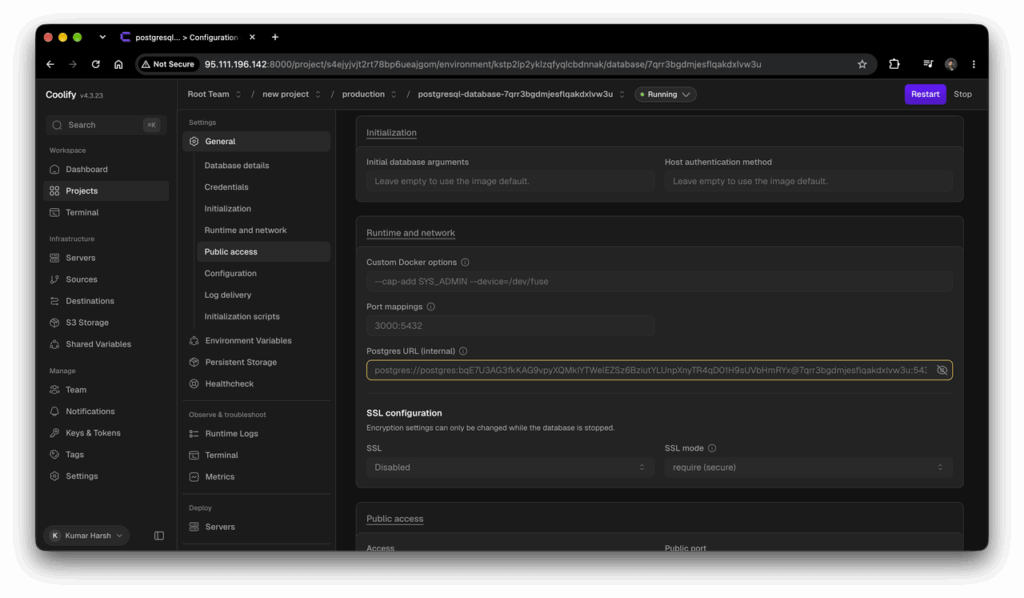
The host is the resource UUID, which is also the container name, so it looks like this:
postgres://postgres:GENERATED_PASSWORD@rs0oo4ccw8kwcg4g8s0ksk0o:5432/postgresCopy the value Coolify shows you on the resource page. Substituting the server IP or a guessed container name breaks the internal lookup because Docker resolves that UUID on the shared network.
Use the string as the value of your app’s DATABASE_URL environment variable, and leave the database’s public access toggle off so the “Public Port” field stays unset. Coolify exposes a public database through a separate TCP proxy bound to that port, so leaving it alone keeps Postgres reachable from your application container and from Coolify’s backup process, and unreachable from the public internet.
Wire the credentials into the app through Coolify’s environment variables interface. Reference the connection string directly. Do not copy the password into your repo or into a .env file that ships with the code.
Once you’ve set up the environment variable correctly, your app should go from:
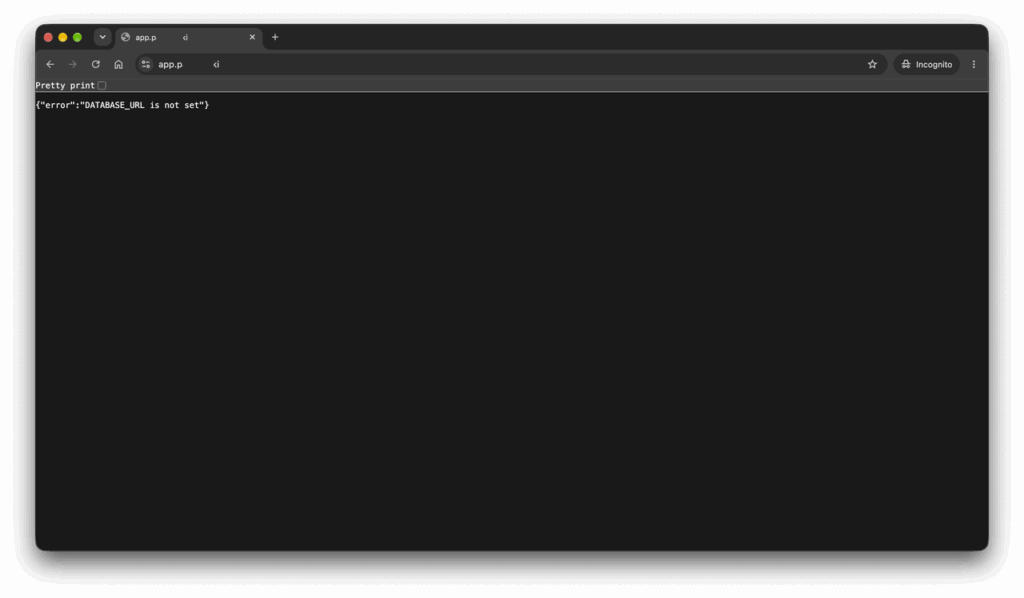
to something like this:
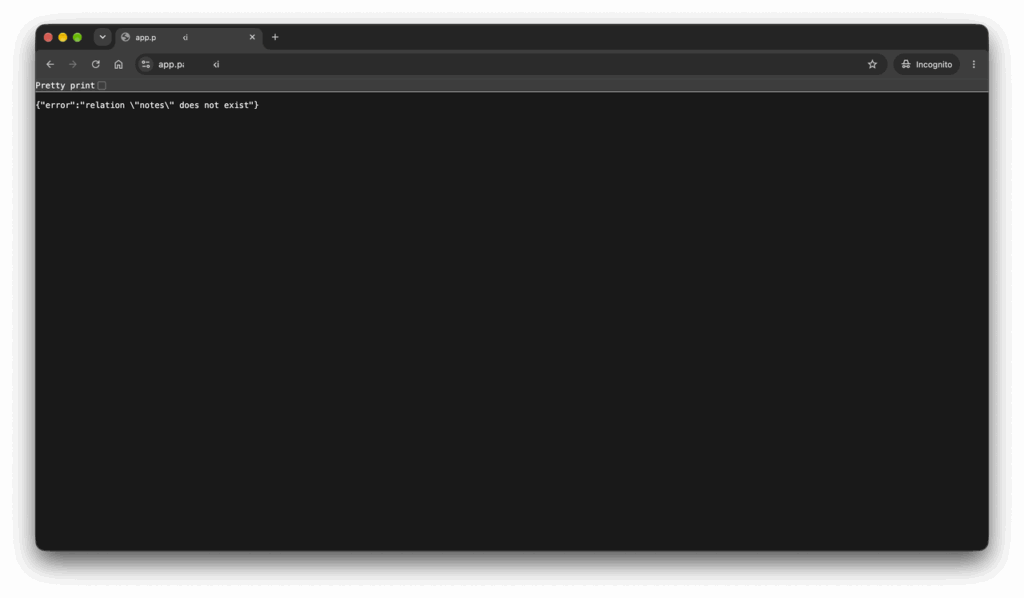
You can now run your first migration by exec-ing into the app container:
docker exec -it APP_CONTAINER_NAME npm run migrateOr use whichever migration workflow your framework provides. Write enough real data through the app that the restore verification in step 8 has something concrete to check against. Create three or four records with recognizable content, and note the row count.
Coolify stores the database on a Docker volume separate from the container, so upgrading the Postgres image or recreating the container keeps the data intact. Deleting the resource opens a Danger Zone dialog that asks which Docker resources to remove alongside it, and the volume is one of the checkboxes. Read that dialog before confirming, because accepting the defaults on a Friday afternoon is how a database disappears.
Step 7: Scheduled backups to object storage
Coolify needs somewhere to send the backups, so set up UpCloud Managed Object Storage first. Five actions in the control panel, in order:
- Create an Object Storage instance and wait for it to report Ready.
- Open the instance and add a bucket under the Buckets tab.
- Under the Users tab, add a user and attach the access policies it needs for that bucket (at least
ECSS3FullAccess). - Generate an access key for that user, then download or copy both the key ID and the secret.
- Copy the endpoint from the Overview tab, inside the Public access section.
The endpoint in step 5 belongs to your instance alone and carries a generated alphanumeric prefix, so it looks like https://abcd1.upcloudobjects.com:
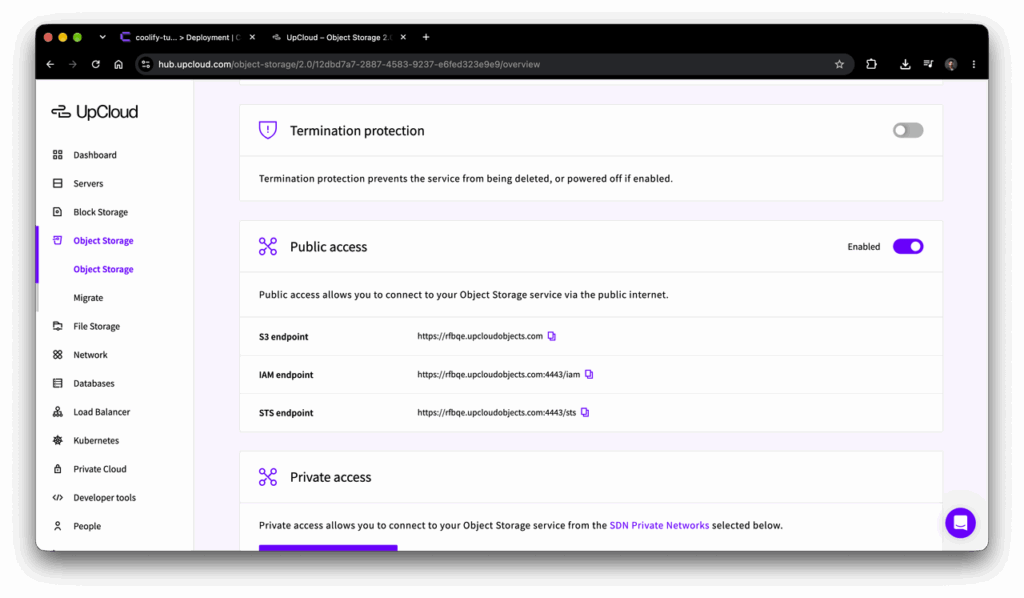
In Coolify, go to S3 Storage in the left pane and add an S3-compatible destination:
- Protocol:
https - Host: your instance endpoint, for example
abcd1.upcloudobjects.com - Bucket: your bucket name
- Access Key / Secret Key: the credentials you just generated
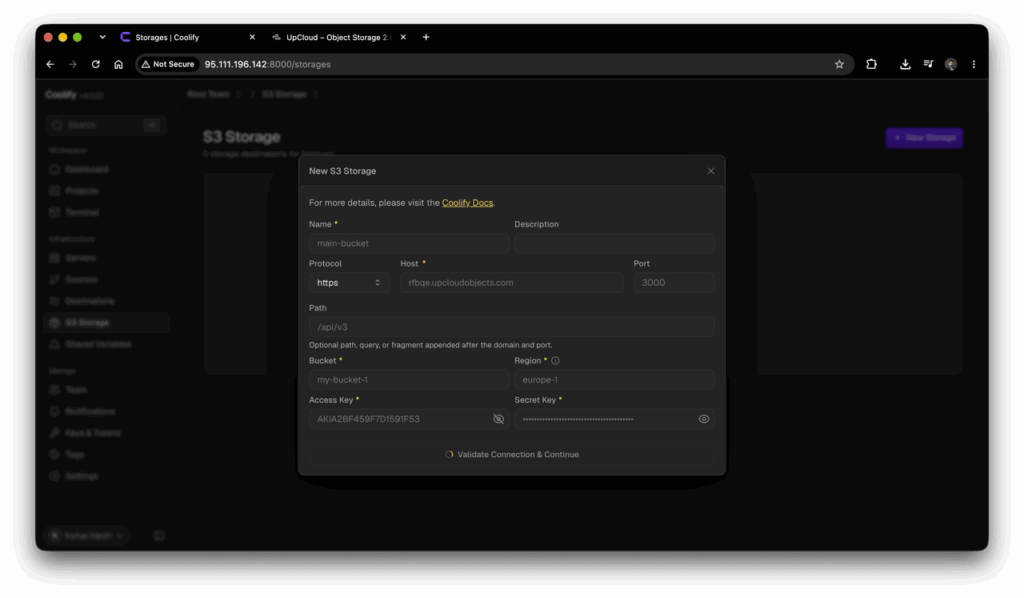
Validate and save the destination, then open the Postgres resource and go to the Backups section from the left pane. Click the Add button to add a new scheduled backup:
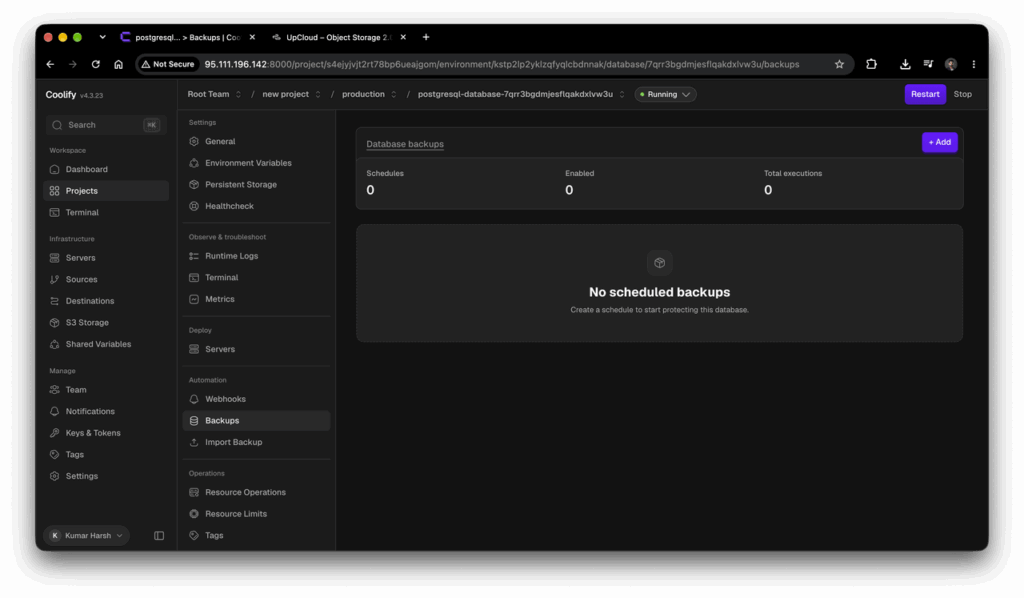
Enable scheduled backups, set the cron schedule to 0 3 * * * (daily at 3 am UTC), set retention to 14 days, and select the storage destination.
Daily backups at 3 am with 14 days of retention are the right default for most production workloads. Shorter retention loses history you might need for compliance or debugging. Longer retention grows storage costs without much added safety once you have two weeks of restore points to choose from.
The backup destination should live on a different host from the database, and ideally with a different provider account from the primary infrastructure. The failure this protects against is loss of the primary VPS. If a mistake, a compromise, or a billing issue takes down the account holding the server, backups stored in the same account go with it. UpCloud Object Storage under a separate account, or an S3-compatible bucket at another provider, both address this.
A VPS snapshot covers a different failure mode. Snapshots restore the whole disk to a point in time, which helps when you need to roll back a server that has been misconfigured or corrupted. Logical dumps produced by pg_dump restore a single database’s schema and data, which is what you need when the server is fine and the data is damaged. Both are worth having, and they solve different problems.
Know what Coolify actually produced before you try to read it. For a single Postgres database, it runs pg_dump --format=custom --no-acl --no-owner, which writes a compressed binary archive named pg-dump-<database>-<unix-timestamp>.dmp. That archive uses Postgres’s own container format, so gunzip and zcat both fail against it, and the Postgres client tools are the only things that can read it. Switching the schedule to Dump All changes this, producing a gzipped pg-dumpall-*.gz file of plain SQL instead.
The object also lands several levels down inside the bucket. Coolify mirrors its local backup directory into the bucket, so the prefix is data/coolify/backups/databases/<team-slug>-<team-id>/<resource-directory>/.
You can list the bucket recursively to find it, and read the exact filename off the Executions panel on the Backups tab:
ENDPOINT=https://abcd1.upcloudobjects.comaws s3 ls s3://YOUR_BUCKET/ --recursive --endpoint-url $ENDPOINT | tail -5
aws s3 cp s3://YOUR_BUCKET/data/coolify/backups/databases/TEAM/RESOURCE/pg-dump-postgres-1758326400.dmp . \
--endpoint-url $ENDPOINTpg_restore --list pg-dump-postgres-1758326400.dmp | head -20pg_restore --list prints the archive’s table of contents, naming every table, index, and sequence the dump contains. That output is the integrity check. A zero-length file or an “input file does not appear to be a valid archive” error means the backup failed silently, and the object in the bucket is an artifact with no recovery value.
Step 8: Restore the backup
A backup you have never restored is an unverified assumption. This is the step almost every Coolify tutorial skips, and the omission is the difference between a backup that exists and a recovery you can actually perform.
Provision a second Postgres database in Coolify as a scratch target, or use a local Postgres instance on your workstation. Custom-format archives load with pg_restore, and feeding one to psql fails with a syntax error on the first binary byte:
aws s3 cp s3://YOUR_BUCKET/data/coolify/backups/databases/TEAM/RESOURCE/pg-dump-postgres-1758326400.dmp . \
--endpoint-url https://abcd1.upcloudobjects.com
docker exec -i SCRATCH_DB_CONTAINER \
pg_restore --clean --if-exists --no-owner --no-acl -U postgres -d postgres \
< pg-dump-postgres-1758326400.dmpCoolify already passes --no-acl --no-owner when it takes the dump, so those same flags on the restore side are insurance for archives that came from somewhere else. They keep pg_restore from erroring on every ownership statement when the scratch database has different role names from production, which is the failure that makes a working restore look broken.
Connect to the scratch database and confirm the restore worked:
SELECT count(*) FROM your_main_table;
SELECT * FROM your_main_table WHERE id = 'the-record-you-noted-in-step-6';
If the row count matches step 6 and the specific record is present with the expected content, the backup is a real recovery point.
A full recovery involves more than the database. Coolify itself holds deployment configuration, environment variables, application secrets, source connections, and the mapping between projects and their resources. Losing the host loses all of that. Rebuilding from an empty Coolify install means recreating every application resource, re-adding the Git source, re-entering every environment variable, and reconfiguring the storage destination before any restore command can run.
Coolify backs up its own database the same way it backs up yours. The coolify-db resource carries a Backups tab, and pointing it at the same S3 destination captures projects, resources, settings, and deployment history on a schedule.
One file decides whether that backup is usable. /data/coolify/source/.env holds APP_KEY, the encryption key for every stored secret, and Coolify’s backup documentation is explicit that secrets restored without it cannot be read. The S3 instance backup contains only the database dump, so copy that APP_KEY somewhere off the server by hand, into a password manager or your own secrets store. Without it, a host loss turns “restore from backup” into “rebuild from memory and old commits.”
Conclusion: What you’ve built
The application answers over HTTPS, the database backs up every night, and both certificates renew themselves. That covers the day-one setup. The recurring obligations are less visible, but they stay with you:
- OS patching, especially Docker and kernel updates
- Coolify upgrades, which occasionally introduce breaking changes and are worth running only after a fresh VPS snapshot
- Disk pressure from unused images, dangling volumes, and build cache. Enable Coolify’s own scheduled cleanup and let it handle this, because
docker system prune -afon a Coolify host removes every image not backing a running container, including the images behind resources you have merely stopped - Certificate renewals that fail quietly when DNS changes or Traefik configuration drifts. Alert on certificate expiry rather than on renewal success
- Monitoring that nobody has set up yet. Coolify’s dashboard shows container health inside the box, and external checks (Uptime Kuma, a hosted uptime service, or Prometheus with Alertmanager) are what tell you the site is down from the outside
The single-host layout puts the control plane and the workload on the same box. One server failure takes out both the application and the tooling you use to redeploy it. That is acceptable for many projects, especially early-stage ones where the cost and complexity of a second server outweighs the marginal reliability gain. It should be a deliberate decision.
The point where a managed platform starts winning against this setup turns on team size and on-call tolerance more than cost. Coolify on a single UpCloud VPS at roughly $18/month is cheaper than Heroku or Render for equivalent workloads well past the point most projects ever reach. The trade shifts when three or more developers are deploying multiple services with a shared expectation of uptime. At that scale, the operational load of running the platform competes for engineering time you could spend on the product.
Moving to UpCloud Managed Kubernetes with managed databases, or to a fully hosted platform, buys back the hours otherwise spent on Coolify upgrades, disk pressure, and certificate diagnostics. Until then, this setup gives you a real production deployment on infrastructure you own, with recovery paths you have actually tested.
Discussion