New - NVIDIA B200 & B300 Dedicated GPU Clusters | Explore GPU clusters
Part 3: RabbitMQ Cluster Setup for High Availability on UpCloud
-
About
- Type
- Tutorial
- Categories
- IntegrationsNetworking
Posted on 12 November 2026
In Part 1, we covered RabbitMQ high availability on UpCloud and designed the three-node architecture for this series. In Part 2, we walked through the RabbitMQ setup for the first production-ready node, including dedicated MaxIOPS storage, scoped users and vhosts, explicit memory and disk limits, and a working definitions export. That node is a solid baseline, but it’s still a single point of failure. In this part, we’ll move on to the RabbitMQ cluster setup by adding two more nodes, bringing the cluster to three nodes.
Clustering changes what we need to think about. A single node can fail, and we can lose all the work, or, worse, it can force downtime for our application. A cluster has partition behavior, quorum requirements, leader election, replication policies, and recovery sequences. We’ll work through all of them here. By the end, we’ll have a functioning three-node RabbitMQ cluster on UpCloud with quorum queues distributed across all nodes, a tested partition handling strategy, and a verified failure response.
This part assumes the single node from Part 2 is running, correctly configured, and accessible over the private SDN network.
Planning a Three-Node RabbitMQ Cluster
Before provisioning two more servers, it’s worth being clear about what three nodes actually give us.
Quorum queues require a majority of their replicas to be available before they’ll accept writes. In a three-node cluster where each node holds a replica, that means two nodes must be up and reachable. If one node fails, the remaining two form a majority and the cluster continues serving traffic. If two nodes fail simultaneously, there is no majority, and the queue stops accepting writes until enough nodes have returned.
A four-node cluster doesn’t improve this. With four nodes, we’d need three available for quorum, which means we can still only lose one. We’d be running an extra server with no additional fault tolerance to show for it. Sure, we’ll get additional throughput and workload capacity, but it doesn’t help with availability. For most teams, three nodes is the right practical shape. It provides the minimum fault tolerance quorum queues needed without the overhead of additional nodes that don’t change the math.
Five nodes give you stronger fault tolerance for business-critical infrastructure. With five nodes, quorum requires three, so any two can fail simultaneously, and the cluster continues serving writes. A three-node cluster can’t absorb a second failure when one node is already down for maintenance or a rolling upgrade, leaving your write path exposed until the first node returns. The cost is two additional servers and the coordination overhead that comes with a larger cluster. For most workloads, that cost is disproportionate. For systems where downtime carries serious business consequences, the five-node setup is the right architecture.
When it comes to node sizing, the relationship between cluster size and quorum size has a direct implication on it. In normal operation, each node carries its share of the workload. When a node goes down, the remaining nodes absorb its client connections and handle quorum operations with one fewer member available. When sizing nodes, we should account for both normal baseline traffic and the additional load when a peer goes down and its connections are redirected. A node that runs at 70% CPU under normal load will be overwhelmed when its peers redirect traffic to it during a failure. That headroom is what lets the cluster absorb a node loss without degrading. Sizing for failure-mode load, with normal operating load as the baseline, is correct capacity planning and not a waste.
Preparing Nodes for the RabbitMQ Cluster
With the logic out of the way, let’s get started with deploying and preparing the nodes to run the quorum.
Step 1: Provision two more servers
We’ll need to create two additional UpCloud Cloud Servers matching the configuration from Part 2: the same plan, storage layout, and OS image, and attached to the same SDN private network as the first node.
Give each server a unique, stable hostname before we install RabbitMQ. RabbitMQ identifies each node in the cluster by its Erlang node name, which takes the form rabbit@hostname. This name is written into the node’s data directory during the first startup. If we rename a node after it has joined a cluster, we’ll need to perform a reset-and-rejoin sequence. Set the hostnames once, before any RabbitMQ installation.
On each new server:
hostnamectl set-hostname rmq2.internalUse whatever naming convention fits the environment, but keep all three names distinct and stable. For an UpCloud SDN private network, /etc/hosts is the simplest option when the node count is fixed.
First, find the private SDN IP assigned to each server. Run this on each node:
ip -4 addr showThe output will list several interfaces. Ignore lo (loopback) and the interface with a public IP. UpCloud also attaches a utility network interface with a /22 subnet—ignore that too. Our SDN private network is the remaining interface, typically with a /24 subnet matching what we configured when creating the network:
1: lo: ...
inet 127.0.0.1/8 ... # loopback: skip
2: eth0: ...
inet 95.111.195.237/22 ... # public interface: skip
3: eth1: ...
inet 10.10.9.200/22 ... # UpCloud utility network (/22): skip
5: eth3: ...
inet 10.0.11.4/24 ... # SDN private network: this is the one
In this example, the SDN IP is 10.0.11.4. Make sure to note it down for each node before continuing.
Alternatively, we could open the UpCloud control panel, navigate to each server, and check the IP address listed under our SDN network in the Network tab.
Once we have all three IPs, run this on all three nodes, replacing the addresses with our actual values:
cat >> /etc/hosts <<'EOF'
<rmq1-sdn-ip> rmq1.internal rmq1
<rmq2-sdn-ip> rmq2.internal rmq2
<rmq3-sdn-ip> rmq3.internal rmq3
EOF
Make sure to use private SDN IP addresses here. Erlang distribution, which RabbitMQ uses for inter-node communication, sends cluster traffic unencrypted by default. Exposing that traffic on a public interface puts cluster cookies, queue metadata, and message payloads in the open. Private SDN keeps inter-node traffic isolated to a network only your cluster nodes can reach.
Once /etc/hosts is updated on all three nodes, verify that each node can resolve the others by name, by running these commands:
ping -c 2 rmq2.internal
ping -c 2 rmq3.internal
If resolution fails, clustering will fail with an opaque Erlang distribution error. We’ll then need to fix /etc/hosts entries on all nodes before proceeding.
Step 2: Install RabbitMQ on the new nodes
On each of the two new servers, run the same installation steps from Part 2: install erlang and rabbitmq-server, enable the management plugin, and start the service.
apt-get update -y
apt-get install -y erlang rabbitmq-server
rabbitmq-plugins enable rabbitmq_management
systemctl enable rabbitmq-server
systemctl start rabbitmq-server
Next, apply the same rabbitmq.conf to each new node. Create the file if it doesn’t exist:
touch /etc/rabbitmq/rabbitmq.confThen write the following configuration:
# /etc/rabbitmq/rabbitmq.conf

# Flow control activates when broker memory exceeds 60% of available RAM.
# Adjust based on node size. Do not set above 0.7 unless the node
# is dedicated exclusively to RabbitMQ.
vm_memory_high_watermark.relative = 0.6

# Block publishers when free disk space drops below 1.5x total physical memory.
# This gives us time to react before the node runs out of disk.
# Use an absolute value instead if our data volume is much larger than memory:
# disk_free_limit.absolute = 10GB
disk_free_limit.relative = 1.5

# Bind the AMQP listener to all interfaces.
# We will restrict this to the private interface in the next step.
listeners.tcp.default = 5672

# Management UI port.
management.listener.port = 15672
Restart RabbitMQ on each node to apply the configuration:
systemctl restart rabbitmq-serverWe don’t need to manually create users or vhosts on these nodes. After the cluster forms, we’ll import the definitions exported from Part 2, which recreates all users, vhosts, permissions, exchanges, queues, and policies.
Step 3: Copy the Erlang cookie
The Erlang cookie is a shared secret that Erlang nodes use to verify that they belong to the same cluster. Every node that should join the cluster must have an identical cookie. If the cookies don’t match, join_cluster will fail with an authentication error.
When RabbitMQ starts for the first time on a node, it generates a random cookie and writes it to /var/lib/rabbitmq/.erlang.cookie. We need to overwrite this generated value on nodes 2 and 3 with the value from node 1.
On node 1, read the cookie and copy the value:
cat /var/lib/rabbitmq/.erlang.cookieOn each of nodes 2 and 3, stop RabbitMQ, write the same cookie, fix the permissions, and restart them:
systemctl stop rabbitmq-server
echo -n 'your-cookie-value-here' > /var/lib/rabbitmq/.erlang.cookie
chown rabbitmq:rabbitmq /var/lib/rabbitmq/.erlang.cookie
chmod 400 /var/lib/rabbitmq/.erlang.cookie
systemctl start rabbitmq-server
We’ll also need to ensure that the cookie file is readable only by its owner (using the chmod command above), as the Erlang runtime requires that. Wrong permissions could cause RabbitMQ to fail at startup or generate a new random cookie, which will break cluster authentication.
Bind inter-node communication to the private interface
By default, Erlang will use whatever interface the hostname resolves to for inter-node communication. On a server with both public and private interfaces, this may route cluster traffic over the public network.
To fix that, in /etc/rabbitmq/rabbitmq-env.conf, set two values on each node:
# /etc/rabbitmq/rabbitmq-env.conf
NODE_IP_ADDRESS=<this-node-sdn-ip>
USE_LONGNAME=true
Here’s what these two do:
- USE_LONGNAME=true: tells Erlang to identify nodes by their fully-qualified hostname ([email protected]) rather than the short form (rabbit@rmq2). Without it, join_cluster will fail with a {:node_name, :short} error when we reference a node by its .internal name.
- NODE_IP_ADDRESS=<this-node-sdn-ip>: pins Erlang’s inter-node listener to the private SDN interface. Without it, Erlang binds to whatever interface the hostname resolves to, which may be the public IP on a multi-interface server.
Restart the service on each node after applying this:
systemctl restart rabbitmq-server
Step 4: Verify firewall rules on all nodes
Before forming the cluster, make sure the inter-node ports are open between all three nodes on the private SDN network. RabbitMQ cluster communication requires three port ranges:
- 4369: the Erlang Port Mapper Daemon (EPMD), which nodes use to discover each other’s inter-node listening ports
- 25672: the actual inter-node communication port
- 35672–35682: used by CLI tools (rabbitmqctl, rabbitmq-diagnostics, etc.) to communicate with nodes
In our UpCloud Firewall rules, add rules for both inbound and outbound directions for these ports. Also, we have to remember UpCloud’s firewall is stateless, which means it does not track connections, so an inbound allow rule alone is not enough. Return traffic will require a matching outbound rule.
RabbitMQ Cluster Setup: Forming the Cluster
With all three nodes running the same cookie and able to resolve each other by hostname, we can form the cluster. To form it, designate one node as the initial member and join the other two to it.
Node 1 already exists and is running. On node 2, stop the RabbitMQ application (not the Erlang runtime), join the cluster, and restart:
rabbitmqctl stop_app
rabbitmqctl join_cluster [email protected]
rabbitmqctl start_app
Repeat this on node 3:
rabbitmqctl stop_app
rabbitmqctl join_cluster [email protected]
rabbitmqctl start_app
Both node 2 and node 3 can join via node 1 and don’t need to join each other separately.
Verifying RabbitMQ Cluster Health
Once both nodes have joined, check the cluster state from any of the three nodes:
rabbitmqctl cluster_statusHere’s what it will look like:
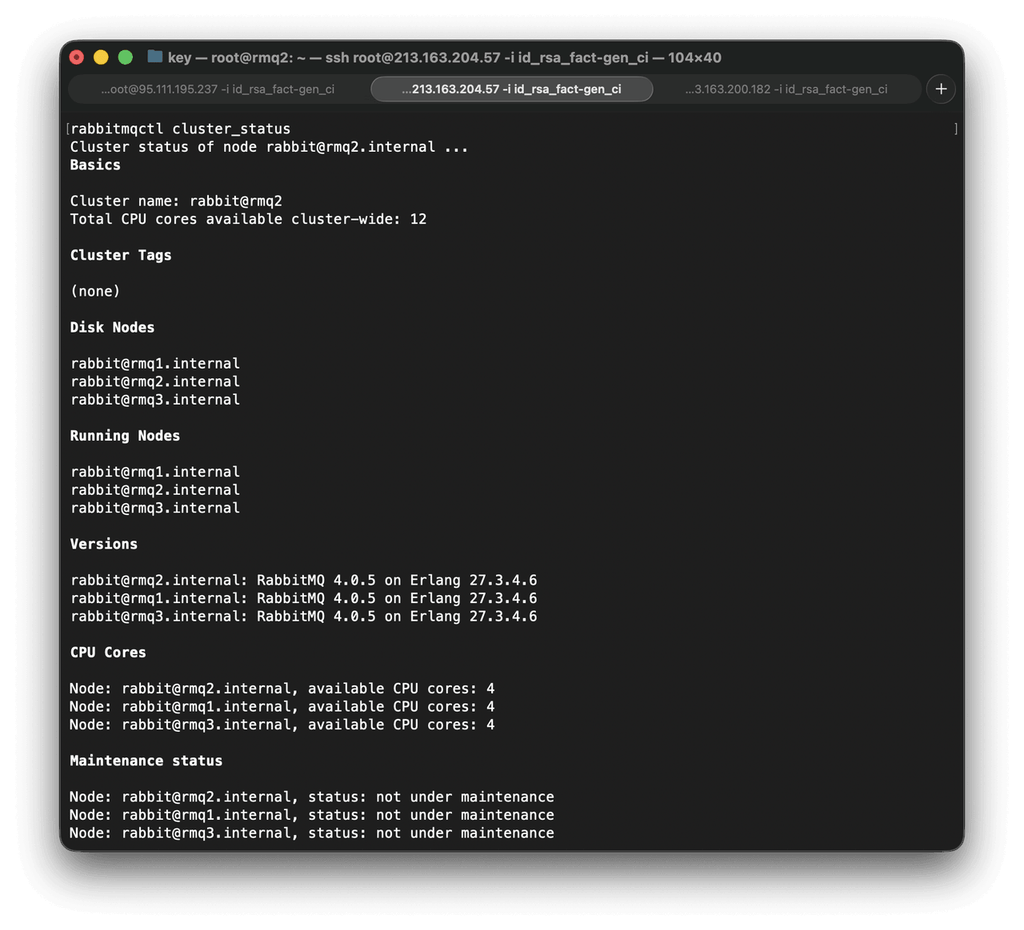
In a healthy cluster, all three nodes appear in both “Disk Nodes” and “Running Nodes”, and the “Network Partitions” section is empty:
Cluster name: [email protected]
Disk Nodes
[email protected]
[email protected]
[email protected]

Running Nodes
[email protected]
[email protected]
[email protected]

Alarms

(none)

Network Partitions

(none)
If a node appears in “Disk Nodes” but not “Running Nodes”, it’s known to the cluster but not currently reachable.
If the cluster status shows only one or two nodes, check the Erlang cookie on the missing node, verify name resolution, and confirm that the firewall isn’t blocking ports 4369 and 25672.
Import definitions
Now that the cluster exists, import the definitions we exported from Part 2 to recreate users, vhosts, permissions, and policies across the cluster. Run this from any one node. RabbitMQ will replicate the topology to all members:
curl -s -u admin:mypassword -H "Content-Type: application/json" -X POST http://localhost:15672/api/definitions -d @rabbitmq-definitions-20260520.jsonAfter the import, verify from the management UI or CLI that users, vhosts, and policies appear correctly on all three nodes.
Common RabbitMQ Cluster Setup Issues
| Symptom | Likely cause |
|---|---|
| join_cluster fails with nodedown | Hostname not resolvable, or EPMD blocked on port 4369 |
| join_cluster fails with authentication_failure | Erlang cookie mismatch between nodes |
| Node joins but shows as stopped in cluster status | Inter-node port 25672 is blocked |
| Node appears in disk nodes but not running nodes after restart | Node has not yet restarted, or data directory permission issue |
RabbitMQ Quorum Queues in Practice
Quorum queues use a Raft-based replication model. When a quorum queue is declared, one replica becomes the leader, and the others become followers. The node where the queue is declared becomes the initial leader (though queue-leader-locator can change that, and placement is a hint rather than a guarantee). If that node fails, the surviving replicas vote among themselves, and whichever one wins a majority takes over. Only a replica that is already fully caught up can win that vote, so nothing confirmed to a publisher is lost during the handover. Because it takes a majority to elect a leader, a three-member queue keeps working even after the loss of one node, but not after the loss of two.
All writes to that queue go through the leader. The leader appends each incoming message to its Raft log and sends the log entry to followers. Once a majority of replicas has acknowledged the entry, the write is considered committed, and the leader can send a publisher confirm if the producer requested one.
Followers don’t serve writes directly. If a producer connects to a node that isn’t the leader for a given queue, RabbitMQ routes the operation to the leader transparently. From the application’s perspective, publishing works the same regardless of which node the client connects to.
When the leader node goes down, the remaining followers hold an election. Raft elections require a majority to succeed, which means two of the three nodes in our cluster must be reachable and agree on the new leader. The election typically completes within a few seconds. During that window, the queue won’t accept new writes. Producers using publisher confirms will receive an error or a nack and should retry. Consumers connected through the failed node will need to reconnect.
After a new leader is elected, it catches up any followers who fell behind and resumes normal operations. A committed log entry survives a leader failure because it was already present on a majority of replicas before the failure.
Setting x-quorum-initial-group-size
When we declare a quorum queue, RabbitMQ places replicas on a subset of available nodes. The number of initial replicas is controlled by the x-quorum-initial-group-size argument on the queue declaration. If this argument isn’t set, RabbitMQ defaults to placing replicas on all available nodes up to a maximum of 3.
In a three-node cluster, the default behavior is appropriate. All three nodes hold a replica, and the queue can survive the loss of any one node. We don’t need to set this argument manually for the standard case.
We would set it explicitly if we have more than three nodes and want a specific queue to use a different group size, or if we/re declaring queues during cluster provisioning and want consistent behavior regardless of how many nodes are currently running.
Declare a quorum queue with an explicit group size:
rabbitmqadmin -u admin -p yourpassword -V production \
declare queue name=orders durable=true \
arguments='{"x-queue-type":"quorum","x-quorum-initial-group-size":3}'
After declaring it, verify that the queue has members on all three nodes:
rabbitmqctl list_queues -p production name type members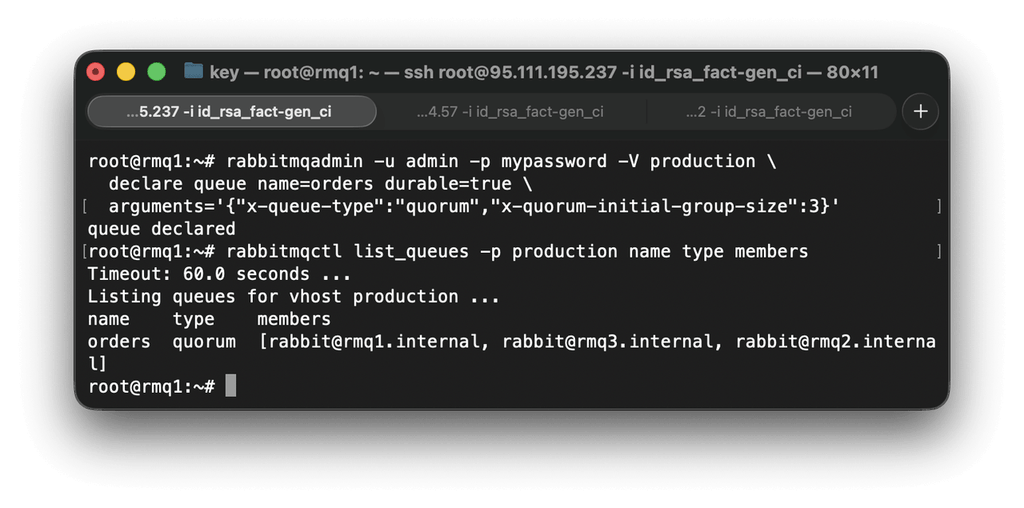
The members column should list all three node names.
Streams as an Alternative
Streams are a separate queue type in RabbitMQ 4.x, and the decision of when to use them instead of quorum queues comes down to the workload pattern.
Quorum queues are a work queue. Consumers compete for messages, and each message is delivered to exactly one consumer. Once a consumer acknowledges a message, it’s removed from the queue. This model suits task dispatch, order processing, payment workflows, and notification pipelines (any pattern where each message is a unit of work that exactly one consumer should process).
Streams behave more like a log. Messages are retained for a configurable period regardless of consumer acknowledgments. Multiple independent consumers can read from the same stream at different offsets. Consumers can replay from any position in the stream. This model fits audit trails, activity feeds, event fan-out where multiple services need to react to the same event independently, or high-throughput ingestion where consumers read sequentially and throughput matters more than per-message routing.
Stream replication is also Raft-based at the storage level but is optimized for sequential I/O patterns. Each type fills a different role: streams handle replay and fan-out, quorum queues handle competing consumers. Most RabbitMQ deployments that need both will run both types on the same cluster.
In this series’ reference architecture, quorum queues are the default for all critical application messaging. Use streams selectively when the workload genuinely requires replay or fan-out semantics.
Policies and Replication
The x-quorum-initial-group-size argument controls replica placement when the queue is declared. For cluster-wide defaults and for existing queues, we must use policies.
A RabbitMQ policy is a set of key-value settings applied to queues (or exchanges) matching a name pattern within a vhost. Policies are applied dynamically and take effect immediately without restarting the broker.
The relevant policy key for quorum queue replication is target-group-size. This sets the desired replica count for queues matching the policy and applies to both new and existing queues.
Apply a cluster-wide quorum policy:
rabbitmqctl set_policy -p production QuorumDefaults ".*" '{"target-group-size":3}' --apply-to queues --priority 0This sets the target replication factor to 3 for all queues in the production vhost. RabbitMQ will expand or shrink replicas on existing queues to match the target the next time those queues are reconciled.
Verify that policies are applied:
rabbitmqctl list_policies -p productionCheck that queues show the expected member count:
rabbitmqctl list_queues -p production name type members policyThe members column should list three node names for each quorum queue, and the policy column should show the policy name if one matched.
Every write to a quorum queue is replicated to all members before it’s committed. A queue with 3 members writes to 3 disks per message. Increasing the member count beyond that in a three-node cluster isn’t possible anyway. Reducing to 1 or 2 would save write overhead, but removes the HA property the cluster was built to provide.
Network Partitions and Split-Brain
A network partition occurs when some nodes in a cluster can’t communicate with others. From each node’s perspective, the nodes it can’t reach have failed. In a partition, both sides of the cluster may believe they are the healthy majority and continue accepting writes independently. When the partition heals, the two sides have diverged with no automatic safe way to reconcile them. That state is split-brain.
RabbitMQ provides three modes for handling partitions, configured with cluster_partition_handling in rabbitmq.conf:
- ignore keeps each partition operating without restriction, which means split-brain can occur. This is the default and isn’t appropriate for production.
- pause_minority pauses any node that detects it’s in the minority partition (fewer than half of all cluster nodes are visible to it). In a three-node cluster where one node loses connectivity to the other two, the isolated node pauses itself and stops serving client traffic. The two remaining nodes form a majority and continue operating. When the isolated node regains connectivity, it resumes automatically with no divergence.
- autoheal lets partitions write freely and then, after the partition heals, picks a winning partition and restarts all nodes that were in the losing partition. The losing partition’s writes since the partition started are discarded. This can cause data loss and require nodes to restart, making it an unreliable primary strategy.
For a three-node cluster, use pause_minority:
cluster_partition_handling = pause_minorityAdd this to rabbitmq.conf on all three nodes and restart to apply it.
pause_minority works predictably in a three-node cluster because the math is unambiguous. Any single node that loses connectivity to both other nodes is in the minority and pauses. If two nodes lose connectivity to the third, those two are the majority and continue operating. There’s no ambiguity and no possible split-brain.
Larger clusters lose that tidiness. A four-node cluster splits evenly into two groups of two, leaving each side with more than half the nodes, so both pause and the whole cluster goes offline; the same happens to a five-node cluster if no group of three survives intact. pause_minority is behaving as designed in both cases, since it trades availability for consistency and makes no promise that some partition will always survive.
Detecting partitions
When a partition has occurred, and a node is paused under pause_minority, rabbitmqctl cluster_status will show the affected node missing from “Running Nodes” as seen from the healthy side. The Network Partitions section in the status output will show the detected partition when the connectivity issue becomes visible:
rabbitmqctl cluster_statusLook for anything under “Network Partitions” in the output. An empty partitions section means the cluster sees no current or unresolved partition state. When a paused node regains connectivity, it automatically restarts and rejoins the cluster. Verify the full cluster is healthy after recovery before resuming normal traffic.
Testing RabbitMQ Cluster Failover
Testing failure scenarios before real incidents happen is a necessary part of bringing a cluster into production. Three scenarios are worth running explicitly.
Stopping a follower node
Find which node is the leader for our test queue:
rabbitmqctl list_queues -p production name leader membersPick a node that is listed as a member but isn’t the leader. Stop RabbitMQ on it:
# On the non-leader node
systemctl stop rabbitmq-server
From another node, check the cluster status:
rabbitmqctl cluster_statusThe stopped node should appear in “Disk Nodes” but not in “Running Nodes”. Run a publish and consume test from the remaining two nodes to confirm the queue is still serving traffic:
rabbitmqadmin -u admin -p yourpassword -V production \
publish routing_key=orders payload="test-after-follower-stop"
rabbitmqadmin -u admin -p yourpassword -V production \
get queue=ordersThe queue should respond normally. Restart the stopped node and verify it rejoins:
systemctl start rabbitmq-server
rabbitmqctl cluster_status
Stopping the leader node
Using the same list_queues output from before, identify and stop the current leader. The cluster needs a few seconds to detect the failure, hold an election, and establish a new leader. During this window, write attempts to the affected queue will fail. Producers using publisher confirms should receive nacks or channel errors and retry.
Once the election completes, confirm the queue has a new leader on one of the remaining nodes:
rabbitmqctl list_queues -p production name leaderThe leader column should show a different node name. Test that the queue is again accepting and delivering messages, then restart the former leader and verify it rejoins as a follower.
Clean versus unclean shutdown
A clean shutdown via systemctl stop rabbitmq-server or rabbitmqctl stop leaves the node’s data in a consistent state. When the node restarts, it rejoins the cluster and resyncs any log entries it missed.
An unclean shutdown due to power loss, a kernel panic, or an OOM kill can leave the Raft log partially written. RabbitMQ handles this during startup by replaying the log from the last safe checkpoint. In most cases, the node recovers and rejoins without operator intervention.
If a node fails to rejoin after an unclean shutdown, check the service logs:
journalctl -u rabbitmq-server --since "10 minutes ago"Look for Raft log errors or quorum membership messages. Allow the node to complete its recovery sequence before considering a reset. Forcing a reset with rabbitmqctl reset causes the node to discard all its queue data and rejoin as an empty member. Use it only when the node is genuinely unrecoverable, and we have confirmed that the other nodes hold all committed data.
What HA Covers and Doesn’t
It’s worth being precise about what we’ve built and where its limits are.
What the cluster handles automatically
When a single node goes down cleanly or crashes, the cluster continues serving traffic for all quorum queues that still have a majority of replicas available. RabbitMQ elects a new leader for any queue whose leader was on the failed node. The load balancer stops sending new client connections to the unavailable node. Consumers connected through the failed node need to reconnect and will have their unacknowledged messages redelivered.
When the node comes back, it rejoins the cluster, resyncs its queue replicas, and begins accepting connections again. No operator action is required for a normal single-node failure and recovery.
What the cluster handles depending on configuration
Network partitions are handled according to our cluster_partition_handling setting. With pause_minority, the cluster correctly suspends the minority partition and avoids split-brain. With the default ignore setting, a partition can result in both sides accepting writes that can’t be reconciled when the partition heals.
What the cluster doesn’t protect against
Messages that a producer published but didn’t receive a publisher confirm for are at risk during any failure. The confirm signal indicates that the message has been committed on a majority of replicas. Without confirms, the producer has no way to know whether the broker accepted the message before the failure occurred. Enable publisher confirms on all producers and retry on nack or connection failure.
Disk exhaustion isn’t handled automatically. When a node’s data volume fills past the disk alarm threshold, RabbitMQ blocks publishers to protect the Raft log. The cluster continues running, but no new messages can be written until disk space is freed or the volume is expanded. Monitor disk usage and alert before reaching the alarm threshold.
Application-level problems sit outside what clustering can fix. A producer that floods a queue, a consumer that never acknowledges, or a client that opens thousands of channels and doesn’t close them will affect the cluster regardless of how many nodes it has. Clustering provides infrastructure-level fault tolerance. Correct client behavior, monitoring, and operational ownership of the messaging layer remain our responsibility.
Conclusion
We now have a running three-node RabbitMQ cluster on UpCloud. The cluster uses quorum queues replicated across all three nodes, private SDN networking for inter-node traffic, and pause_minority partition handling to prevent split-brain. We’ve tested single-node failure and leader election, and we understand the conditions under which the cluster will and won’t protect our messages.
The configuration decisions that matter most in this setup are the partition handling mode, the quorum group size, and the replication policy. Those three settings determine what the cluster actually guarantees in the event of a failure. The default partition handling (ignore) and the disk-free limit require explicit values in production. Everything else we set in Part 2 carries forward correctly.
Part 4 covers RabbitMQ monitoring, scaling, and operations on UpCloud: routing client traffic through the UpCloud Load Balancer, surfacing useful signals before something breaks, and handling the operational sequences we’ll encounter in production, including node replacement, rolling upgrades, and consumer backlog management.
Discussion