New - NVIDIA B200 & B300 Dedicated GPU Clusters | Explore GPU clusters
How to Build Full-Stack Infrastructure as Code with OpenTofu – Part 1
-
About
- Type
- Tutorial
- Categories
- AutomationLoad balancingNetworkingTerraform
Posted on 11 November 2026
Have you ever tried building a full-stack infrastructure-as-code setup?
Well, I have, and it was quite the journey.
I had intended to deploy a multi-server application on UpCloud, with a load balancer in front, a managed database, a cache, object storage for uploads, and a shared filesystem.
However, there were no good tutorials available, and I kept finding guides that stopped at a single server, whereas I wanted to go further. Even UpCloud, the provider I was building on, wasn’t covered by the guides I found.
Since I couldn’t find a good one, I decided to write one myself and build it as a set of reusable modules.
In this tutorial, I will walk you through the process of building a full-stack infrastructure-as-code setup using OpenTofu.
This guide will cover the essential components needed for a robust deployment, including private networking, load balancers, managed databases, caching, object storage, and shared file storage.
Added to that are decisions I made and the reasoning behind them, so you can learn from my experience and apply it to your own projects.
If this sounds fun, then let’s get started!
TL;DR
- Build a full-stack infrastructure-as-code setup on UpCloud using OpenTofu: private networking, a NAT gateway, a load balancer, two app servers, managed PostgreSQL and Valkey, S3-compatible object storage, shared file storage, and network peering.
- The completed modules can be found in this GitHub repository
- Clone the repository, cd examples/basic, then run tofu init, tofu plan, and tofu apply
- The modules are generic. Set name_prefix, and you can deploy any application.
- A full build takes around 25 minutes. A full teardown takes about the same.
Stack
- OpenTofu 1.6 or later
- UpCloud provider UpCloudLtd/upcloud, version ~> 5.0
- Seven modules: network, compute, loadbalancer, database, storage, filestorage, peering
To run it
- Export UPCLOUD_USERNAME, UPCLOUD_PASSWORD, and TF_VAR_db_password
- Run tofu init, tofu plan, then tofu apply
- Run tofu destroy when you’re done, since most of these services bill hourly
Things to look out for
- Trial accounts allow one managed database and block firewall changes. Add a payment method first.
- A NAT gateway alone doesn’t give private servers internet access. The network also needs dhcp_default_route = true.
- Cloud-init needs metadata = true on the server, and package installs need retries.
- Object storage takes a region (like europe-1), not a zone (like fi-hel1).
- Managed databases get assigned ports, not 5432. Always use the output values.
- Keep every zoned resource in the same zone. Managed databases on a private network can’t migrate zones.
- File storage encryption can only be turned on when the storage is created.
- Network peering has to be created in both directions before traffic flows.
- Valkey connections use TLS. Configure your app with rediss:// or its equivalent TLS option, not plain redis://.
- Don’t interrupt an apply. It leaves resources that OpenTofu no longer tracks.
Prerequisites
- OpenTofu 1.6 or later installed.
- An UpCloud account with a payment method added.
- An UpCloud API sub-account, so as not to use your main login creds.
If you’re new to OpenTofu on UpCloud, the OpenTofu on UpCloud hands-on tutorial is a good starting point. It covers provisioning a single server, configuring remote state, and working with the UpCloud provider before moving on to a larger deployment.
Architecture overview
Before we write any code, let’s look at what we’re building.
flowchart TB
user([Users]) –>|HTTP| lb[Load balancer<br/>the only public resource]
subgraph private[“Private network · 10.0.10.0/24”] app1[App server 1] app2[App server 2] pg[(PostgreSQL + PgBouncer)] vk[(Valkey)] obj[Object storage] fs[File storage] app1 & app2 –> pg app1 & app2 –> vk app1 & app2 –> obj app1 & app2 –> fs end lb –> app1 lb –> app2 private –>|NAT gateway, outbound only| internet([Internet]) private <–>|Peering| mgmt[Management network<br/>10.0.20.0/24]
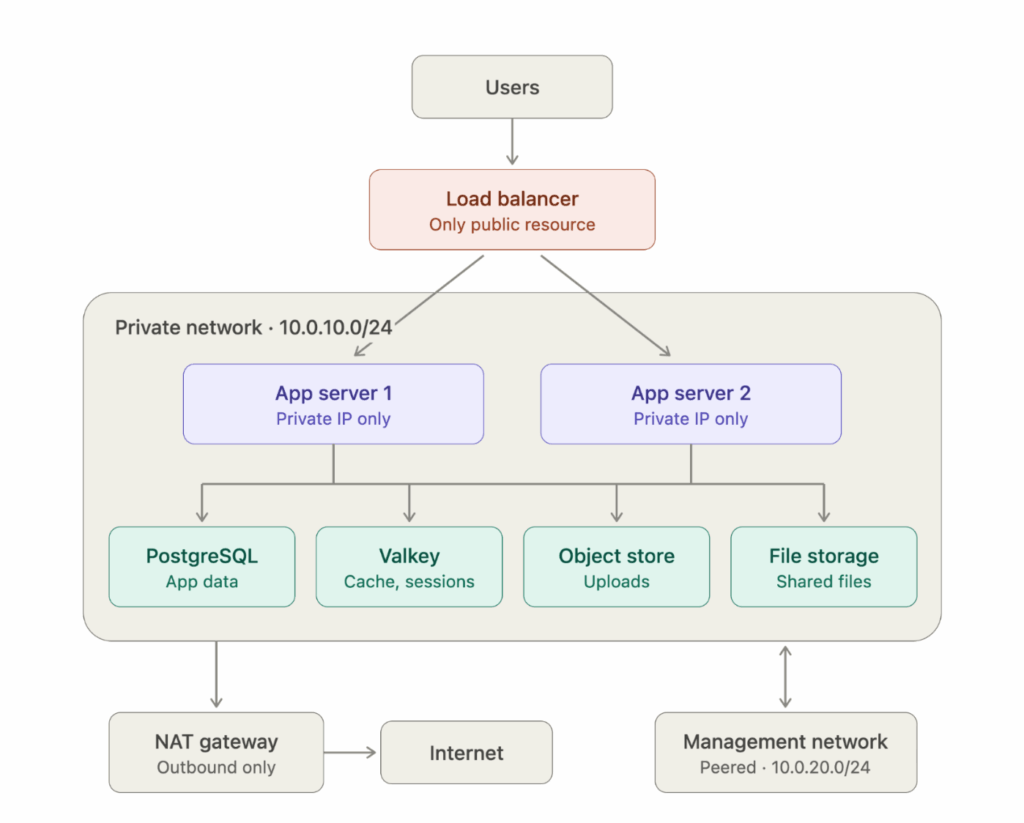
NOTE: This part builds the load balancer, the app servers, and the private network they sit on, along with the NAT gateway that gets them outbound access. The managed services and the peered network come in part 2.
Everything starts at the load balancer. It’s the only resource in this setup with a public IP address. When a request comes in, the load balancer checks which app servers are healthy and forwards the request to one of them.
The app servers sit on a private network, and they don’t have public IPs, so there’s no way for anyone to reach them directly from the internet. The only way in is through the load balancer.
Behind the app servers are the managed services, and each one has a specific job:
- PostgreSQL: This stores the application’s data like users, accounts, and file metadata.
- Valkey: Handles caching and sessions. Once you have more than one app server, this stops being optional, because a user’s session has to be available to whichever server handles their next request. It’s also where shared locks live, so two servers don’t write to the same file at once.
- Object storage: Holds uploaded files, so it doesn’t matter which server received the upload.
- File storage: Gives every app server the same shared filesystem for config and application files.
All four are only reachable from the private network.
The app servers still need to reach the internet to install packages. That’s what the NAT gateway is for. Traffic can go out through it, but nothing can come in.
Finally, there’s a second private network connected through peering. In this setup, it represents a management network, basically, the kind of place you’d put monitoring or admin tools. It shows how to connect two networks without exposing either one to the internet.
What you’ll have at the end
When the build finishes, OpenTofu prints everything you need to connect an application, which includes the load balancer’s DNS name, the private IPs of both servers, and the hosts and ports for PostgreSQL, Valkey, object storage, and the file share.
Curl the load balancer a few times, and you’ll see responses alternating between both app servers. That one test proves the load balancer, the health checks, the private network, and the server setup all work together.
Project structure
Each part of the architecture is its own module:
.
├── main.tf
├── variables.tf
├── versions.tf
└── modules/
├── network/
├── compute/
├── loadbalancer/
├── database/
├── storage/
├── filestorage/
└── peering/
Every module has the same four files: versions.tf, variables.tf, main.tf, and outputs.tf. The root main.tf connects them by passing one module’s outputs into another’s inputs.
NOTE: The example app I was deploying is Nextcloud, so that’s the `name_prefix` throughout. You can change `name_prefix` to `myapp` and you get `myapp-private` and a `myapp-data` bucket instead.
Setting up the project
Before we create any infrastructure, there are three decisions that shaped how I built this:
- How OpenTofu authenticates
- How the modules declare their provider
- Where the zone is defined
Credentials
The UpCloud provider reads UPCLOUD_USERNAME and UPCLOUD_PASSWORD from the environment, so the provider block can be completely empty:
export UPCLOUD_USERNAME=”your-api-username”
export UPCLOUD_PASSWORD=”your-api-password”
Providers
In the project root, create a versions.tf file:
terraform {
required_version = “>= 1.6”
required_providers {
upcloud = {
source = “UpCloudLtd/upcloud”
version = “~> 5.0”
}
}
}
provider “upcloud” {}
The ~> 5.0 constraint allows any 5.x release but not 6.0, so you get fixes without a major version changing resource behaviour.
Each module in modules/ gets a versions.tf with the same required_providers block but no provider block. The root configures the provider and the modules only declare it, which is what keeps them reusable.
Zone
Create a variables.tf file in the root:
variable “zone” {
description = “UpCloud zone for all resources”
type = string
default = “fi-hel1”
}
Every module takes zone = var.zone. Managed databases must sit in the same zone as the private network they attach to, and once attached they can’t migrate zones. So a zone mismatch between modules shows up as a plan that tries to rebuild things.
Run tofu init before moving on.
Networking
The network module creates the private network, a router, and a NAT gateway.
To set this up, create a modules/network/variables.tf file:
variable “name_prefix” {
type = string
}
variable “zone” {
type = string
}
variable “cidr” {
type = string
default = “10.0.10.0/24”
}
Then create a modules/network/main.tf file:
resource “upcloud_router” “this” {
name = “${var.name_prefix}-router”
lifecycle {
ignore_changes = [static_route]
}
}
resource “upcloud_network” “private” {
name = “${var.name_prefix}-private”
zone = var.zone
router = upcloud_router.this.id
ip_network {
address = var.cidr
dhcp = true
dhcp_default_route = true
dhcp_dns = [“1.1.1.1”, “8.8.8.8”]
family = “IPv4”
}
}
resource “upcloud_gateway” “this” {
name = “${var.name_prefix}-gateway”
zone = var.zone
features = [“nat”]
router {
id = upcloud_router.this.id
}
}
And finally, a modules/network/outputs.tf file:
output “network_id” {
value = upcloud_network.private.id
}
output “router_id” {
value = upcloud_router.this.id
}
Then, in the root main.tf file, call the module and add an output so the network ID is visible after the apply:
module “network” {
source = “./modules/network”
name_prefix = “nextcloud”
zone = var.zone
}
output “network_id” {
value = module.network.network_id
}
If you’re coming from AWS, note that there’s no separate subnet resource. The ip_network block is the subnet, so one network means one address range. The CIDR is a variable because peering later needs non-overlapping ranges.
Outbound access
The app servers have no public IP, but they still need to install packages, and that’s the NAT gateway’s job.
A gateway with features = [“nat”] lets the router translate outbound traffic, and it doesn’t tell the servers to send traffic there.
Without dhcp_default_route = true, DHCP never gives the servers a default route, so anything outside 10.0.10.0/24 has nowhere to go. The servers boot normally, cloud-init fails to install anything, and the only visible symptom is the load balancer returning 503 because no backend is serving (I can’t tell you how many hours I spent debugging this one).
The ignore_changes on the router exists for a related reason. The gateway adds its own static route to the router behind the scenes. Without the lifecycle rule, OpenTofu sees that route as drift and removes it on the next apply.
Run tofu apply.
The gateway takes a couple of minutes to provision, and when it finishes, you should see:
Apply complete! Resources: 3 added, 0 changed, 0 destroyed.
Outputs:
network_id = “036656aa-b67e-4b07-999b-80441b8ba056”
Your ID will be different.
In the UpCloud control panel, open Networks and select nextcloud-private. The overview should show 10.0.10.0/24 with DHCP enabled.
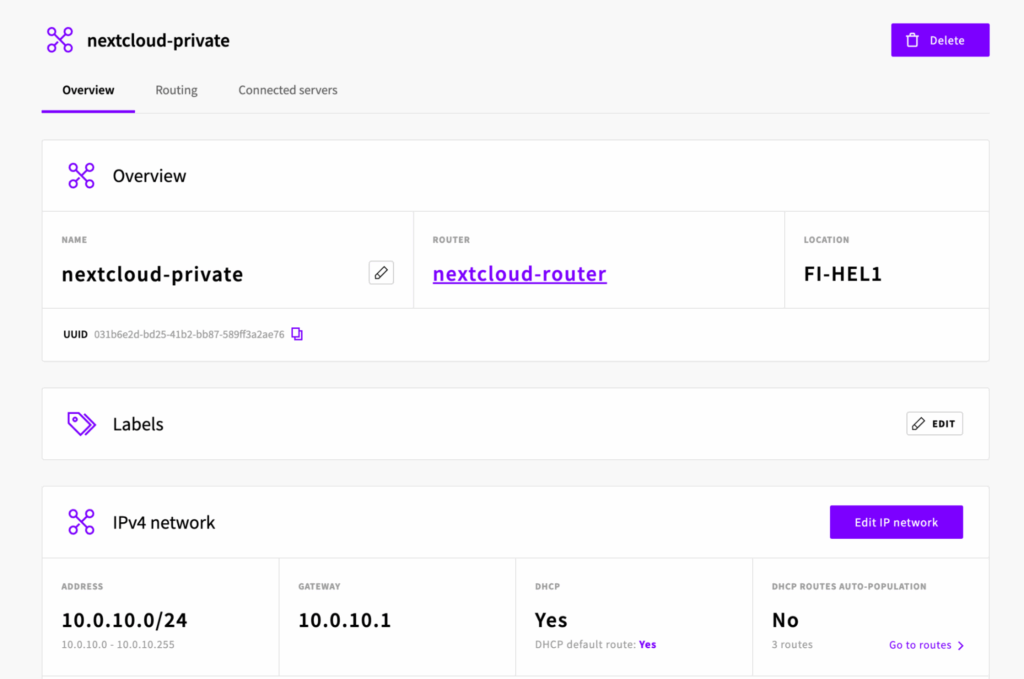
UpCloud network overview showing the private network with DHCP enabled
Then check the Routing tab. You’ll see a 0.0.0.0/0 route. That’s the route the gateway added, and the one the ignore_changes rule protects.
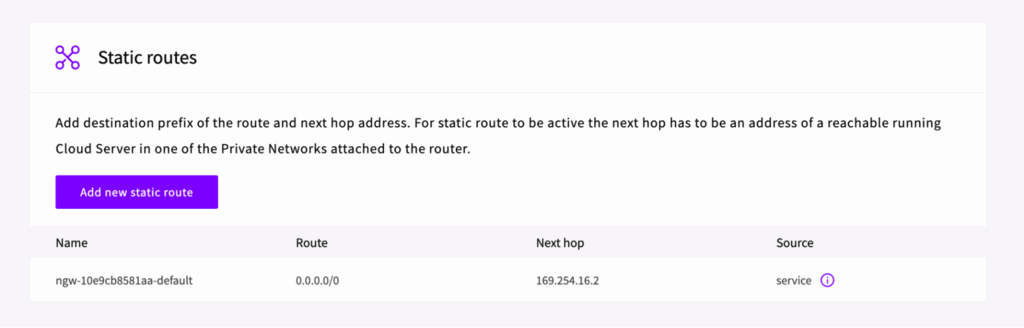
Routing tab showing the default route added by the NAT gateway
Servers
The compute module creates the app servers.
To do this, create a modules/compute/variables.tf file:
variable “name_prefix” {
type = string
}
variable “zone” {
type = string
}
variable “network_id” {
type = string
}
variable “plan” {
type = string
default = “1xCPU-2GB”
}
variable “server_count” {
type = number
default = 2
}
Then a modules/compute/main.tf file:
resource “upcloud_server” “app” {
count = var.server_count
hostname = “${var.name_prefix}-app-${count.index + 1}”
zone = var.zone
plan = var.plan
metadata = true
template {
storage = “Ubuntu Server 24.04 LTS (Noble Numbat)”
size = 25
}
network_interface {
type = “private”
network = var.network_id
}
login {
user = “root”
create_password = true
password_delivery = “email”
}
user_data = <<-EOF
#!/bin/bash
set -x
for i in 1 2 3 4 5; do
apt-get update && apt-get install -y nginx && break
sleep 15
done
echo “hello from $(hostname)” > /var/www/html/index.html
systemctl enable –now nginx
EOF
}
And finally, a modules/compute/outputs.tf file:
output “private_ips” {
value = [for s in upcloud_server.app : s.network_interface[0].ip_address]
}
Go back to the root directory, and in the main.tf file, call the compute module and add an output for the private IPs:
module “compute” {
source = “./modules/compute”
name_prefix = “nextcloud”
zone = var.zone
network_id = module.network.network_id
}
output “app_private_ips” {
value = module.compute.private_ips
}
The nginx page is a placeholder so the load balancer has something to check. We’ll replace the user_data with real connection details later.
Access
The servers have a single private interface, so there’s no public IP and no SSH from your machine. The fallback is the web console in the control panel, which is why the login block generates a root password and emails it to you.
You can’t have both. UpCloud rejects create_password = true alongside SSH keys, so pick one per server. With no public interface, a key has nothing to connect to, so the password is the option to go with.
metadata = true is required too. Cloud-init reads user_data from UpCloud’s metadata service, and the API refuses to create a server from a cloud-init template without it.
Cloud-init
I added the retry loop because both servers boot at the same moment and hit the package mirrors together, and on one run, one of them failed to install nginx.
Cloud-init runs once, and nothing supervises it, so that failure was permanent. Anything in user_data that touches the network should assume it’ll sometimes fail.
Run tofu apply and when it finishes, you should see:
Apply complete! Resources: 2 added, 0 changed, 0 destroyed.
Outputs:
app_private_ips = [
“10.0.10.2”,
“10.0.10.3”,
]
network_id = “036656aa-b67e-4b07-999b-80441b8ba056”
In the control panel, open Servers. You’ll see nextcloud-app-1 and nextcloud-app-2.
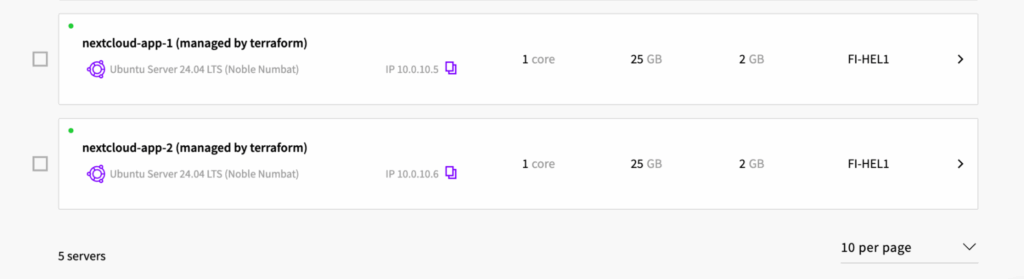
Clicking on any of them will reveal they have no public IP, only a private one.
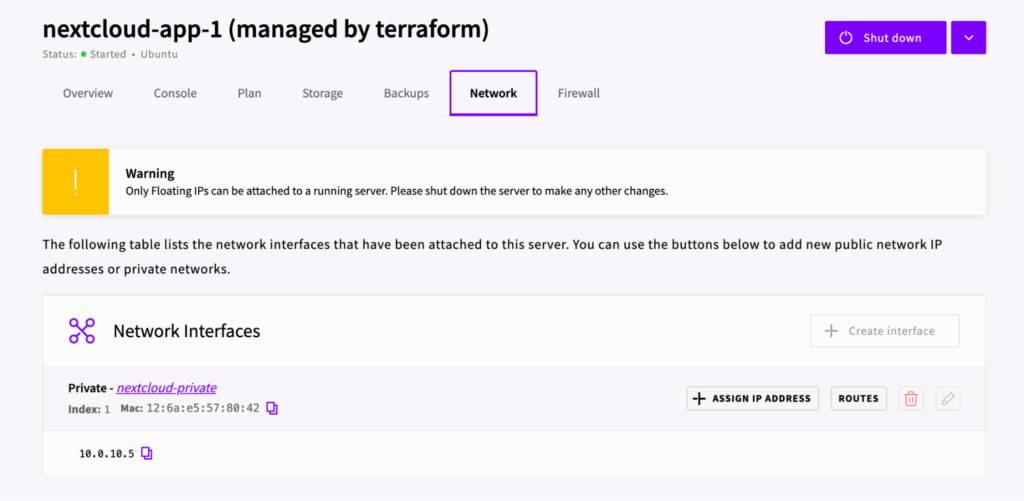
UpCloud control panel showing two servers with only private IPs
Load balancer
The load balancer module creates the only public resource in the build.
To set it up, create a modules/loadbalancer/variables.tf file:
variable “name_prefix” {
type = string
}
variable “zone” {
type = string
}
variable “network_id” {
type = string
}
variable “backend_ips” {
type = list(string)
}
Then a modules/loadbalancer/main.tf file:
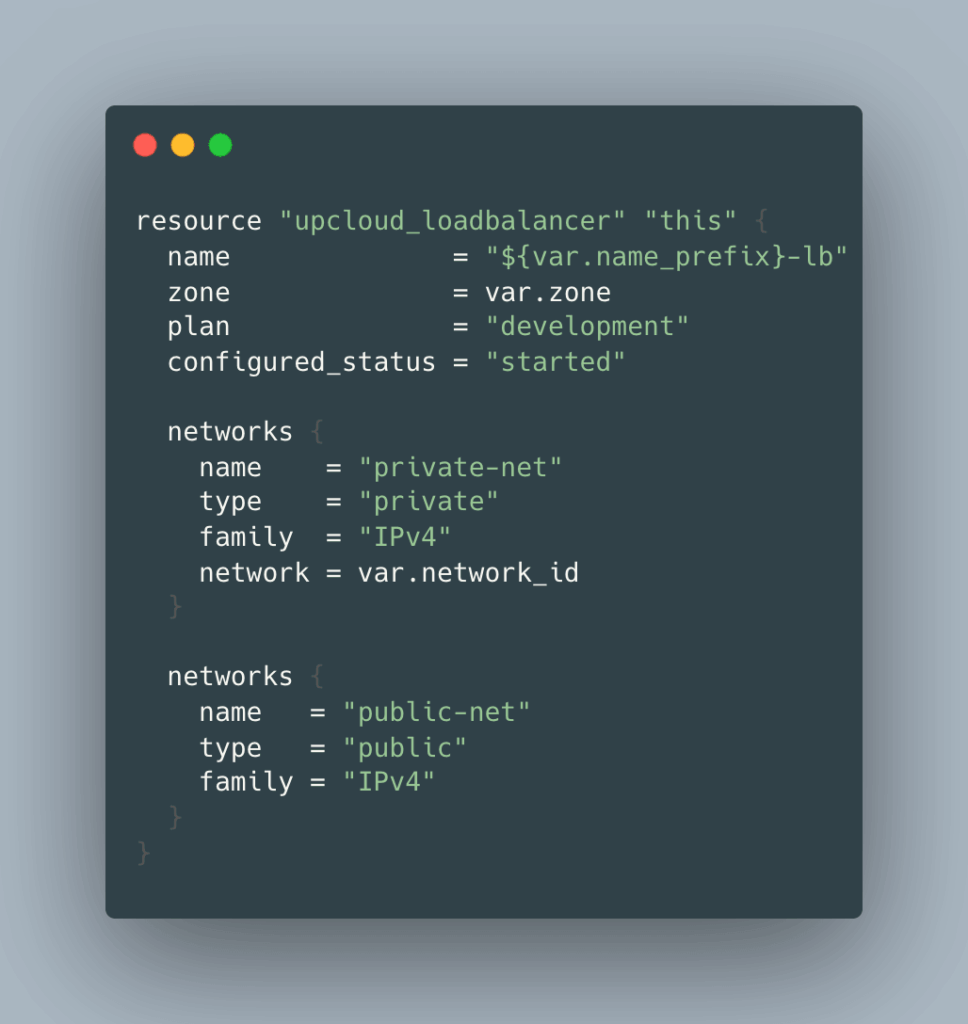
resource “upcloud_loadbalancer” “this” {
name = “${var.name_prefix}-lb”
zone = var.zone
plan = “development”
configured_status = “started”
networks {
name = “private-net”
type = “private”
family = “IPv4”
network = var.network_id
}
networks {
name = “public-net”
type = “public”
family = “IPv4”
}
}
resource “upcloud_loadbalancer_backend” “this” {
loadbalancer = upcloud_loadbalancer.this.id
name = “${var.name_prefix}-backend”
properties {
health_check_type = “http”
health_check_url = “/”
health_check_interval = 10
health_check_fall = 3
health_check_rise = 2
health_check_expected_status = 200
timeout_server = 30
}
}
resource “upcloud_loadbalancer_static_backend_member” “app” {
count = length(var.backend_ips)
backend = upcloud_loadbalancer_backend.this.id
name = “${var.name_prefix}-member-${count.index}”
ip = var.backend_ips[count.index]
port = 80
weight = 100
max_sessions = 1000
enabled = true
}
resource “upcloud_loadbalancer_frontend” “this” {
loadbalancer = upcloud_loadbalancer.this.id
name = “${var.name_prefix}-frontend”
mode = “http”
port = 80
default_backend_name = upcloud_loadbalancer_backend.this.name
networks {
name = upcloud_loadbalancer.this.networks[1].name
}
}
And then a modules/loadbalancer/outputs.tf file:
output “public_dns” {
value = upcloud_loadbalancer.this.networks[1].dns_name
}
In the root main.tf file, call the module and add an output for the DNS name:
module “loadbalancer” {
source = “./modules/loadbalancer”
name_prefix = “nextcloud”
zone = var.zone
network_id = module.network.network_id
backend_ips = module.compute.private_ips
}
output “lb_dns” {
value = module.loadbalancer.public_dns
}
backend_ips takes the server list straight from the compute module. Change server_count, and the backend members follow, with no edits to this module.
Public access
There’s no public network resource on UpCloud. Public access is a networks block with type = “public” on whatever needs it, and in this build that’s only the load balancer. It sits on both networks: public to receive traffic, private to reach the servers.
The frontend and the DNS output both use networks[1], which is the public block because it’s declared second. That index is positional because if you reorder the blocks, both point to the private network. The DNS name is read from the network block rather than the top-level dns_name attribute, which is deprecated because a load balancer can now have more than one network.
This listens on plain HTTP. For production, add a certificate bundle and a frontend on 443. The provider supports both automatic and manual bundles.
Health checks
fall = 3 and rise = 2 are deliberately different. A server is pulled after 30 seconds of failures but brought back after 20 seconds of success, so a single slow response doesn’t halve your capacity and a flapping server doesn’t keep rejoining.
Run tofu apply and when it finishes:
Apply complete! Resources: 5 added, 0 changed, 0 destroyed.
Outputs:
app_private_ips = [
“10.0.10.2”,
“10.0.10.3”,
]
lb_dns = “lb-0a7026fbfb434a388e1b23b9dd0cc42d-2.upcloudlb.com”
network_id = “036656aa-b67e-4b07-999b-80441b8ba056”
Don’t curl it straight away. An apply finishing means UpCloud accepted the resources, not that the servers are serving. For the first few minutes, you’ll get a 503, which is the health check correctly refusing to send traffic to servers still running cloud-init.
Give it three to four minutes, then:
curl -H “Connection: close” http://<your-lb-dns>
Run it a few times. The response should alternate between hello from nextcloud-app-1 and hello from nextcloud-app-2. The Connection: close header forces a fresh connection each time, so you’re testing the balancing rather than a reused connection.
In the control panel, open Load balancers, select nextcloud-lb, and check the backend. Both members should show as Up. If one is Down while the other serves, it’s a server that didn’t finish cloud-init, not a load balancer problem. That’s the first place to look when traffic only ever reaches one backend.
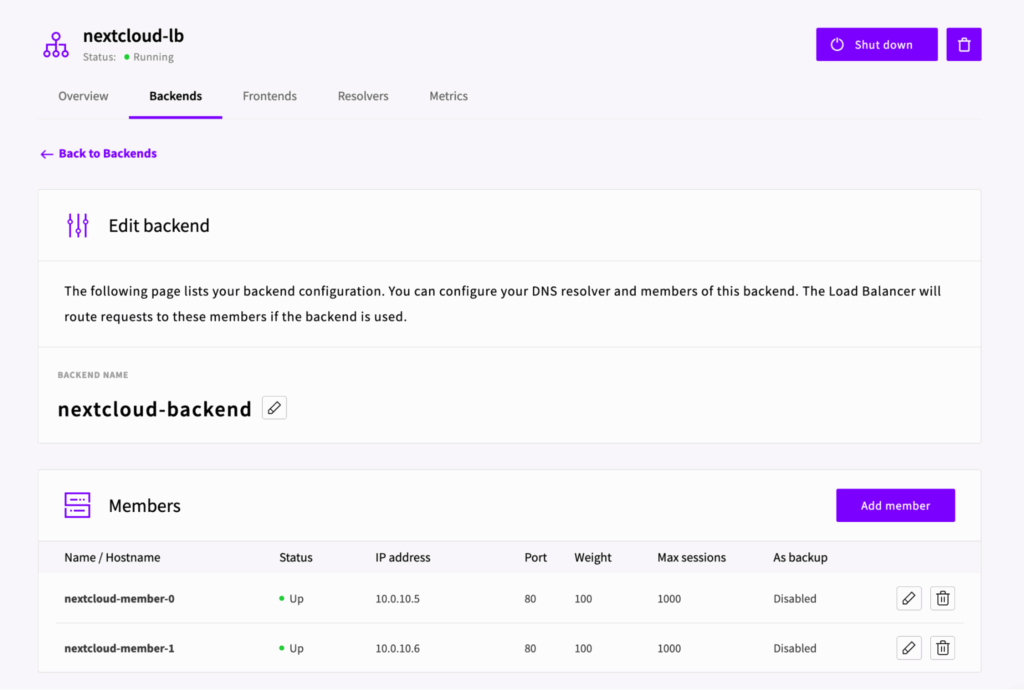
UpCloud control panel showing the load balancer with both backend members up
Wrapping up
At this point, you have a private network with a NAT gateway for outbound access, two app servers with no public IP at all, and a load balancer in front of them that health-checks both and distributes traffic between them.
However, it has nowhere to put anything. The servers serve a placeholder page, and nothing persists.
Part 2 fixes that. We’ll add managed PostgreSQL with connection pooling, Valkey for caching and sessions, object storage for uploads, an encrypted shared filesystem that both servers can mount, and a peered management network.
Then we’ll wire every connection detail into the servers through cloud-init, and finish with how to manage and secure the whole thing.
Before you go, two things. If you’re stopping here for now, run `tofu destroy`, since the gateway and the load balancer bill hourly, and one `tofu apply` brings everything back.
And the complete modules for both parts are in the GitHub repository if you’d rather read ahead.
Discussion