Part 1 of this series established the architecture: a three-node RabbitMQ cluster on UpCloud with quorum queues, private SDN networking for inter-node traffic, and a load balancer to route client connections to healthy nodes.
Before we build that cluster, we need a single node that is correctly configured, secured, and verified. Simply clustering a misconfigured node does not fix its problems; it will only distribute them across three machines.
This part walks us through provisioning an UpCloud server, installing RabbitMQ from the official RabbitMQ and Erlang repositories, applying configuration changes to separate a development default from a production deployment, and verifying that the result behaves as expected before any clustering occurs.
Step 1: Provisioning the Server
To get started, create an UpCloud Server with the following configuration:
| Setting | Value |
|---|---|
| OS image | Ubuntu 26.04 LTS (Resolute Raccoon) |
| Plan | PREMIUM-4xCPU-16GB (minimum); PREMIUM-8xCPU-32GB (higher-throughput production) |
| OS storage | Included MaxIOPS storage with the Premium plan, 150 GB |
| Data storage | MaxIOPS (NVMe), minimum 100 GB, added as a separate device |
| Network | Attach to an SDN private network in addition to the public interface |
| Region | Any, but remember it — the two nodes we add in Part 3 need to be in the same region as this one |
We need to use a Premium plan, not a Starter plan, because MaxIOPS storage is only available on Premium plans. Starter plans are limited to Standard block storage, which is not suitable for the write throughput required by RabbitMQ quorum queues.
A single RabbitMQ node that will later join a three-node quorum cluster needs enough headroom to handle its share of cluster traffic, not only baseline single-node traffic. Starting with 4 vCPU and 16 GB RAM is a practical minimum for moderate production use, and UpCloud lets us resize vertically later as real workload data becomes available.
Storage deserves particular attention for RabbitMQ. Quorum queues write to the Raft log on disk before acknowledging messages to producers. If the storage layer cannot keep up with write throughput, RabbitMQ flow control activates, and producers begin to block. Keep the OS on its own volume and place RabbitMQ’s data directory on a separate MaxIOPS volume. This prevents a full data volume from starving the OS and lets us resize the two volumes independently.
The 100 GB minimum for the data volume is only a starting point. We can size it up based on message size, publish rate, and how long messages remain in queues before being consumed.
For example, if a producer produces 5,000 messages per second, each message averages 2 KB, and messages are retained for 12 hours, the math looks like this:
5,000 × 2 KB × 43,200 seconds = ~432 GB
That number covers peak message data before replication, filesystem overhead, and operational headroom. Since the data volume can be resized in UpCloud Hub, starting at 100 GB and expanding based on observed usage, is reasonable for moderate workloads.
Also, we need to create an SDN private network in UpCloud Hub before provisioning the server if we do not already have one, and then attach the server to that network during creation. UpCloud will add a second network interface alongside the public one.
Once the server is running, SSH into it and check the interfaces:
ip addr
The private interface is typically eth1 or ens4, depending on the OS image. Note the interface name and private IP address. We will use them in Part 3 when binding RabbitMQ inter-node traffic to the private network.
UpCloud assigns the second storage device as /dev/vdb inside the VM. We’ll need to format it and mount it at RabbitMQ’s data directory:
mkfs.ext4 /dev/vdb
mkdir -p /var/lib/rabbitmq
echo ‘/dev/vdb /var/lib/rabbitmq ext4 defaults,noatime 0 2’ >> /etc/fstab
systemctl daemon-reload
mount -a
The noatime mount option prevents the filesystem from updating the access timestamp on every read, which matters for a write-intensive workload like a message broker.
Step 2: Installing RabbitMQ
Ubuntu 26.04 ships RabbitMQ 4.0.5 in its default apt repository. That is part of the RabbitMQ 4.x series this tutorial is based on, and it covers all of the configuration, security, and clustering steps that follow. The Team RabbitMQ repositories at deb1.rabbitmq.com, which would give us the current 4.3.x release, do not yet publish packages for Ubuntu 26.04, so the default repository is the right source for now.
apt-get update -y
apt-get install -y erlang rabbitmq-server
RabbitMQ and Erlang have a specific compatibility matrix. The Erlang package that Ubuntu 26.04 pulls in as a dependency is tested against the bundled RabbitMQ version, so the default install produces a compatible pair. If we later upgrade RabbitMQ from a different source, we need to verify that the Erlang version still falls within the supported range for that release using the RabbitMQ Erlang Version Requirements page.
After installation, enable the management plugin. The management API is how we verify the broker state, export definitions, and inspect queues, connections, and channels:
rabbitmq-plugins enable rabbitmq_management
systemctl enable rabbitmq-server
systemctl start rabbitmq-server
Confirm the plugin is actually enabled before continuing. Sometimes, the enable command can silently fail to apply:
rabbitmq-plugins list | grep rabbitmq_management
The rabbitmq_management line should show [E] on the left:
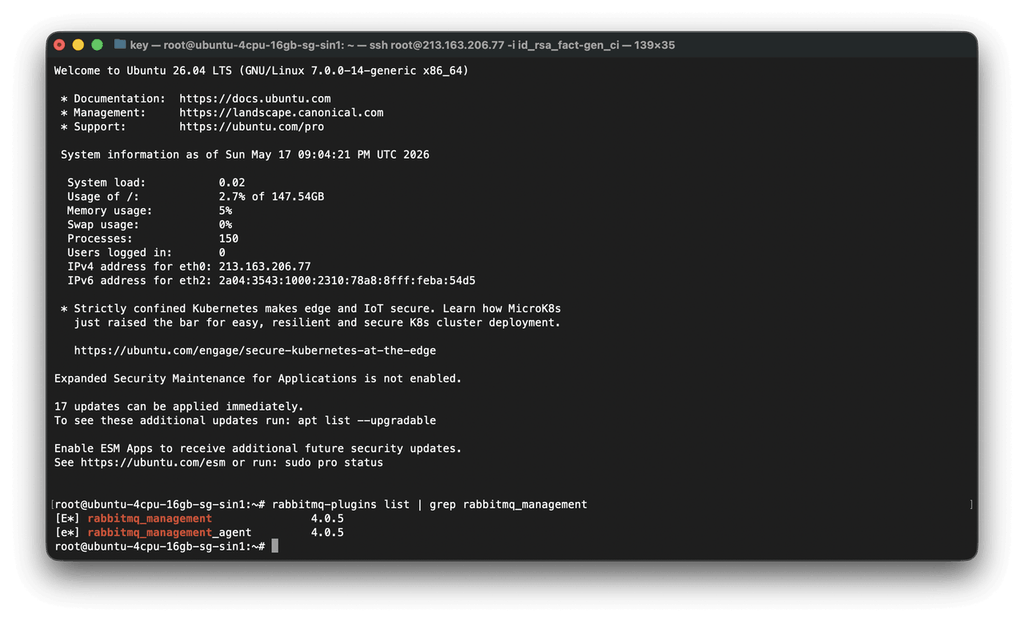
If it shows [ ], run the enable command again and restart the service:
rabbitmq-plugins enable rabbitmq_management
systemctl restart rabbitmq-server
Then confirm port 15672 is listening:
ss -tlnp | grep 15672
If nothing appears on 15672 even after the plugin shows [E], check the logs:
journalctl -u rabbitmq-server –since “5 minutes ago”
Verify the installation and confirm the Erlang and RabbitMQ versions are compatible:
rabbitmqctl status
The output of this command shows both the RabbitMQ version and the Erlang version it is running against. We must confirm that the Erlang version falls within the supported range on the RabbitMQ Erlang Version Requirements page for our RabbitMQ release before proceeding.
Step 3: Initial Configuration
RabbitMQ supports two configuration file formats. The current format is rabbitmq.conf, which uses a flat key = value syntax. The legacy format is rabbitmq.config, written as an Erlang term file with a .config extension. If both files exist in the configuration directory, RabbitMQ reads rabbitmq.conf and ignores the Erlang term file for main configuration, though advanced.config (the modern Erlang term file) can coexist with rabbitmq.conf for settings not yet exposed in the new format.
In this tutorial, we will use rabbitmq.conf for everything it supports. It is readable, version-controllable, and not vulnerable to the syntax errors that Erlang term files invite.
The default configuration file location on Linux is /etc/rabbitmq/rabbitmq.conf. It may not exist after a fresh installation; create it:
touch /etc/rabbitmq/rabbitmq.conf
Now, let’s configure each relevant setting one by one.
Memory threshold
The default memory threshold is 0.4, meaning RabbitMQ activates flow control when it uses 40% of the available RAM. On a 16 GB node, that triggers at around 6.4 GB of broker memory. This threshold is a starting point, not a production value.
For a node handling real workloads, we want the threshold high enough that normal operating peaks do not trigger flow control, but low enough that the OS retains enough room to function.
A reasonable starting value for a dedicated RabbitMQ node:
vm_memory_high_watermark.relative = 0.6
At 60% on a 16 GB node, flow control is activated at around 9.6 GB. The remaining 40% gives the OS, filesystem cache, and other processes enough room to operate. Monitor memory under our actual workload and adjust from there. Do not set this above 0.7 on a node that is not exclusively running RabbitMQ.
Disk free limit
The default disk free limit is 50 MB. When free disk space drops below this value, RabbitMQ blocks all publishers to prevent writing into a disk-full condition, which would corrupt the Raft log.
On a production cluster with any real data volume, 50 MB of free space is a realistic normal operating condition, not a warning threshold. By the time we hit it, we have already run out of room.
Set the disk free limit to a value that gives us time to react:
disk_free_limit.relative = 1.5
This sets the limit to 1.5 times the total physical memory. On a 16 GB node, that is 24 GB of required free disk space. When free space drops below that value, the alarm activates and publishers block. That alarm gives us time to add capacity, clear old data, or investigate before the node runs out of disk space.
If our data volume is much larger than our memory, use an absolute value instead:
disk_free_limit.absolute = 10GB
Make sure to use one or the other, not both. If both are set, disk_free_limit.absolute takes precedence, and the relative setting is ignored, even if the absolute value is smaller and leaves less headroom.
Users, vhosts, and permissions
RabbitMQ ships with a guest user and a single default vhost named /. The guest user has full administrator access and a password of guest. We will remove it in the next section. Before we do it, create the users and vhosts our application needs.
Create a vhost for our application:
rabbitmqctl add_vhost production
Create an application user with a strong password:
rabbitmqctl add_user appuser ‘choose-a-strong-password-here’
rabbitmqctl set_permissions -p production appuser “.*” “.*” “.*”
The three “.*” arguments grant the user configure, write, and read permissions on all resources in the production vhost. For stricter environments, scope these to specific exchange and queue name patterns.
Create a separate administrator user for management access:
rabbitmqctl add_user admin ‘choose-a-different-strong-password’
rabbitmqctl set_user_tags admin administrator
rabbitmqctl set_permissions -p production admin “.*” “.*” “.*”
Applying the configuration
Restart RabbitMQ to apply the rabbitmq.conf changes from above. The users and vhosts created with rabbitmqctl take effect immediately, but the memory threshold, disk free limit, and listener settings require a restart:
systemctl restart rabbitmq-server
Once the service is back up, download rabbitmqadmin from the management API. This tool is used in the sections that follow to declare exchanges and queues and to run the verification tests:
curl -s http://admin:yourpassword@localhost:15672/cli/rabbitmqadmin \
> /usr/local/bin/rabbitmqadmin
chmod +x /usr/local/bin/rabbitmqadmin
Verify the download produced a working binary:
rabbitmqadmin –version
If this prints nothing or errors, the download failed, likely because the management API wasn’t reachable when curl ran, so the file contains an error page instead of the script. Re-run the curl command once the API is confirmed up on port 15672 to fix the setup.
Step 4: Securing the Node
Now that our node is set up and running, there are a few basic security measures we should implement.
Removing the default guest user
The guest user should be one of the first things we remove after installation. It has a known password and full administrator privileges. Even though the default configuration restricts guest to localhost connections, that restriction is one configuration change away from disappearing.
Remove the account by running the following command:
rabbitmqctl delete_user guest
Confirm it is gone by listing the active users:
rabbitmqctl list_users
Firewall rules
RabbitMQ uses several ports, and each has a different exposure requirement. We should configure our UpCloud Firewall rules to enforce this:
- 5672 (AMQP) and 5671 (AMQPS). Accessible from our application servers or through the UpCloud Load Balancer, not from the public internet directly.
- 15672 (management UI/API). Accessible only from our internal network or specific admin IP addresses. Exposing this to the internet gives anyone who can reach it a full view of our broker state and, if an account is compromised, full administrative access.
- 25672 (inter-node communication) and 4369 (Erlang Port Mapper Daemon). Accessible only between the cluster nodes themselves. Scope these rules to our private SDN network. No external system needs to reach these ports.
In the UpCloud Firewall, we need to create rules that accept traffic on 5672 from our application server IPs, accept traffic on 15672 from our admin IP range, accept traffic on 25672 and 4369 from the private network IP range of our cluster nodes, and deny everything else to those ports.
Private vs public access
We should bind the management listener to avoid unnecessary public exposure. For now, the management plugin defaults to listening on all interfaces. Make sure to restrict access via the firewall as above, and add TLS before exposing it to any remote access.
In rabbitmq.conf:
listeners.tcp.default = 5672
management.listener.port = 15672
In Part 3, when we configure clustering, we will add explicit inter-node listener bindings to the private network interface. Setting them up here would require the private network to already be configured for clustering, which it is not yet.
TLS
TLS for RabbitMQ covers three separate connection paths, each with its own configuration: AMQP client connections, the management HTTP API and UI, and inter-node cluster traffic. These are independent. Enabling TLS for client connections does not affect the management UI or inter-node communication, and vice versa.
For AMQP over TLS on port 5671:
listeners.ssl.default = 5671
ssl_options.cacertfile = /etc/rabbitmq/certs/ca_certificate.pem
ssl_options.certfile = /etc/rabbitmq/certs/server_certificate.pem
ssl_options.keyfile = /etc/rabbitmq/certs/server_key.pem
ssl_options.verify = verify_peer
ssl_options.fail_if_no_peer_cert = false
Setting verify_peer with fail_if_no_peer_cert = false means the server presents its certificate to clients but does not require clients to present one. Set fail_if_no_peer_cert = true and provision client certificates if you need mutual TLS.
For the management UI over HTTPS:
management.ssl.port = 15671
management.ssl.cacertfile = /etc/rabbitmq/certs/ca_certificate.pem
management.ssl.certfile = /etc/rabbitmq/certs/server_certificate.pem
management.ssl.keyfile = /etc/rabbitmq/certs/server_key.pem
Inter-node TLS uses the Erlang distribution protocol and is configured separately in an Erlang term file. For a single node being prepared for clustering, we will need to configure inter-node TLS when we set up the cluster in Part 3. The certificates need to be consistent across all nodes, which makes it a cluster-level concern rather than a single-node one.
Securing the management UI
Beyond TLS, we should apply two controls to the management UI. First, restrict which users have administrator tags: only accounts that need to manage the broker should be tagged as administrators. Application users should have no management tags. Second, consider whether you need the management UI to be network-accessible at all.
If we manage the broker exclusively through rabbitmqctl on the host, we can restrict the management listener to localhost:
management.listener.ip = 127.0.0.1
For most teams, the management UI is useful remotely, particularly during incidents. If we keep it network-accessible, TLS and IP restriction at the firewall are the minimum requirements.
Step 5: Setting up for Persistence and Durability
Queue durability and message persistence are two independent settings. Both need to be set explicitly.
A durable queue survives a broker restart. If we declare a queue without the durable flag, it is deleted when RabbitMQ restarts. A persistent message is written to disk before the broker acknowledges it to the producer. A message published to a durable queue with transient delivery mode lives only in memory and will not survive a restart, even though the queue itself persists. For any message that has business value, we should always declare the queue as durable and publish with persistent delivery mode (delivery mode 2 in the AMQP protocol).
With quorum queues, durability is enforced by default, and messages are always written to disk before acknowledgment. The distinction between durable and transient matters mainly for classic queues, which should not be used for production workloads where message loss creates a business problem.
What persistence actually guarantees is this: once the broker sends a publisher confirm, the message has been written to a majority of replicas and will survive any single node failure. What it does not guarantee is the safety of messages the producer sent but has not yet received confirmation for. A message in flight between the producer and the broker is at risk until the confirmation arrives. If the broker fails before sending the confirm, the producer must retry.
This is why publisher confirmations are necessary. Fire-and-forget publishing cannot distinguish between a message that was received and one that was lost. We should enable publisher confirms on our producers and handle the confirm callback before treating a message as delivered.
Dead letter exchanges
Without a dead letter exchange, messages that cannot be processed disappear silently. A consumer that rejects a message with requeue=false, a message that exceeds its TTL, or a message that cannot enter a full queue are all discarded without any record that they existed.
A dead letter exchange (DLX) is a regular exchange that receives these messages. We should configure it as a policy applied to our queues:
# Declare the dead letter exchange
rabbitmqadmin -u admin -p yourpassword -V production \
declare exchange name=dlx type=direct durable=true
# Declare a queue to receive dead-lettered messages
rabbitmqadmin -u admin -p yourpassword -V production \
declare queue name=dead-letter-queue durable=true \
arguments='{“x-queue-type”:”quorum”}’
# Bind the dead letter queue to the exchange
rabbitmqadmin -u admin -p yourpassword -V production \
declare binding source=dlx destination=dead-letter-queue routing_key=dead
# Apply the DLX policy to all queues in the production vhost
rabbitmqctl set_policy -p production DLX “.*” \
‘{“dead-letter-exchange”:”dlx”,”dead-letter-routing-key”:”dead”}’ \
–apply-to queues
With this policy in place, any message that cannot be delivered lands in dead-letter-queue, where we can inspect it, alert on it, and decide whether to replay it.
Also, configure an alert for the depth of this queue in our monitoring setup so that accumulation becomes visible before it grows large.
Step 6: Verifying the Setup
Before sending any real traffic to this node, it is important to verify that the configuration is correct and that no alarms are already active.
Check the broker status:
rabbitmqctl status
Look for the alarms section in the output.
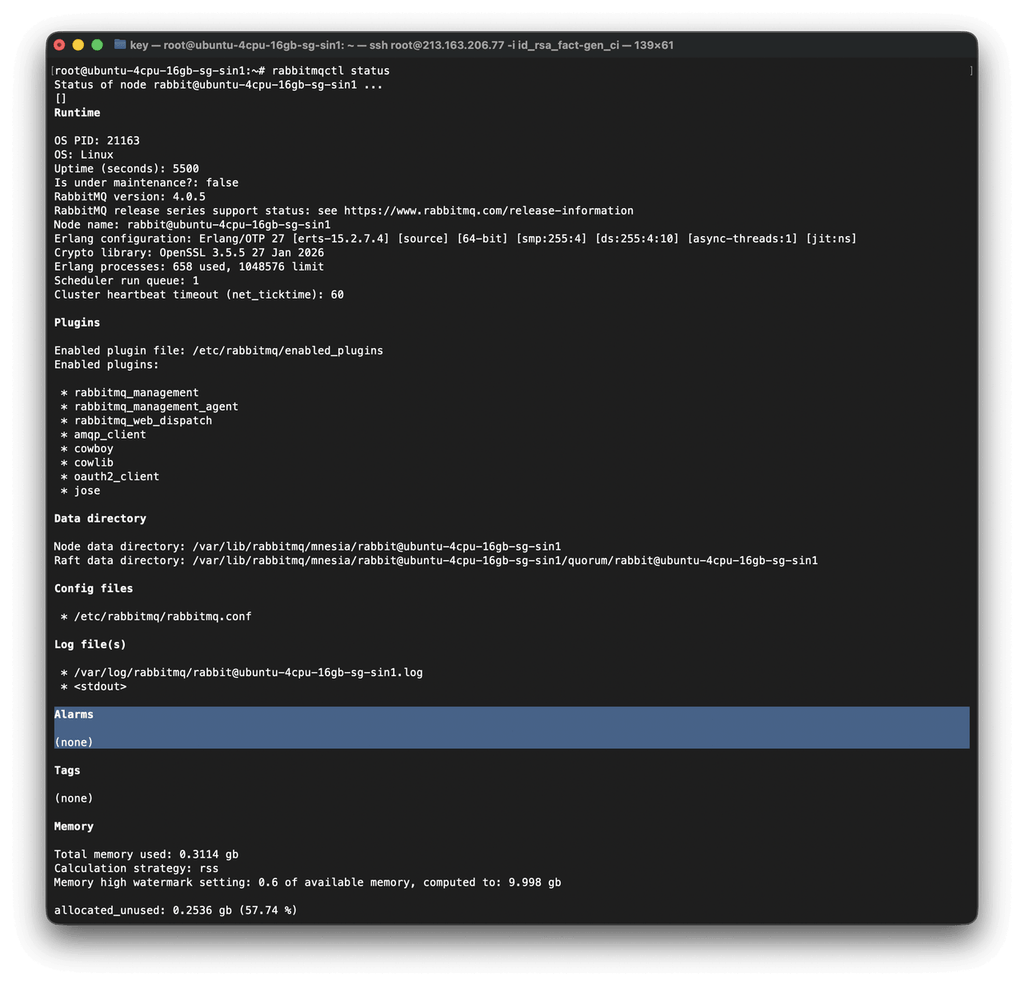
Before any load arrives, the memory and disk alarms should not be active. If the disk alarm is already triggered, our data volume is too small, or the disk free limit is set higher than the available space allows. If the memory alarm is triggered on a freshly started node, the memory threshold is misconfigured.
Next, verify that the guest user no longer exists and that the application user has the correct permissions:
rabbitmqctl list_users
rabbitmqctl list_permissions -p production
The list_users output should show only the accounts we created. The list_permissions output should show our application user with configure, write, and read permissions scoped to the production vhost.
Now, run a producer and consumer test to confirm that the AMQP listener is working and messages flow correctly. The rabbitmqadmin CLI is the simplest way to do this:
# Declare a test quorum queue
rabbitmqadmin -u admin -p yourpassword -V production \
declare queue name=test-queue durable=true \
arguments='{“x-queue-type”:”quorum”}’
# Publish a test message
rabbitmqadmin -u admin -p yourpassword -V production \
publish routing_key=test-queue payload=”hello from part 2″
# Consume it
rabbitmqadmin -u admin -p yourpassword -V production \
get queue=test-queue
We should receive a similar output:
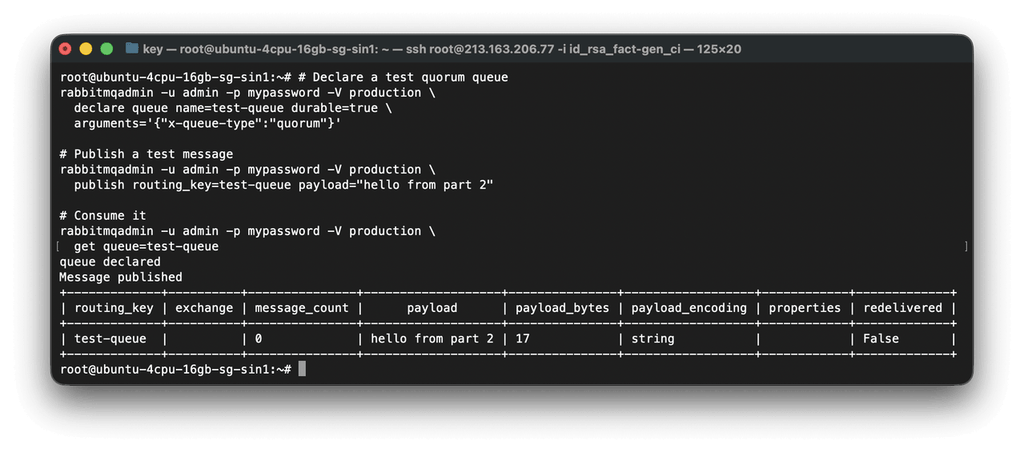
Such a successful consume confirms that the queue is working, the user permissions are correct, and messages are flowing through the vhost. Clean up when we are done:
rabbitmqadmin -u admin -p yourpassword -V production \
delete queue name=test-queue
Open the management UI at http://your-server-ip:15672 and log in as the admin user. Confirm that the production vhost appears in the vhost list:
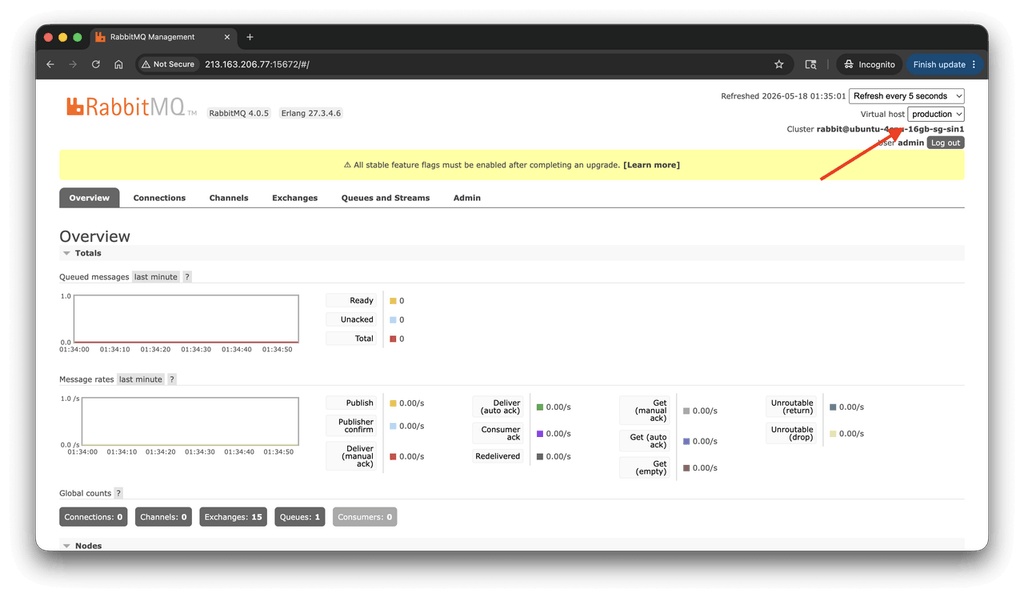
The management UI’s queue view, connection list, and channel counts are the primary tools we will use to inspect cluster state during incidents in Part 3. Let’s get familiar with the layout now to make that easier.
At this point, we have a working, persistent, and reliable RabbitMQ node!
Exporting Definitions
RabbitMQ’s definitions export captures the complete broker topology: all exchanges, queues, bindings, vhosts, users, permissions, and runtime policies. We can export it now, before clustering, so we have a clean reference point and a recovery artifact.
Export definitions using the management API:
curl -s -u admin:yourpassword http://localhost:15672/api/definitions \
> rabbitmq-definitions-$(date +%Y%m%d).json
Inspect the file and confirm it contains the exchanges, queues, users, vhosts, and policies we configured. It should not be empty, and it should reflect everything we applied in the previous sections.
Store this file off the node. UpCloud Managed Object Storage is a straightforward destination since it is already available in our UpCloud project, is S3-compatible, and keeps the definitions independent of the node’s disk:
s3cmd put rabbitmq-definitions-$(date +%Y%m%d).json \
s3://your-bucket/rabbitmq/definitions/
We can also consider exporting on a schedule. A daily export uploaded to object storage gives us a versioned history of our broker topology, which we can reimport on a new node or use to verify that configuration drift has not occurred.
Two things the definitions export does not contain: in-flight messages and message history. The definitions export is a backup of the topology. If a node fails with unprocessed messages in queues, the definitions export cannot recover those messages. Message durability and loss prevention come from quorum queue replication across cluster nodes, as established in Part 3.
Conclusion
We now have a single RabbitMQ node ready to serve as the basis for a production cluster. It runs a supported RabbitMQ and Erlang combination, stores broker data on a dedicated MaxIOPS volume, uses scoped users and vhosts, and replaces its default development assumptions with explicit production settings.
This setup is still not highly available. A single node remains a single point of failure, and persistent messages do not protect us from losing the server itself. What we have now is the foundation the cluster needs: a known-good node with predictable storage, access control, resource limits, durability settings, and exported definitions.
Those choices carry into Part 3. Next, we will add two more UpCloud servers, configure private inter-node communication, set up the Erlang cookie, form a three-node RabbitMQ cluster, import the saved definitions, and verify that quorum queues replicate correctly across nodes.
Discussion