CircleCI and UpCloud make a great combination for deploying Node.js applications with speed and reliability. CircleCI offers a flexible and developer-friendly CI/CD platform that integrates easily with your GitHub, GitLab, or Bitbucket repository, allowing you to automate builds, tests, and deployments with minimal setup. UpCloud, on the other hand, provides high-performance cloud servers with predictable pricing, an ideal hosting solution for modern web applications.
In this tutorial, you’ll learn how to configure a CircleCI pipeline to automatically deploy a Node.js application to an UpCloud server. Whether you’re running a personal project or managing a production environment, this guide will help you automate your deployment process, reduce manual work, and ensure smooth, consistent application releases.
Why Deploy to UpCloud From Circle CI?
Deploying to UpCloud from CircleCI brings the power of continuous integration and deployment to individual developers and small teams without requiring a dedicated DevOps engineer. CircleCI is a handy tool to automate the entire deployment pipeline from pushing code to production, so you can skip the manual steps of SSHing into servers, running build commands, and restarting services. When used together with UpCloud’s fast, reliable cloud infrastructure, this automation enables you to ship updates quickly and consistently while maintaining full control over your hosting environment.
This setup works well for startups, indie developers, and growing teams who want to spend more time building features and less time wrestling with deployment. CircleCI’s seamless VCS integrations make it easy to set up custom pipelines, while UpCloud’s flexible resource plans and rapid server provisioning ensure your application scales as needed. Together, they offer a streamlined, cost-effective solution for deploying modern Node.js applications with speed, stability, and minimal overhead.
Overview and Prerequisites
In this tutorial, you will start by forking this GitHub repository that has a basic Node.js app. Then, you will set up a new server on UpCloud where the app will be hosted. Next, you will deploy the app manually on the server for the first time.
Then, you’ll connect your repository to Circle CI so that it can handle future deployments for you. In this setup, every time you make a change and push it to GitHub, Circle CI will automatically update the app on your UpCloud server.
To follow along, you will need the following:
- A GitHub account. You will use this account to fork your copy of this GitHub repository on which you will set up the CI/CD workflow. You will learn more about this repository shortly.
- A Circle CI account. You can sign up here.
- An UpCloud account. You can sign up for a free trial here.
- Basic understanding of SSH. Here are a few resources to help you out:
Once you have these in place, let’s now take a quick look at the Node.js app that your CircleCI pipeline will deploy.
The app in the repository is a random facts generator. It has a list of facts in the source code, and it picks and returns a fact from it randomly on each API call:
// contents of index.js
const express = require('express');
const app = express();
const PORT = process.env.PORT || 5001;

// Array of random facts
const facts = [
    "Honey never spoils.",
    "A group of flamingos is called a 'flamboyance.'",
    "Bananas are berries, but strawberries aren't.",
    "Octopuses have three hearts.",
    "Australia is believed to have lost to emus in the Great Emu War of 1932",
    "A jiffy is an actual unit of time: 1/100th of a second.",
    "Cows have best friends and get stressed when they are separated.",
    "The shortest war in history lasted 38 minutes.",
    "The Eiffel Tower can be 15 cm taller during the summer.",
    "A small child could swim through the veins of a blue whale."
];

// Serve static files (HTML, CSS, JS)
app.use(express.static('public'));

// Endpoint to get a random fact
app.get('/random-fact', (req, res) => {
    const randomIndex = Math.floor(Math.random() * facts.length);
    res.json({ fact: facts[randomIndex] });
});

// Start the server
app.listen(PORT, () => {
    console.log(`Server is running on http://localhost:${PORT}`);
});
It also serves a static HTML page on its root path (/). This HTML page contains a heading, a button to generate a random fact, a placeholder for the random fact to be displayed to the user, and a footer at the bottom of the page. Here’s the source code for this page:
<!DOCTYPE html>
<html lang="en">
<head>
    <meta charset="UTF-8">
    <meta name="viewport" content="width=device-width, initial-scale=1.0">
    <title>Random Facts Generator</title>
    <style>
        body {
            font-family: Arial, sans-serif;
            display: flex;
            flex-direction: column;
            align-items: center;
            justify-content: center;
            height: 98vh;
            background-color: #f5f5f5;
        }
        button {
            padding: 10px 20px;
            font-size: 16px;
            cursor: pointer;
        }
        p {
            margin-top: 20px;
            font-size: 20px;
            text-align: center;
        }

        #footer {
            position: absolute;
            bottom: 10px;
            font-size: 0.8rem;
        }
    </style>
</head>
<body>

<h1>Random Fact Generator</h1>
<button id="generate">Get a Random Fact</button>
<p id="fact"></p>
<p id="footer">Made in 2024</p>

<script>
    document.getElementById('generate').onclick = async () => {
        const response = await fetch('/random-fact');
        const data = await response.json();
        document.getElementById('fact').innerText = data.fact;
    };
</script>

</body>
</html>
You can try running the app locally using the following commands:
# Clone the repo
git clone https://github.com/krharsh17/random-facts-generator
cd random-facts-generator

# Install dependencies
yarn

# Run the development server
yarn dev
You can now go to http://localhost:5001 to view the app in action:

Once you click the Get a Random Fact button, you will, indeed, get a random fact.

Ensure that you fork a copy of this repo to your GitHub account before moving ahead. This is important because you will need to make changes to the source code of this app to trigger the CI/CD pipeline and update the deployed application.
Now, let’s move on to setting up the UpCloud server where you will deploy this application.
Setting up an UpCloud Server through upctl
This section will walk you through creating an UpCloud server through upctl. You can find detailed instructions on how to set it up here based on your operating system.
Once you have set up upctl correctly and authenticated with your UpCloud account, running the following command should print the details of your UpCloud account:
✗ upctl account show

  Username: <your-upcloud-username>
  Credits:  <your-credits>

  Resource Limits:
    Cores:                      100
    Detached Floating IPs:       10
    Load balancers:              50
    Managed object storages:     20
    Memory:                  307200
    Network peerings:           100
    Networks:                   100
    NTP excess GiB:               0
    Public IPv4:                 20
    Public IPv6:                100
    Storage HDD:              10240
    Storage MaxIOPS:          10240
    Storage SSD:              10240
Now you’re ready to create a new server. But before doing that, it is important to understand the various options you will need to supply to the upctl create server command.
Server Location
You’ll need to choose the physical location of your server. You should choose the location closest to you for the least latency when connecting to the server remotely.
You can run upctl zone list to view a list of available zones:
✗ upctl zone list

 ID        Description    Public
───────── ────────────── ────────
 au-syd1   Sydney #1      yes
 de-fra1   Frankfurt #1   yes
 es-mad1   Madrid #1      yes
 fi-hel1   Helsinki #1    yes
 fi-hel2   Helsinki #2    yes
 nl-ams1   Amsterdam #1   yes
 pl-waw1   Warsaw #1      yes
 se-sto1   Stockholm #1   yes
 sg-sin1   Singapore #1   yes
 uk-lon1   London #1      yes
 us-chi1   Chicago #1     yes
 us-nyc1   New York #1    yes
 us-sjo1   San Jose #1    yes
Server Plan
Next up, you’ll need to choose a server plan. The server plan defines the CPU, RAM, and storage space available to your server. UpCloud provides you with a range of options from developer-focused small sizes for testing purposes and personal projects to large and cost-effective cloud native plans that unbundle storage and IPv4 addresses from the plans. You can learn more about the available plans here.
You can list the available server plans by running upctl server plans:
✗ upctl server plans
General purpose
Name Cores Memory Storage size Storage tier Transfer out (GiB/month)
────────────────────────── ─────── ──────── ────────────── ────────────── ──────────────────────────
1xCPU-1GB 1 1024 25 maxiops 1024
1xCPU-2GB 1 2048 50 maxiops 2048
CLOUDNATIVE-1xCPU-4GB 1 4096 0 1024
CLOUDNATIVE-1xCPU-8GB 1 8192 0 2048
2xCPU-2GB 2 2048 60 maxiops 3072
CLOUDNATIVE-2xCPU-4GB 2 4096 0 2048
2xCPU-4GB 2 4096 80 maxiops 4096
CLOUDNATIVE-2xCPU-8GB 2 8192 0 2048
CLOUDNATIVE-2xCPU-16GB 2 16384 0 3072
CLOUDNATIVE-4xCPU-8GB 4 8192 0 2048
4xCPU-8GB 4 8192 160 maxiops 5120
CLOUDNATIVE-4xCPU-16GB 4 16384 0 5120
CLOUDNATIVE-4xCPU-24GB 4 24576 0 6144
CLOUDNATIVE-4xCPU-32GB 4 32768 0 7168
CLOUDNATIVE-4xCPU-48GB 4 49152 0 14336
CLOUDNATIVE-6xCPU-16GB 6 16384 0 5120
6xCPU-16GB 6 16384 320 maxiops 6144
CLOUDNATIVE-6xCPU-24GB 6 24576 0 6144
CLOUDNATIVE-8xCPU-16GB 8 16384 0 6144
CLOUDNATIVE-8xCPU-24GB 8 24576 0 7168
CLOUDNATIVE-8xCPU-32GB 8 32768 0 9216
8xCPU-32GB 8 32768 640 maxiops 7168
CLOUDNATIVE-8xCPU-48GB 8 49152 0 14336
CLOUDNATIVE-8xCPU-64GB 8 65536 0 16384
CLOUDNATIVE-8xCPU-96GB 8 98304 0 26624
CLOUDNATIVE-8xCPU-128GB 8 131072 0 30720
CLOUDNATIVE-12xCPU-24GB 12 24576 0 8192
CLOUDNATIVE-12xCPU-32GB 12 32768 0 9216
12xCPU-48GB 12 49152 960 maxiops 9216
CLOUDNATIVE-16xCPU-32GB 16 32768 0 13312
CLOUDNATIVE-16xCPU-48GB 16 49152 0 15360
CLOUDNATIVE-16xCPU-64GB 16 65536 0 20480
16xCPU-64GB 16 65536 1280 maxiops 10240
CLOUDNATIVE-16xCPU-96GB 16 98304 0 26624
CLOUDNATIVE-16xCPU-128GB 16 131072 0 35840
CLOUDNATIVE-16xCPU-192GB 16 196608 0 46080
CLOUDNATIVE-20xCPU-64GB 20 65536 0 22528
CLOUDNATIVE-20xCPU-96GB 20 98304 0 28672
24xCPU-96GB 24 98304 1920 maxiops 12288
CLOUDNATIVE-24xCPU-256GB 24 262144 0 61440
CLOUDNATIVE-32xCPU-64GB 32 65536 0 25600
CLOUDNATIVE-32xCPU-128GB 32 131072 0 40960
32xCPU-128GB 32 131072 2048 maxiops 24576
CLOUDNATIVE-32xCPU-192GB 32 196608 0 51200
CLOUDNATIVE-32xCPU-256GB 32 262144 0 66560
CLOUDNATIVE-32xCPU-384GB 32 393216 0 76800
38xCPU-192GB 38 196608 2048 maxiops 24576
48xCPU-256GB 48 262144 2048 maxiops 24576
CLOUDNATIVE-48xCPU-384GB 48 393216 0 81920
CLOUDNATIVE-48xCPU-512GB 48 524288 0 92160
CLOUDNATIVE-64xCPU-192GB 64 196608 0 56320
CLOUDNATIVE-64xCPU-256GB 64 262144 0 71680
CLOUDNATIVE-64xCPU-384GB 64 393216 0 87040
64xCPU-384GB 64 393216 2048 maxiops 24576
CLOUDNATIVE-64xCPU-512GB 64 524288 0 97280
CLOUDNATIVE-80xCPU-512GB 80 524288 0 102400
80xCPU-512GB 80 524288 2048 maxiops 24576
High CPU
Name Cores Memory Storage size Storage tier Transfer out (GiB/month)
──────────────────── ─────── ──────── ────────────── ────────────── ──────────────────────────
HICPU-8xCPU-12GB 8 12288 100 maxiops 4096
HICPU-8xCPU-16GB 8 16384 200 maxiops 4096
HICPU-16xCPU-24GB 16 24576 100 maxiops 5120
HICPU-16xCPU-32GB 16 32768 200 maxiops 5120
HICPU-32xCPU-48GB 32 49152 200 maxiops 6144
HICPU-32xCPU-64GB 32 65536 300 maxiops 6144
HICPU-64xCPU-96GB 64 98304 200 maxiops 7168
HICPU-64xCPU-128GB 64 131072 300 maxiops 7168
High memory
Name Cores Memory Storage size Storage tier Transfer out (GiB/month)
──────────────────── ─────── ──────── ────────────── ────────────── ──────────────────────────
HIMEM-2xCPU-8GB 2 8192 100 maxiops 2048
HIMEM-2xCPU-16GB 2 16384 100 maxiops 2048
HIMEM-4xCPU-32GB 4 32768 100 maxiops 4096
HIMEM-4xCPU-64GB 4 65536 200 maxiops 4096
HIMEM-6xCPU-128GB 6 131072 300 maxiops 6144
HIMEM-8xCPU-192GB 8 196608 400 maxiops 8192
HIMEM-12xCPU-256GB 12 262144 500 maxiops 10240
HIMEM-16xCPU-384GB 16 393216 600 maxiops 12288
HIMEM-24xCPU-512GB 24 524288 700 maxiops 12288
Developer
Name Cores Memory Storage size Storage tier Transfer out (GiB/month)
──────────────────── ─────── ──────── ────────────── ────────────── ──────────────────────────
DEV-1xCPU-1GB-10GB 1 1024 10 standard 1024
DEV-1xCPU-1GB 1 1024 20 standard 1024
DEV-1xCPU-2GB 1 2048 30 standard 1536
DEV-1xCPU-4GB 1 4096 40 standard 2048
DEV-2xCPU-4GB 2 4096 60 standard 2560
DEV-2xCPU-8GB 2 8192 80 standard 3072
DEV-2xCPU-16GB 2 16384 100 standard 4096
Since this is a test project, choose the first option in the Developer list (1 CPU core, 1 GB RAM, and 10 GB storage), named DEV-1xCPU-1GB-10GB.
Operating System
After you’ve decided on the hardware configuration, it’s time to choose the operating system for the server. UpCloud provides you with a few popular public templates to choose from, along with the option of a wider variety of distributions through CDROMs and the ability to download and install nearly any other possible operating system using custom images.
You can find a list of available templates here. There are lots of technical considerations, opinions, and personal/project preferences that need to be taken into account before making this choice. However, for this tutorial, you can select AlmaLinux 9 as it is a lightweight option compared to enterprise distributions of Linux.
Note: The commands used in this tutorial have been written with AlmaLinux in mind, so using a different OS might cause you to run into unexpected issues.
SSH keys
This is an important part of the server setup. The chosen operating system requires you to set up an SSH key pair to be able to remotely log into the server. You need to create an SSH key pair and provide upctl with its public key. You can follow this quick guide to generate the SSH key pair for your operating system.
You will need to provide the location of the public key file when running the server create command.
Initialization Script
Finally, you have the option to add an initialization script to the deployment.
Normally, right after you set up a cloud server, you will want to do a few things before you deploy applications on it. This can include anything from upgrading installed packages to configuring new tools and setting up user accounts or credentials. Initialization scripts help you automate these tasks instead of doing them manually after the server deploys.
Since you will be deploying a Node.js application to this server, you need to ensure that Node is installed on it. You will also need the git CLI tool to interact with the repository and pull in the updated code from upstream. And, since the project uses yarn to manage dependencies and scripts, you will need to install it as well.
To do all that, save the following script in a file named init-script.sh:
#!/bin/bash
sudo dnf update -y
sudo dnf install curl dnf-plugins-core -y
sudo dnf module install nodejs:22 -y
sudo dnf install git -y
npm install --global yarn
Remember to add the line #!/bin/bash to the top of the script to make sure the server host understands what kind of interpreter it needs to run this script. You will pass the location of this init-script.sh file in the server create command.
Creating the server
Now that you understand all of the configuration options for the server and have collected the SSH keys and initialization script, here’s the command you need to run to create the server.
upctl server create \
  --title "Random Facts Generator Server" \
  --zone sg-sin1 \
  --os "AlmaLinux 9" \
  --hostname random-facts-generator-server \
  --ssh-keys id_rsa_fact-gen_ci.pub \
  --plan DEV-1xCPU-1GB-10GB \
  --user-data "$(cat init-script.sh)"
Here’s a quick explanation of the arguments and values used:
title: sets the name of the serverzone: allows you to choose the location of the server.os: allows you to choose the operating system for your server. Not including this would set up the server with Ubuntu Server 24.04hostname: allows you to set up the hostnamessh-keys: allows you to provide the public SSH key for the server as a fileplan: allows you to choose the server plan.user-data: allows you to provide an initialization script to the server. This takes in a string value, so the command above has been configured to access the script stored in the file init-script through the cat command.
Once you run the command, you will receive a similar output:
✓ Creating server random-facts-generator-server                                                                                                              9 s

  UUID         00ac84b2-48f4-4708-b115-696c8431fab4
  IP Addresses 2a04:3543:1000:2310:78a8:8fff:feba:0833,
               10.10.3.6,
               213.163.194.16
You can run upctl server list to view the list of active servers along with their state:
✗ upctl server list

 UUID                                   Hostname                        Plan                 Zone      State
────────────────────────────────────── ─────────────────────────────── ──────────────────── ───────── ─────────
 00ac84b2-48f4-4708-b115-696c8431fab4   random-facts-generator-server   DEV-1xCPU-1GB-10GB   sg-sin1   started
Once the state is started, you can SSH into the server using the command ssh root@<server-ip-address>. You can use upctl to retrieve the server IP address by running the command upctl server show <server-name>:
✗ upctl server show random-facts-generator-server

  Common
    UUID:          00ac84b2-48f4-4708-b115-696c8431fab4
    Hostname:      random-facts-generator-server
    Title:         Random Facts Generator Server
    Plan:          DEV-1xCPU-1GB-10GB
    Zone:          sg-sin1
    State:         started
    Simple Backup: no
    Licence:       0
    Metadata:      True
    Timezone:      UTC
    Host ID:       7450935939
    Server Group:
    Tags:

  Labels:

    No labels defined for this resource.

  Storage: (Flags: B = bootdisk, P = part of plan)

     UUID                                   Title                              Type   Address    Size (GiB)   Encrypted   Flags
    ────────────────────────────────────── ────────────────────────────────── ────── ────────── ──────────── ─────────── ───────
     01841993-b72f-4364-9203-da3c8ad8fd6e   random-facts-generator-server-OS   disk   virtio:0           10   no          P

  NICs: (Flags: S = source IP filtering, B = bootable)

     #   Type      IP Address                                      MAC Address         Network                                Flags
    ─── ───────── ─────────────────────────────────────────────── ─────────────────── ────────────────────────────────────── ───────
     1   public    IPv4: 213.163.194.16                            7a:a8:8f:ba:21:44   03ec5a97-e295-4201-a0a6-53f32748119c   S
     2   utility   IPv4: 10.10.3.6                                 7a:a8:8f:ba:e2:6c   0372fde3-e376-4e4c-a646-22789035cec0   S
     3   public    IPv6: 2a04:3543:1000:2310:78a8:8fff:feba:0833   7a:a8:8f:ba:08:33   03000000-0000-4000-8030-000000000000   S
You’re now ready to deploy the application for the first time!
Deploying the Application for the First Time
Before you start deploying the application, make sure you have forked it to your GitHub account.
Once ready, SSH into the server and run the following commands:
# Clone your forked repository
git clone https://github.com/<your-github-username>/random-facts-generator.git

# Change into the cloned directory
cd random-facts-generator

# Install dependencies
yarn

# Start the production server
yarn start:prod
This will start the Node.js application in a background process on the server. The Express app is configured to run on port 5001, so you should now be able to see the deployed app in action on the web address http://<your-server-ip>:5001:

This indicates that your server and app have been deployed successfully! Now, it’s time to set up an automated pipeline that redeploys your app whenever you push a new commit to the main branch.
Creating a Circle CI Pipeline
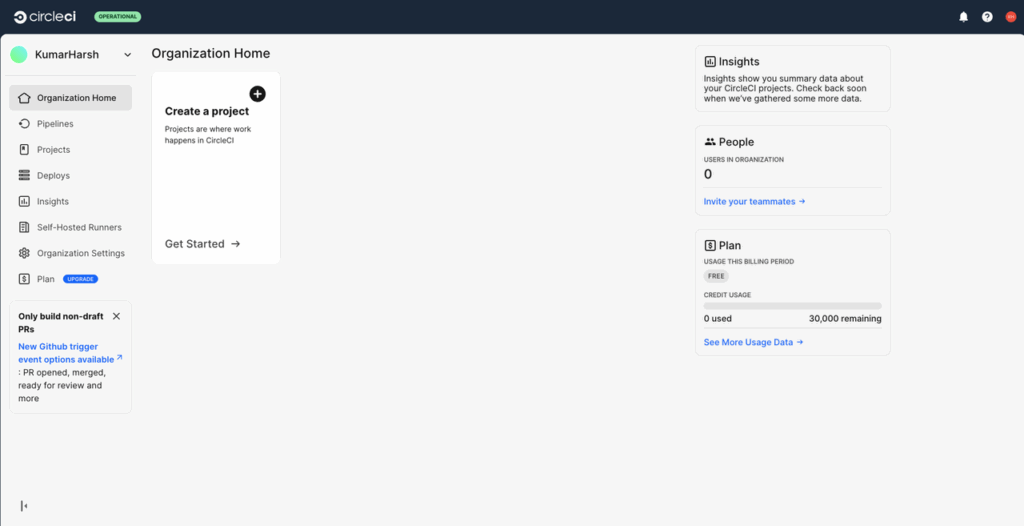
To create the pipeline, you will first need to set up the GitHub VCS connection in your CircleCI account. To do that, first navigate to your CircleCI dashboard:
In the left navigation pane, click on Organization settings. On the organization settings page, click on VCS connections in the left pane to open the VCS connection settings:
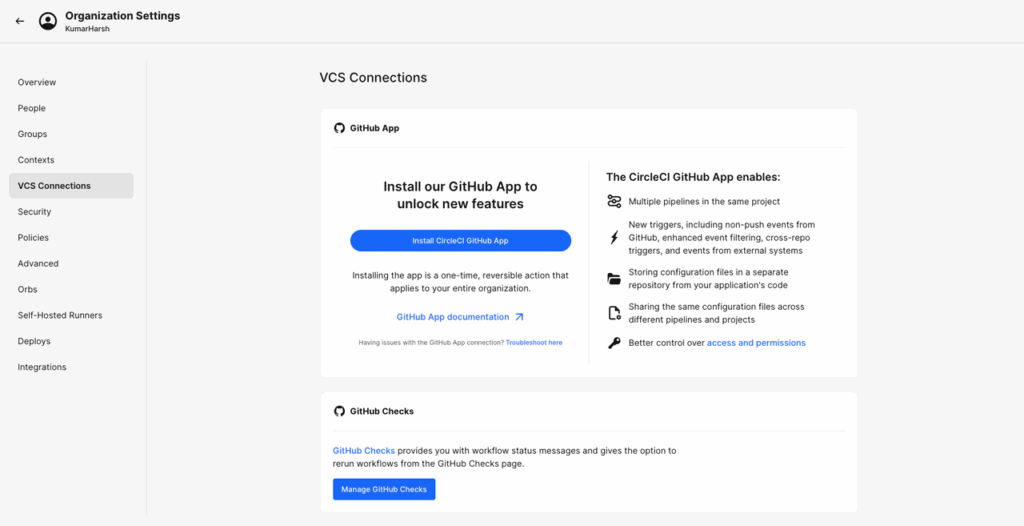
Here, click on the Install Circle CI GitHub App button and follow the instructions to install the Circle CI app and authorize it to access your GitHub repositories.
Once done, head back to the Circle CI dashboard and click on the Create a project card:

Projects in Circle CI are used to represent a code repository (from GitHub or Bitbucket) for which you want to build CI pipelines. Clicking the Create a project card will take you through a guided process of configuring and creating a project. Name your project “random-facts-generator”, the pipeline “deploy”, and choose the forked GitHub repo as the repository for the Circle CI project. Choose the default options in all other steps. If you’re confused at any point, Circle CI has a detailed guide to help you through the process.
Writing the Circle CI config file
Once the project is created, you will notice a new .circleci/config.yml file in your repo. This is the file that CircleCI uses to store the configuration details of your pipeline. You need to replace the contents of this file with the following:
version: 2.1

executors:
  node-executor:
    docker:
      - image: cimg/node:16.20 # or whatever Node.js version you prefer

jobs:
  deploy:
    executor: node-executor
    steps:
      - checkout
      - run:
          name: SSH into Server and Deploy
          command: |
            ssh -o StrictHostKeyChecking=no $UPCLOUD_USERNAME@$SERVER_IP \<< 'EOF'
              cd ~/random-facts-generator
              git pull origin main
              yarn restart:prod
            EOF

workflows:
  version: 2
  deploy:
    jobs:
      - deploy:
          filters:
            branches:
              only: main
The version node sets the CircleCI configuration version to 2.1, which is the latest version available and offers modern features such as reusable executors, commands, and workflows.
The executors key defines custom environments in which your jobs will run. In this case, we’ve defined an executor named node-executor that uses a Docker container. Executors allow you to standardize and reuse environment setups across jobs. This helps you avoid repeating image or environment definitions in every job.
The jobs node defines the individual units of work that your pipeline will run. In this file, we have a single job called deploy. Jobs contain a series of steps that are executed in order.
Within the steps block, the checkout step pulls your project’s source code from your GitHub repository into the executor environment. This is a built-in CircleCI step and is required if your job depends on your project’s codebase.
Next, the run step performs the deployment. It SSHs into the remote UpCloud server using the $UPCLOUD_USERNAME and $SERVER_IP CircleCI environment variables (which you’ll set up next). The SSH command disables strict host key checking to avoid SSH confirmation prompts. Once connected, it navigates to the application directory, pulls the latest changes from the main branch using git pull, and restarts the app with the yarn restart:prod command.
Finally, the workflows node defines how your jobs are orchestrated. This node allows you to specify the order, concurrency, and conditions under which jobs should run. In this file, we define a single workflow named deploy that includes the deploy job.
Using filters, we tell CircleCI to run this job only when changes are pushed to the main branch. This ensures that deployments don’t happen from feature branches or during pull requests, which is a common best practice for production environments.
You need to commit this file to the GitHub repo. You might notice that CircleCI starts deploying your app but fails. This is because you haven’t provided it with the SSH private key and the environment variables UPCLOUD_USERNAME and SERVER_IP.
Supplying the UpCloud SSH Key
Unlike most CI platforms, Circle CI offers a dedicated feature to add and manage SSH keys in your Circle CI projects. This removes the hassle of manually encoding, storing, and securing sensitive SSH keys.
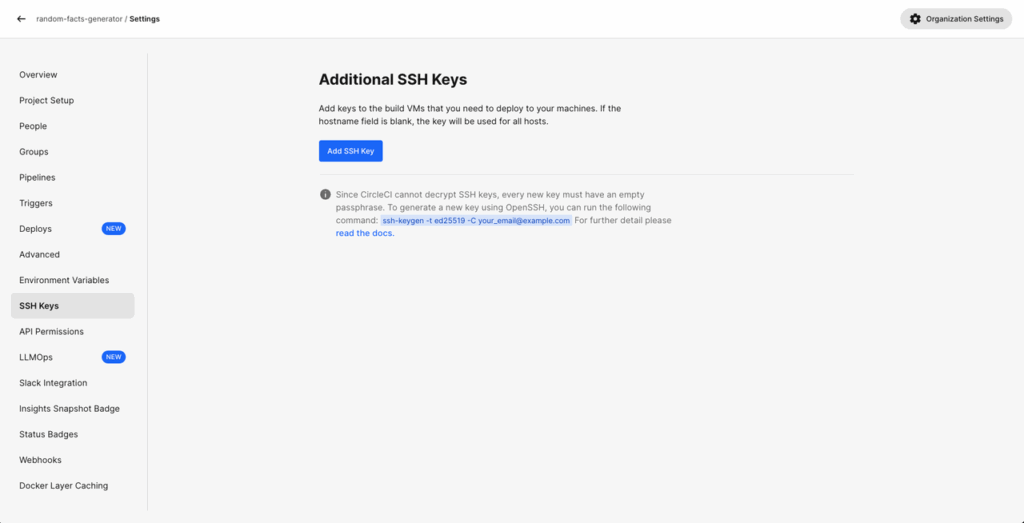
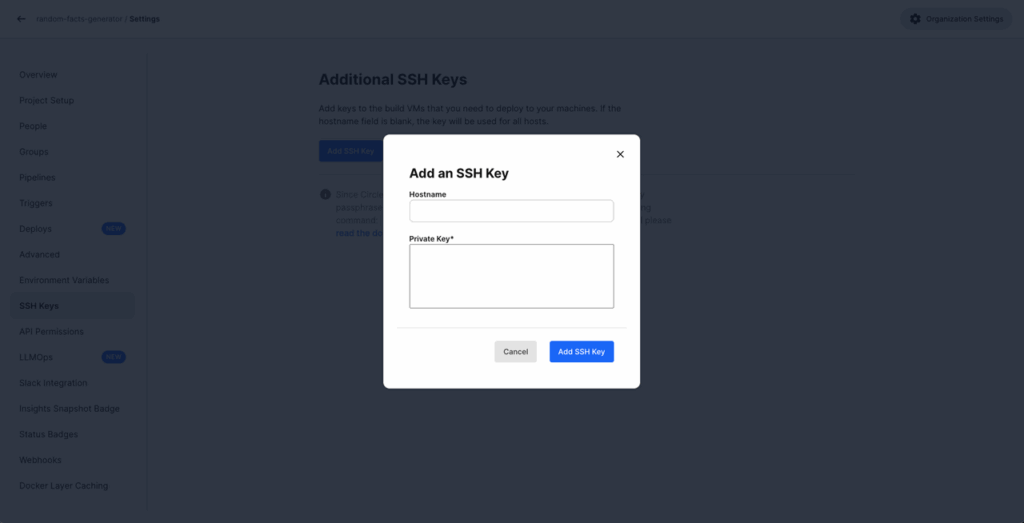
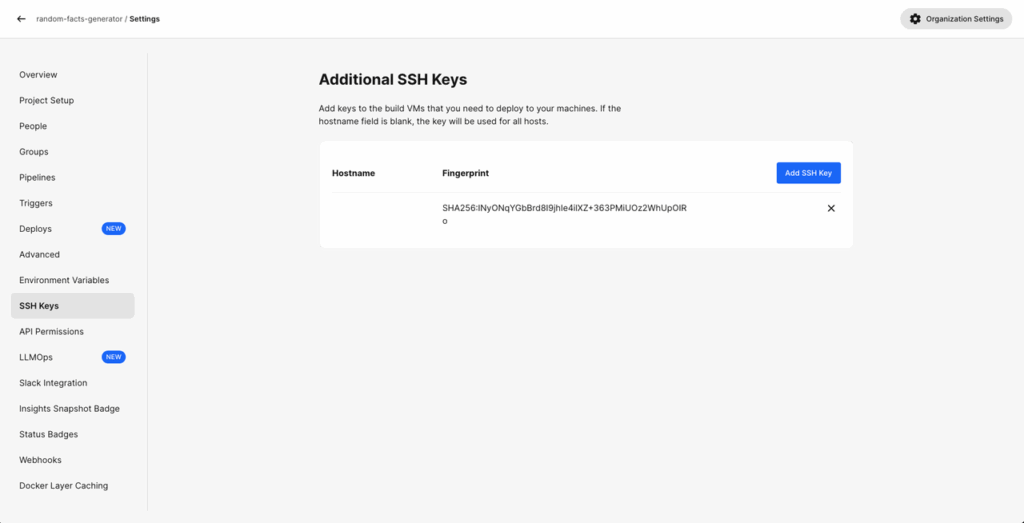
To add an SSH key, head over to the Project settings page and select SSH Keys from the left pane. On this page, click the Add SSH Key button:
In the dialog box that opens, provide the SSH private key as text and leave the hostname blank. Click on the Add SSH Key button:
Once added, here’s what it should look like:
Now, click on Environment Variables on the left pane in the same page and click the Add Environment Variable button to add the two environment variables needed for the pipeline (SERVER_IP and UPCLOUD_USERNAME). Here’s what it should look like when done:
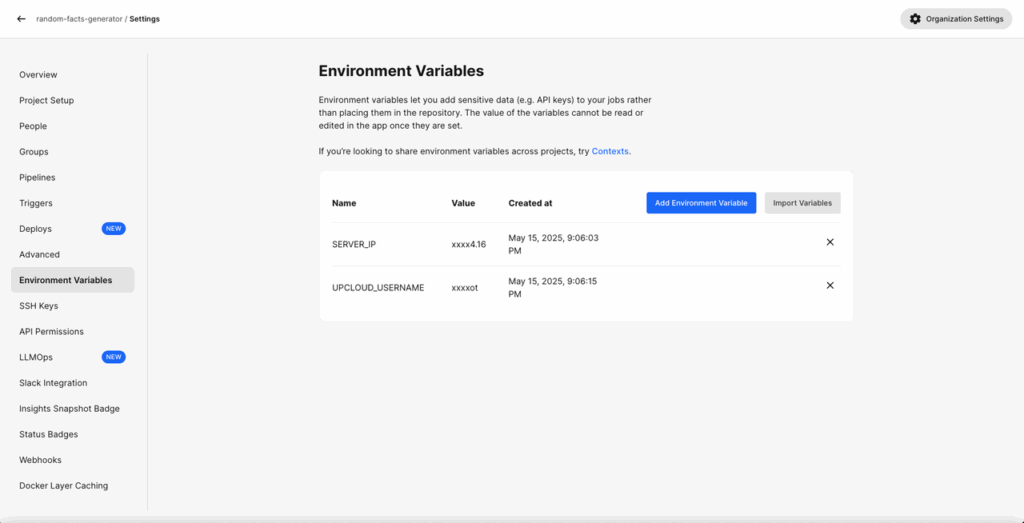
The SERVER_IP is the same server IP you received when you ran the upctl server create command earlier. UPCLOUD_USERNAME needs to be set to root.
Once done, your pipeline is now ready to run!
Running and Testing the Pipeline
The pipeline is now set up and working. To test it out, update something in the repo. For example, change the footer text in the public/index.html file that says “Made in 2024” to “Made in 2025”, and push a commit to the main branch. You will see that a new build gets triggered automatically:
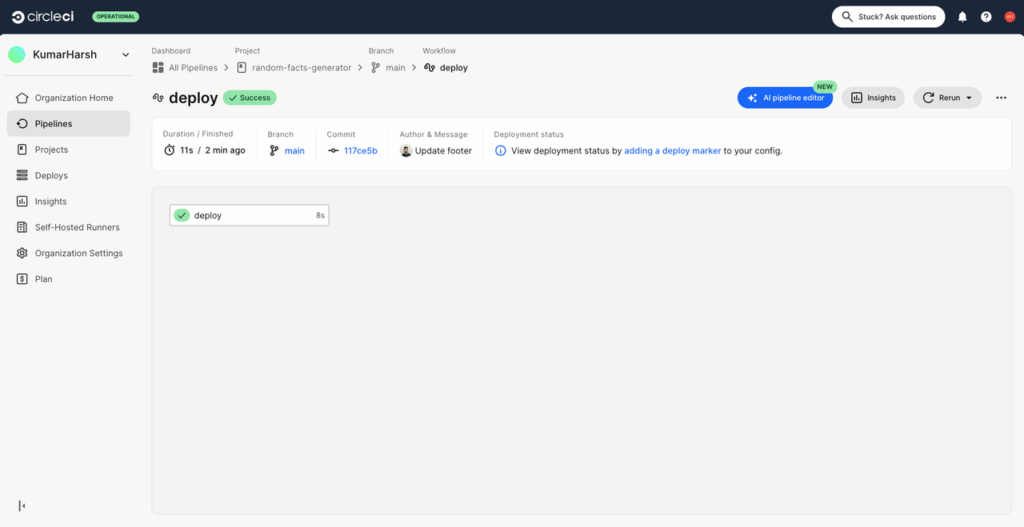
And within a few seconds, the text on your public website will be updated:

This means that your pipeline has been set up and connected to your UpCloud server successfully!. You can find the code used in the tutorial in the circle branch of the GitHub repository.
Troubleshooting
As you’ve seen, CircleCI makes it easy to work with SSH keys, so you’ll usually run into fewer problems than with other CI/CD tools. On the off chance that you run into a error with the UpCloud server initialization script, such as a missing a -y flag to say yes to downloading packages or a missing or incorrect version tag for a dependency, you need to have access to the script’s execution logs to be able to debug them. You can access that by SSH-ing into the server and running the command:
sudo grep cloud-init /var/log/messagesConclusion
As you’ve seen, deploying a Node.js application to UpCloud using CircleCI brings together the best of automation and performance. With a simple configuration file and a few setup steps, your team (or even a solo developer) can roll out changes automatically, reduce human error, and save hours of manual work. CircleCI’s easy-to-use workflows, when combined with UpCloud’s high-speed infrastructure, create a reliable path to production for any modern web application.Now’s a great time to put this into practice.
Sign up for an UpCloud account and experience industry-leading cloud server performance with predictable pricing. Then, connect your GitHub or Bitbucket repo to CircleCI and set up pipelines to automate deployments with ease. As your application grows, take advantage of UpCloud’s hot resize feature to scale server resources up or down instantly; no downtime required!. With these tools, you’re not just deploying code, you’re building a faster, smarter development workflow.
Discussion