CockroachDB is a distributed database designed for the cloud. It is built to be resilient, horizontally scalable and it is PostgreSQL wire-protocol compatible to a high degree. Together with UpCloud MaxIOPS storage, it can create high-performant and fault-tolerant, low-cost backend for applications. You can find more information about CockroachDB at their documentation.
In this tutorial, we will install and set up a secure CockroachDB cluster on UpCloud. The cluster will be placed inside an SDN and client applications can connect to the database through an SQL client.
Prerequisites:
- Register for UpCloud account
- SSH client such OpenSSH or Putty installed on your local computer
Overview of the tutorial steps:
- Creating a database node template
– Deploying the Ubuntu server
– Creating the CockroachDB user, setting up SSH
– Installing CockroachDB - Setting up the CockroachDB server
– Creating the ballast file
– Keeping the servers synchronized
– Securing the connections to a node - Setting up an SDN private network
– Create the SDN private network
– Connecting DB server to the private network - Finalising the server template and creating custom image
– Creating a template systemd file
– Creating a custom image by cloning the storage
– Creating Node2 and Node3 from the custom image - Initialising the CockroachDB cluster
– Setting up node-certificates for the nodes
– Create a local root client Certificate on Node1
– Starting up the nodes
– Initializing the cluster: The database is live! - Connecting and testing the database
– Adding a test user and test database
– Logging in to the admin web-UI
– Testing the DB with DBeaver - Continuing further
1. Creating a database node template
The minimum number of nodes in a Cockroach database cluster is three, which gives CockroachDB the ability to tolerate the failure of one of the nodes. With five nodes we would be able to handle the simultaneous failure of two nodes, and so on. It is possible to scale the Cockroach DB cluster simply by adding servers to the cluster.
We will create three servers that act as nodes for the database. The servers will be identical, as Cockroach Labs, the developers of the Cockroach DB recommend that the nodes (or in our case, UpCloud servers that run Cockroach DB) are uniform for consistent SQL performance. We will create one server as a template and then use UpCloud server cloning functionality to create a cluster of three identical servers.
The minimum requirements for CockroachDB are 2 or more vCPUs and at least 2 GB of RAM. However, for actual production use it is recommended to have:
- 2 or more vCPUs
- RAM of 2 GB per vCPU, which means for 2 vCPUs you should configure 4 GB of RAM
- Storage based on your workload, which will likely be over 200 GB. Cockroach Labs recommends a 300 – 2 TiB storage for best performance results
It’s good to note that for resiliency Cockroach Labs recommends using many smaller nodes instead of a few larger ones. With many smaller nodes, the data is more spread making recovery from a node failure faster.
For this installation tutorial, I’m using the 5$/month Simple plan Ubuntu server with 1 vCPU, 1 GB of RAM and 25GB of storage. Despite being well below the minimum requirements, it’ll work perfectly for the purposes of this tutorial. The server plan can always be upgraded later.
Deploying Ubuntu server
Creation of an Ubuntu server we will work with is straight-forward using the UpCloud control panel. If you haven’t used UpCloud before, there’s a quick start guide that will get you up to speed in no time.
To deploy an Ubuntu server:
- Login to the UpCloud Control Panel
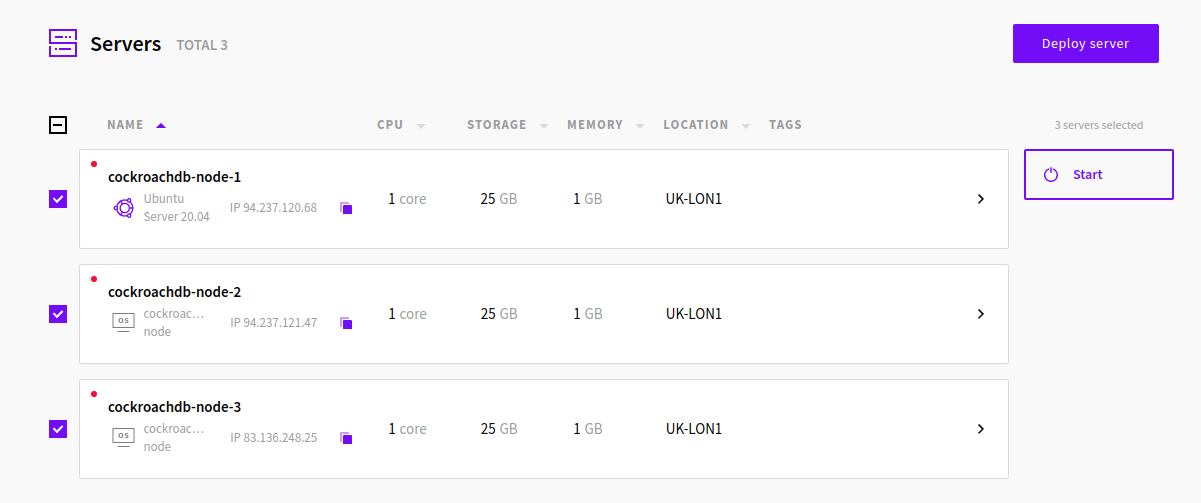
- Go to the Servers tab
- Click Deploy Server
- Choose the location of your liking for the server, UK-LON1 in this tutorial
- Choose a plan for your server, the $5/mo Simple plan will work fine to start with
- Choose the amount of storage, the $5/mo Simple plan includes 25 GB, add a secondary storage device you want to have more at this point
- Choose Ubuntu Server as the operating system, 20.04 is the latest at the time of writing
- Give a hostname and a description to your server, i.e. cockroachnode1
- Click Deploy!
The server will now be created and you will get a password you can use to login to the server with root user. The next step is to set up a user that will run the CockroachDB.
Creating the user for CockroachDB and setting up SSH
Instead of using the root user, we’ll create a cockroach DB user cradmin and configure the database by using this user. We will also do some basic setup by disabling password login to the server and only allowing login using SSH keys. The following steps will create the user and setup SSH for Ubuntu, but you can read more about this setup for other OSes from these tutorials:
Log in to your server using Putty or some other SSH client via the public IP address of your server. We’ll start by updating the server with the following command:
apt update && apt upgrade
Afterwards, reboot your server and login again.
reboot
Then follow on by creating the cradmin user using the next command:
adduser cradmin
In Ubuntu, this command will prompt for a password and other user details. Fill in a password and you can leave the other values as blank.
Then we’ll add the cradmin user to the SUDO group using the command below:
adduser cradmin sudo
To ensure that you can connect to the server using the cradmin user, open another session with your SSH client and login with the cradmin user. After logging in successfully, we’ll continue the setup in the cradmin session.
ssh cradmin@<node_1_public_IP>
The first thing we will do is disable password login and enable SSH key login. To do this, we’ll create a .ssh directory in the home directory of the cradmin user. Type in the following commands:
mkdir -p /home/cradmin/.ssh
chmod 700 /home/cradmin/.ssh
The mkdir command creates the hidden .ssh folder and chmod command will restrict the permissions to the .ssh directory to just the cradmin user.
Next, you need to generate an SSH key pair, save the private key to your computer and copy-paste the public key to the server.
Do the following on your own computer:
- Open Puttygen
- Click Generate and follow instructions in Puttygen. If you want, you can set a passphrase for the SSH key pair.
- Save both the private key and the public key to a folder where you’ll find them later
We are now ready to add the public key to the server. On the cradmin SSH session, go to the .ssh folder with the command:
cd /home/cradmin/.ssh
Then create a file named authorized_keys with the command below.
nano authorized_keys
The command creates a new file called authorized_keys and opens it in the nano text editor. Copy the public key from Puttygen or from the file where you saved it earlier and right-click on the SSH window. This should copy the public key into the editor. Save the file with ctrl+o (click enter to confirm the filename), then close nano with ctrl+x.
Lastly, ensure appropriate permissions for the keys by using the following command.
chmod 600 /home/cradmin/.ssh/authorized_keys
You should then try to login to the server with cradmin using the new SSH keys before continuing. If you’re using Putty, you’ll use the keys to login by going to the Connection settings and on the Data tab. Set the auto-login username to cradmin, then expanding the SSH and on the Auth tab select the private key file with the browse button.
On the Sessions tab, you can save these settings to make login more convenient later on. Click Open and you should now login with the key-pair you just created.
If you cannot log in or you are prompted for a password (and not the passphrase if you set one up), check that
- You have copied the entire public key to the authorized_keys file
- Check that the public key is the first and only line on the authorized_keys file (delete any empty rows from the file)
- Check that you chose the correct .ppk file in Putty.
After logging in successfully, we’ll update the settings of the server to only allow SSH key-based login and we will also disable root login. In the cradmin session, open the sshd_config file with the next command:
sudo nano /etc/ssh/sshd_config
Change the row “PermitRootLogin yes” to “PermitRootLogin no“.
Remove the comment (#-character) from the row “PubkeyAuthentication yes“.
And finally, change the row “PasswordAuthentication yes” to “PasswordAuthentication no“.
Ctrl+o, then enter to save your changes, ctrl+x to close the editor.
To activate these changes, we need to restart the SSH service with the following command:
sudo systemctl restart ssh
Logout from the server and login again with your private key to ensure that everything works as intended.
2. Setting up CockroachDB server
Next, we’ll install the CockroachDB files and create the CA certificate that will later be used to create node certificates for each node.
Installing CockroachDB
While logged in as the cradmin user, download the CockroachDB archive for Linux and extract the binary from the archive:
wget -qO- https://binaries.cockroachdb.com/cockroach-v20.1.3.linux-amd64.tgz | tar xvz
To make it easy to use the binary, we’ll copy it to a folder that is included in the PATH variable:
sudo cp -i cockroach-v20.1.3.linux-amd64/cockroach /usr/local/bin/
Check that the binary works by running the next command:
cockroach version
You should receive a listing showing the version of cockroach, which should be 20.3.1 at the time of writing this tutorial.
Build Tag:    v20.1.3
Build Time:   2020/06/23 08:44:08
Distribution: CCL
Platform:     linux amd64 (x86_64-unknown-linux-gnu)
Go Version:   go1.13.9
C Compiler:   gcc 6.3.0
Build SHA-1:  7fd454f880f386cdd0eda6b21b12f6532c14f0db
Build Type:   release
Next, we’ll create a ballast file and prepare the server template for securing the CockroachDB nodes by creating a CA certificate.
Creating a ballast file
If the cockroach node runs out of disk space, it will shut down. The ballast file can be used to reserve some disk space. Then, if the disk space runs out, the ballast file can be deleted and the node restarted. To create a ballast-file of 1GB you use the following command:
cockroach debug ballast ballast.txt --size=1GB
Keeping the servers synchronized
The servers on the cluster must be synchronized for CockroachDB to preserve data consistency. By default, when a node detects that its clock is out of sync with at least half of the other nodes by 80% of the maximum allowed offset, the node will shut down. The default maximum offset is 500 ms, which means that if the difference in server clock is more than 400 ms compared to half of the other servers running Cockroach nodes, the node on the server will shut itself down.
To keep the servers in sync we need to install an NTP package and point them all to the same source to sync their clocks. Cockroach Labs recommends using Google’s NTP service because it handles “smearing” of the leap second and thus saves some configuration on the client-side later on. We will follow this recommendation.
First, we need to disable timesyncd daemon which is active by default, then install NTP. You can check if it’s active by running the command:
timedatectl
If the daemon is active, you’ll see “NTP service: active” in the output:
To disable it, run the command:
sudo timedatectl set-ntp no
When you run the command timedatectl the NTP service should now be inactive:
               Local time: Fri 2020-08-21 10:50:04 UTC
           Universal time: Fri 2020-08-21 10:50:04 UTC
                 RTC time: Fri 2020-08-21 10:50:05
                Time zone: Etc/UTC (UTC, +0000)
System clock synchronized: yes
              NTP service: inactive
          RTC in local TZ: no
We’re now ready to install the NTP package. Run the command:
sudo apt-get install ntp
We’ll then change the sync source to Google’s NTP service. Stop the NTP daemon with the command:
sudo systemctl stop ntp
Then sync the server’s clock with Google’s NTP service:
sudo ntpd -b time.google.com
We must also update the conf file, so we’ll open the /etc/ntp.conf with nano:
sudo nano /etc/ntp.conf
Then comment out all the lines starting with the word server or pool. They will likely be the following:
--
#pool 0.ubuntu.pool.ntp.org iburst
#pool 1.ubuntu.pool.ntp.org iburst
#pool 2.ubuntu.pool.ntp.org iburst
#pool 3.ubuntu.pool.ntp.org iburst
# Use Ubuntu's ntp server as a fallback
#pool ntp.ubuntu.com
--
After commenting out the rows, add the following lines to the file:
server time1.google.com iburst
server time2.google.com iburst
server time3.google.com iburst
server time4.google.com iburst
Then ctrl+o and enter to save your changes, ctrl+x to close nano.
Restart the NTP daemon and verify that the server used is a google NTP-server:
sudo systemctl start ntp
sudo ntpq -p
The active NTP server is marked with an asterisk as the first character on the line. In the picture below it is time4.google.com:
     remote           refid      st t when poll reach   delay   offset  jitter
==============================================================================
 0.ubuntu.pool.n .POOL.          16 p    -   64    0    0.000    0.000   0.000
 1.ubuntu.pool.n .POOL.          16 p    -   64    0    0.000    0.000   0.000
 2.ubuntu.pool.n .POOL.          16 p    -   64    0    0.000    0.000   0.000
 3.ubuntu.pool.n .POOL.          16 p    -   64    0    0.000    0.000   0.000
 ntp.ubuntu.com  .POOL.          16 p    -   64    0    0.000    0.000   0.000
*time3.google.co .GOOG.           1 u   26   64    1    7.219   -0.811   2.357
+static.141.138. 194.100.2.194    2 u   25   64    1   37.003   -0.257   2.334
+ivanova.ganneff 192.53.103.108   2 u   26   64    1   36.914   -2.491   2.418
+support.russian 194.58.202.148   2 u   28   64    1   36.944   -0.784   1.920
#time03.nevondo. 17.253.38.125    2 u   23   64    1   34.350   -3.292   1.937
...
Securing the connections to a node
CockroachDB uses certificates to secure communication between nodes. CockroachDB can create the required certificates by itself or alternatively, OpenSSL can be used to create them. For this tutorial, we are using the CockroachDB’s built-in cert command.
Start by creating two directories, certs and my-safe-directory. The certs directory will contain all the certificates including the CA certificate and my-safe-directory will contain the CA key.
mkdir certs
mkdir my-safe-directory
Once these directories are created, we can create our CA key with the following command:
cockroach cert create-ca --certs-dir=certs --ca-key=my-safe-directory/ca.key
If the command succeeded, you should see a ca.crt in the certs directory and ca.key file in the my-safe-directory.
For now, we’re happy with the configuration that we have. We still need to add the systemd configuration file for the database, but before we can do that we need to set up the SDN private network. Shut down the server by using the following command:
sudo shutdown -h now
3. Setting up an SDN private network
All the servers we’ll use in the cluster will connect to an SDN private network on UpCloud and they will communicate with one another using the network interface on the SDN.
Create the SDN
It is very easy to create a private network and costs just $5 each per month:
- Login to the UpCloud Control Panel
- Go to the Network tab.
- Choose the Private Networks tab.
- Click the “Create SDN network” button
- Choose the same location that you used when creating the server
- Set the IP address space to your liking, e.g. 10.0.1.0/24
- Make sure that Enable DHCP is checked.
- Click the Create SDN network button.
Connecting the DB server to the private network
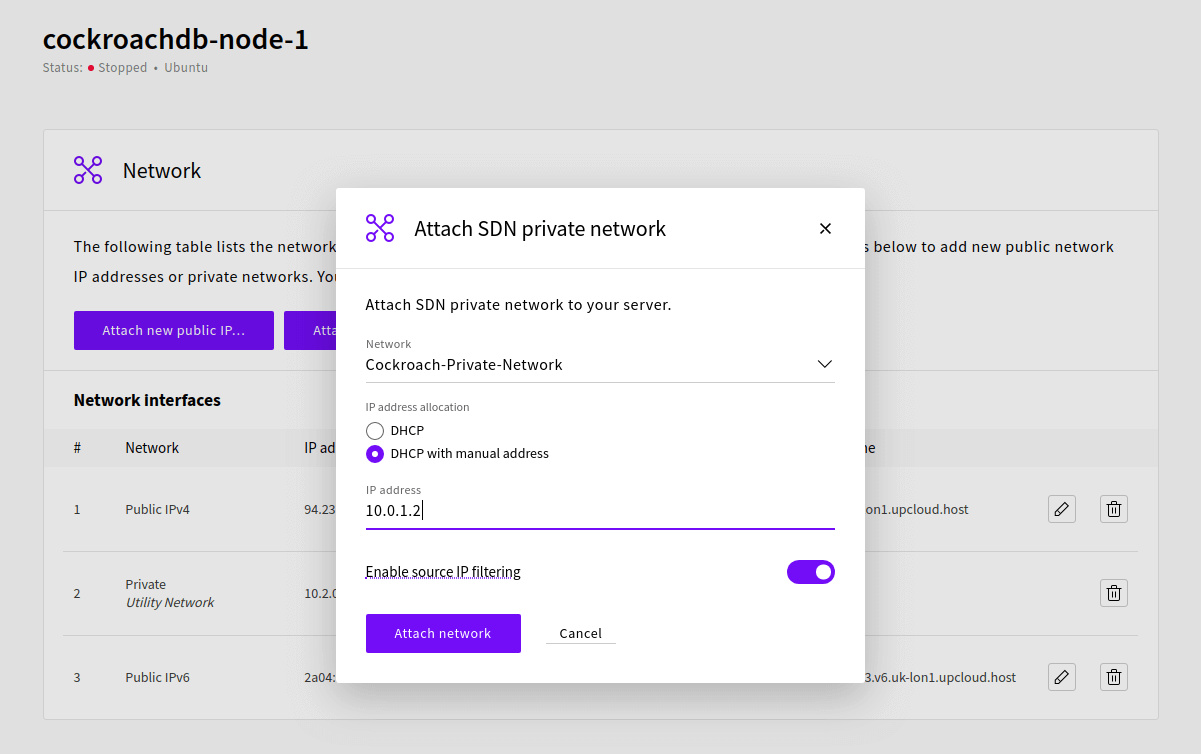
Again, it is very simple to connect a server to the SDN private network. Go to Servers, choose the server you created, make sure it’s shut down and then choose the Network tab for the server.
Click the “Attach SDN private network…” button, choose the network you just created, then assign an IP manually to the server. In this example, we’ll assign the IP 10.0.1.2 to the server that will be cockroachnode1. Nodes 2 and 3 will receive the IPs of 10.0.1.3 and 10.0.1.4 respectively.
To finalise, we need to configure the network interface on the server itself, so start up the server and login with the cradmin user.
Then open the network configuration file with the following command:
sudo nano /etc/network/interfaces
If you’ve created the server with the default settings, you need to add a fourth ethernet interface to the file. Add the following lines to the end of the file:
auto eth3
iface eth3 inet dhcp
Once done, use ctrl+o and enter to save your changes, ctrl+x to close the file.
Then restart networking with the command:
sudo systemctl restart networking
You can check that you can see the interface you added with the command:
ip addr
You should see something like this:
5: eth3: <BROADCAST,MULTICAST,UP,LOWER_UP> mtu 1500 qdisc fq_codel state UP group default qlen 1000
    link/ether 6e:d7:1b:bf:c8:e5 brd ff:ff:ff:ff:ff:ff
    inet 10.0.1.2/24 brd 10.0.1.255 scope global dynamic eth3
       valid_lft 3598sec preferred_lft 3598sec
    inet6 fe80::6cd7:1bff:febf:c8e5/64 scope link
       valid_lft forever preferred_lft forever
Now that we’ve created the network interface, we can create a template for the systemd config file for the server.
4. Finalising the server template and creating custom image
To finalize our server template we’ll create a template for the systemd configuration file that will be used to start and stop the database and to start it automatically when the server restarts.
Creating a template systemd file
Create the file by running the following command:
sudo nano /etc/systemd/system/securecockroachdb.service
Then add the following text to the file. You can notice that we have a few IP addresses in the config file, namely the IP addresses to the nodes 1, 2 and 3. You must change these to the ones you will be using in your SDN you created earlier.
Note that whenever you are adding a node, later on, you must update the –advertise-addr -parameter to the node’s own IP address, but everything else can be as is.
[Unit]
Description=Cockroach Database cluster node
Requires=network.target
[Service]
Type=notify

WorkingDirectory=/home/cradmin
ExecStart=/usr/local/bin/cockroach start --certs-dir=certs --advertise-addr=10.0.1.2 --join=10.0.1.2,10.0.1.3,10.0.1.4 --cache=.25 --max-sql-memory=.25
TimeoutStopSec=60
Restart=always
RestartSec=10
StandardOutput=syslog
StandardError=syslog
SyslogIdentifier=cockroach

User=cradmin

[Install]
WantedBy=default.target
Then press ctrl+o and enter to save the file, ctrl+x to close nano editor.
We do not want to start or enable the service just now, but to create the custom image instead. Next, logout from the server and shut it down from the UpCloud Control Panel or by using the command below:
sudo shutdown -h now
Creating a custom image
There’s more than one way to clone a server, and you can find information about them in a tutorial on server cloning.
For this tutorial, we’ll create a custom image of the storage of our CockroachDB server. This is the way to do it:
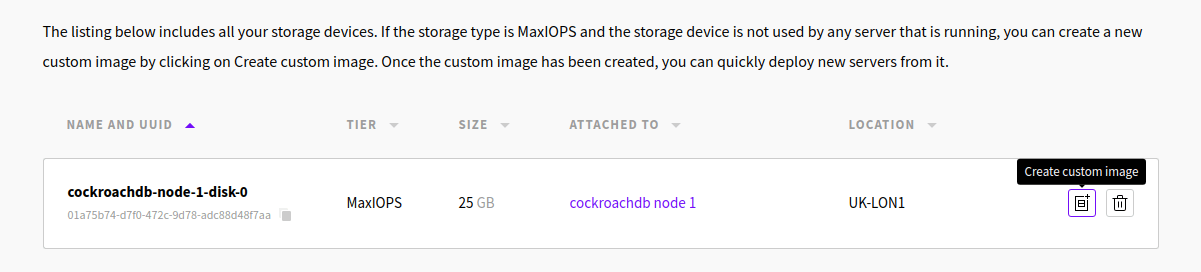
In the UpCloud Control Panel, after shutting down the server, go to the Storage tab
On the Devices tab, you can see all the storage devices of your servers. There should be one for the server you created. You should see two buttons for each storage device.
Click the button on the left to create a custom image.
Give your template a name, e.g. cockroachdb-node, then click the Create button.
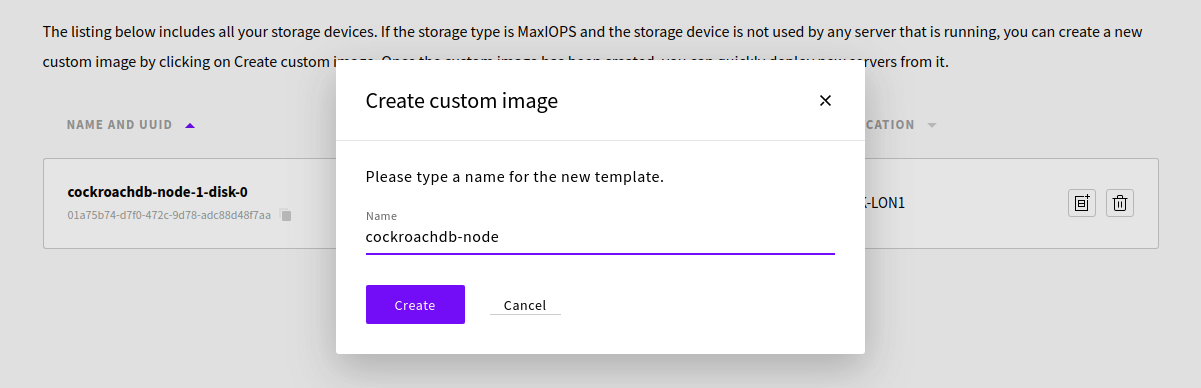
After a few seconds, the template is ready and you should see it under the Custom Images tab.
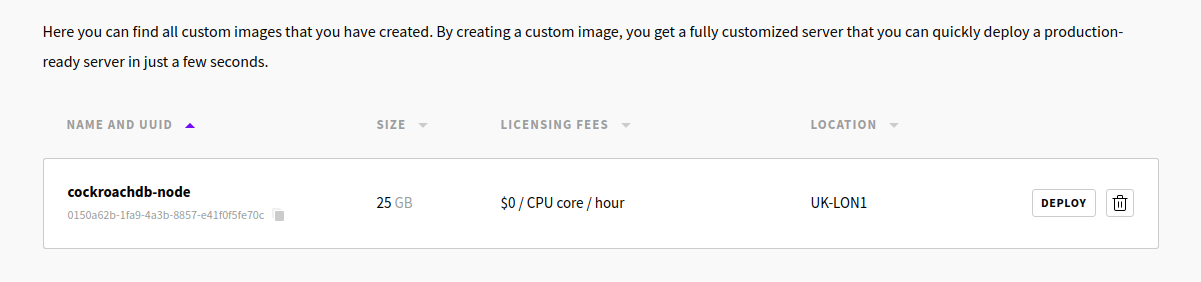
You can now use the Deploy button to create new nodes to the cluster. This way you only need to choose the server plan, give a hostname, and the server is deployed with all the earlier setup steps already done. Your SSH keys should work similarly as with node 1.
We can now start deploying nodes 2 and 3 and can finalise node 1.
Creating Node2 and Node3
Deploy two new nodes using your custom cockroach-node image. Once the deployments have finished, shut down both node 2 and node 3.
Attach both new nodes to the same SDN private network by going to the Network tab in the server settings.
Next, go to the server’s Network tab and attach the private SDN you created for the servers. Assign the IP address manually for both new nodes as you did for the first one.
cockroachdb-node-2 10.0.1.3
cockroachdb-node-3 10.0.1.4
Afterwards, restart all server and login to make sure everything is working.
Next, we need to update the hostname on all nodes for the server with the command:
sudo nano /etc/hostname
Change the name to indicate which node is which, for example:
cockroachdb-node-<node_number>
Then press ctrl+o and enter to save, ctrl+x to close the editor.
Afterwards, reboot all nodes to enable the hostname changes. You can do this at your UpCloud Control Panel or by using the following command:
sudo reboot
You should now have three identical database nodes running and ready. Continue in the next section to get the cluster initialised.
5. Initialising the CockroachDB cluster
Setting up node-certificates for the nodes
Now that each server has its own IP we can create the node certificates for the nodes. We do this by using the CA key we created in the earlier step.
Log in to the node 1 server and run the following command to create the node certificate:
cockroach cert create-node 10.0.1.2 cockroachnode1 localhost 127.0.0.1 --certs-dir=certs --ca-key=my-safe-directory/ca.key
This node certificate makes the node reachable via the SDN private IP, the hostname, “localhost” and the local IP 127.0.0.1. If you want the node to be reachable via the public IP, add it to the list after the local IP.
If you made a mistake typing in the IPs, you can run the command with the additional argument –overwrite. This will overwrite the certs if the file already exists.
Now do the same for nodes 2 and 3, by using their IPs.
# node 2
cockroach cert create-node 10.0.1.3 cockroachnode1 localhost 127.0.0.1 --certs-dir=certs --ca-key=my-safe-directory/ca.key
# node 3
cockroach cert create-node 10.0.1.4 cockroachnode1 localhost 127.0.0.1 --certs-dir=certs --ca-key=my-safe-directory/ca.key
Afterwards, on nodes 2 and 3, delete the ca.key file with the commands:
rm ~/my-safe-directory/ca.key
Create a local root client Certificate on Node1
On node 1, we’ll create a root client certificate. This certificate is used later to log in to the database to create users, databases etc. Root login can be used on any of the servers that contain this certificate, but for now, we’ll just have it on the node 1 server. Run the command:
cockroach cert create-client root --certs-dir=certs --ca-key=my-safe-directory/ca.key
Starting up the nodes
It is now time to enable and start the systemd service script we created earlier. On nodes 2 and 3 we need to update the node IP in the service file.
Open the file with the following command:
sudo nano /etc/systemd/system/securecockroachdb.service
And then update the parameter –advertise-addr to the IP address you’ve selected to the node. For example, on node 2, we’ll change the ExecStart to show the following:
...
ExecStart=/usr/local/bin/cockroach start --certs-dir=certs --advertise-addr=10.0.1.3 --join=10.0.1.2,10.0.1.3,10.0.1.4 --cache=.25 --max-sql-memory=.25
...
On all nodes, run the following command to enable the systemd script. This will start the database whenever the server reboots.
sudo systemctl enable securecockroachdb.service
Then run the following command to start the database:
sudo systemctl start securecockroachdb.service
As a result, the node becomes active but is not yet connected to the other nodes. We are now ready to initialize the cluster.
Initializing the cluster: The database is live!
Now that the nodes are started, we’re ready to initialize the cluster. On node 1, run the command:
cockroach init --certs-dir=certs --host=<node_1_sdn_ip>
For this example, the command is:
cockroach init --certs-dir=certs --host=10.0.1.2
Cluster successfully initialized
If all went correctly, you get the message like the example output above.
6. Connecting and testing the database
Creating a database and a user
Login to node 1 with the cradmin user. We will log in to the database cluster using the root certificate we created in the earlier step. To do this, run the command:
cockroach sql --certs-dir=certs --host=localhost
You can connect to the cluster through any of the nodes, however, for the root user you need to copy the certificate over to your other servers certs-directory.
Now that we’re logged in to the database cluster, we will create a database and a user that we can use to test the database. This user can also be used to login to the admin web-UI in the next step. In the SQL client, run the following commands to create a test database named testdb and a test user named tester:
create database testdb;
set database=testdb;
create user tester with password '<write a password here>';
Then we’ll grant the tester user all privileges to the database we created, create a table and then add value to the table:
grant all on database testdb to tester;
create table test(column1 string);
insert into test(column1)values('test!');
q;
We’re now ready to test how the database works with a database client and we can log in to the admin web UI.
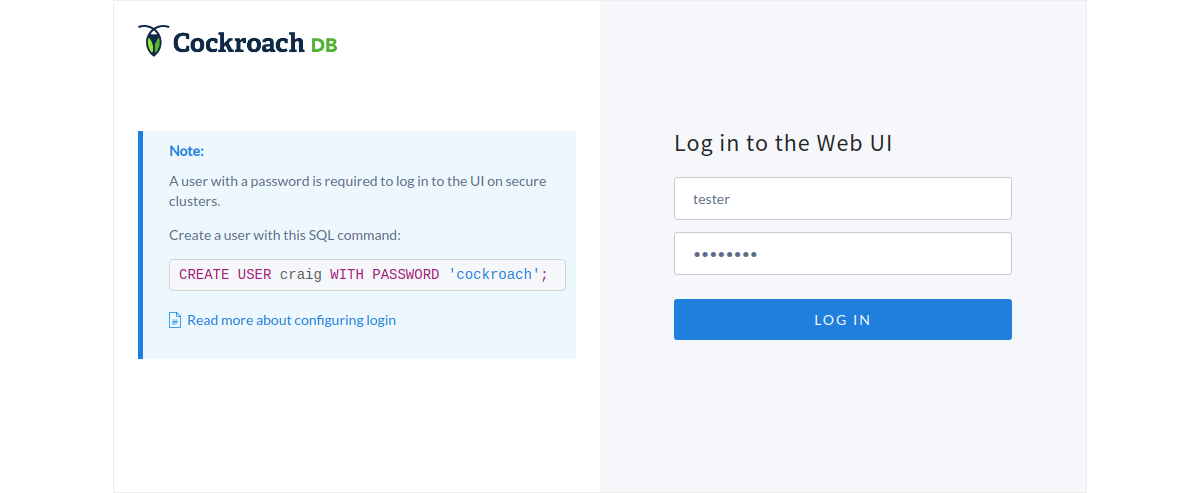
Logging in to the admin web UI
After creating the user tester and granting all privileges to it, we can use it to log in to the web UI. To do that you take the public IP of any of your server nodes and in your browser navigate to:
https://<node_1_public_ip>:8080
Your browser will warn about the site certificate as it is self-signed by Cockroach, but you can continue to the login page and then login by using the user tester you created earlier.
The web UI shows the status of the nodes and other useful information to administer the database cluster. If you get a 404 error, you’ve forgotten to update the node IP on the systemd service file.
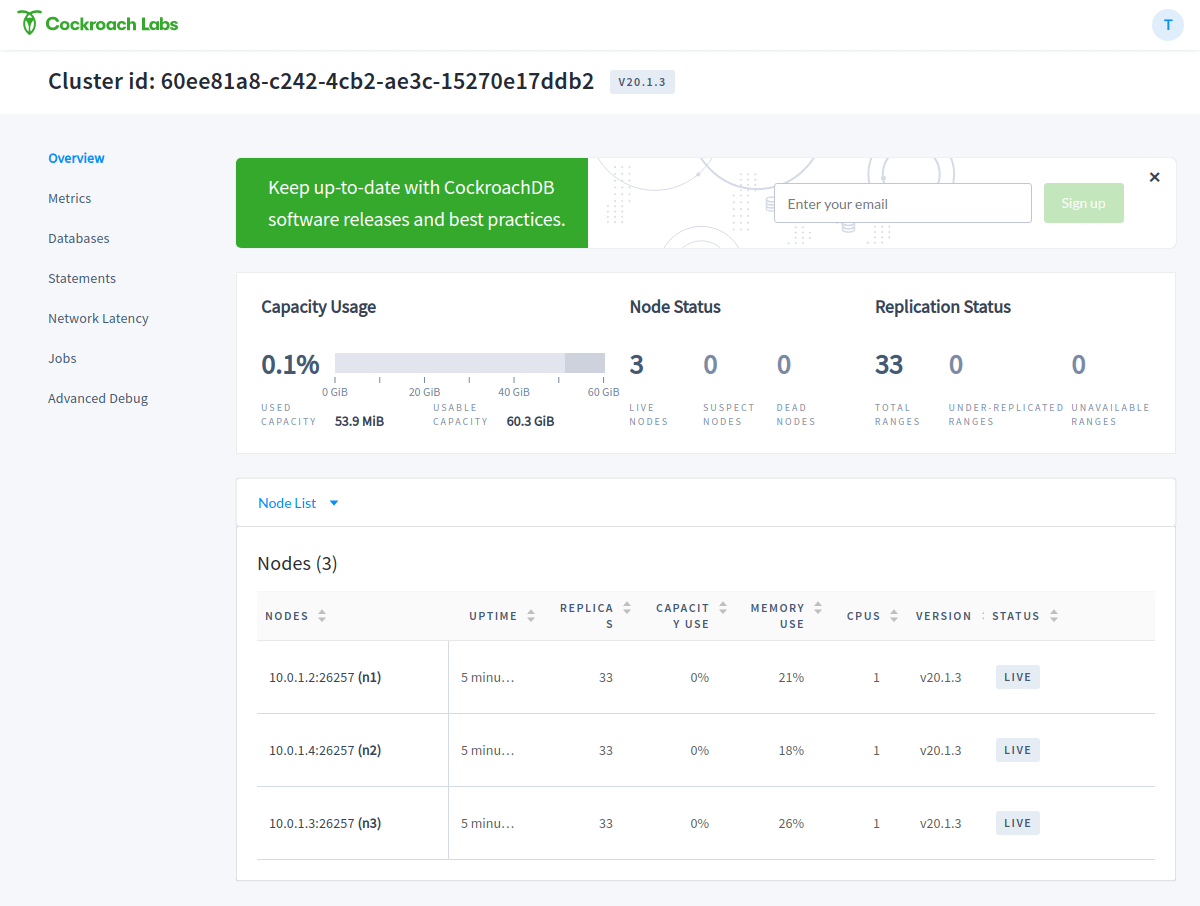
To try how everything works, you can shut down one of the nodes and see the status changes in the web-UI. You can then restart the node to see if it resumes normal operation.
Testing the DB with DBeaver
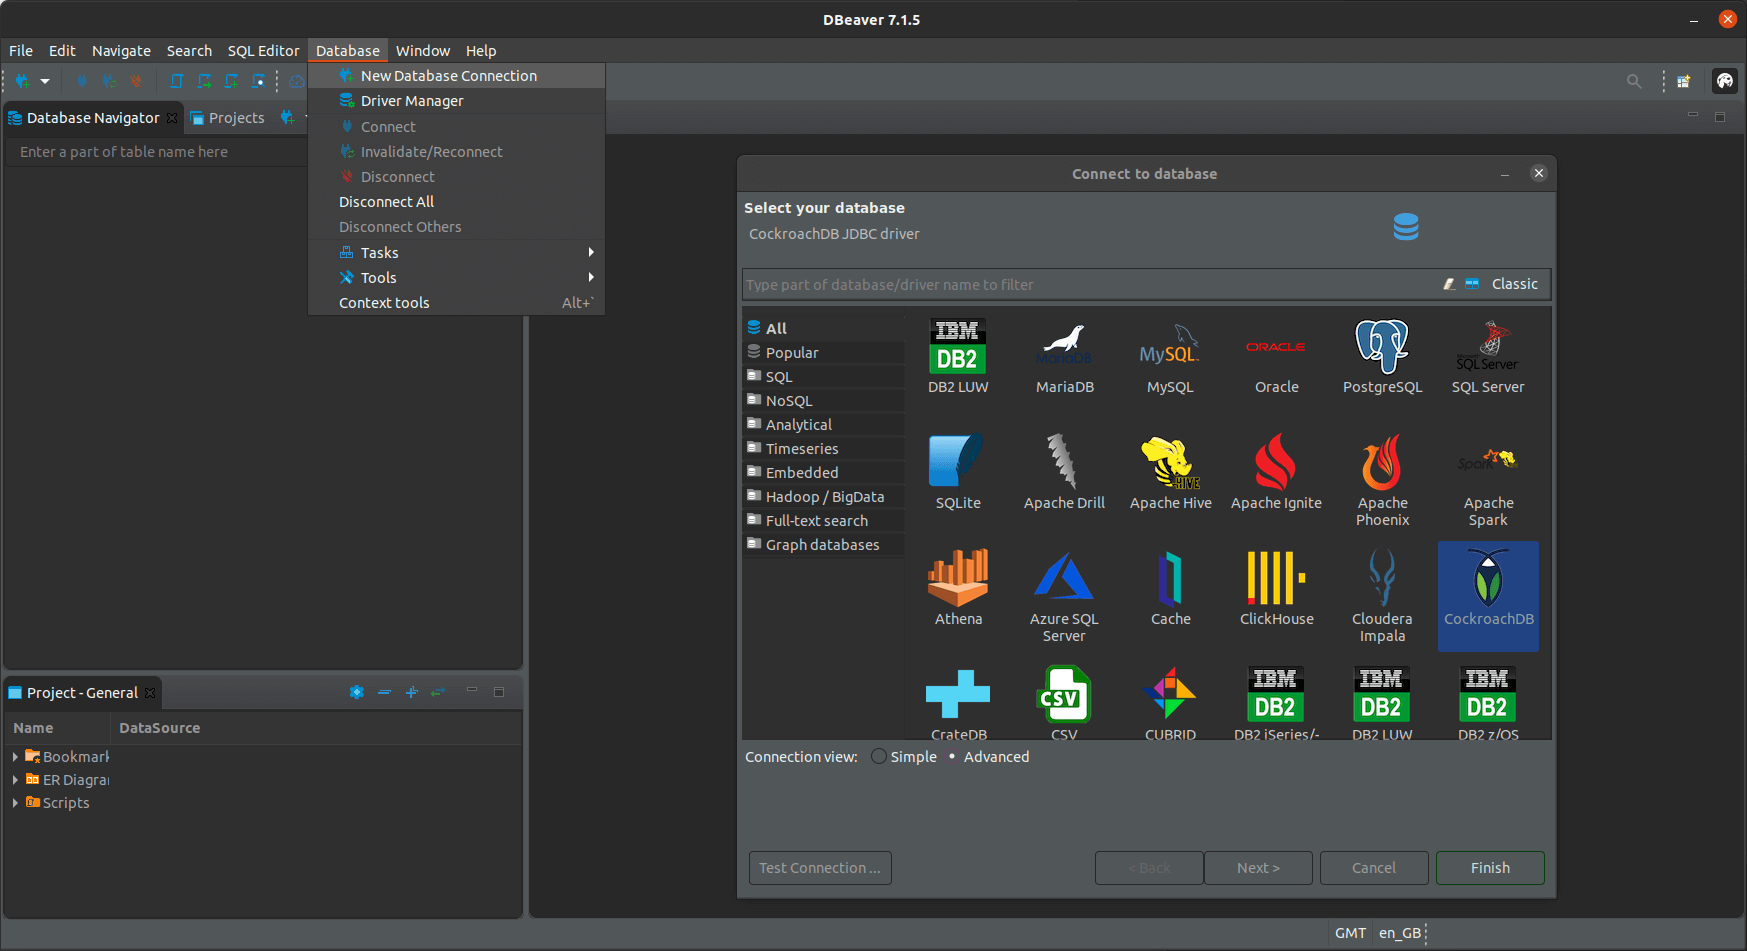
For a more hands-on test, we will use the DBeaver SQL client. Head over to their download page and get the community edition version appropriate to your OS.
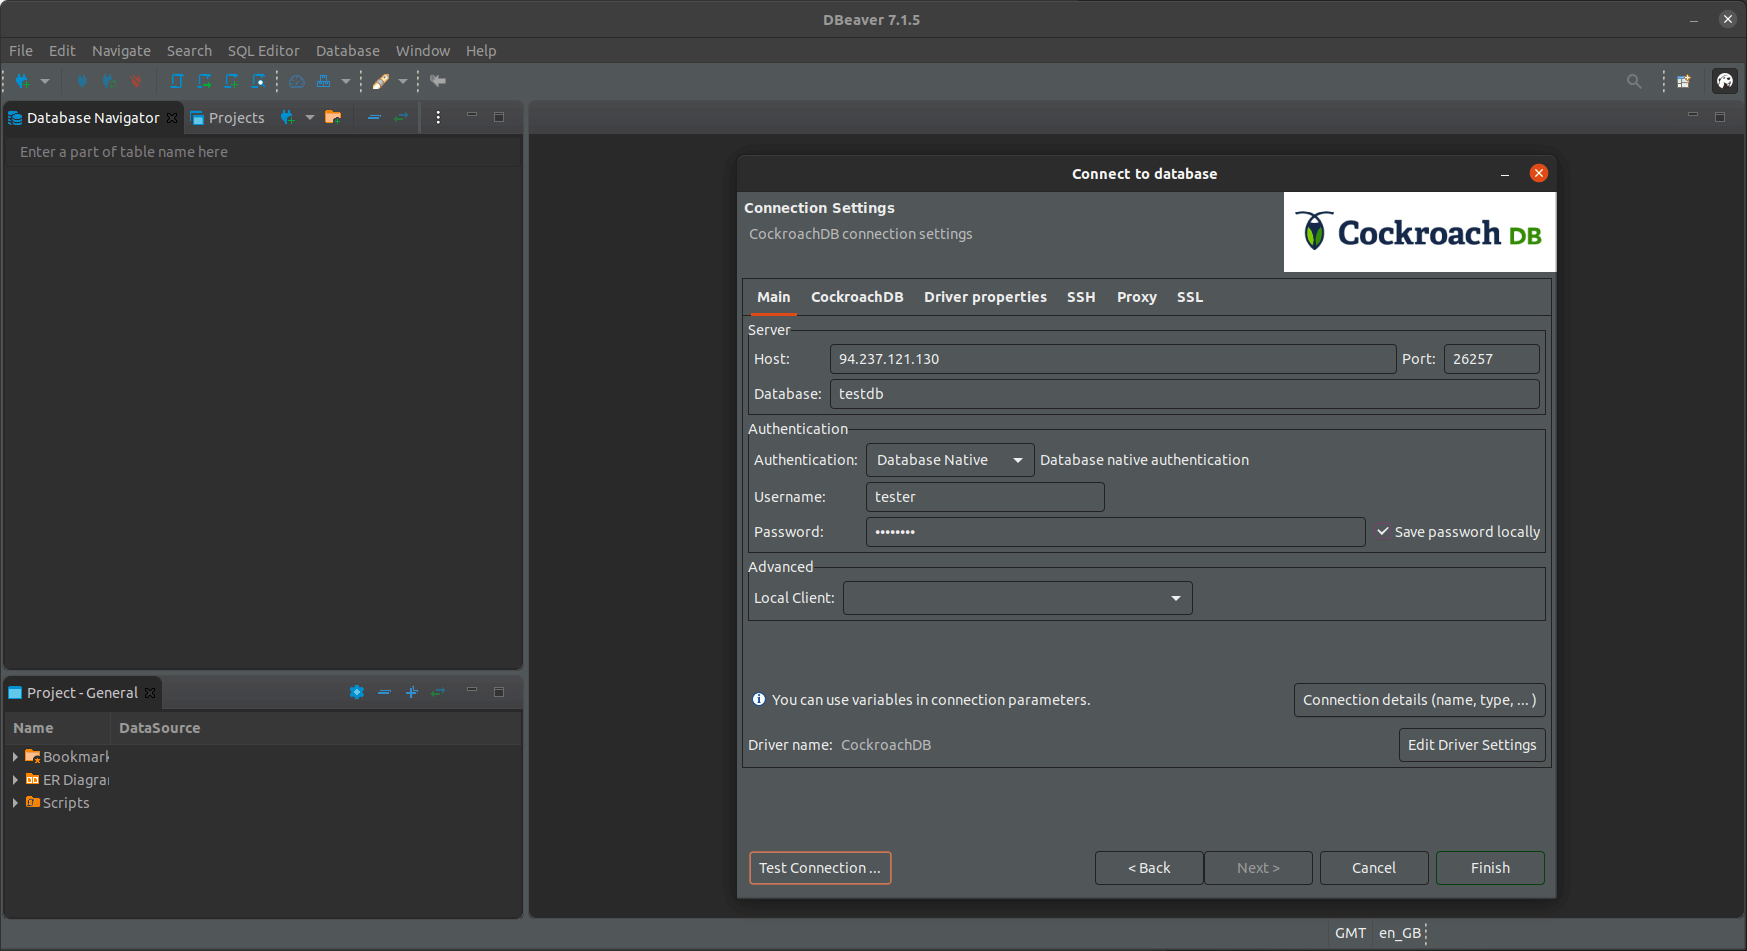
After the installation, open the DBeaver and click on the new connection button. Select CockroachDB as the target and click the Next button.
Then in the new connection settings, set the host to any of the public addresses of your cockroach nodes, leave the port as the default (26257).
Write the database name testdb, the username tester and the password you chose. You can test the credentials by clicking the Test Connection button.
Once all set, click Finish.
Then on the database navigator, expand the testdb connection and you should be able to find the table you created.
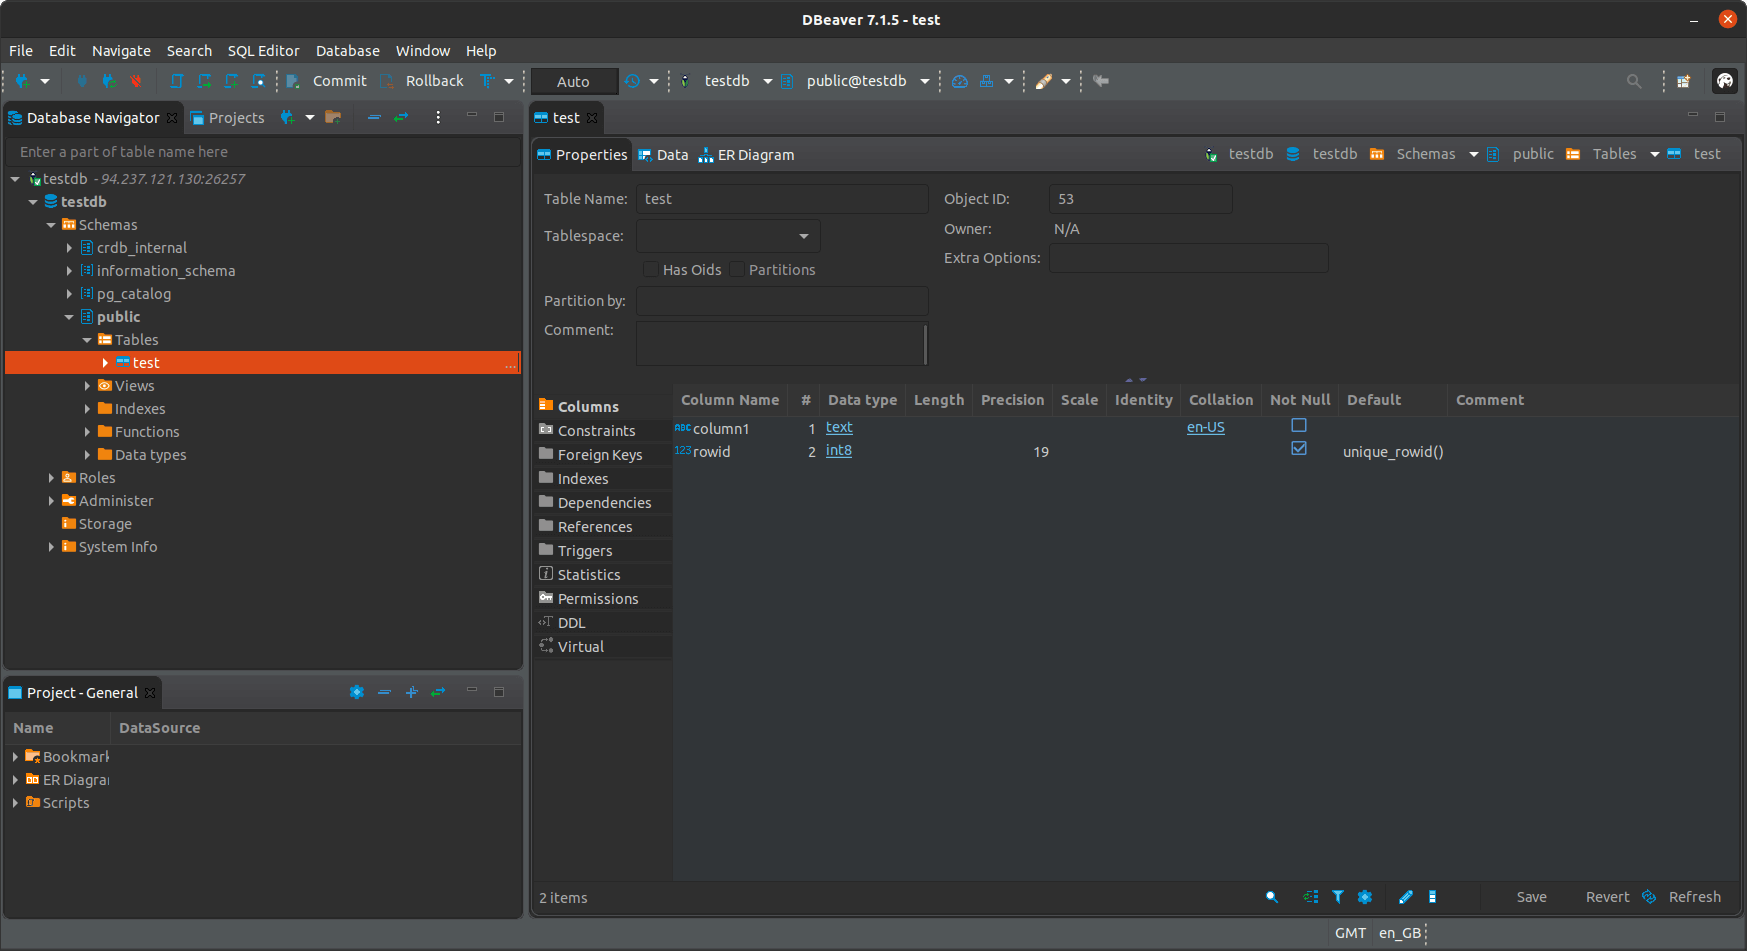
You can try creating a table, adding some rows and then logging in through some other node to see that your changes are replicated between all the instances.
7. Continuing further
Congratulations! If you’ve made it this far, you should now have a fully functional CockroachDB cluster up and running.
However, there is one, big glaring problem with the current setup: we usually don’t want our database nodes to be available through the public internet. So the next step would be to remove the public IPs from the cockroach node servers and then set up a way to connect to them through VPN. One good choice for this is to use Wireguard VPN.
You can also further improve the setup by adding a load balancer server that is used to connect to the servers. CockroachDB can create HAProxy configuration files automatically, so the primary steps to do this are:
- Deploy a new UpCloud server and connect it to the SDN private network
- Then install the HAproxy load balancer
- On cockroach node 1, run the following command to create the haproxy config file:
cockroach gen haproxy --certs-dir=certs --host=<any node address> - Copy the resulting haproxy.cfg config file over to the Load balancer server from cockroach node 1
- On the load balancer server, start the load balancer with the command:
haproxy -f <path to the config file>/haproxy.cfg
Once that’s all done, you should be able to connect to your cockroach cluster through the load balancer IP address.
Paul
In your article, you mention that you’ll be using “DE-FRA1” as the location for your setup but the “cockroachdb-start-cluster.png” states otherwise. It shows the servers running in “UK-LON1”. Also, I think the target audience for this article would like to see a cluster distributed over multiple datacenters instead of 1 datacenter being the sole point of failure.