Kamal is an open-source deployment tool that automates the process of deploying and managing containerized web applications on target servers. These target servers can be provisioned anywhere whether in an on-premises environment, Cloud environment, hosted VPS, or even a simple virtual machine that you create on your own. Kamal was originally created for Rails applications, but it can actually deploy any type of web application that can be containerized.
Kamal makes the application deployment as seamless as possible by abstracting the underlying details of the process and providing a simple configuration to set and a CLI interface to work with. Kamal reads this deployment configuration and applies it according to the required CLI action or command that is provided. After Kamal finishes its work, you’ll have a web application that is running inside a Docker container and ready to receive client requests.
Moreover, Kamal offers some out-of-the-box features, including zero-downtime deployments, SSL certificate generation, and multi-arch image builds. It also provides an easy way to deploy additional components – called accessories – required by your web application, like databases or message queues.
While Kamal takes care of the deployment process, you still need a scalable and performant infrastructure layer that hosts and runs your Kamal deployments, and this is what UpCloud does best.
With the industry-leading server components and extreme performance storage, you can provision on-demand Cloud servers that satisfy your application requirements. By using Kamal with UpCloud, you get a complete platform for deploying and managing your web applications in a fast, reliable, and scalable way.
In this guide, we’ll explain the concepts of Kamal and how it works. We’ll start by installing and configuring Kamal on a Cloud server using UpCloud, and then we’ll go through the step-by-step process of deploying a web application through Kamal. Throughout this guide, you’ll be able to practice the following:
- Install Kamal on a Linux server
- Create a deployment configuration for your web app
- Deploy your web app using Kamal
- Scale your deployment by adding more target servers
Prerequisites
To follow along with this guide, you’ll need to:
- Create an UpCloud account: This gives you access to different UpCloud services using the GUI control panel, command-line interface, or the API.
- Generate an SSH key pair to use it for authentication to the UpCloud server.
- Deploy a Cloud server on UpCloud: This is going to be our control server where we’ll install Kamal.
- Create a Docker hub account: Kamal uses container registries to push and pull images for deployment, the default registry for Kamal is Docker Hub.
- Familiarity with using the CLI: We’ll be using some basic commands throughout this guide to install our tools, navigate project directories, and work with SSH.
What is Kamal?
Before diving into the practical scenario, let’s first explain in more detail what Kamal is and how it works.
Kamal enables you to deploy your web app to one or more target servers in an automated way. All you need to do is provide a set of configuration through a YAML file which includes details about how and where you want to execute your deployment. Kamal takes it from there and connects to each of the target servers to start deploying your web app.
Kamal uses containerization for the application deployments, meaning that it will package and deploy your web app to the target server as a container, and not run it directly on the target server OS. You’ll need to provide a Dockerfile along with your web app so that Kamal understands how to build the required container image.
Under the hood, Kamal uses Docker to execute the container deployment steps, including building, pushing, pulling the image, and starting a container from it on the target server. However, Kamal abstracts all the underlying Docker commands so that you don’t have to worry about directly interacting with Docker.
After the web app is deployed to the target server, Kamal uses a lightweight HTTP proxy – called Kamal proxy – to route traffic for the web app. The specific configuration for the proxy and how it handles the routing is also provided through the YAML file of the deployment configuration. This proxy server is the main component that makes it possible to implement zero-downtime deployments. It checks the health of any new deployed container instance and starts forwarding traffic to it when it’s up and healthy. If the deployment is a new version of a previously deployed instance, it will gradually shift the traffic from the old to the new instance, making sure no outstanding requests are dropped during the process.
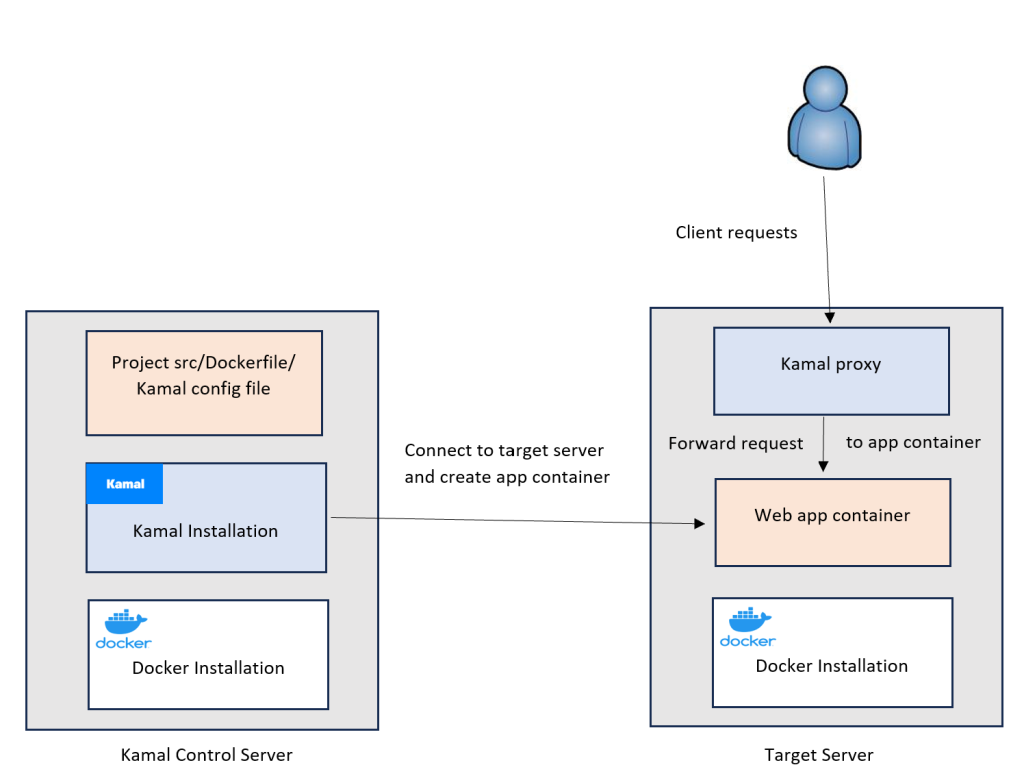
It’s worth mentioning that Docker and Kamal proxy are installed automatically by Kamal on the target servers, you only need to install Docker manually on the control server.
When comparing Kamal to other containerization platforms like Kubernetes, we can say that Kamal fits small-scale deployments while prioritizing simplicity and abstracting the complexities of the deployment, so you can fast-track running a functional web app in production. While Kubernetes provides more control and customization for every component and fits large-scale deployments, at the cost of adding more complexity and time for the configuration.
Another deployment tool that is usually compared to Kamal is Capistrano. They both have a lot in common, like automated deployment to multiple target servers, support for zero-downtime deployments, rolling restarts, and rollback. However, a key difference between them is that Kamal uses containerization and Docker, while Capistrano relies on native deployments to the target server without using containers. This distinction enables you to decide upon which tool should match your deployment requirements, depending on whether your application is containerized or not.
Installing Kamal on UpCloud Servers
Now that we’ve an understanding of Kamal and how it works, let’s start our practical scenario by installing Kamal. We’ll be using an Ubuntu Cloud server from UpCloud for the installation. Throughout the rest of this guide we’ll refer to this server as the control server.
Once you’ve got the server running, use the following steps to install Kamal:
1. Connect to the server using SSH. Replace <key-file> with the path to the private key file that you generated previously, and the <server-ip> with the IP address of the Cloud server.
ssh -i <key-file> root@<server-ip>2. Install Ruby and the required dependencies on the server. Kamal is distributed as a Ruby gem, so you’ll need to have Ruby installed before installing Kamal.
apt update -y
apt install -y ruby-full build-essential libssl-dev zlib1g-dev make
3. Verify the Ruby installation.
ruby -vIf the command output shows the version, this means the installation was successful.
4. Install Kamal using RubyGems.
gem install kamal5. Verify the Kamal installation.
kamal versionThe above command output will show the installed Kamal version.
6. Install Docker on the server. Kamal requires Docker on the control server to build the image, log in to the registry, and push the image.
7. Verify the Docker installation.
docker --versionConfigure Application Deployment with Kamal
After installing Kamal, the next step is to configure our application deployment. Kamal can deploy any application that can be containerized. For our scenario, we’ll use a Spring Boot project.
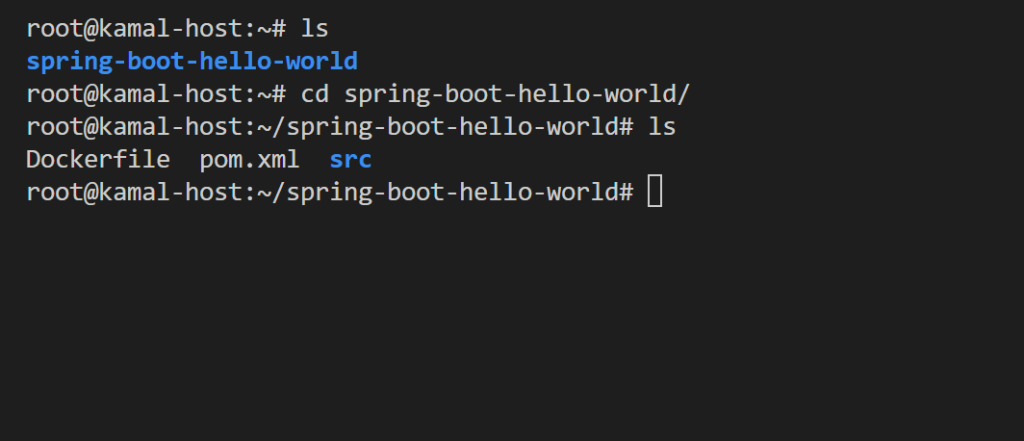
1. Clone the project repository to the control server:
git clone https://github.com/Amr-tmorot/spring-boot-hello-worldThe project is a simple Hello world application, it contains the source code under the src/ directory, a Dockerfile for containerizing the app, and the pom.xml file for the project dependencies.
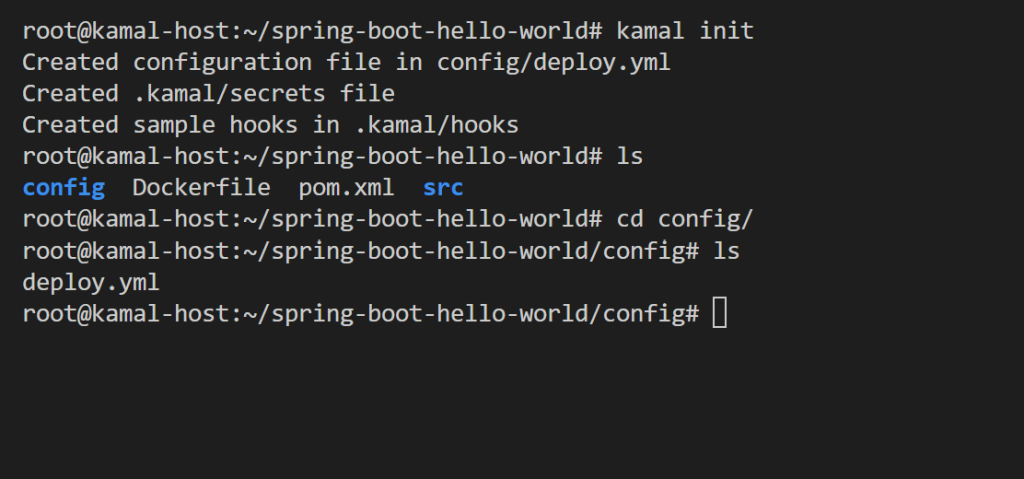
2. To start using Kamal with the project, initialize the Kamal configuration with the following command (use the command from within the project root directory):
kamal initThis will create a default configuration file for the deployment under config/deploy.yml
3. Create another UpCloud server for our deployment. This is the server which Kamal will connect to and deploy the app container. We’ll refer to this server through the rest of the guide as the target server. You can use the same SSH key that you created previously in your UpCloud account.
4. Open the config/deploy.yml file with a text editor and replace its contents with the following:
service: hello-world

image: <Docker Hub username>/<repository name>

servers:
  web:
    - <target server ip>

proxy:
  ssl: false
  host: myapp.spring.com
  app_port: 8080
  healthcheck:
    path: /

registry:
  username: <Docker Hub username>
  password:
    - KAMAL_REGISTRY_PASSWORD

builder:
  arch: amd64

ssh:
  user: root
  keys: [ "~/.ssh/myKey" ]
Let’s explain the above fields that we’ve added to the file:
- service: this is an arbitrary name that you give to your service. Kamal will use this in the container name that it will create. image: Kamal will build the container image using the Dockerfile in the project, then it will push it to this repository on Docker Hub. You’ll need to create a repository on Docker Hub for the image, then replace <Docker Hub username> with your Docker Hub user and the <repository name> with the repository you created.
- servers: This is a list of servers that Kamal will deploy the app to. The web key is the role of these servers, which is a way to categorize each group of servers according to which functionality they provide. For example, a web app can contain worker instances that execute background tasks, besides the main web app instances that serve client traffic. In this case, we can create two roles, one for the web and another for the worker servers. Under the role, we provide the IP addresses of the servers for the deployment. Here we only have our target server under the web role, so replace the <target server ip> with its IP address.
- proxy: This is the configuration for the Kamal proxy and how it should handle traffic routing. The ssl option specifies whether we want to use SSL or not for client traffic. If we choose to use SSL, Kamal will automatically generate the certificate using Let’s encrypt. The host option specifies a hostname to be used for routing traffic to the destination app container, this means that when the proxy receives traffic that has this hostname provided in the request header, it will forward it to the container. This allows running different app containers on the same target server by separating them with different hostnames. You’ll need to set this hostname in a DNS server and map it to the IP address of the target server so that it can be resolved correctly. The app_port is the port to which the Kamal proxy will forward the traffic to on the destination app container. This is typically the port number that the application will listen on inside the container. Here we use 8080, which is the default port for spring boot. The healthcheck option is used by the proxy to verify the health of the app container before starting to send traffic to it. By default, the proxy uses /up endpoint to check the app health, but since we only have a single endpoint in our spring boot app, which is the root /, we’ll use it for the health check instead.
- registry: This is the container image registry that Kamal will use to push and pull the images. Kamal uses Docker Hub by default, but you can specify another registry URL if you want. Replace the <Docker Hub username> with your Docker Hub user. For the password option, Kamal retrieves the value from the .kamal/secrets file. This file is created automatically when we initialize the project with the kamal init command. It contains variables that shouldn’t be passed directly as plain text in the deployment config file.
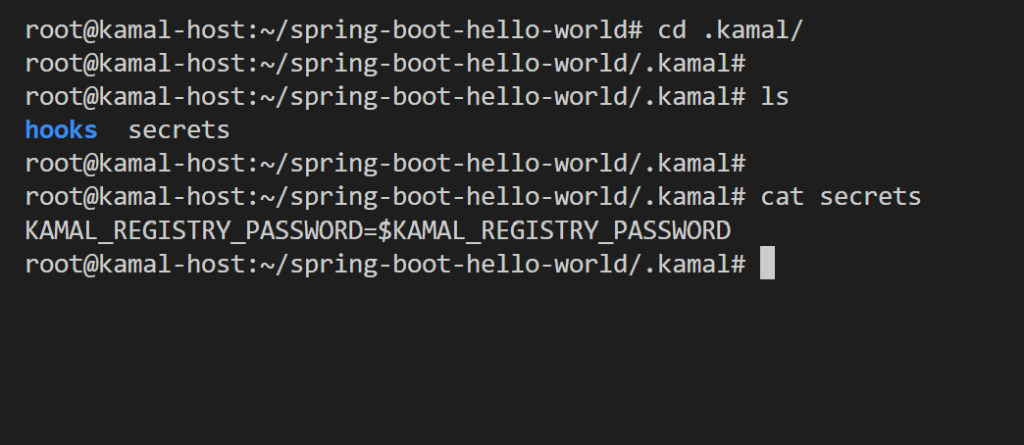
- Here we can see that the value of the KAMAL_REGISTRY_PASSWORD is retrieved from an environment variable with the same name. This means that we need to set this environment variable on the Kamal control server with the value of the Docker Hub registry password so that Kamal can authenticate to the registry. We can use the command export KAMAL_REGISTRY_PASSWORD=<Docker Hub password> to set this environment variable. Replace <Docker Hub password> with your account password or personal access token. It’s always recommended to use tokens instead of passwords for a more secure access to the registry, additionally, using personal access tokens is a must if you have two-factor authentication enabled.
- builder: Kamal supports building container images for multi-architectures like amd64 or arm64, so this option specifies which architecture we want to build our image for.
- ssh: Kamal connects to the target servers for deployment using SSH, this option specifies the SSH configuration for the connection like the user and SSH key. You’ll need to provide the path to the SSH private key of your target server. If you generated the key pair on a local machine and it doesn’t exist on the Kamal control server, you can copy it to the control server using SCP.
5. Now that we’ve added our configuration to the file, let’s run our deployment with the following command:
kamal setup This command will connect to the target server, install Docker if it’s not already installed there, deploy the Kamal proxy, and then deploy the app container after building and pushing the image to the registry.
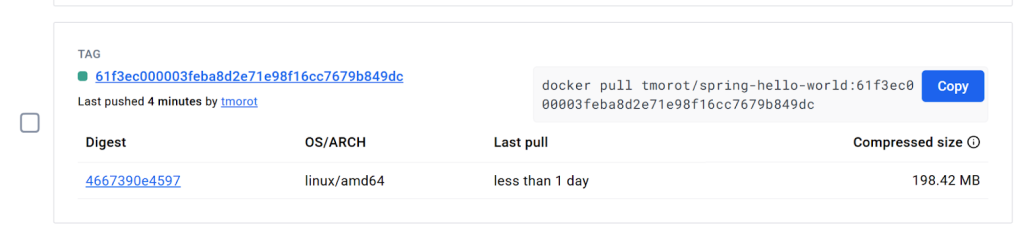
If we check the image repository on Docker Hub, we’ll see the new image pushed there by Kamal:
Now let’s connect directly to the target server and verify the actions that Kamal executed:
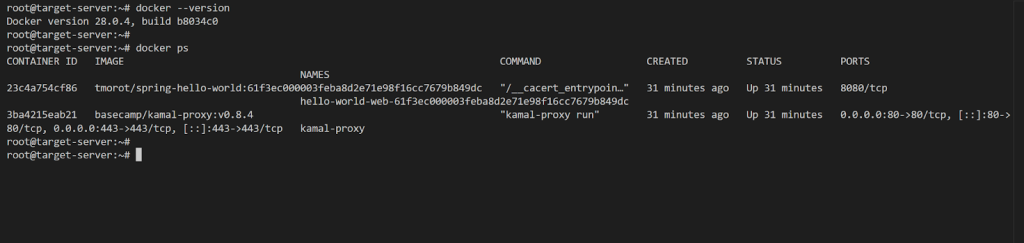
In the above image, we can see that we’ve Docker installed, although we didn’t install it manually, so this was done by Kamal. Also, we can see that we’ve two containers running, the app container, which contains hello-world-web in its name, which is derived from the service name and the role in the deployment configuration, and the other container is the kamal-proxy container. We can also notice that the Kamal proxy listens on ports 80 and 443, while the app container listens on port 8080.
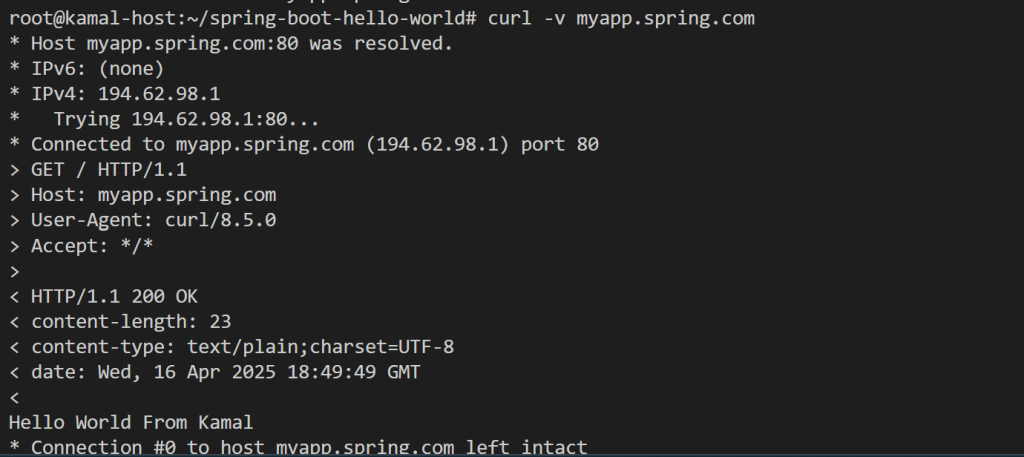
6. Now let’s try to connect to our app from the control server using the hostname we provided in the deployment configuration:
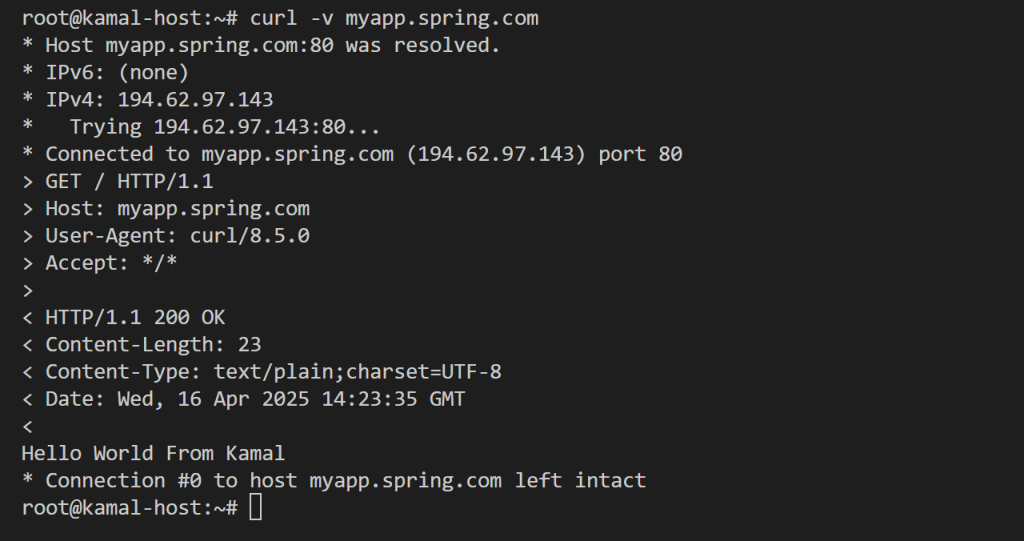
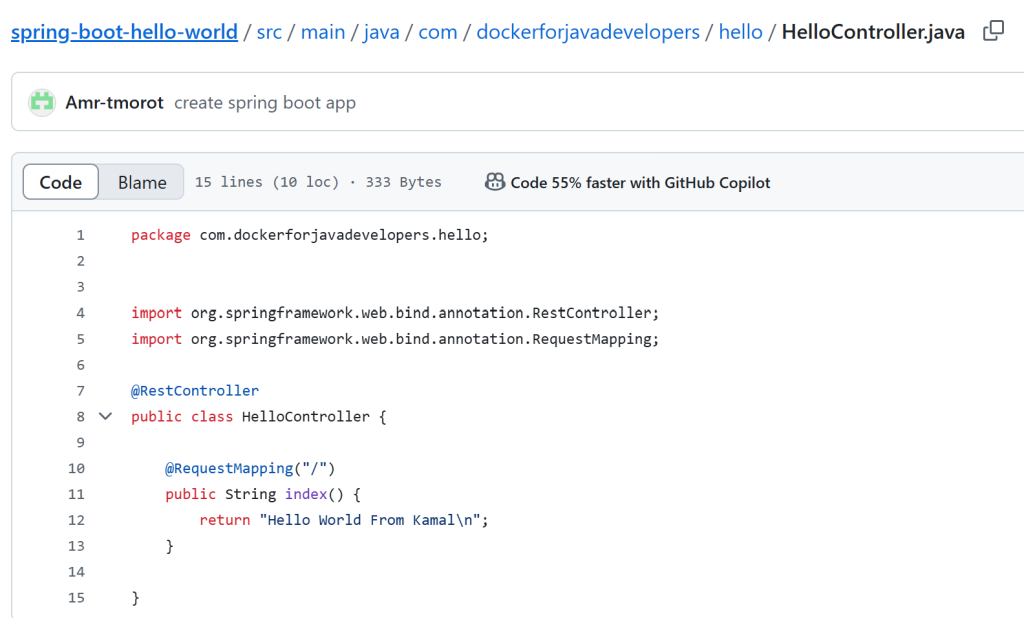
As we can see, we get the “Hello World From Kamal” response, which is set in our Spring Boot source code.
So now our app is running and serving traffic successfully!
Running Multiple Applications on the Same Server
Using the host option in the Kamal proxy configuration enables us to run multiple applications on the same server. The Kamal proxy will rely on the host header in the request to route the traffic to the appropriate container app.
Let’s try this by using another app, this time it’s a Python Flask app:
1. Clone the project repo on the control server.
git clone https://github.com/Amr-tmorot/python-flask-hello-world.git2. Initialize Kamal configuration from the project root.
cd python-flask-hello-world/
kamal init
3. Modify the config/deploy.yml with the following contents.
service: flask-hello-world

image: <Docker Hub username>/<New repository name>

servers:
  web:
    - <target server ip>

proxy:
  ssl: false
  host: myapp.flask.com
  app_port: 5000
  healthcheck:
    path: /

registry:
  username: <Docker Hub username>
  password:
    - KAMAL_REGISTRY_PASSWORD

builder:
  arch: amd64

ssh:
  user: root
  keys: [ "~/.ssh/myKey" ]
So this is almost similar to the previous app deployment configuration, with the exception of using a different service name, using a different image repository for this app image, and using a different host and app_port in the proxy configuration. Again make sure you set this hostname in the DNS server and map it to the target server IP address.
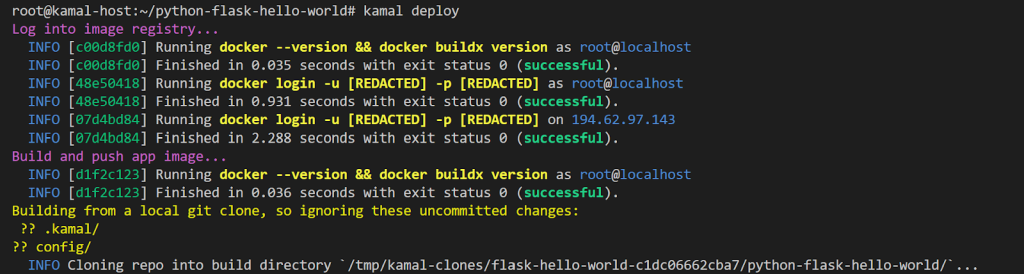
4. Deploy the application using Kamal.
kamal deployWe should see Kamal starting the new application deployment.
5. Let’s verify the new container that is running on the target server.

We can see that our Flask app container is running now and listening on port 5000.
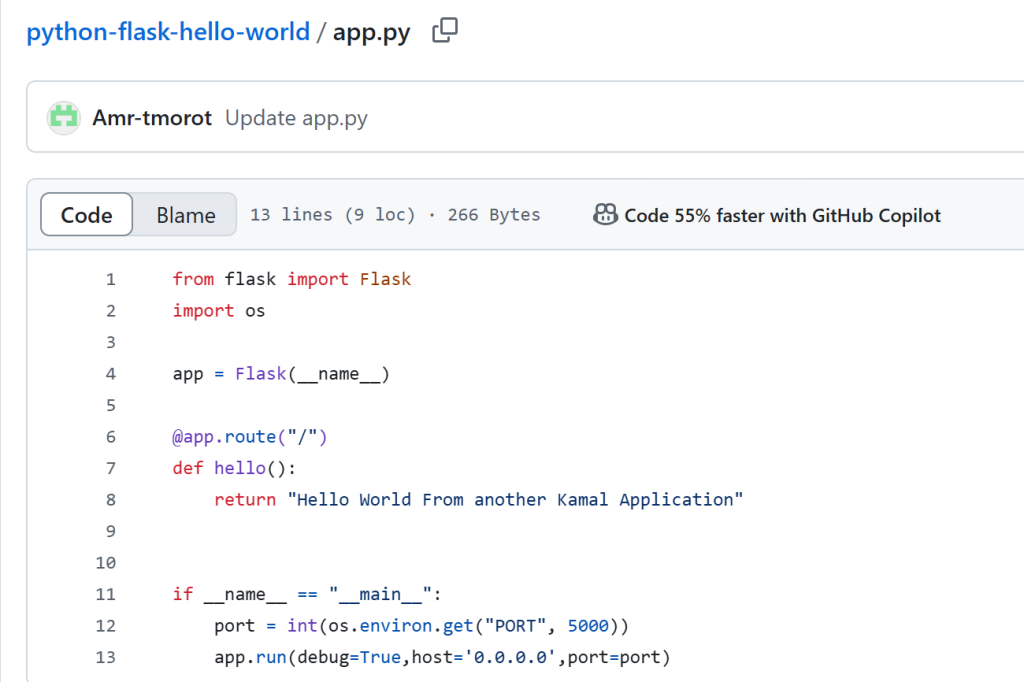
6. Again, let’s use our configured Flask app hostname to test connectivity to our application.
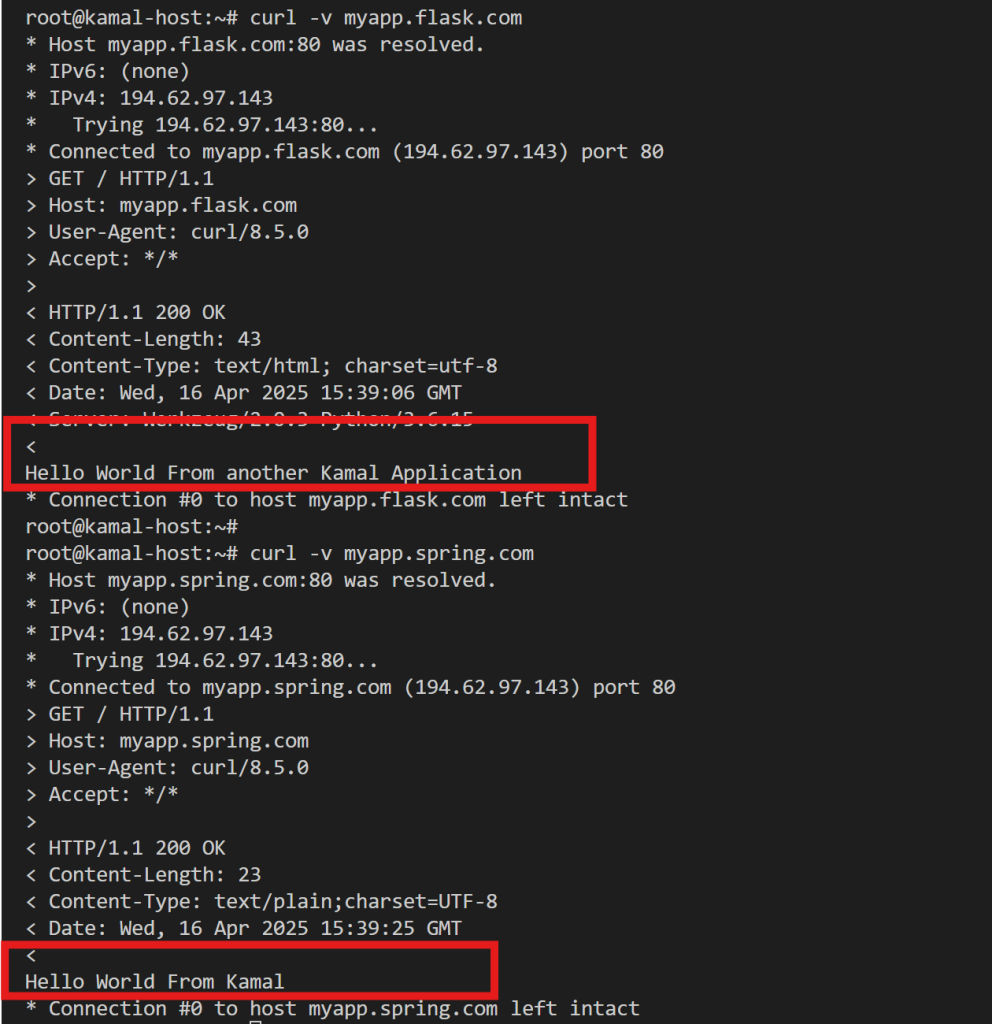
We can see that we’re getting the “Hello World From another Kamal Application” response that is set in the source code of the Flask app.
We’re also able to get the response from the spring boot app depending on which hostname we use in the request, while using the same target server.
Scaling the Application Deployment
Scaling deployments with Kamal is fairly simple, we only need to provision new target servers and add their IP address to the deployment configuration, then Kamal will prepare them with the required tools and deploy an instance of the app container there.
Now let’s try to scale our Spring Boot application:
1. Provision a new UpCloud Cloud server. We’ll refer to this one as target server02. Again, you can use the same SSH key you created previously.
2. Modify the Spring Boot deployment file under configure/deploy.yml by adding the IP address of target server02 to the server list under the web role.
service: hello-world

image: <Docker Hub username>/<repository name>

servers:
  web:
    - <target server ip>
    - <target server02 ip>

proxy:
  ssl: false
  host: myapp.spring.com
  app_port: 8080
  healthcheck:
    path: /

registry:
  username: <Docker Hub username>
  password:
    - KAMAL_REGISTRY_PASSWORD

builder:
  arch: amd64

ssh:
  user: root
  keys: [ "~/.ssh/myKey" ]
3. Prepare the new target server02 and deploy the app with Kamal.
kamal setup4. Now if you change the DNS record for myapp.spring.com to point to target server02 IP address, you should be able to connect to the app container on the new target server02.
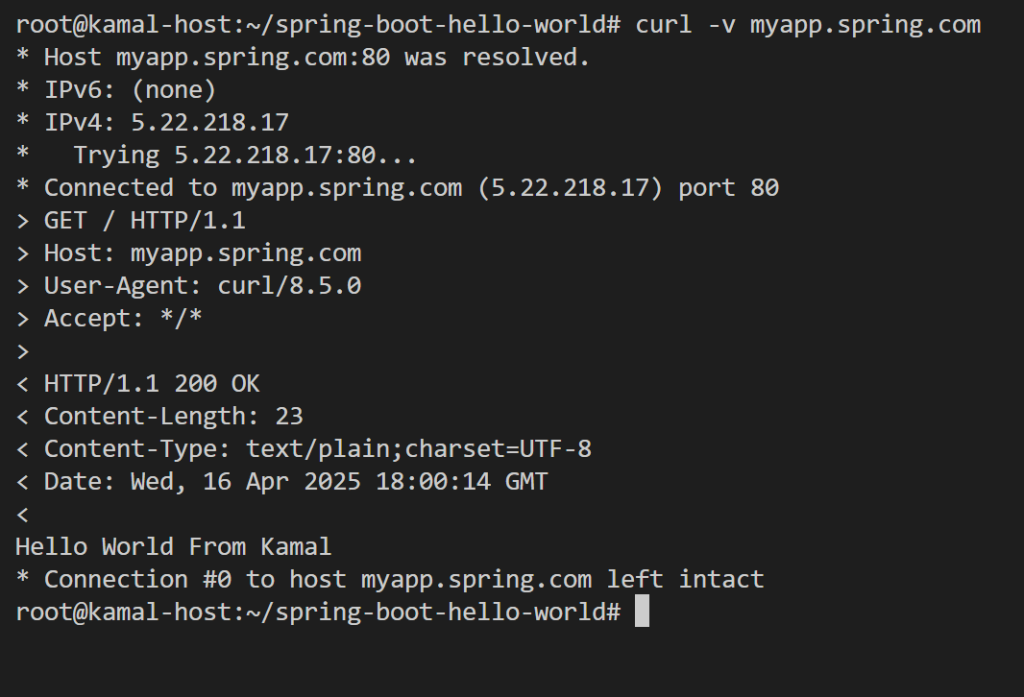
Our target server02 is now running an additional instance of our app container. However, we’re pointing our DNS entry to only one of the target servers at a time.
If we want to use both target servers at the same time, we’ll need to provision a load balancer in front of them as follows:
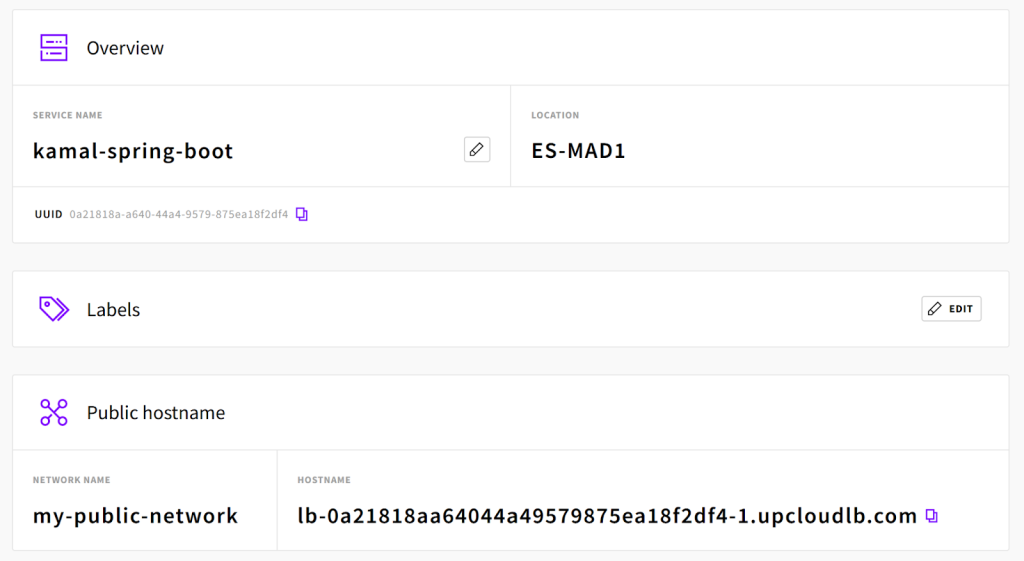
- Create an UpCloud Managed Load Balancer. Make sure you set up the load balancer in the same location as the target servers.
- Create a private SDN network to attach the load balancer and the target servers to it.
- Modify the DNS entry to point the hostname of myapp.spring.com to the load balancer hostname, which you can find in the load balancer overview tab in the UpCloud GUI control panel. (This DNS entry type should be an alias or CNAME record.)
- Test the connectivity again to the application.
Now our load balancer will distribute the traffic across the two target servers, achieving higher throughput for handling requests and improving availability in case any of the target servers goes down.
Monitoring and Managing Applications with Kamal
Monitoring is a key aspect of deploying production applications. We always need to track how our application is performing and whether it’s meeting user requirements or not. Depending on the information we get from the monitoring, we might also need to execute operational tasks on our applications. Luckily, Kamal provides some built-in commands that we can use to view information about our running apps and maybe take necessary actions if required.
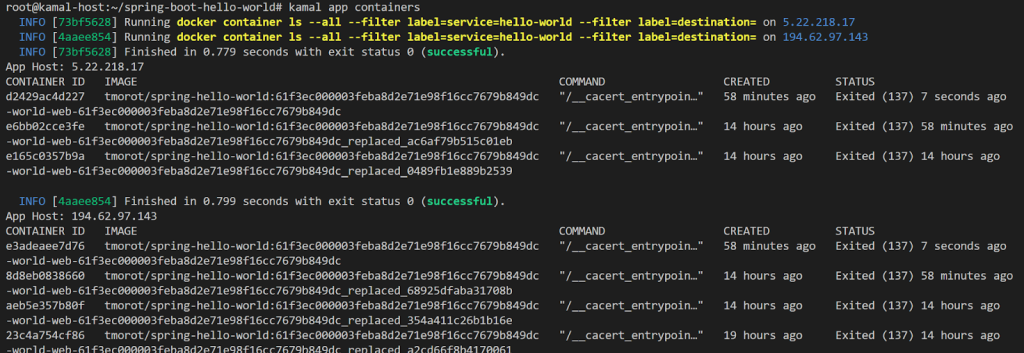
- To show the app containers that are running on the target servers, we can use the following command:
kamal app containers 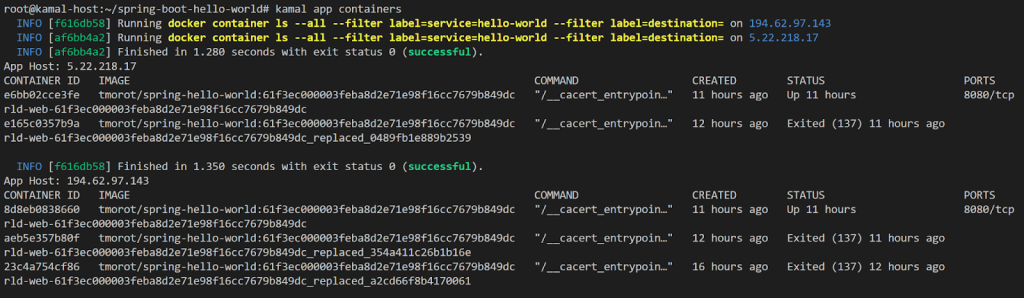
We need to issue this command from inside the specific app directory so that Kamal knows which app we are retrieving the information for. As we can see in the above image, the command is showing the Spring Boot app containers on the two target servers (referred to as App Host in the output), it’s also showing older versions of the containers (the ones with Exit Status 137) that have been superseded by a new deployment.
- If we discover an issue with a deployment and want to roll back, we can use an older version from the ones that appear in the previous output:
kamal rollback <older-version>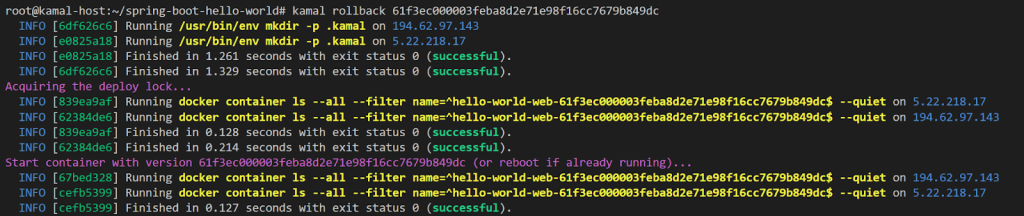
Now, if we check the containers again, we’ll see the latest one was terminated and an additional container is deployed, which is actually the same as the older version:

- If we want to view only the current running containers, we can use the following command:
kamal app details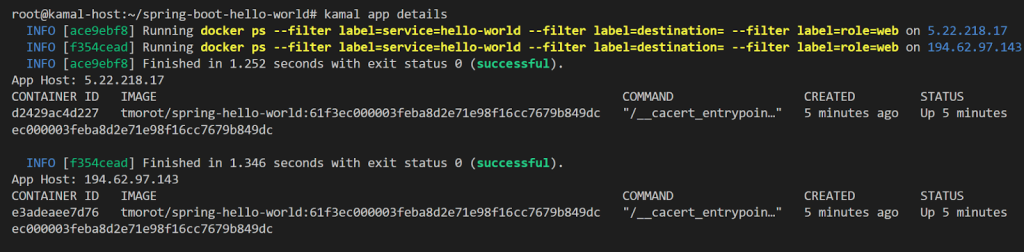
- We can also view the logs of our app containers on each server with the following command:
kamal app logs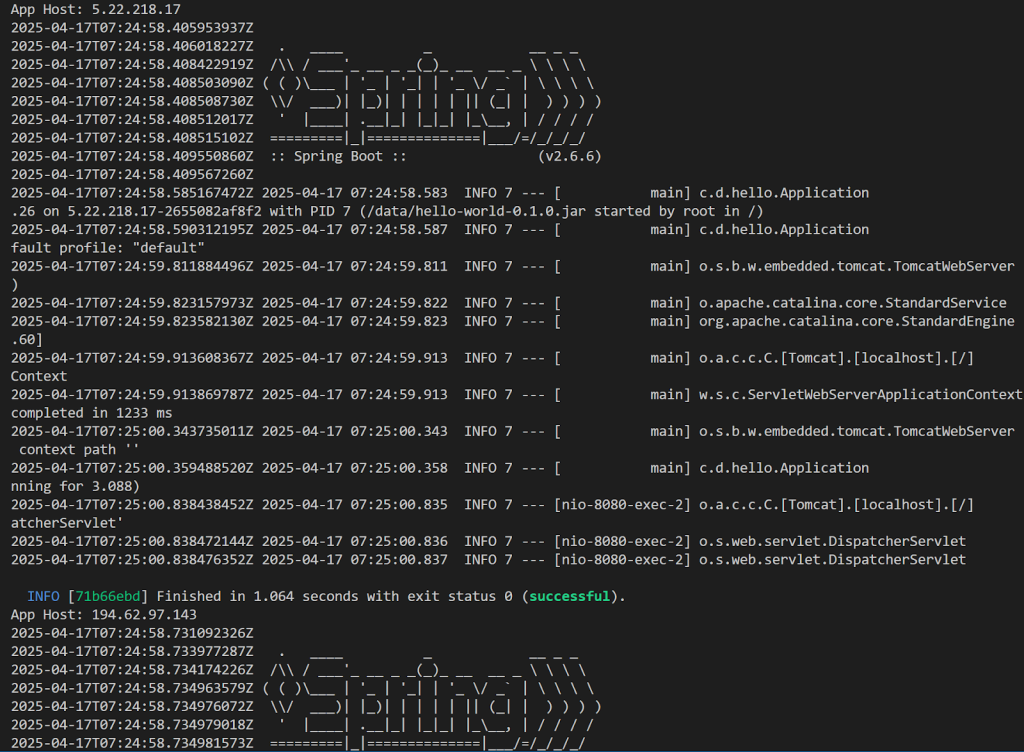
This is similar to things like kubectl logs in Kubernetes, which allows us to view the logs generated by our application running inside the container.
- Another common task that we might need is to execute some arbitrary commands inside our app containers. We can achieve this by the following Kamal command:
kamal app exec <command>This will run the specified command inside the app container on all the target servers.
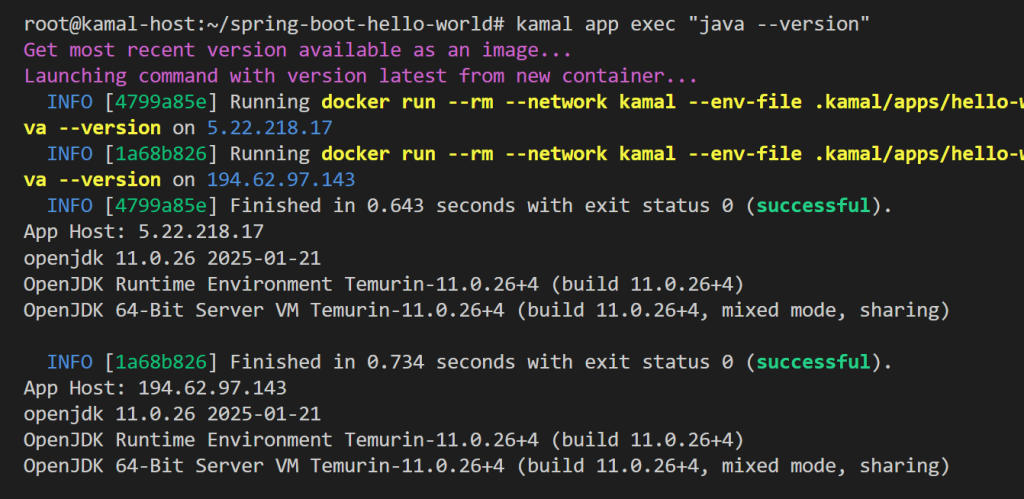
In the above image, we’re able to get the Java version inside each of our app containers.
- To see the current app version running on the target servers, we can use the following command:
kamal app version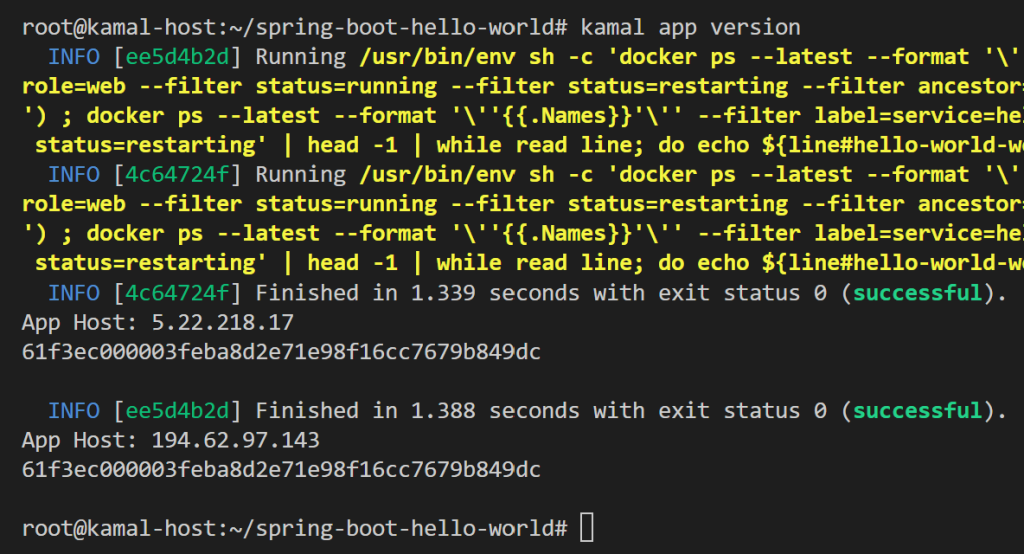
The random ID in the above output 61f3ec000003feba8d2e71e98f16cc7679b849dc is the app version.
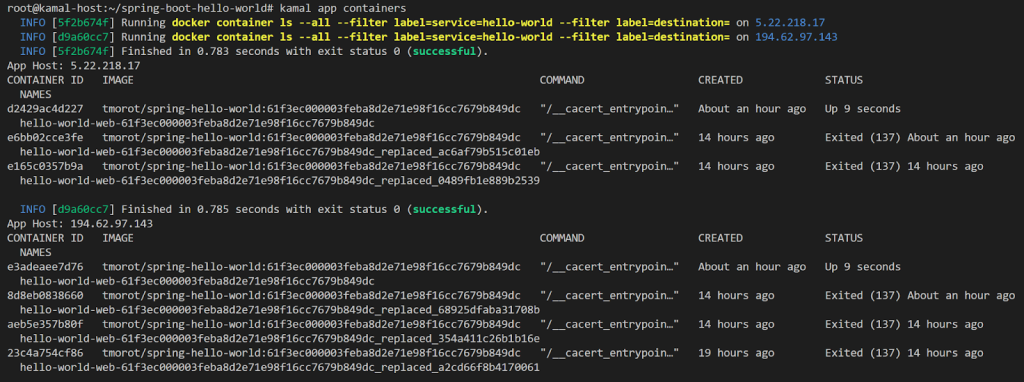
- We can stop our running app containers on the target servers with the following command:
kamal app stopIf we check our containers now, we’ll see all of them have exited:
We can start them again with the following command:
kamal app startAnd the latest version should be running again:
Conclusion
Kamal is an open-source tool that automates the deployment of web applications. It relies on Docker to build a container image for the app and deploy it to multiple target servers. Kamal makes the deployment process as simple and efficient as possible by abstracting the underlying complexity and providing an easy-to-use CLI interface along with a configuration file where you declare how the deployment process should work.
We can use UpCloud servers with Kamal to get a reliable and scalable infrastructure for our deployments. The UpCloud enterprise grade SSD storage and industry leading server components enable extreme performance that satisfy application requirements, making it a perfect fit for Kamal deployments.
Deploy your web application in minutes now by trying UpCloud servers with Kamal and making use of the scalable and performant infrastructure provided for your container environments.
Discussion