New - NVIDIA B200 & B300 Dedicated GPU Clusters | Explore GPU clusters
Offsite Server Backups with Restic and S3-Compatible Object Storage
-
About
- Type
- Tutorial
- Categories
- BackupsObject StorageStorage
Posted on 4.11.2026
A server can fail without warning.
A disk can become corrupted. A VPS can become unavailable. An attacker can delete files, encrypt data, or gain access to local backups. Even a perfectly configured server snapshot may not help if the snapshot lives in the same environment as the server it protects.
That is why backups should be designed for failure, not just created when things are working.
A practical approach is to keep an encrypted backup repository outside the production server and send backups to S3-compatible object storage. In this guide, we will use restic with UpCloud Managed Object Storage to build that setup.
The design follows the 3-2-1 backup principle: keep three copies of important data, use two different storage types, and keep at least one copy off-site.
CISA also recommends encrypting backups, keeping them separate from production systems, and regularly testing them.
The important part is what happens after the backup finishes. We will also cover automation, retention, monitoring, verification, and disaster recovery.
How the Backup Architecture Works
The basic architecture is simple:
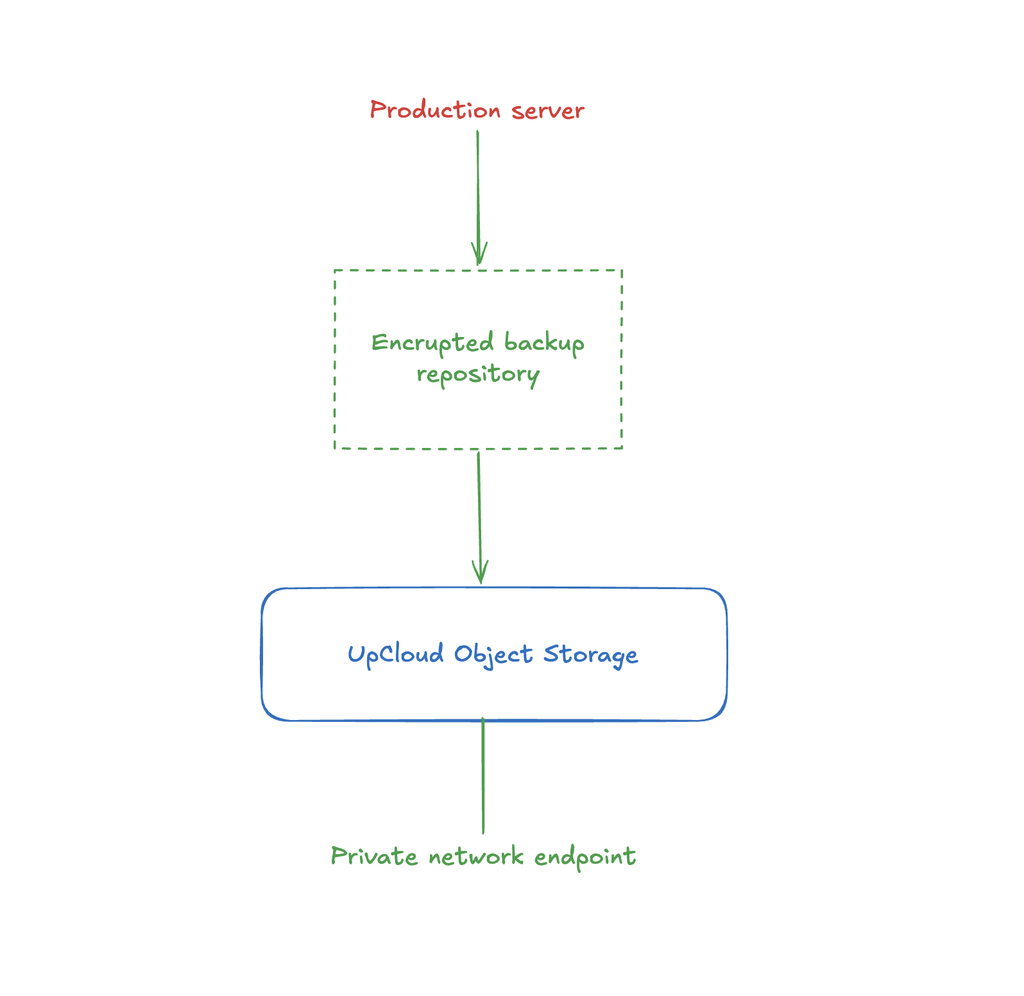
Restic runs on the production server, and it:
- Reads the files you select,
- Splits them into chunks,
- Removes duplicate data,
- Encrypts the repository, and
- Sends the resulting data to the S3-compatible backend.
Restic encrypts repository data on the client before it is stored. Its repository format uses AES-256 for encryption and authenticates encrypted data with Poly1305-AES, giving you an important separation.
The object storage service may store the encrypted repository, but it doesn’t need your Restic repository password to understand the contents.
UpCloud Managed Object Storage is S3-compatible, so Restic can use it as an S3 backend. UpCloud also supports private endpoints that route traffic through its private network rather than the public internet.
For a server and Object Storage instance in the same region, using the private endpoint is the preferred configuration. UpCloud says private endpoint traffic does not count toward the account’s fair transfer limit, and its Object Storage service has a zero-egress policy.
Prerequisites
You need:
- A running Linux server.
- An UpCloud Managed Object Storage instance.
- An S3 bucket for the Restic repository.
- An UpCloud Object Storage user with access keys.
- Restic installed on the server.
- A secure location for the Restic repository password.
The examples in this guide assume a Linux server using systemd.
Before you begin, create the Object Storage instance and bucket. If the server and Object Storage instance are in the same UpCloud region, attach them to the same private network and use the private S3 endpoint.
Your endpoint will look similar to: https://aqit8-private.upcloudobjects.com
You can tell it’s a private endpoint because of the -private in its hostname. The exact hostname depends on your Object Storage instance.
Step 1: Install Restic
Install Restic using your distribution’s package manager, or use an official Restic binary.
For Debian or Ubuntu:
| sudo apt updatesudo apt install restic |
|---|
For Fedora:
| sudo dnf install restic |
|---|
Verify the installation using restic version.
Step 2: Create the Backup Environment
Do not put your Object Storage credentials or Restic password directly in a backup command.
First, you create a directory that only root can access:
| sudo install -d -m 700 /etc/restic |
|---|
Then you create an environment file:
| sudo touch /etc/restic/backup.envsudo chmod 600 /etc/restic/backup.env |
|---|
In the .env file, add the following values:
| RESTIC_REPOSITORY=s3:https://<private-endpoint>/<bucket-name>RESTIC_PASSWORD_FILE=/etc/restic/passwordAWS_ACCESS_KEY_ID=<access-key>AWS_SECRET_ACCESS_KEY=<secret-key> |
|---|
Replace <private-endpoint> and <bucket-name> with the values for your Object Storage instance.
Also, notice that the password file path was set despite us never having created one. Now’s the time we do that using
| sudo sh -c ‘umask 077; openssl rand -base64 32 > /etc/restic/password’sudo chmod 600 /etc/restic/password |
|---|
The password is important, and losing it could mean that the encrypted repository stays unrecoverable. So store a secure copy somewhere outside the server.
You may already know this, but do not commit either .env or password files to Git.
Step 3: Initialize the Restic Repository
We begin by loading the environment:
| sudo bash -c ‘set -a; source /etc/restic/backup.env; set +a; restic init’ |
|---|
Executing this command initializes the repository in the S3 bucket. To be sure it worked, list the repositories by running:
| sudo bash -c ‘set -a; source /etc/restic/backup.env; set +a; restic snapshots’ |
|---|
At this point, the repository exists, but it does not contain a backup yet.
Step 4: Create the first backup
Let’s start with a small, deliberate backup.
For example, suppose your server keeps application configuration under /etc/myapp and persistent application data under /srv/myapp.
You can back them up with:
| sudo bash -c ‘set -a; source /etc/restic/backup.env; set +a; restic backup /etc/myapp /srv/myapp’ |
|---|
For a larger server, you may want an exclude file to tell restic what you do not want in the repository.
Create one:
| sudo tee /etc/restic/excludes.txt > /dev/null <<‘EOF’/var/cache/**/var/tmp/**/tmp/**/srv/myapp/cache/**EOF |
|---|
Then run:
| sudo bash -c ‘set -a; source /etc/restic/backup.env; set +a; restic backup /etc/myapp /srv/myapp –exclude-file=/etc/restic/excludes.txt’ |
|---|
The trick of having a backup with no essential parts missing is to not exclude data simply because it looks temporary. You must first confirm that the application can recreate it.
How to Back Up Database Dumps Directly
A database’s live data files should not normally be treated like ordinary application files. Instead, create a consistent database dump and send its output directly to Restic.
For PostgreSQL, for example:
| sudo bash -c ‘set -a; source /etc/restic/backup.env; set +a; restic backup –stdin-from-command –stdin-filename=production.sql — pg_dump –dbname=production’ |
|---|
–stdin-from-command is useful here because Restic checks the command’s exit code. If pg_dump fails, Restic does not create the snapshot. This avoids a common backup failure where a broken database dump is accidentally treated as a successful backup.
You can use the same pattern with other database dump tools.
Step 5: Automate the Backup
A backup that depends on someone remembering to run a command is not an operational backup system. We have to take the backup a step further by automating it.
Here’s a sample wrapper script for automation:
| sudo tee /usr/local/sbin/restic-backup.sh > /dev/null <<‘EOF’#!/usr/bin/env bashset -Eeuo pipefailENV_FILE=”/etc/restic/backup.env”EXCLUDE_FILE=”/etc/restic/excludes.txt”if [[ ! -r “$ENV_FILE” ]]; then echo “Missing environment file: $ENV_FILE” >&2 exit 1fiset -asource “$ENV_FILE”set +arestic backup \ /etc/myapp \ /srv/myapp \ –exclude-file=”$EXCLUDE_FILE”restic forget \ –keep-daily 7 \ –keep-weekly 4 \ –keep-monthly 12 \ –pruneEOFsudo chmod 700 /usr/local/sbin/restic-backup.sh |
|---|
The retention policy keeps the latest snapshot for each selected day, week, and month. Restic’s forget command supports policy-based retention, while prune removes data that is no longer referenced. You can use –dry-run with forget before enabling an automated policy.
Test the script manually:
| sudo /usr/local/sbin/restic-backup.sh |
|---|
Then check the snapshots:
| sudo bash -c ‘set -a; source /etc/restic/backup.env; set +a; restic snapshots’ |
|---|
Step 6: Schedule the Backup With systemd
systemd timers are great for server backups because the schedule and service execution are separate components. They also integrate with the system journal, which gives you a central place to inspect failures.
Unlike cron, systemd separates the schedule from the command that runs. The backup itself lives in a service unit, while the timer controls when that service runs.
This makes it easier to inspect the service status, read its logs through journalctl, add dependencies, and reuse the service for manual runs.
To create the service, we first write a unit file:
| sudo tee /etc/systemd/system/restic-backup.service > /dev/null <<‘EOF'[Unit]Description=Back up server data with Restic[Service]Type=oneshotExecStart=/usr/local/sbin/restic-backup.shEOF |
|---|
Then we create the timer:
| sudo tee /etc/systemd/system/restic-backup.timer > /dev/null <<‘EOF'[Unit]Description=Run Restic backup every day[Timer]OnCalendar=*-*-* 02:00:00Persistent=true[Install]WantedBy=timers.targetEOF |
|---|
To get the timer to work, reload systemd and then enable:
| sudo systemctl daemon-reloadsudo systemctl enable –now restic-backup.timer |
|---|
Check the schedule:
| systemctl list-timers restic-backup.timer –all |
|---|
You can also trigger the service manually by running:
| sudo systemctl start restic-backup.service |
|---|
Then inspect its logs:
| sudo journalctl -u restic-backup.service |
|---|
Persistent=true is useful for backup jobs because systemd can run the timer after the machine comes back up if a scheduled activation was missed while the timer was inactive.
Step 7: Add Backup Observability
A scheduled job can fail silently, and that is dangerous given what is at stake: your backups. At minimum, you should monitor:
- Whether the backup service succeeded.
- When the last successful backup completed.
- Whether restic check succeeds.
- Whether the repository is approaching its storage budget.
- Whether the server can still reach the Object Storage endpoint.
For a simple notification workflow, you can add a webhook to the backup script.
For example:
| WEBHOOK_URL=”https://example.invalid/webhook” |
|---|
Then use a failure trap:
| trap ‘curl –fail –silent –show-error \ -X POST \ -H “Content-Type: application/json” \ -d “{\”text\”:\”Restic backup failed on $(hostname)\”}” \ “$WEBHOOK_URL” >/dev/null || true’ ERR |
|---|
Use the webhook URL provided by your alerting system. Also do not commit it to your repository.
The important design choice here is that the alert should tell you that something failed. The backup service itself must still return a non-zero exit code so systemd and your monitoring system can detect the failure.
Step 8: Protect the Backup Credentials
The backup server needs credentials that can write to the backup bucket. It does not need unrestricted access to every Object Storage resource.
Use a dedicated Object Storage user for the backup job and grant it only the permissions it needs. UpCloud recommends separate users for separate applications and supports fine-grained IAM policies. It also recommends rotating access keys and avoiding credentials in source code.
The environment file should be owned by root:
| sudo chown root:root /etc/restic/backup.envsudo chmod 600 /etc/restic/backup.env |
|---|
Do the same for the Restic password:
| sudo chown root:root /etc/restic/passwordsudo chmod 600 /etc/restic/password |
|---|
Only grant the application user access it requires and not simply a read access to your backup credentials.
This matters during a compromise. If an attacker gains access to a web application, you don’t want that application to have the credentials to delete or modify its backups.
Protecting Backups From Destructive Attacks
Encryption protects the contents of a backup. It does not stop someone with valid storage credentials from deleting the repository.
Restic’s own threat model notes that the backup software does not protect a repository from an attacker who can delete data at the storage location.
A stronger design therefore separates backup creation from backup administration.
Use a dedicated storage user, private network access, least-privilege IAM policies, and a separate administrative path for changing the storage configuration.
UpCloud currently supports S3 versioning, lifecycle management, and IAM for Managed Object Storage.
What About Object Lock?
Object Lock is commonly used with S3-compatible storage to prevent objects from being deleted or overwritten during a retention period. However, UpCloud’s current S3 compatibility documentation lists Object Lock as coming soon and Object Retention APIs as unsupported.
For now, use the controls UpCloud supports, including dedicated users, least-privilege IAM policies, private endpoints, and versioning. Revisit Object Lock when UpCloud documents general availability.
Step 9: Manage Retention and Storage Costs
Keeping every backup forever sounds safe.
It is also expensive and difficult to manage.
Restic’s snapshots are deduplicated, so unchanged data does not need to be uploaded repeatedly. Even so, old snapshots eventually need to be removed if they are no longer useful.
A practical starting policy is:
- 7 daily snapshots
- 4 weekly snapshots
- 12 monthly snapshots
Before making that policy permanent, preview what Restic would remove:
| sudo bash -c ‘set -a; source /etc/restic/backup.env; set +a; restic forget \ –keep-daily 7 \ –keep-weekly 4 \ –keep-monthly 12 \ –dry-run’ |
|---|
If the result is correct, run:
| sudo bash -c ‘set -a; source /etc/restic/backup.env; set +a; restic forget \ –keep-daily 7 \ –keep-weekly 4 \ –keep-monthly 12 \ –prune’ |
|---|
Do not automate forget –prune until you have reviewed the dry-run output.
Your retention policy should reflect your recovery requirements. If your application needs to recover data from six months ago, keeping only 12 monthly snapshots may not be enough.
Step 10: Verify Repository Health
A successful backup command does not prove that you can recover your data.
We can begin by checking the repository’s structure and integrity:
| sudo bash -c ‘set -a; source /etc/restic/backup.env; set +a; restic check’ |
|---|
For a deeper check, use:
| sudo bash -c ‘set -a; source /etc/restic/backup.env; set +a; restic check –read-data’ |
|---|
The second command reads the repository’s stored data and therefore takes longer and transfers substantially more data. Restic recommends regular repository checks, while noting the additional cost of –read-data.
Schedule full data checks less frequently if the repository is large.
For example, you might run a normal check after each backup and a full –read-data check weekly or monthly.
Step 11: Test an Actual Restore
Backup workflows often overlook testing restoration. However, simply trusting your strategy isn’t enough—you shouldn’t wait for an outage to find out you can’t recover your data.
Create a temporary directory:
| sudo install -d -m 700 /tmp/restic-restore-test |
|---|
List available snapshots:
| sudo bash -c ‘set -a; source /etc/restic/backup.env; set +a; restic snapshots’ |
|---|
Restore a snapshot to the temporary directory:
| sudo bash -c ‘set -a; source /etc/restic/backup.env; set +a; restic restore latest –target /tmp/restic-restore-test’ |
|---|
Restic supports restoring latest directly, as well as restoring a specific snapshot ID.
Depending on your application, you may also need to restore ownership, permissions, ACLs, system users, service definitions, and other host configuration before starting the application.
Now inspect the restored files:
| sudo find /tmp/restic-restore-test -type f | head |
|---|
For application data, do more than check whether the files exist.
Restore a database dump and verify that it can be imported. Restore configuration files and validate their syntax. Start a test container from restored application data.
The goal is to verify the recovery process, not simply prove that Restic can download files.
When the test is complete:
| sudo rm -rf /tmp/restic-restore-test |
|---|
Make Recovery Part of Normal Operations
A backup system is not complete when the first snapshot appears in Object Storage. Before calling the backup system production-ready, verify that you can answer the following questions:
- What data is backed up?
- Where is the repository?
- Who can access it?
- How is the repository password recovered?
- When did the last successful backup run?
- How do you know the repository is healthy?
- How long will the backups be retained?
- Which snapshot should you restore after an incident?
- How long does a complete recovery take?
- Who is responsible for performing the recovery?
These questions turn a backup command into an operational recovery process.
The same principle applies to disaster recovery testing. NIST emphasizes that backups should be created, maintained, and tested as part of the recovery process, rather than treated as files that simply exist somewhere.
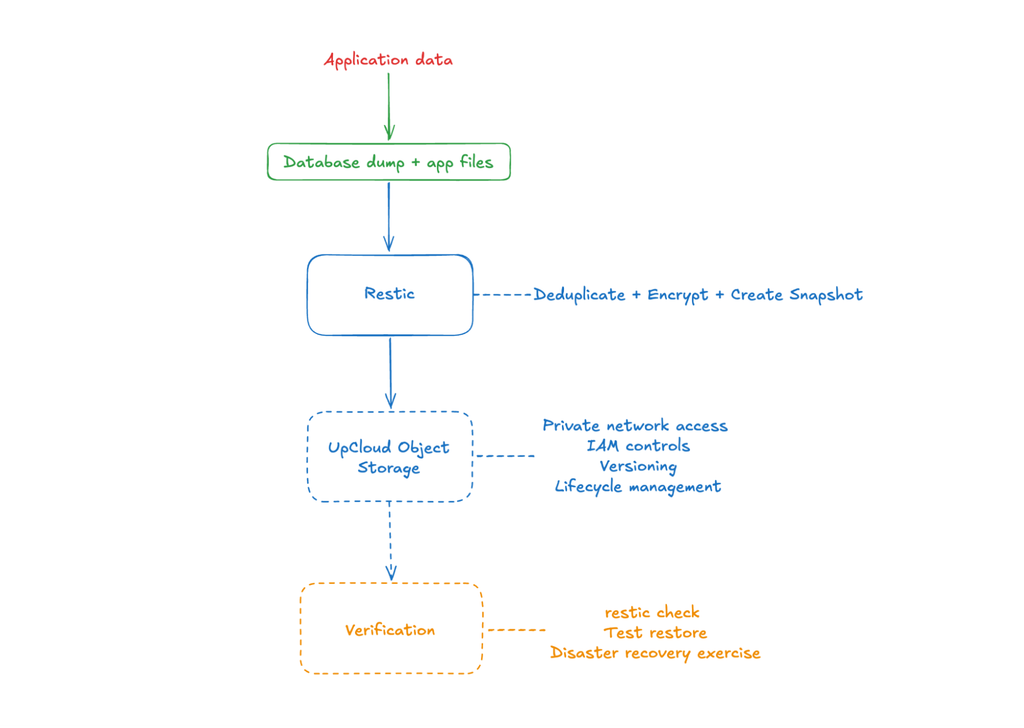
The complete backup workflow now looks like this:
Build a More Resilient Backup Storage Layer
A reliable backup strategy needs more than a backup tool. It needs a storage layer that keeps your data off the production server, gives you secure access, and lets you recover without adding unnecessary transfer costs.
With Restic and S3-compatible object storage, you can build that layer without making your backup system unnecessarily complex. UpCloud Managed Object Storage gives you an S3-compatible destination for encrypted Restic repositories, private endpoints for internal traffic, and zero-egress data transfer.
Give your backups a reliable home with UpCloud Object Storage.
Discussion