Build your own lightning-fast WordPress development server with UpCloud & EasyEngine.io in just a few minutes. EasyEngine is a powerful CLI tool which is used to deploy WordPress sites. EasyEngine utilizes the power of Docker without you needing to know anything about Docker. With EasyEngine you can easily deploy new and fresh WordPress sites with just one command.
Setting up a cloud server
Go ahead and deploy a new UpCloud server with Ubuntu 18.04 by logging in to your UpCloud Control Panel and clicking Deploy server. Please note that EasyEngine v4 does not support CentOS. If you are new to UpCloud, you can get started with the free trial by signing up.
Once you’ve deployed a new cloud server, log in using your favourite SSH client. One option is to use Royal TS which can manage various remote control credentials all in one place.
Initial Ubuntu server setup
When deploying new cloud servers, it’s good to follow a common setup routine to get the server prepared. We recommend you follow the steps below to update and secure your cloud server before installing EasyEngine.
While logged in as root, run the following commands.
Update and upgrade your Ubuntu server. It’s important to make sure you keep your server up to date to avoid security vulnerabilities caused by outdated software.
apt update && apt upgrade -y
You should also install a UFW firewall which can be used to only allow traffic to SSH, HTTP and HTTPS (ports 22, 80 and 443) to add an extra layer of protection to your server. Alternatively, you may wish to check out UpCloud’s L3 firewall feature in your cloud server’s settings.
apt install ufw -y
If you installed UFW, add the following rules and then enable the firewall.
ufw allow ssh
ufw allow http
ufw allow https
ufw enable
Lastly, set up a new account with sudo privileges. It’s a good practice to use a non-root account for connecting to your cloud server and restrict SSH to prevent login with the root account. This is done to greatly reduce the chance brute-forcing your password would be able to gain access to your cloud server.
adduser new-user
usermod -aG sudo new-user
Login to your new user in a new SSH session. Now let’s setup SSH keys to further harden your server’s security. Please check out this tutorial on how to use SSH keys for authentication and how to harden your SSH service.
Once you’ve prepared your cloud server, you can go ahead and install EasyEngine.
Setting up EasyEngine
With the cloud server prepared, you can go ahead and install EasyEngine itself.
EasyEngine has made the installation process ridiculously easy. Simply run the following command while logged in to your sudo privileged user and wait for EasyEngine to install.
wget -qO ee rt.cx/ee4 && sudo bash ee
The script will install all required dependencies as well as the actual EasyEngine tool.
While the installation is going on in the background, you should consider setting up a domain for your development server if you haven’t yet. This way you can use subdomains for each WordPress you would like to spin up and easily have multiple concurrent WordPress sites on a single cloud server.
When the installation process finishes, you’ll see an output similar to the example below.
+-------------------+-----------------------------------------------------------------------------+
| OS                | Linux 4.15.0-99-generic #100-Ubuntu SMP Wed Apr 22 20:32:56 UTC 2020 x86_64 |
| Shell             | /bin/bash                                                                   |
| PHP binary        | /usr/bin/php7.3                                                             |
| PHP version       | 7.3.18-1+ubuntu18.04.1+deb.sury.org+1                                       |
| php.ini used      | /etc/php/7.3/cli/php.ini                                                    |
| EE root dir       | phar://ee.phar                                                              |
| EE vendor dir     | phar://ee.phar/vendor                                                       |
| EE phar path      | /home/new-user                                                              |
| EE packages dir   |                                                                             |
| EE global config  |                                                                             |
| EE project config |                                                                             |
| EE version        | 4.0.17                                                                      |
+-------------------+-----------------------------------------------------------------------------+
-----> Run "ee help site" for more information on how to create a site.
Afterwards, you can get started setting up your first WordPress site with EasyEngine!
Configuring domain name records
To be able to reach the WordPress sites running on your EasyEngine server, you will need to have configured a domain name A record to point to your cloud server. The actual process of creating domain name records depends on your domain registrar but you can find out generalised instructions in the following guide to how to manage DNS records.
With a valid domain name, you can use subdomains to create as many websites with EasyEngine as you want.
Creating WordPress instances
EasyEngine has an extensive library of various commands you can run straight from your SSH terminal. Let’s go ahead and install our first WordPress instance and take a closer look at what we can do with it.
If you want just a plain WordPress install with nothing fancy, you can do so with the following command. Remember to replace example.com with your own domain or subdomain.
sudo ee site create example.com --type=wp
However, with EasyEngine you can set up a new WordPress instance together with Let’s Encrypt SSL certificates and Redis Cache enabled.
Note that when installing with a Let’s Encrypt, you need to already have your DNS record set to point correctly to your server. A valid domain name is required for Let’s Encrypt to be able to obtain SSL certificates for your website.
Replace example.com with your domain or subdomain name.
sudo ee site create example.com --type=wp --ssl=le --cache
When configuring a website with SSL, the installation script will ask for your email address. The email address is used to notify you of important information about your Let’s Encrypt SSL certificate, for example, the certificate’s expiration date.
Once you’ve entered your email address, the installation will continue. When completed, you will see an output similar to the example below.
+--------------------+---------------------------------------+
| Site               | https://example.com                   |
+--------------------+---------------------------------------+
| Site Root          | /opt/easyengine/sites/example.com     |
+--------------------+---------------------------------------+
| Site Title         | example.com                           |
+--------------------+---------------------------------------+
| WordPress Username | vigorous-chaum                        |
+--------------------+---------------------------------------+
| WordPress Password | cvlGJlSYXkqG                          |
+--------------------+---------------------------------------+
| DB Host            | global-db                             |
+--------------------+---------------------------------------+
| DB Name            | example_com                           |
+--------------------+---------------------------------------+
| DB User            | example.com-RdqaXV                    |
+--------------------+---------------------------------------+
| DB Password        | m09oZe2TvYam                          |
+--------------------+---------------------------------------+
| E-Mail             | [email protected]                     |
+--------------------+---------------------------------------+
| SSL                | Enabled                               |
+--------------------+---------------------------------------+
| SSL Wildcard       | No                                    |
+--------------------+---------------------------------------+
| Cache              | Enabled                               |
+--------------------+---------------------------------------+
Browse to the site you just installed and you should see a freshly installed WordPress site with HTTPS enabled.
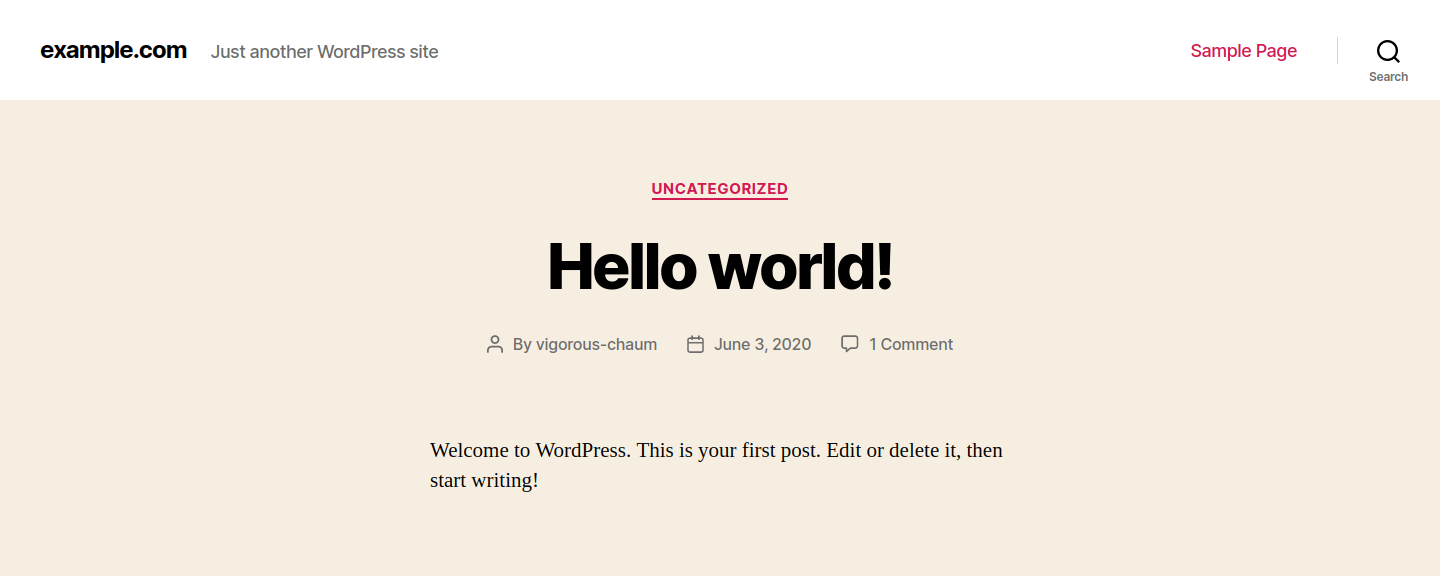
Afterwards, log in to your WordPress admin panel by going to https://example.com/wp-admin/ and use the WordPress user and password as shown in the information provided by your EasyEngine output.
You can repeat the WordPress site deployment as many times as you want to install multiple websites on the same cloud server. EasyEngine will take care of the background task in order to make the websites accessible. You’ll just need to have the corresponding domains or subdomains pointing to your cloud server.
You are then ready to start developing new WordPress sites. If you decided to enable Redis in your installation process, you can see two plugins activated: Nginx Helper and WP Redis. These plugins help you manage the Redis cache straight from your WordPress installation. Nginx Helper clears your cache whenever a post is edited/published, and WP Redis allows WordPress to utilize Redis cache to its full potential.
Other features
EasyEngine has a lot of other features you might want to check out. EasyEngine can be used to spin up WordPress instances whenever needed to test something or for developing a new site. Here are some commands you will likely find useful.
Check and monitor specific website log files. This can be used to monitor sites in case of errors or abnormalities while troubleshooting issues. Combined with your web browser’s own console it helps a lot to find troublesome issues.
sudo ee log show example.com
Adding HTTP Authentication to your development site. This feature can be used to password-protect websites under development so that nobody finds them by accident.
sudo ee auth create example.com --user=username --pass=password
sudo ee auth delete example.com --user=username
Here is a list of other commands you will be needing when using EasyEngine.
Delete a website when you don’t need it anymore.
sudo ee site delete example.com
Restart all services related to the website.
sudo ee site restart example.com
Display installation information on a specific website.
sudo ee site info example.com
You may wish to have a look at EasyEngine’s own command documentation for more info. Some useful guides can also be found in their handbook.
About the Contributor
Tuomas Lindroos
Hey, thank you for reading my guide on how to deploy WordPress websites using EasyEngine. I’m the business owner of a company called Tuonetti. We specialize in WordPress website development and in website hosting using UpCloud’s amazingly fast servers. We are more than happy to help you with any WordPress related issues.
Max
Hi Tuomas, thank for this post!
I need to migrate the url of my wordpress how would the procedure be in EEngine
Best Regards.
Even
Hi Tuomas, thanks for this tutorial.
Do you know how to install ioncube loader in Easyengine with server ubuntu 18.04?.
Thanks
Goku G
Hi Tuomas,
When I using cloudflare DNS, I’m getting Error 522. can you please help
Teddy
hey Tuomas thanks for this, do you know how to enable www. using ee ?