Welcome back to the four-part series on supercharging your CI/CD pipelines by deploying lightning-fast GitHub Actions Runners on UpCloud’s Managed Kubernetes! In the previous installment, you successfully set up a functional self-hosted runner on an UpCloud-based Kubernetes cluster, ready to execute your GitHub Actions workflows.
Now, it’s time to look closer into your runner deployment and learn some advanced configurations. In this part, we’ll explore how to customize the runner deployment configuration, giving you fine-grained control over resources, tool installations, and standardization across your runner fleet.
You’ll also learn how to configure network policies for enhanced security and implement effective autoscaling policies to optimize runner costs. Let’s get started on fine-tuning your GitHub Actions Runners!
Customizing Runner and Workflow Pods
Customizing runner and workflow pods can help with optimizing the performance and functionality of your self-hosted GitHub Actions Runners. As you installed the Actions Runner Controller using Helm charts in the last part of this series, you use the values file for the chart to pass in customization options when creating the controller. This template for the values.yaml file for the GitHub Actions Runner Controller mentions all the options and customizations you can pass in through it.
In some cases, you might also need to use configmaps and hook extensions to pass in configurations and scripts to the runner pods. You will learn about these in this section as you need them.
While you might be used to directly modifying the values.yaml file of the helm chart or using other Kubernetes native methods to customize pods and other resources, you can not actually use those methods here.
Let’s see how to use these methods to implement a few types of customizations.
Specifying Resource Requests and Limits
When running the Actions Runner controller on a shared cluster, resource consumption and limits are important to keep in mind. To ensure that your runner pods have the necessary resources to execute workflows efficiently (and also to ensure that they do not hog up more resources than they need), you can specify resource requests and limits. This is particularly important for workflows that require significant CPU or memory resources.
You can implement this via the values file. To do that, create a new file named values.yaml in your current working directory and save the following contents in it:
template:
  spec:
    containers:
      - name: runner
        image: ghcr.io/actions/actions-runner:latest
        command: ["/home/runner/run.sh"]
        resources:
          requests:
            cpu: "1000m"
            memory: "2Gi"
          limits:
            cpu: "2000m"
            memory: "4Gi"
This configuration sets a CPU request of 1 core and a memory request of 2 GB, with a CPU limit of 2 cores and a memory limit of 4 GB. The $job variable will be dynamically replaced by the runner controller.
Now, apply the changes to the chart using the updated values.yaml file by running the following command:
INSTALLATION_NAME="arc-runner-set"
NAMESPACE="arc-runners"
GITHUB_CONFIG_URL="https://github.com/<github-username>/<github-repo-name>"
GITHUB_PAT="<YOUR_GITHUB_PAT>"

helm upgrade --install "${INSTALLATION_NAME}" \
  --namespace "${NAMESPACE}" \
  --create-namespace \
  --set githubConfigUrl="${GITHUB_CONFIG_URL}" \
  --set githubConfigSecret.github_token="${GITHUB_PAT}" \
  -f values.yaml \
  oci://ghcr.io/actions/actions-runner-controller-charts/gha-runner-scale-set
That’s it! The workflow pods that are created now will have the resource limits applied to them as you specified in the values file above. You can try checking the configuration of the runner pods to confirm by running kubectl get pod <pod_name> -o yaml -n arc-runners.
Here’s what a typical pod created using these values might look like:
$ kubectl get pod/arc-runner-set-c48pp-runner-s5b5t -o yaml -n arc-runners

apiVersion: v1
kind: Pod
metadata:
  annotations:
    actions.github.com/patch-id: "2"
    # omitted other details...
spec:
  containers:
  - command:
    - /home/runner/run.sh
    env:
    - name: ACTIONS_RUNNER_INPUT_JITCONFIG
      valueFrom:
        secretKeyRef:
          key: jitToken
          name: arc-runner-set-c48pp-runner-s5b5t
    - name: GITHUB_ACTIONS_RUNNER_EXTRA_USER_AGENT
      value: actions-runner-controller/0.10.1
    image: ghcr.io/actions/actions-runner:latest
    imagePullPolicy: Always
    name: runner
    # Here are the limits you had specified in the values file
    resources:
      limits:
        cpu: "2"
        memory: 4Gi
      requests:
        cpu: "1"
        memory: 2Gi
    terminationMessagePath: /dev/termination-log
    terminationMessagePolicy: File
    volumeMounts:
    - mountPath: /var/run/secrets/kubernetes.io/serviceaccount
      name: kube-api-access-spnzt
      readOnly: true
  dnsPolicy: ClusterFirst
  # omitted other details...
You can fine-tune these limits based on your workload requirements and the other services running on the host cluster.
Installing Additional Tools
There are times when you create a runner type for particular use cases, such as running E2E tests on your app by building and hosting it on remote environments such as Kubernetes clusters. To be able to make these use cases work, you might need to install additional tools on the runner (such as kubectl for example).
It is important to mention that you can always do this initial setup in your GitHub Actions workflow as well. However, if you have a large number of workflows following the same setup routine, it might make sense to design runners that implement that routine before picking up jobs to help keep the workflow scripts simple.
You can do that by instructing the Actions Runner Controller to run your script before starting a job using the ACTIONS_RUNNER_HOOK_JOB_STARTED environment variable in the values file.
Also, you will need to supply the script file to the runner pods before they can try running the script. To do that, you will use a ConfigMap mounted as a volume on the runner pod.
To start off, write your initialization script in a file named install-additional-tools.yaml:
apiVersion: v1
kind: ConfigMap
metadata:
  name: init-script
  namespace: arc-runners
data:
  init.sh: |
    #!/bin/bash
    curl -LO "https://dl.k8s.io/release/$(curl -L -s https://dl.k8s.io/release/stable.txt)/bin/linux/amd64/kubectl"
    sudo install -o root -g root -m 0755 kubectl /usr/local/bin/kubectl
Now, create the ConfigMap by applying this configuration to your cluster. Here’s the command to do that:
kubectl apply -f install-additional-tools.yamlNext, update the values.yaml file to mount this ConfigMap as a volume and use the mounted address of the initialization script in the ACTIONS_RUNNER_HOOK_JOB_STARTED path. Here’s what your values.yaml file should look like:
template:
    spec:
      containers:
      - name: runner
        image: ghcr.io/actions/actions-runner:latest
        command: ["/home/runner/run.sh"]
        env:
          - name: ACTIONS_RUNNER_HOOK_JOB_STARTED
            value: /home/runner/init-script/init.sh
        volumeMounts:
          - name: init-script
            mountPath: /home/runner/init-script
      volumes:
        - name: init-script
          configMap:
            name: init-script
Finally, apply the changes to the Actions Runner Controller by running the following command:
INSTALLATION_NAME="arc-runner-set"
NAMESPACE="arc-runners"
GITHUB_CONFIG_URL="https://github.com/<github-username>/<github-repo-name>"
GITHUB_PAT="<YOUR_GITHUB_PAT>"

helm upgrade --install "${INSTALLATION_NAME}" \
  --namespace "${NAMESPACE}" \
  --set githubConfigUrl="${GITHUB_CONFIG_URL}" \
  --set githubConfigSecret.github_token="${GITHUB_PAT}" \
  -f values.yaml \
  oci://ghcr.io/actions/actions-runner-controller-charts/gha-runner-scale-set
And that’s it! You can try creating a workflow such as this one and running it to see that kubectl has been set up before the job begins executing:
name: ARC Demo
on:
  workflow_dispatch:

jobs:
  Test-Runner:
    runs-on: arc-runner-set
    steps:
      - run: kubectl version --client --output=yaml
Here’s what the output of the run looks like:
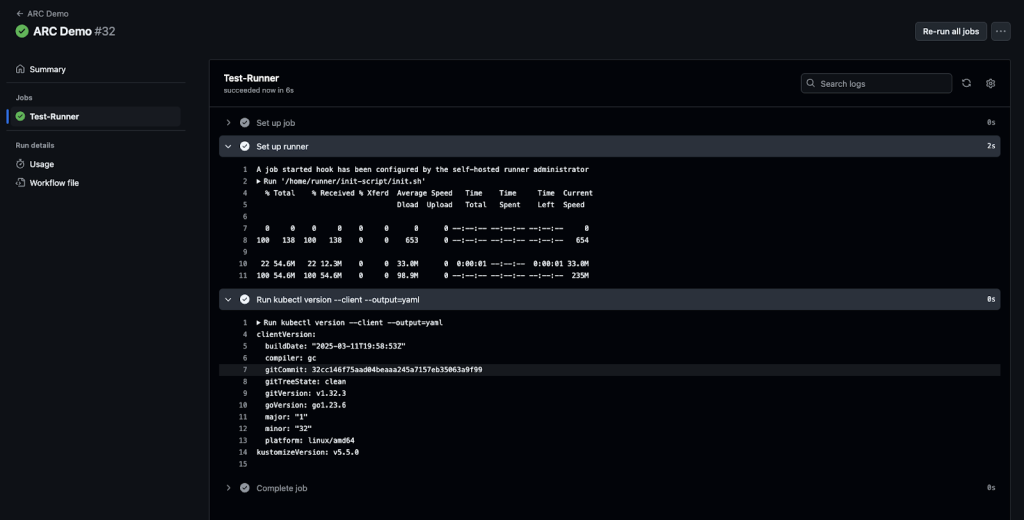
You’ll see logs from the initialization script under the Set up runner step and the expected output under the run steps.
If you choose to allow running container jobs or container actions in your ARC runners, this method will not be able to supply initialization scripts to the containers created when jobs are run. This is because the containers created for the runner in those cases will be created via runner-container-hooks. To supply customizations (such as setting resource limits or providing initialization scripts) to these containers, you will need to use container hook extensions.
To do that, you will need to create a ConfigMap that specifies the template that you would like to use with the containers that get created using the hooks. Here’s what a typical ConfigMap would look like:
apiVersion: v1
kind: ConfigMap
metadata:
  name: hook-extension
  namespace: arc-runners
data:
  content: |
    metadata:
      annotations:
        example: "extension"
    spec:
      containers:
        - name: "$job" # Target the job container
          env:
            - name: ACTIONS_RUNNER_HOOK_JOB_STARTED # specify the init script path
              value: /home/runner/init-script/init.sh
            volumeMounts: # mount the init script
              - name: init-script
                mountPath: /home/runner/init-script
          resources: # set resource limits
            requests:
              cpu: "1000m"
              memory: "2Gi"
            limits:
              cpu: "2000m"
              memory: "4Gi"

      volumes: # set up the init script volume from its configmap
        - name: init-script
          configMap:
            name: init-script
Now, you need to supply this ConfigMap in the env ACTIONS_RUNNER_CONTAINER_HOOK_TEMPLATE in your values.yaml file. Here’s what the file would look like (assuming you’ve saved the ConfigMap above as resource-limits-extension.yaml):
template:
    spec:
      containers:
      - name: runner
        image: ghcr.io/actions/actions-runner:latest
        command: ["/home/runner/run.sh"]
        env:
          - name: ACTIONS_RUNNER_CONTAINER_HOOK_TEMPLATE
            value: /home/runner/pod-template/content
        volumeMounts:
          - name: pod-template
            mountPath: /home/runner/pod-template
      volumes:
        - name: pod-template
          configMap:
            name: resource-limits-extension
The pods now created via the runner-container-hooks for container jobs and services and container actions will now have the customizations you’ve passed above.
Using Runner ScaleSet Names
When working with workloads that have different resource requirements, it might make sense to create multiple runners based on these resource requirements. This can help in cases like memory-heavy build processes which you only want to run on (potentially expensive) machinery, but scale it down right after it’s done; all this while keeping a regular runner available for general use.
You can deploy multiple runner scalesets using the helm install command, but you would need a way to pick which scaleset to run your workflow jobs on. Runner scaleset names help solve this problem. They act as the label for the runner scaleset, allowing you to define the possible runner options for a workflow using the runs-on node in the workflow configuration file.
To try it out, simply deploy another runner scaleset with a different installation name, a different namespace, and your required resource limits in your values file:
INSTALLATION_NAME="arc-runner-set-heavy"
NAMESPACE="arc-runners-heavy"
GITHUB_CONFIG_URL="https://github.com/<github-username>/<github-repo-name>"
GITHUB_PAT="<YOUR_GITHUB_PAT>"

helm upgrade --install "${INSTALLATION_NAME}" \
  --namespace "${NAMESPACE}" \
  --set githubConfigUrl="${GITHUB_CONFIG_URL}" \
  --set githubConfigSecret.github_token="${GITHUB_PAT}" \
  -f values.yaml \
  oci://ghcr.io/actions/actions-runner-controller-charts/gha-runner-scale-set
You can now use the arc-runner-set-heavy label in your workflow configuration files, such as this one to run jobs specifically on this runner:
name: ARC Demo
on:
  workflow_dispatch:

jobs:
  Test-Runner:
    runs-on: arc-runner-set-heavy
    steps:
      - run: echo "Heavy runner 💪"
Network and Security
When deploying self-hosted GitHub Actions Runners on a Kubernetes cluster, network security is an important aspect to keep in mind. By default, Kubernetes allows all pods to communicate freely with each other, which can pose significant security risks. In this section, we’ll explore the issues with the default Kubernetes network policy, key principles of Kubernetes network policies, and how to implement these policies to enhance security.
Issues with the Default Kubernetes Network Policy
Kubernetes operates on an “allow-any-any” model by default, which means that all pods can communicate with each other freely. This flat network model simplifies cluster setup but lacks security, as it doesn’t restrict traffic between pods. Without additional configuration, sensitive data could be exposed if a pod is compromised.
Kubernetes network policies provide a way to control traffic flow within a cluster, enhancing security and helping adhere to compliance requirements. Here are a few key principles you should keep in mind for most CI/CD setups on Kubernetes infrastructure:
- Restricting Ingress and Egress Traffic: Network policies allow you to define rules for incoming (ingress) and outgoing (egress) traffic. By specifying which pods can communicate with each other, you can prevent unauthorized access and limit the attack surface.
- Namespace Isolation: You can isolate pods within different namespaces, ensuring that applications running in separate namespaces cannot communicate unless explicitly allowed. This can help in ensuring that pods do not run in the same context as critical services on a Kubernetes cluster.
- Zero-Trust Networking: Implementing a zero-trust model means that no pod is trusted by default. All traffic must be explicitly allowed, reducing the risk of lateral movement in case of a breach.
Creating and Applying Kubernetes Network Policies
To implement these principles, you need to create and apply Kubernetes network policies. Here’s an example network policy configuration:
apiVersion: networking.k8s.io/v1
kind: NetworkPolicy
metadata:
  name: restrict-ingress
spec:
  podSelector:
    matchLabels:
      app.kubernetes.io/name: arc-runner-set
  policyTypes:
  - Ingress
  ingress:
  - from:
    - podSelector:
        matchLabels:
          app: allowed-pod
    ports:
    - 80
This policy restricts ingress traffic to pods named “arc-runner-set”, allowing only traffic from pods labeled as allowed-pod on port 80.
You can apply this policy by saving the configuration in a file (say config.yaml) and running the following command:
kubectl apply -f config.yamlYou can then use kubectl get networkpolicies to check if the policy is applied correctly.
Implementing Security Contexts for Runner Pods
To further improve the security of your GitHub Actions Runner pods, you should consider implementing security contexts. A security context defines privilege and access control settings for a pod or container, allowing you to specify settings such as running as a non-root user, disabling privilege escalation, and mounting the root filesystem as read-only.
You can configure the security context using the values file you used earlier for setting the resource limits on your runner pods. Here’s an example:
template:
  spec:
    containers:
      - name: runner
        image: ghcr.io/actions/actions-runner:latest
        command: ["/home/runner/run.sh"]
        resources:
          securityContext:
            readOnlyRootFilesystem: true
            allowPrivilegeEscalation: false
            capabilities:
              add:
                - NET_ADMIN
Some key security measures you might want to implement this way could include:
- Drop Unnecessary Linux Capabilities: Prevent privilege escalation within runner pods.
- Run as Non-Root User: Avoid running processes as root to minimize risks.
- Read-Only Filesystem: Restrict writes to prevent tampering.
Here’s what the values file would look like for these settings:
template:
  spec:
    containers:
      - name: runner
        image: ghcr.io/actions/actions-runner:latest
        command: ["/home/runner/run.sh"]
        resources:
          securityContext:
            runAsNonRoot: true
            readOnlyRootFilesystem: true
            capabilities:
              drop:
                - ALL
Cost Management and Autoscaling
As you continue to optimize your self-hosted Runners on UpCloud’s Managed Kubernetes clusters, it is important to keep an eye on cost management and autoscaling. Efficiently managing resources not only helps reduce expenses but also ensures that your CI/CD pipelines operate smoothly and reliably. In this section, we’ll share some best practices for optimizing resource allocation, reducing idle runners, and implementing effective autoscaling policies.
Implementing Effective Autoscaling Policies
The Actions Runner Controller provides a powerful tool for implementing autoscaling policies. The controller allows you to create rules that automatically adjust the number of runners based on the current workload.
Set up autoscaling rules through the values file to choose a maximum and minimum number of runners for autoscaling. The Actions Runner Controller will automatically take care of creating new runner instances to match demand and delete idle instances to match the minimum number of runners needed. This will ensure that your CI/CD pipeline always has the necessary resources to run smoothly without wasting resources during idle times.
Reducing Idle Runners and Scaling Based on Actual Usage
Idle runners can significantly increase costs without providing any benefits. To mitigate this, focus on scaling your runners based on actual usage patterns. This means dynamically adjusting the number of runners available to match the current demand from your workflows.
You should use monitoring tools (more on these in the next part!) to identify periods when runners are idle. This could be during off-peak hours or weekends when development activity is lower. And then set up automation to automatically scale down the number of idle runners during these periods. This ensures that you’re not paying for resources that aren’t being used.
It is important to note that the GitHub Actions Runner Controller does not support scheduling scaling. You might need to make use of third-party cron or automation services to implement this.
Best Practices for Optimizing Resource Allocation
Optimizing resource allocation involves ensuring that your runners are using the right amount of resources for the tasks they perform. This includes setting appropriate CPU and memory limits for each runner based on the types of workflows they execute. For instance, if your workflows primarily involve lightweight tasks like code compilation or testing, you might allocate fewer resources compared to workflows that require more intensive operations like large-scale data processing.
As mentioned before, you should regularly monitor your runners’ usage patterns to identify peak hours and idle times. This data will be crucial for setting up effective autoscaling policies. Also, ensure that each runner is allocated the right amount of resources based on the workload. Over-allocating resources can lead to unnecessary costs, while under-allocating can cause performance issues. Finally, you should use Kubernetes’ resource requests and limits to ensure that your runners are allocated the necessary resources while preventing over-allocation.
Conclusion
In this part, we looked into advanced configuration techniques for your self-hosted GitHub Actions Runners on UpCloud’s Managed Kubernetes. You learned how to customize runner deployments for better resource management, tool installation, and standardization. Additionally, we covered configuring network policies for enhanced security, setting up monitoring for performance insights, and implementing cost-effective autoscaling strategies.
With these advanced configurations in place, your GitHub Actions workflow is now more robust and efficient. However, even the best setups can encounter issues. In Part 3, we’ll shift focus to troubleshooting and handling common problems that may arise with your self-hosted runners. You’ll discover practical tips and techniques to identify and resolve issues quickly, ensuring your workflows run smoothly and reliably.
Continue in the part 3 for expert advice on maintaining a seamless CI/CD experience!
Discussion