SimpleBackups is an all-in-one website & database backup automation service built for the cloud. It offers extensive support for databases such as MySQL, MongoDB and PostgreSQL as well as most cloud storage options. SimpleBackups also allows you to automate your Cloud Server backups on UpCloud.
Using SimpleBackups, you are able to take snapshots, automatically on your own terms. Whether you need to take backups daily, weekly, every couple of hours or on-demand, everything is possible using the SimpleBackups API. You will also have the option to choose the number of snapshots to keep on your provider to save on snapshot storage costs.
Prerequisites
To be able to utilise the services on both UpCloud and SimpleBackups, you will need to register on both. Begin by signing up for an account if you haven’t yet.
- Register on SimpleBackups
- Sign up on UpCloud
Now, let’s get started!
1. Creating new UpCloud API credentials
SimpleBackups can integrate directly with your UpCloud account using the UpCloud API. To start, we will create unique API credentials on UpCloud that will allow us to automate UpCloud snapshots from the SimpleBackups dashboard.
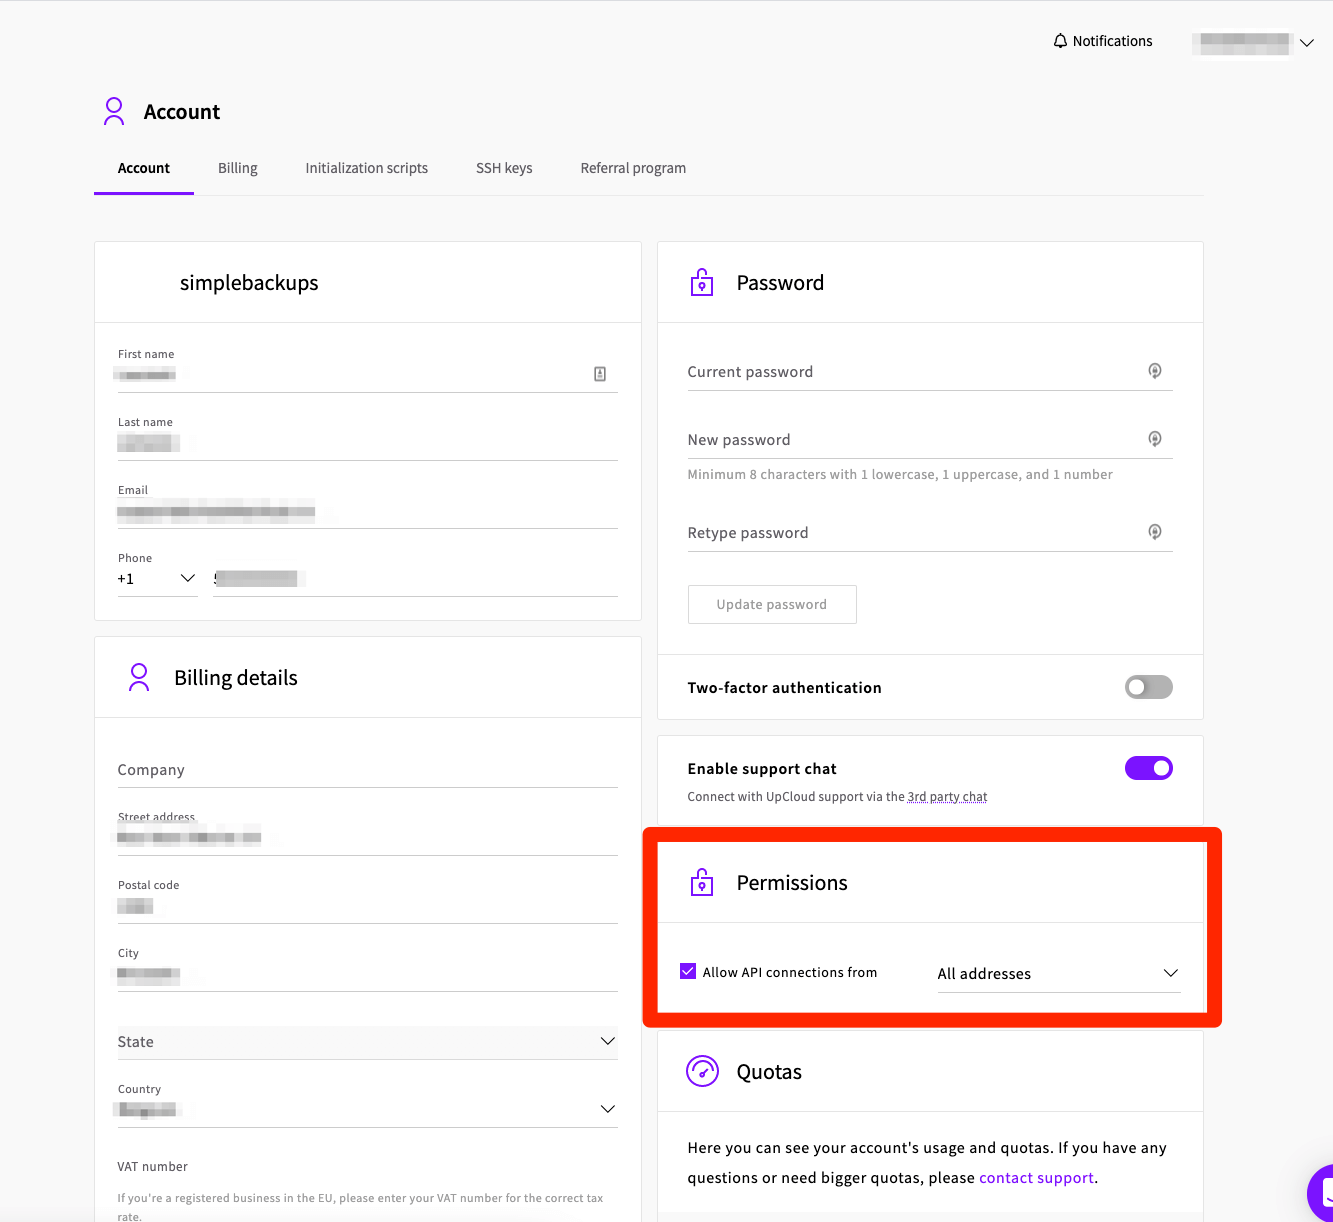
First, log in to your UpCloud Control Panel and head over to the People section.
- In the People section, click the Add button
- Choose a username for the API account
- Enter the contact details for your API credentials
- Set the API password by default, the API account will have full permissions to any resources it creates but no access to existing servers or storage. You can grant additional permissions as needed using the server, storage, and tag access options.
- Under Permissions set API Connections to All addresses OR whitelist all SimpleBackups IP by selecting ‘Address range’
The API Username and Password are required for connecting your UpCloud account to SimpleBackups. This allows you to integrate services without sacrificing security by creating unique API credentials for each service that needs access to your UpCloud account.
You can learn more at the guide for getting started with UpCloud API .
Note that you cannot enable two-factor authentication on API accounts which is why APIs need to use their own credentials.
Next, log in to your SimpleBackups account, then head to the snapshot creation section.
2. Connecting your UpCloud account
Let’s now connect your UpCloud account to SimpleBackup. Log in to your SimpleBackups account.
- Go to Create Snapshot
- Click on Connect a new provider button
Connect your UpCloud account
- Name: the name we’ll use to identify your UpCloud account in SimpleBackups
- User: your UpCloud API username
- Password: your UpCloud API password

Choose your UpCloud account
From the list, choose the UpCloud account your Cloud Servers reside on. You may add as many UpCloud accounts as you need under your SimpleBackups account and manage all backups from a single dashboard.
Choose the UpCloud server or volume resource
You can choose either a Cloud Server under the Resource Type or a specific storage volume. The Resource dropdown will be populated by all the UpCloud resources accessible under your UpCloud API credentials.
3. Creating an UpCloud backup job
Now that you’ve connected your UpCloud account, you can finish creating the backup job. Continue with the next step.
Set the retention you need
Define the backup Retention. This is the number of individual snapshots SimpleBackups will keep. When a maximum number of snapshots already exists, taking a new snapshot will automatically prune the oldest one on the list.
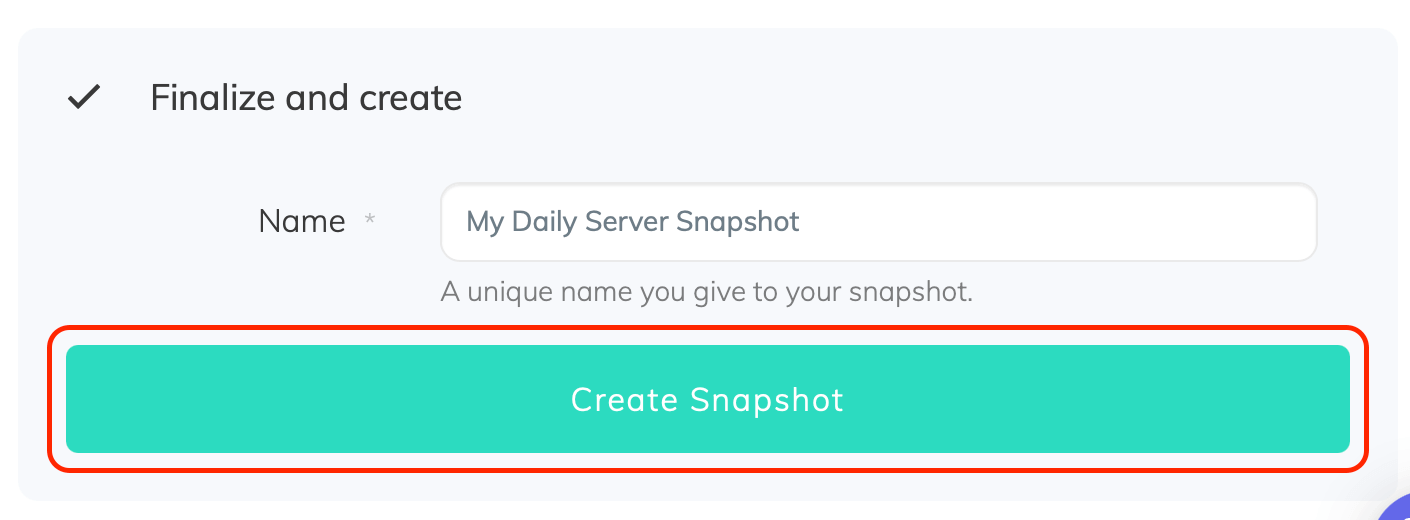
Save the snapshot backup job
Finally, give your snapshot backup job a friendly name you can recognise it by.
Then click the Create Snapshot button.
Congratulations, you now have an automated UpCloud snapshot backup!
Run the backup job once manually using the Run snapshot button from the snapshots list. Running the job will trigger your first snapshot backup!
Discussion