Managing data at scale is now baseline. Teams must reliably ingest, store, transform, process, and serve data across many sources and consumers.
A modern data platform sits at the core of well-run companies. It drives market insight, shows the state of the business, and powers the AI systems teams rely on.
This tutorial is courtesy of Niels Claeys at Dataminded. It uses only open-source tools to deliver an end-to-end, production-ready solution. Consider it a practical blueprint for building a robust platform without vendor lock-in.
Introduction of the project
This tutorial walks you through setting up a cloud-agnostic, open-source data platform on UpCloud using opentofu. All the necessary code is available in Github
Estimated deployment time: ~30–45 minutes (most of it waiting for the Kubernetes cluster, Load balancer and managed database to be ready). Expected cost: ~10€X/day for the demo setup.”
Architecture overview
Before we start, here is a high-level overview of the architecture and components used in this demo data platform.
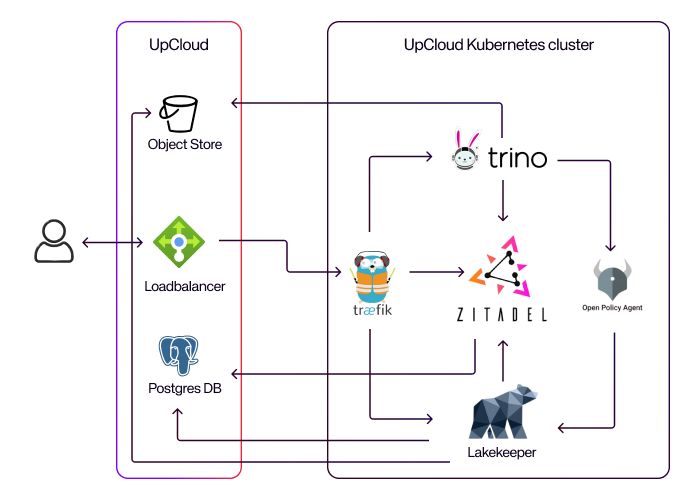
Main components of the infrastructure are as follows:
- Trino: A distributed SQL engine for interactive queries across large and small datasets It allows us to build a data warehouse on UpCloud without depending on a managed service.
- Lakekeeper: The production-ready metadata catalog for Iceberg tables, tightly integrated with Trino and OPA.
- Open policy agent (OPA): A general-purpose policy engine used here to enforce fine-grained data access control.
- Traefik: A reverse proxy and ingress controller that manages SSL termination and routes traffic to the different services of our data platform.
- Zitadel: An identity and access management platform that handles user and application authentication, with support for integration into your company’s identity provider.
Prerequisites
Before starting the deployment, make sure you have:
- A verified UpCloud account with an API enabled subaccount for creating resources.
- A hosted domain and DNS provider for assigning a subdomain to the data platform stack.
- Installed OpenTofu, kubectl, AWS CLI (for the S3-compatible object storage backend)
Before diving into infra deployment, include quick sanity checks to check if needed tools are installed and in which version:
Prerequisites
Before starting the deployment, make sure you have:
A verified UpCloud account with an API enabled subaccount for creating resources.
A hosted domain and DNS provider for assigning a subdomain to the data platform stack.
Installed OpenTofu, kubectl, AWS CLI (for the S3-compatible object storage backend)
Before diving into infra deployment, include quick sanity checks to check if needed tools are installed and in which version:
Deploying the platform
Now you are ready to start deploying the platform on UpCloud.
Step 1: Clone the repo and bootstrap Opentofu state storage
git clone https://github.com/datamindedbe/demo-upcloud-data-platform.git
cd demo-upcloud-data-platform
As a first step, we need to create the OpenTofu state storage such that our OpenTofu state is stored remotely and can be used by multiple people at the same time.
- export your UpCloud user credentials in your current shell:
export UPCLOUD_USERNAME="your_upcloud_username"
export UPCLOUD_PASSWORD="your_upcloud_password"
go to the bootstrap folder and initialize backend, which will create an S3 bucket for our state files
cd infra/bootstrap
tofu init
tofu apply
When successful, the outputs will print storage_bucket_name and storage_bucket_domain_name
Step 2: Deploy the core infrastructure (Kubernetes, Postgres, Traefik, Zitadel)
Next, we will create the core infrastructure which will be needed by all our other platform applications. All the infrastructure code is in the infra/foundation folder.
- create terraform.tfvars from the terraform.tfvars.example and update the variables as needed
- In order to use the S3-compatible object storage as a backend for OpenTofu, you need to configure your AWS CLI with a profile named upcloud. You can find the necessary steps in the UpCloud object storage overview in your object storage for S3 programmatic access.
- Setup our Postgres database and Kubernetes cluster, which can take 10-15 minutes:
tofu init -var-file=terraform.tfvars
tofu apply -var-file=terraform.tfvars \
-target=upcloud_kubernetes_cluster.this \
-target=upcloud_kubernetes_node_group.default_group \
-target=upcloud_managed_database_postgresql.db
After the cluster is ready you can inspect the pods/nodes:
export KUBECONFIG=$(pwd)/.kubeconfig.yml
kubectl get nodes
Next up is Traefik, which will create a load balancer with a public IP address and expose our applications to the outside world.
tofu apply -var-file=terraform.tfvars -target=module.traefikAfter 5 minutes, UpCloud will assign a public IP address to the load balancer. You can find this in the UpCloud console under Load Balancers -> Services. In order to get DNS working, you need to add an A record in your DNS provider that points to the load balancer IP address.
- Finally, you can create the remaining foundation resources using:
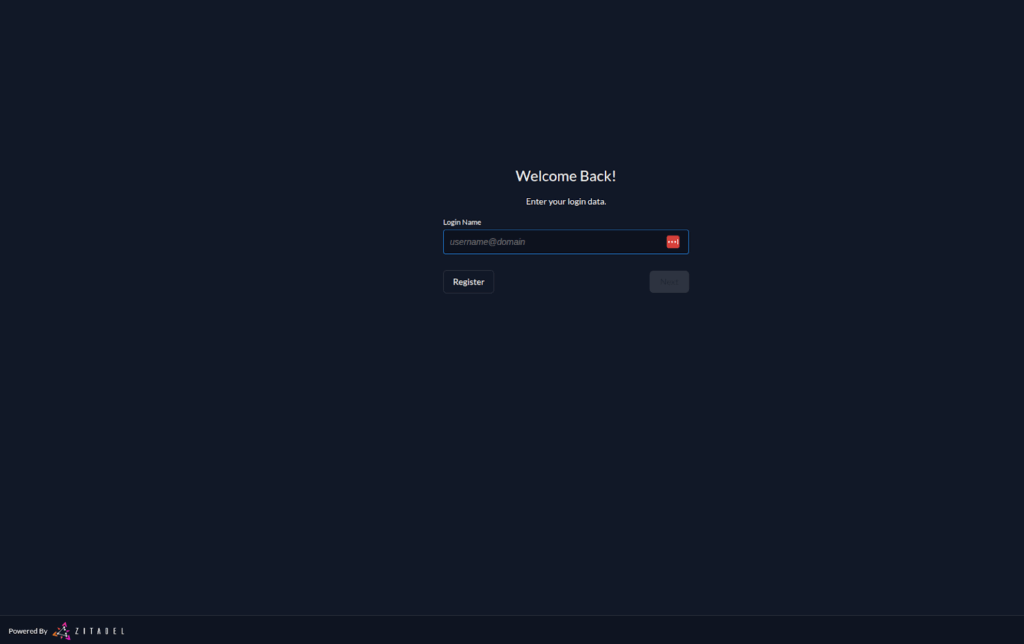
tofu apply -var-file=terraform.tfvarsIn order to validate that everything is working correctly, make sure that the zitadel service is reachable at https://zitadel.<your-domain> (replace with the domain you configured). The login page looks like this:
If this is not working, double check your DNS configuration and the Traefik, Zitadel pods in kubernetes for any errors.
Step 3: Create a Zitadel service user
Before we can setup the remainder of our stack, we need to create a service user in Zitadel. This will allow us to configure authentication (using oauth) for every application on our stack.
- Go to the service users tab and create a new service user.
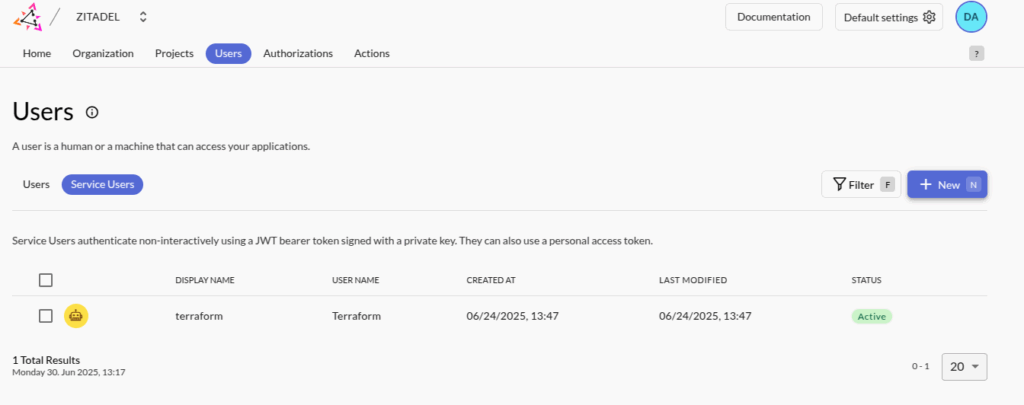
- Make sure to assign the service user the Org owner and Iam owner roles.
- Create a key for the service user. Zitadel will create the json key that you need for the OpenTofu provider.
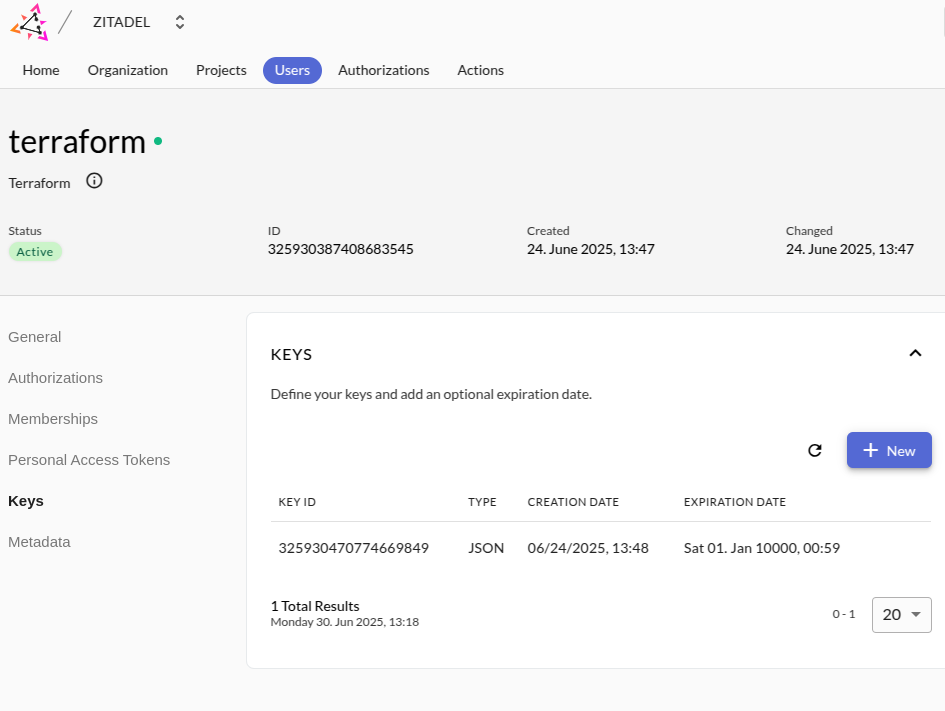
- Put the key in the infra/apps directory as a token.json file.
- Look up the organization ID in the Zitadel UI, you will need it in the next step.
Step 4: Deploy the platform applications (Trino, Lakekeeper, OPA)
Now we are ready to deploy the applications that make up our data platform stack: OPA, Lakekeeper and Trino.
- create terraform.tfvars from the terraform.tfvars.example and update the variables as needed.
- Apply all resources in the infra/apps folder as follows:
tofu init -var-file=terraform.tfvars
tofu apply -var-file=terraform.tfvars
Troubleshooting tips
- Trino won’t start? Check kubectl get pods -n services -l app.kubernetes.io/instance=trino and kubectl logs -n services <pod-name> for crash logs.
- DNS not resolving, getting connection refused when browsing to one of the services? Make sure the A record is added to your DNS provicer with the Traefik LB IP.
- SSL certificate errors? Check the logs of the traefik pod kubectl logs -n traefik <traefik-pod-name>. Also double check your Loadbalancer configuration in UpCloud.
- Zitadel login fails? Verify that your DNS + SSL certificates are configured correctly.
Using the data platform
Now that the full stack is deployed, you can start using it.
Configure your warehouse in Lakekeeper
Before you can run SQL queries, you need to configure a Lakekeeper warehouse that points to the S3-compatible object storage.
To get the necessary information, run the following command in the infra/foundation folder:
tofu output s3_warehouse_infoNow go to the Lakekeeper UI at https://lakekeeper.<your-domain>/ui and login. From there click on Warehouses in the left menu and then click on Create Warehouse. Fill in the form using the information retrieved from the previous command.
Running your first SQL queries
You can now run your first SQL queries against Trino. You can use your favorite SQL client that supports Trino or use the Trino CLI.
- Download the Trino CLI if you haven’t done this already:
curl -o trino https://repo1.maven.org/maven2/io/trino/trino-cli/476/trino-cli-476-executable.jar
chmod a+x trino
Connect to Trino using the CLI:
trino --server trino.<your-domain> --user <zitadel-admin-email>Execute queries inside Trino:
-- Find available catalogs & schemas:

SHOW CATALOGS;
-- check the schemas in the iceberg catalog
SHOW SCHEMAS FROM iceberg;

-- Create a demo schema and table, insert some data and run a few queries
CREATE SCHEMA IF NOT EXISTS iceberg.demo;

CREATE TABLE IF NOT EXISTS iceberg.demo.events (
id BIGINT,
user_name VARCHAR,
event_type VARCHAR,
ts TIMESTAMP
);

INSERT INTO iceberg.demo.events (id, user_name, event_type, ts) VALUES
(1, 'alice', 'login', TIMESTAMP '2025-09-18 08:00:00'),
(2, 'bob',   'click', TIMESTAMP '2025-09-18 08:05:00');

SELECT event_type, count(*) as cnt FROM iceberg.demo.events GROUP BY event_type;
SELECT * FROM iceberg.demo.events ORDER BY ts DESC LIMIT 10;
Congratulations! Your open-source data platform is now live on UpCloud. You can connect to Trino, create Iceberg tables, insert sample data, and query it using SQL.
Next steps
In order to make this stack production-ready, you will need to take care of the following:
- Harden OPA policies to enforce strict access cotnrol in Trino and Lakekeeper At the moment we allow all actions, but we provide the necessary rego files to restrict access using Lakekeeper. For more information, check our blog on the topic as well as the Lakekeeper OPA bridge for the details.
- Enable Zitadel-based OIDC authentication for both uses and inter-service communication.
- Enable autoscaling of your Kubernetes cluster by deploying the cluster-autoscaler.
- Extend the stack with additional components such as Airflow for orchestration, Hashicorp Vault for secret management.
Cleaning up
If you want to tear down the platform, you can do it as follows:
cd infra/apps
tofu destroy -var-file=terraform.tfvars

cd ../foundation
tofu destroy -var-file=terraform.tfvars -target=module.traefik -target=module.zitadel
# Now you can destroy the rest of the resources
tofu destroy -var-file=terraform.tfvars

cd ../bootstrap
tofu destroy
Support
This article was written by Niels Claeys from Dataminded.
If you have any questions or run into issues, feel free to open an issue in this Github repo or reach out to [email protected] or anyone else at Dataminded.
If you want guidance on how to extend this stack or make it production ready, you can reach out to the team at DataMinded.
Discussion