Docker Swarm mode not only makes cluster orchestration a breeze, but it also offers an easy way to publish ports for services. Usually, containers are only accessible through their host machine’s IP addresses but in a swarm, all nodes participate in an ingress routing mesh.
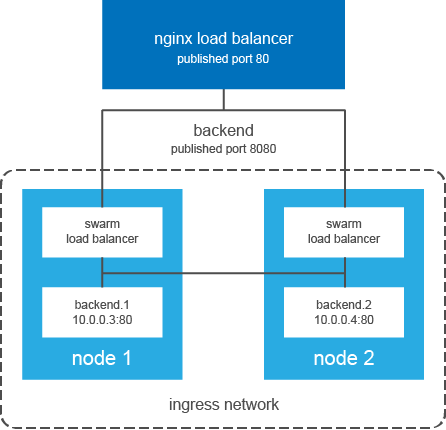
Swarm mode routing mesh
The swarm internal networking mesh allows every node in the cluster to accept connections to any service port published in the swarm by routing all incoming requests to available nodes hosting service with the published port.
The ingress mesh uses the following ports in communication between nodes in the swarm.
- Port 7946 TCP/UDP for container network discovery.
- Port 4789 UDP for the container ingress network.
Using the private network between your UpCloud servers when initializing the swarm ensures the connections will remain secure. However, when publishing ports in the swarm, as mentioned before, they are accessible through any node’s public IP. In Docker Engine 1.12, it is not possible to bind the published port to a specific IP address. If you wish to prevent direct access to the container ports, set up a firewall blocking the incoming connections to the swarm public IP addresses.
Deploying CoreOS nodes
Start off by logging into your UpCloud control panel and deploying two CoreOS nodes for the Docker Swarm and a third node for the load balancer. If you are not familiar with deploying CoreOS nodes for Docker, take a look at our introductory guide to Docker Swarm Orchestration for a quick start guide.
Once you have the three nodes online, log into each of them with SSH.
To enable Docker Swarm mode, you will need to update CoreOS to a version that includes Docker 1.12 or newer. You can find the version numbers in the CoreOS release notes. At the time of the update, the required Docker version was only available on the CoreOS Alpha channel. Perform the following steps on all three of your nodes to update them.
Edit the updated configuration file and change the GROUP from stable to alpha.
sudo vi /etc/coreos/update.conf

GROUP=alpha
Save the file and exit the editor, then reboot the servers.
sudo reboot
Although CoreOS usually performs updates automatically in the background, use the following command to run the update manually.
sudo update_engine_client -update
...
Update succeeded -- reboot needed.
When the update finishes, it will prompt you to restart the servers.
sudo reboot
...
CoreOS alpha (1192.1.0)
With the CoreOS nodes updated, verify that the Docker is running the required version.
docker -v

Docker version 1.12.1, build 7a86f89
You can then continue with configuring the swarm itself.
Configuring the backend nodes
Enable the Swarm mode for two of the three nodes by initializing one of them as the cluster manager and then joining the second node to it. Run the command below on the node you wish to assign as the Swarm manager.
docker swarm init --advertise-addr <manager private IP>
Once the initialization is complete, you will see a docker swarm command towards the end of the output similar to the one below.
docker swarm join
--token <SWMTKN token>
<manager private IP>
Run the command with your swarm manager token and manager private IP on the second node to join it to the cluster.
You can see the nodes in your cluster with the command below.
docker node ls

ID                          HOSTNAME  STATUS  AVAILABILITY  MANAGER STATUS
3h39l1ex8c1i5oo2xn4qnwkj6 * node0     Ready   Active        Leader
4bdtzjfa0qw799e6npb4dxvl1   node1     Ready   Active
Then start the web host service with replicas for both nodes.
docker service create
--name backend
--replicas 2
--publish 8080:80
nginx
A short explanation of the command above. Docker creates two replicas of the latest nginx container named backend and publishes them to an external port 8080.
Setting up the load balancer
Using a load balancer outside of the Swarm allows an easy way to connect to your containers without having to worry about the cluster nodes. As all of the published services are available through any of the swarm nodes thanks to the ingress routing, the load balancer can be set to use the swarm private IP addresses without concern of which node is hosting what service.
For consistency, the load balancer will be deployed on its own single-node swarm. Open an SSH connection to your load balancer server and initialize a new swarm on it.
docker swarm init --advertise-addr <load balancer private IP>
Next, prepare the load balancer setup by creating a default.conf file in a new directory.
sudo mkdir -p /data/loadbalancer

sudo vi /data/loadbalancer/default.conf
Enter the following server and upstream segments in the configuration file and replace the <node private IP> placeholders with the private IP addresses of the two swarm nodes hosting your web service.
server {
   listen 80;
   location / {
      proxy_pass http://backend;
   }
}
upstream backend {
   server <node0 private IP>:8080;
   server <node1 private IP>:8080;
}
Save the file and exit the editor.
Then create the load balancer container using the following command to publish it to port 80 and mount the configuration directory in the container.
docker service create
--name loadbalancer
--mount type=bind,source=/data/loadbalancer,target=/etc/nginx/conf.d
--publish 80:80
nginx
The container will start in a matter of seconds and allow connections to the web services hosted by your Docker Swarm. You can test the load balancer by opening the load balancer server’s public IP address in your web browser.
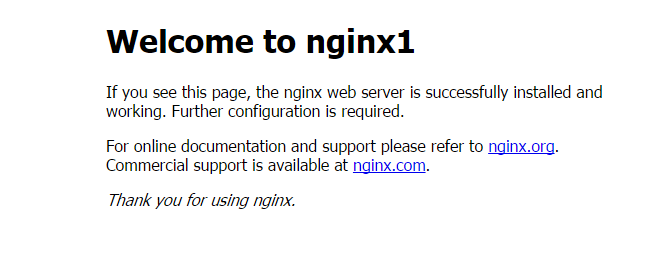
If everything is running correctly, you will be greeted by the default nginx welcome page.
Summary
The Docker Swarm mode allows an easy and fast load-balancing setup with minimal configuration. Even though the swarm itself already performs a level of load balancing with the ingress mesh, having an external load balancer makes the setup simple to expand upon.
If you wish to further improve upon the redundancy of your web cluster, you should look into setting up a floating IP address between multiple load balancer servers. Follow this article to find out more about the floating IPs on UpCloud.