This guide will help you install and get started with Matrix and its reference home server, Synapse. These instructions and example commands will help you set up Matrix Synapse on a CentOS 8, Debian 10, or Ubuntu 18 Cloud Server.
What is Matrix?
Matrix is an open standard for decentralised communication, which securely distributes persistent chatrooms over an open federation of servers preventing any single points of control or failure.
Matrix provides simple HTTP APIs and open-source reference implementations to create a common fabric to interconnect existing communication islands. Some of the use cases include creating and managing fully distributed conversations, enabling WebRTC VoIP and video calls using Matrix signalling, and synchronising history across all clients in real time.
1. Deploy a cloud server
If you have not already registered with UpCloud, you should begin here to get started with $25 in credits when you sign up today.
Once you have signed up, log into your UpCloud Control Panel and deploy a server.
Synapse requires a POSIX-compliant system, such as the aforementioned Linux distributions, Python 3.6 or newer installed, and at least 1GB of free RAM to be able to join large public rooms such as the #matrix:matrix.org.
Deploy a new cloud instance for hosting the Matrix home server using one of the tested Linux operating systems to an availability zone of your choosing. You can find in-depth instructions on all of the configuration options in the guide for how to deploy a server.
2. Installing prerequisites
When you have a server up and running, use the commands below, which are appropriate to your system, to install the required packages and libraries.
For Ubuntu 18 and Debian 10 systems, install the prerequisites with the following command.
sudo apt-get install build-essential python3-dev libffi-dev
  python-pip python-setuptools sqlite3
  libssl-dev python-virtualenv libjpeg-dev libxslt1-dev
Ubuntu 20 needs a couple of newer packages, so use this command instead.
sudo apt-get install build-essential python3-dev libffi-dev
  python3-pip python-setuptools sqlite3
  libssl-dev python3-virtualenv libjpeg-dev libxslt1-dev
On CentOS 8, you can fulfil the requirements with the installs below. You will also need to enable access to the required ports and services at the firewall.
sudo dnf install libtiff-devel libjpeg-devel libzip-devel freetype-devel
  lcms2 libwebp-devel tcl-devel tk-devel redhat-rpm-config
  python36 virtualenv libffi-devel openssl-devel
sudo dnf group install "Development Tools"
sudo firewall-cmd --permanent --add-service http
sudo firewall-cmd --permanent --add-service https
sudo firewall-cmd --permanent --add-port=8448/tcp
sudo firewall-cmd --reload
With the prerequisites sorted, you can continue installing Synapse.
3. Installing Synapse home server
Synapse is the Matrix reference implementation of a “home server” written by the Matrix core development team. It is intended as a showcase of the Matrix concept to demonstrate the spec in the context of a codebase. It lets you easily run your own home server and generally helps to bootstrap the Matrix ecosystem.
The home servers are used as an access point for clients to connect to the Matrix network. They store the user’s personal chat history and account information in a similar fashion as an IMAP/SMTP server would. Like email, you can run your own Matrix home server to keep personal control and ownership of your communications and history, or use one of the hosted Matrix services. Matrix has no single point of control or mandatory service provider.
To prepare the system, set up a new virtual environment under ~/synapse using the commands below or choose a different directory by replacing the ~/synapse in the commands with the folder you wish to store the server files.
mkdir -p ~/synapse
virtualenv -p python3 ~/synapse/env
source ~/synapse/env/bin/activate
Check that the following packages are installed and up to date.
pip install --upgrade pip virtualenv six packaging appdirsThen use pip to install and upgrade the setup tools as well as the Synapse server itself.
pip install --upgrade setuptools
pip install matrix-synapse
This installs the Synapse home server along with its libraries.
If you run into problems installing the Synapse home server, Matrix has outlined some helpful troubleshooting tips on the Synapse GitHub page.
4. Configuring Synapse
Before Synapse can be started, you will need to generate a configuration file that defines the server settings.
Run the following commands in your Synapse virtual environment. Replace the server name matrix.example.com with your own domain, but note that the name cannot be changed later without reinstalling the home server. Also, choose whether you wish to allow Synapse to report statistics by entering either --report-stats=yes or no.
source ~/synapse/env/bin/activate
pip install -U matrix-synapse
cd ~/synapse
python -m synapse.app.homeserver
  --server-name matrix.example.com
  --config-path homeserver.yaml
  --generate-config
  --report-stats=yes|no
A config file has been generated in 'homeserver.yaml' for server name 'matrix.example.com'. Please review this file and customise it to your needs.
Once Synapse has finished generating the required settings, you should see a confirmation like in the example output above.
5. Enabling TLS
Matrix Synapse now requires TLS enabled by default to allow the server to be used securely. The easiest way to configure TLS is to obtain SSL certificates from a trusted Certificate Authority such as Let’s Encrypt.
Let’s Encrypt’s Certbot client is primarily distributed via Snap packages. Check below the instructions for installing Snap and Certbot client for your operating system.
The OS templates for Ubuntu 18 and 20 on UpCloud have Snap installed by default. Simply check that Snap is at its latest version and then use Snap to install Certbot.
sudo snap install core; sudo snap refresh core
sudo snap install --classic certbot
sudo ln -s /snap/bin/certbot /usr/bin/certbot
For Debian 10, install Snap first, then Certbot.
sudo apt-get install snapd -y
sudo snap install core; sudo snap refresh core
sudo snap install --classic certbot
sudo ln -s /snap/bin/certbot /usr/bin/certbot
On CentOS 8 systems, you will first need to install the Extra Packages for Enterprise Linux (EPEL), followed by Snap and then Certbot itself.
sudo dnf install -y epel-release
sudo dnf install -y snapd
sudo snap install core; sudo snap refresh core
sudo snap install --classic certbot
sudo ln -s /snap/bin/certbot /usr/bin/certbot
You’ll also need to have a web server available for Certbot to use for validating the certificate. Install nginx using the instructions below according to your operating system.
On Debian and Ubuntu systems, simply run the following command.
sudo apt-get install nginxNginx for CentOS 8 is also installed from the Extra Packages for Enterprise Linux (EPEL) which we already did for Certbot so just install Nginx with the command below.
sudo dnf install nginxWith the Certbot client and Nginx installed, you can obtain certificates using the certonly command together with the --nginx plugin. Include at least one domain name by replacing the matrix.example.com with yours.
Then use the Certbot client as shown in the example below.
sudo certbot certonly --nginx -d matrix.example.comThe command starts an interactive configuration script that asks a couple of questions to help with managing certificates.
- On the first installation on any specific host, you’ll need to enter a contact email.
- Then go through the Let’s Encrypt Terms of Service and select Agree if you accept the terms and wish to use the service.
- Choose whether you wish to share your email address with the Electronic Frontier Foundation (EFF) for updates on their work.
If the client was successful at obtaining a certificate you can find a confirmation and certificate expiration date at the end of the client output.
In case you are having problems with the client, make sure you are trying to register a domain or subdomain that currently resolves to your server as DNS configurations might take a moment to propagate. Also, check that you are running the command with admin privileges.
When the certificates have been issued successfully, you’ll need to enable them for the Synapse home server.
You can find out more about the Let’s Encrypt client including how to automate the certificate renewal in our article on how to install Let’s Encrypt on nginx.
6. Configuring reverse proxy with nginx
Matrix recommends setting up a reverse proxy, such as nginx, Apache or HAProxy, in front of your Synapse server. This is intended to simplify client connections by allowing Matrix to use the common HTTPS port 443 while keeping the server-to-server connections at port 8448.
Change the default home server configuration to only listen to the localhost address for port 8008. Open the homeserver.yaml file for editing.
nano ~/synapse/homeserver.yamlFind the following segment and set the bind only to the address 127.0.0.1 and check that the forward flag is set to true as shown below. You can leave the rest as is, we’ll terminate the SSL at the proxy so Matrix does not need to worry about TLS settings.
  - port: 8008
    tls: false
    bind_addresses: ['127.0.0.1']
    type: http
    x_forwarded: true
Save the file and exit.
Next, enable nginx to act as the reverse proxy by creating a configuration file for the proxy functionality.
sudo nano /etc/nginx/conf.d/matrix.confThen enter the following to enable the proxy with SSL termination. Replace the matrix.example.com with your domain in the server name. The certificates issued by Let’s Encrypt are saved under the directory indicated in the Certbot output, usually under /etc/letsencrypt/live/. Again, replace the matrix.example.com with the domain name the certificates were issued for.
server {
    listen 80;
	listen [::]:80;
    server_name matrix.example.com;
    return 301 https://$host$request_uri;
}

server {
    listen 443 ssl;
    listen [::]:443 ssl;
    server_name matrix.example.com;

    ssl on;
    ssl_certificate /etc/letsencrypt/live/matrix.example.com/fullchain.pem;
    ssl_certificate_key /etc/letsencrypt/live/matrix.example.com/privkey.pem;

    location / {
        proxy_pass http://localhost:8008;
        proxy_set_header X-Forwarded-For $remote_addr;
    }
}

server {
    listen 8448 ssl default_server;
    listen [::]:8448 ssl default_server;
    server_name matrix.example.com;

    ssl on;
    ssl_certificate /etc/letsencrypt/live/matrix.example.com/fullchain.pem;
    ssl_certificate_key /etc/letsencrypt/live/matrix.example.com/privkey.pem;
    location / {
        proxy_pass http://localhost:8008;
        proxy_set_header X-Forwarded-For $remote_addr;
    }
}
The above nginx configuration includes three parts to help make using your Matrix Synapse home server as easy as possible. It listens for secure connections as ports 443 for HTTPS and 8448 for Matrix federation server-to-server communication. Connections to the insecure HTTP port 80 are redirected to use HTTPS instead.
Once you’re done, save the file and exit the editor.
Then start and enable nginx.
sudo systemctl restart nginx
sudo systemctl enable nginx
That’s all you need for configuring a Synapse home server. Continue below to start the server and create your first user.
7. Registering a new user
Now that Synapse is installed, you should add a new user as an admin to be able to configure chat rooms and web client settings. First, make sure you are in the home server virtual environment and start the server.
cd ~/synapse
source env/bin/activate
synctl start
Then register a new user to the localhost.
register_new_matrix_user -c homeserver.yaml http://localhost:8008This starts an interactive user configuration. Enter the desired username and password, and then select yes to enable administration privileges.
New user localpart [root]: username
Password: password
Confirm password: password
Make admin [no]: yes|no
Sending registration request...
Success.
That is it, you should now be able to log into your Synapse home server with the user credentials you just created.
8. Logging into Matrix
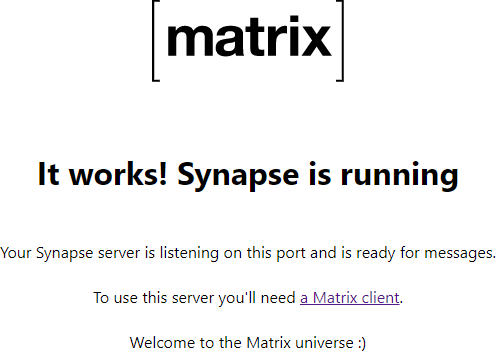
Users have the ability to connect to a Matric home server using one or more Matrix clients. First, verify that the Matrix server is running and reachable by opening your domain on a web browser.
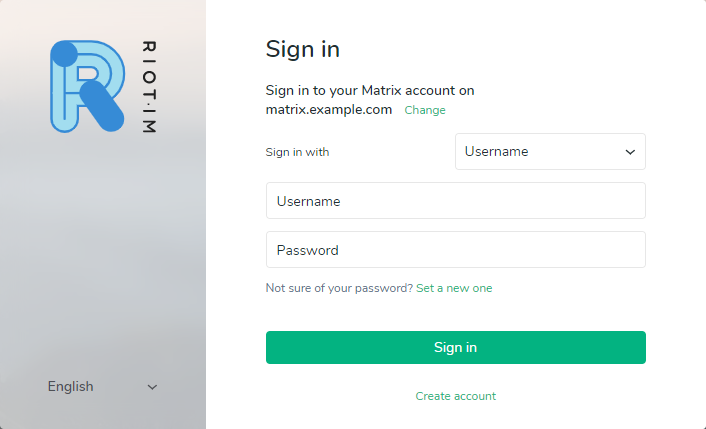
https://matrix.example.comYou should see a page such as the one below.
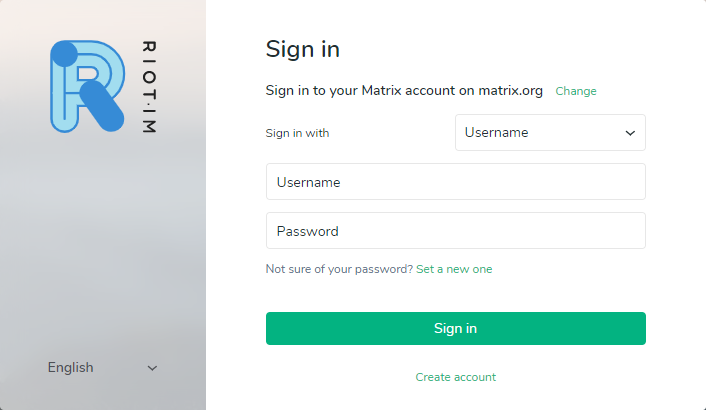
The home server doesn’t include a Matrix client by default but you can use the Riot web client. It has a polished and easy-to-use user interface, and after installing trusted certificates using Let’s Encrypt, you can connect to your home server using a public client such as Riot.
Go to the following URL on your web browser.
https://riot.im/app/#/loginYou should see a sign-in page like in the example picture below. First, click the change link to select to use your custom Matrix server.
Enter your Matrix server domain name as your home server URL and click the Next button.
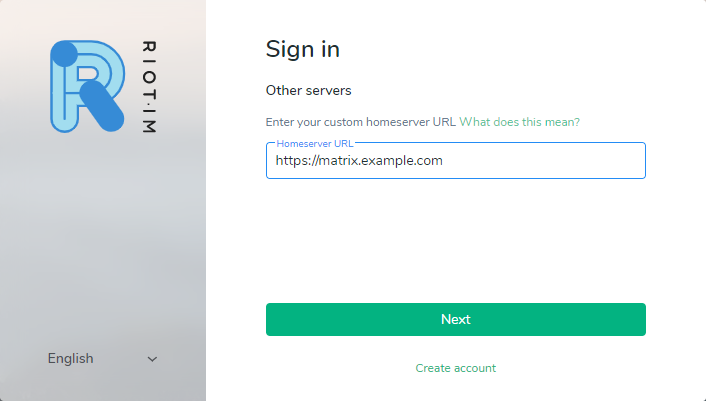
Riot will then make a quick connection check to your cloud server. If you see an error message, check your server domain and that you entered it using HTTPS.
Then sign in with the username and password you just created in the previous section for your own home server.
The Riot web app is a convenient way of testing your custom Matrix Synapse server but it’s definitely not the only client available. Other client applications can be found on the Matrix documentation page.
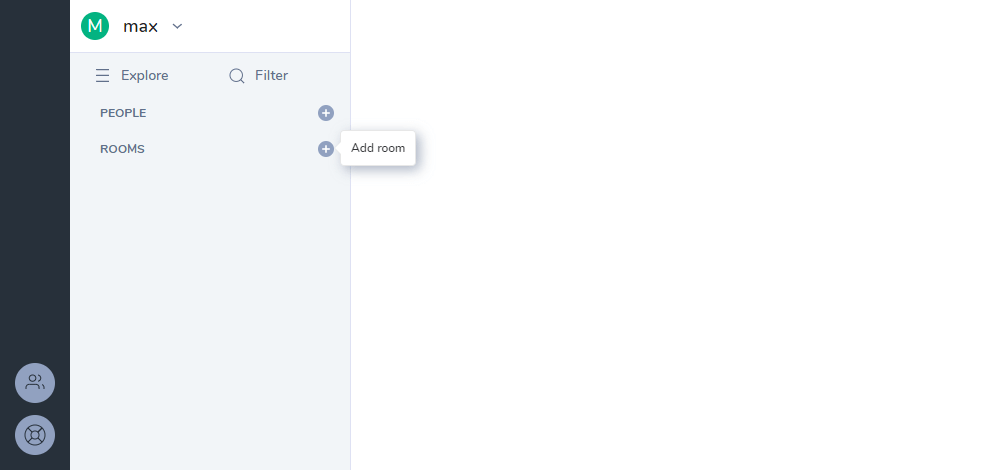
9. Creating a room
Next, you might wish to create a new room. In Matrix, everything happens in rooms which are distributed and do not exist on any single server. Rooms can be identified and located using aliases such as #matrix:matrix.org or #test:localhost:8008.
Click the plus icon to the left of the Rooms list of the Riot web client.
Give your room a name, and with the Synapse client, you can also make the room public if you wish.
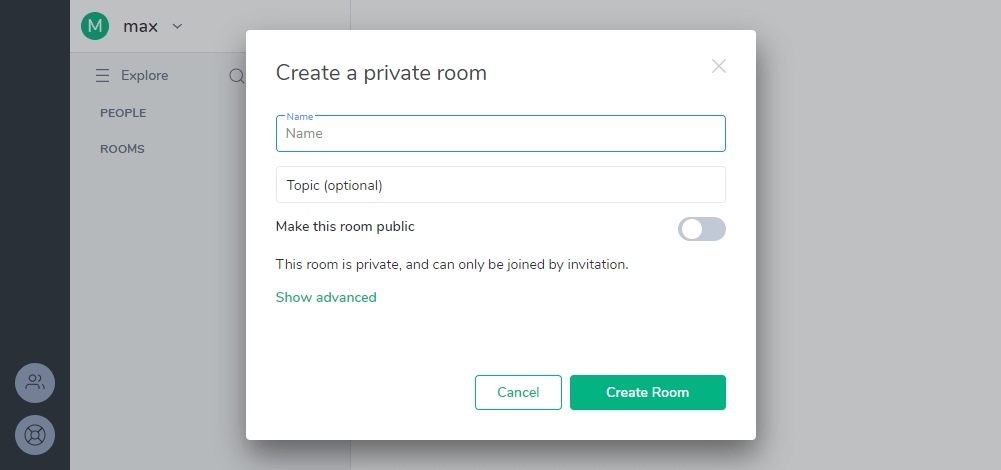
Then hit enter to save the name and join the new room.
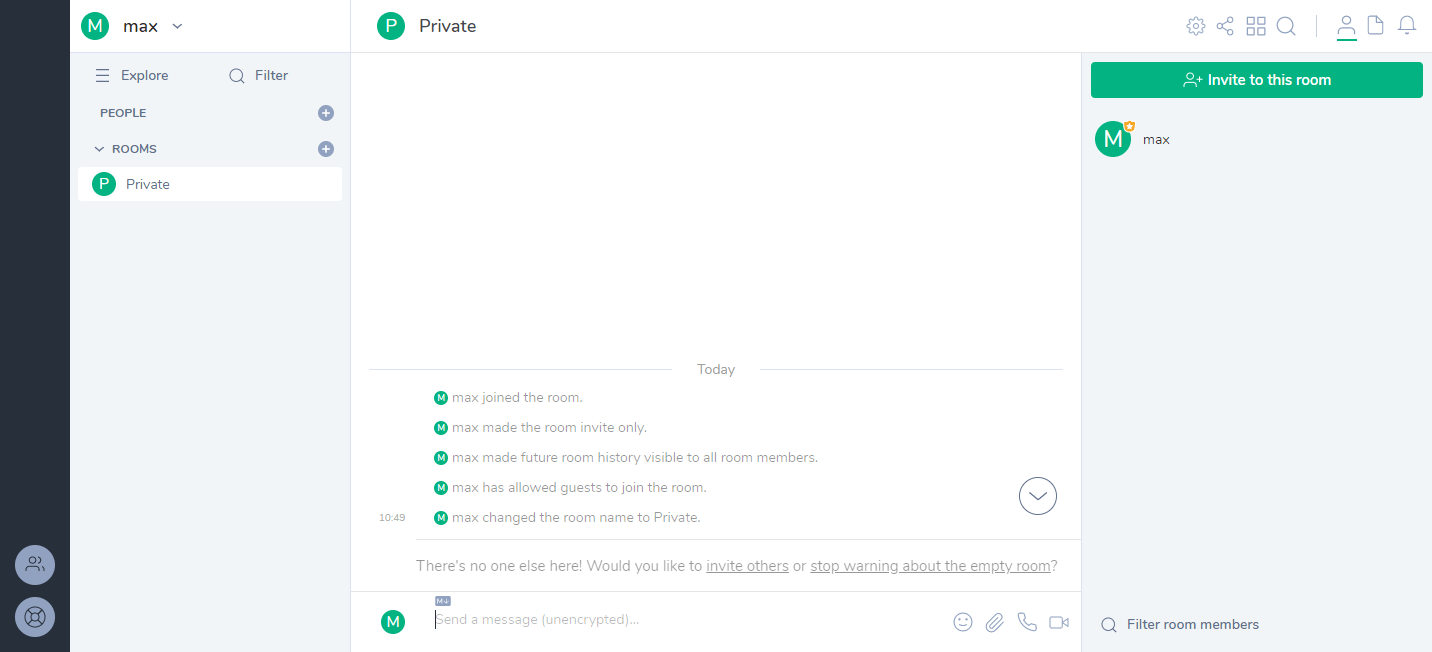
The rooms can be used just as any communication channel, but Matrix is intended to be much more capable than a simple text chat. The basic implementation of the Synapse home server and web client are just examples of how the Matrix network can be utilised. There are already a number of other options for home servers with many different use cases. You can find more publicly available application servers in the Matrix projects documentation.
All done!
Congratulations, you have now successfully deployed and configured your first Matrix home server using Synapse.
If you would like to try out different clients, Weechat Matrix plugin allows logging in even on the command line, while Riot is also available on Android and iOS. Alternatively, those with the technical know-how can always write their own client using one of the Matrix SDKs.
Matrix presents a tonne of potential for secure communication for anything from group chat rooms, VoIP and video calls, to the exchange of persistent data between devices and services in the Internet of Things. Feel free to experiment with the existing servers and clients or begin developing your own!
Discussion