When deploying a Linux Cloud Server using SSH keys as the login method, the root user account is created without a password. This method greatly improves security but can present challenges if you lose your private key and need to regain access to the server.
The first step in the process involves acquiring new root credentials. This can be done by following the instructions in the password reset guide.
After successfully resetting the password, you might find that you are still unable to log into the server using an SSH client, such as PuTTY or Terminal. This is because, by default, password authentication has been disabled on the server for security reasons, meaning, for now, the only way to access the server with the newly reset root password is via the console in the control panel.
To fix this, you must log in via the console in the control panel and copy your public key to the server. This is done by opening the authorized_keys file and adding your public key to the file. However, a public key typically consists of approximately 450 characters. This can be tricky since the console doesn’t natively support copying and pasting, and manually entering such a long string is understandably inconvenient.
To get around this, you will temporarily need to enable password authentication on the server, which allows you to log in using a password through an SSH client. Once you have accessed the server using the password, you can easily open the sshd_config file and conveniently paste your public key into it.
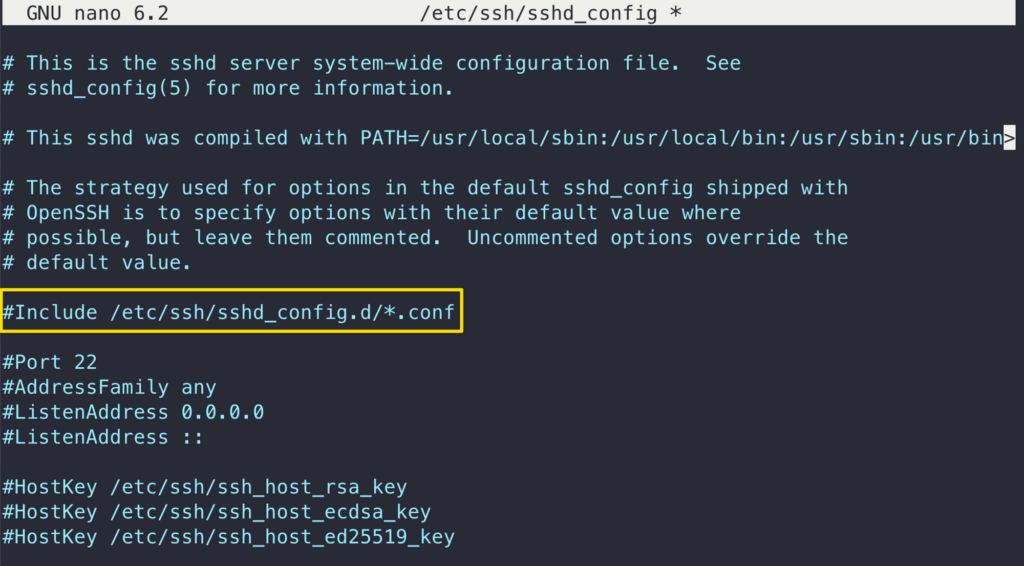
To allow password authentication on the server, open the sshd_config file using the command below:
nano /etc/ssh/sshd_config
Near the top of the file, look for the following line “Include /etc/ssh/sshd_config.d/*.conf” and comment it out like this:
#Include /etc/ssh/sshd_config.d/*.conf
Then, scroll down a little and find “PasswordAuthentication”. This needs to be set to yes to enable clear text passwords.
PasswordAuthentication yes
If it is already set to yes but is commented out, be sure to remove the # in front of it to uncomment it. Then save and exit the editor.
Now restart the SSH service to apply the changes by using the command below (or a suitable alternative for your OS)
sudo systemctl restart sshd
You should now be able to log into the server using an SSH client on your laptop or PC with the root account password.
While logged in, go to the SSH keys directory.
cd ~/.ssh/
sudo nano authorized_keys
Paste the public key into the file by right-clicking the SSH client window. Make sure the key goes on a single line for OpenSSH to be able to read it. Note that the type of the key also needs to be included, ssh-rsa, as shown in the example below:
ssh-rsa AAAAB3NzaC1yc2EAAAADAQABAAABgQDEeV/UKOVqNUwmED8PO1E6wY3ITEbWx30rAgGudzTGnYI8fB176nlmIS+O01vaI4fMYwO9Chg3mzVT2+4AkTBm1sXnDdjhajdhfjhgbaNNnkclipMXdmAHnRtREFZU0/yyOhorzqxWBi0LQxpjTAZawi+8ysH7PGnNlXnotarealkey3FUObZcmHis0oD/C7ll6DwX4WVSjh2JGcaIhbhB+sovxW5duTDqyuyKpRsbyBD0+wNjSuJFjh5MnXJqcqrEUaPRoe2wQ9k7q0K2KOXAmYYPUWrLY6N+jjYdnkyP9XWWkz6c7Qvx7m/dBfgpyJbPryWsdfgjhjbSZ8PsvSgtDTIND/wdZ5gq1HPFdyLblHs46P9ClfMbWJt9APx7c1SRE+qMbdLf/5/vNGiGHr6bBXKRX70+XODl04shFQpjm1kKkG9qHkp3bOSot4Da987dRHMhAbd0d3QdS8wCg7s6NPk4qDVnR6BCxiM2vbOD1B4gWQ8= user@server
After you have copied the public key to the authorized keys list, save the file and exit the editor. You can now test the public key authentication by logging in to your server again. You should not get asked for your password, but instead, you’ll be logged straight in with the SSH keys.
With the SSH key authentication configured and tested, you should now disable the temporary changes you made to the sshd_config file to enhance your server’s security. The steps below outline how to do that:
Open the SSH configuration file with the following command.
sudo nano /etc/ssh/sshd_config
To disable password authentication, set PasswordAuthentication to “no”.
PasswordAuthentication no
Check that public key authentication is enabled, just to be safe and not get locked out from your server. If you do find yourself unable to log in with SSH, you can always use the console in the control panel again to access the server.
PubkeyAuthentication yes
Then save and exit the editor.
Finally, restart the SSH service to apply the changes by using the command below.
sudo systemctl restart sshd
With that done, you have regained full access to your cloud server and restored it to a secure configuration where SSH access is only possible using an SSH key. Malicious attempts to connect to your server will result in authentication rejection, as plain passwords are not allowed, and brute-forcing an RSA key is practically impossible.