If you are looking to migrate to UpCloud or want to use your own media, get started quickly using Storage Import. The Storage Import service allows you to easily import installation media or even entire virtual machine images.
Migrate servers from on-premise or any other cloud quickly and easily by simply creating new storage out of your server image and deploying it to a cloud server.
How Storage Import Works
Storage Import creates a new installation media or server storage out of any system or server image available online by fetching the requested file and uploading it onto a new storage device. It can be useful for migrating existing server images from on-premise hosting or from other cloud providers.
Storage Import is also handy for using custom installation media if your favourite Linux distribution is not yet available as a public template or ready-made install disk.
Supported file types:
- RAW storage images
- IMG storage images
- ISO archive files
- GZIP compressed files
- XZ compressed files
The target storage needs to be free and not in operation, either;
- detached from any cloud server
- if attached, the cloud server needs to be shutdown
- not in a maintenance state
Note that the system image or installation media you wish to upload needs to be made available for download for Storage Import to be able to retrieve it. The process supports the use of HTTPS and Basic Auth for secure upload.
Uploading data using Storage Import
Storage Import is done directly to a new storage device which can be created in the Storage menu of any cloud server. The process requires the server to shut down during the upload. Therefore, you can opt to deploy a new temporary cloud server to facilitate the importing instead of shutting down any of your existing servers.
It’s also possible to use Storage Import via your UpCloud API.
Get started by going to the Storage tab in your cloud server settings and scrolling down to the Storage list. Below the storage devices, you’ll find buttons to create new and attach existing storage.
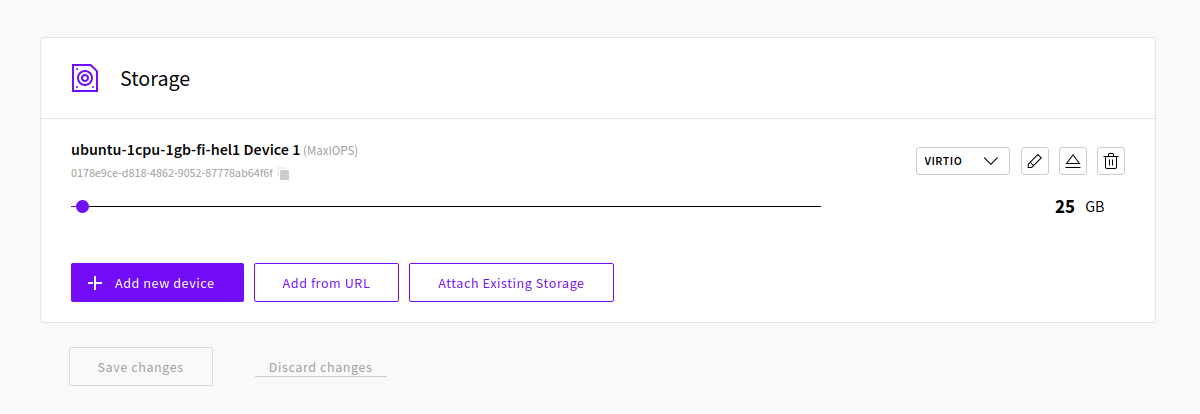
Click the Add from URL button to get started.
- Enter the URL where your target file is located. Include any credentials at the beginning of the URL if your file is password protected. E.g. https://username:password@example.com/files/system.img
- Set the label for the new storage device with something recognisable.
- Select the storage device size to be the same or larger than your target file.
- Choose the device type, either MaxIOPS or HDD.
- Depending on the type of file you are about to upload, you might wish to already select a different storage controller. VirtIO is the default and provides the best performance but older storage images may require you to use IDE for compatibility. You can also choose CDROM if you are uploading an installation ISO.
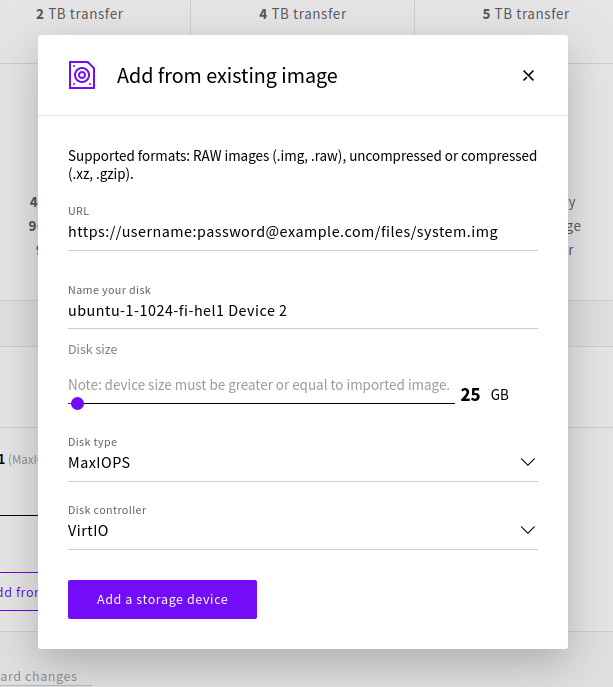
Once done, click the Add storage device button to begin the upload.
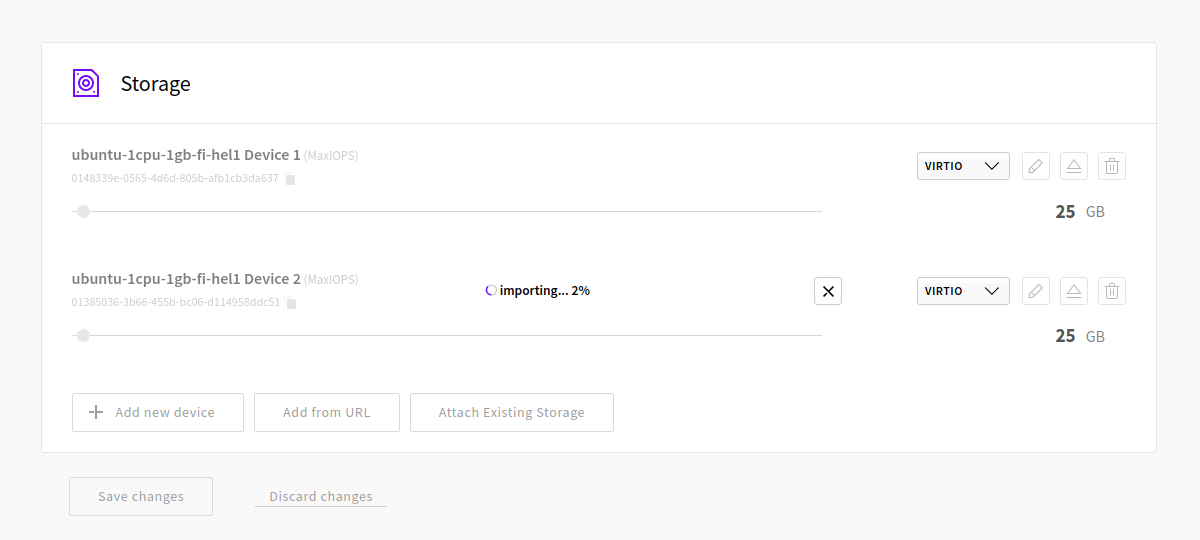
Then kick back and relax while we do the rest!
Setting password protection using Basic Auth
We recommend using Basic Auth password protection when preparing files and images for import. This needs to be done on the webserver that is hosting your files and the steps will differ depending on the operating system and web server in use. Here we’ve outlined some of the options you have for setting password protection on files and folders on your web server.
Start by installing Apache2 utils. The utils package includes a password generator tool which we’ll be using to encode the credentials.
sudo apt install apache2-utils
Afterwards, continue below with the instructions applicable to your web server.
Apache2
Generate a password file using the htpasswd command as shown below. Replace the username with whatever you want to use. On running the command, you will be asked to set the password, and enter it twice when prompted.
sudo htpasswd -c /etc/apache2/.htpasswd usernameNew password: Re-type new password: Adding password for user username
Next, edit your site configuration. The file name will differ depending on your set up but it’s generally stored in /etc/apache2/sites-available/ and ends in .conf file type notation.
sudo nano /etc/apatche2/sites-available/example.confOnce you’ve opened the file for editing, add the following authentication parameters as shown below if not already present. You may need to add the <Directory “/path/to/html”> segment if your configuration does not contain one. You can set the path to your webroot to enable authentication site-wide.
VirtualHost *:80>
    ...
    <Directory "/var/www/html">
        AuthName "Restricted"
        AuthType Basic
        AuthBasicProvider file
        AuthUserFile "/etc/apache2/.htpasswd"
        Require valid-user
        ...
    </Directory>
Alternatively, if you want to only enable authentication for a specific folder, set the directory with the path to the folder containing your private files. Otherwise include the same parameters.
VirtualHost *:80>
    ...
    <Directory "/var/www/html/files">
When done, save the file and exit the editor.
Then reload the webserver.
sudo systemctl reload apatche2
Done! You should now be prompted for credentials when browsing to the password-protected URL.
Nginx
We’ll use the htpasswd installed above also with nginx web servers. Run the following command to generate a password file. Replace the username with whatever you wish. When running the command, you will be asked to set the password, and enter it twice when prompted.
sudo htpasswd -c /etc/nginx/.htpasswd usernameNew password: Re-type new password: Adding password for user username
Once you’ve generated the password file, you’ll need to set it in your web server configuration file. The file name will differ depending on your website but it’s generally stored in /etc/nginx/sites-available/ and ends in .conf file type notation.
sudo nano /etc/nginx/sites-available/example.confWith the website configuration open for edit, set enable authentication by adding the two parameters as shown below. Adding these two lines directly to the server section will enable password protection for the whole site.
server {
        ...
        auth_basic "Restricted access";
        auth_basic_user_file /etc/nginx/.htpasswd;
        ...
Alternatively, you can include the authentication parameters within a location segment to set the password for a specific directory.
server {
        ...
        location /files {
                auth_basic "Restricted access";
                auth_basic_user_file /etc/nginx/.htpasswd;
        }
        ...
Once done, save the file and exit the editor.
You can test that the syntax is correct before applying the changes by using the next command.
sudo nginx -t
nginx: the configuration file /etc/nginx/nginx.conf syntax is ok
nginx: configuration file /etc/nginx/nginx.conf test is successful
If you get a confirmation such as the one shown above, you are ready to enable the new configuration by reloading the nginx service.
sudo systemctl reload nginx
That’s it! Your files are now set to require authentication to access and be safe from prying eyes.
Accessing password-protected files
When fetching password-protected files, add your credentials at the beginning of the URL separated from the rest by an @ sign.
https://username:password@example.com/files/system.imgStorage Import should then be able to access your target file and begin uploading it.
Making use of new storage
Once your import has finished, you can put the new storage device to use the way you wish.
Storage image with a boot partition
If your storage image contains a boot partition, you can set it as the main device for a standalone cloud server.
Depending on your system storage and the previous networking setup, you may not have network access out of the box. You can use the web console at your UpCloud Control Panel or any VNC viewer to reach your cloud server to restore connectivity.
The default network interfaces on our cloud servers include the following:
- Public IPv4 for internet access
- Private utility network
- Public IPv6 network connection
If you do not need all of the default network interfaces, you can detach unwanted networks to simplify your setup. Then configure the network connection you want to use.
File storage
Storage images that contain a file system can be mounted to any cloud server to access the files. Uploaded storage will work much the same as any other storage device allowing you to mount it at the directory point you wish.
Installation media
If you uploaded installation media, change the boot order to select CDROM as the first device and get started with the installation process at the next startup.